1
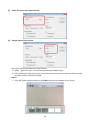
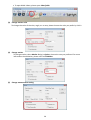
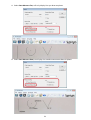
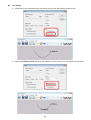
Software V 3.3W User Manual
Note: This software only works on Windows Operating System.
Contents
1.
2.
3.
4.
Installation .......................................................................................................................... 3
Start microscope ................................................................................................................. 3
Language ............................................................................................................................. 4
Basic setting ........................................................................................................................ 4
4.1. Device source ................................................................................................................ 4
4.2. Device setting................................................................................................................ 4
4.3. Video format setting..................................................................................................... 5
5. Photo................................................................................................................................... 6
5.1. Photo capture/Shoot .................................................................................................... 6
5.2. Save photos................................................................................................................... 7
5.3. Preview photos ............................................................................................................. 7
6. Video................................................................................................................................... 8
6.1. Video record ................................................................................................................. 8
6.2. Save videos.................................................................................................................... 9
6.3. Setting frame rate/frame frequency (FPS).................................................................. 10
6.4. Play video .................................................................................................................... 10
7. Add Text............................................................................................................................. 11
8. Measurement.................................................................................................................... 13
8.1. Measurement calibration............................................................................................ 13
8.2. Measure length ........................................................................................................... 14
8.3. Measure arc ................................................................................................................ 14
8.4. Measure angle............................................................................................................. 15
8.5. Marker......................................................................................................................... 16
9. Paint .................................................................................................................................. 18
10. Option setting ................................................................................................................... 18
11. Output............................................................................................................................... 23
12. Display Performance ......................................................................................................... 23
13. Measure image ................................................................................................................. 23
14. Disclaimers ........................................................................................................................ 23
Disclaimers
The measurement value worked out by the software is only for reference; it may not be 100% correct.
The contents of this brochure are based on the existing product specifications. In order to improve
products or other reasons, Maker D & F Corp. will not be in charge of any errors which appear in this
document. Meanwhile, D & F Corp. are not responsible for the update contents of this document and
information.
2
1. Installation
A.
B.
C.
D.
Copy Setup and Supereyes 3.3w.rar from the CD to a folder on your computer.
Extract Setup and install it. After installing finished, restart the computer.
Extract Supereyes 3.3w.rar to the folder you prefer to install Supereyes software.
If needed, create a shortcut of Supereyes.exe to the desktop, which is inside the Supereyes 3.3.rar.
2. Start microscope
After connecting the device (USB receiver)to the computer, please open Supereyes.exe. By clicking the
icon and you will see the following screen pop up.
If your product is B004,so plug the transmitter into microscope, ensure that the light is on, if not, so you
need charge first;
If your product is B006, switch on, test the LED light to confirm the power is enough.
Then select Preview to open the device. Now you should see the image taken by the device. If the
image is not clear, please adjust LED light and focal length.
3
3. Language
On Screen display language could be changed by the following operation:
Click Language, and then choose the one you prefer.
4. Basic setting
4.1. Device source
If multiple camera devices are connected to the computer at the same time, please click the Device
Source, and then select the device that you need.
4.2. Device setting
Device setting is to control brightness, contrast, saturation and etc.
By clicking Device setting, a Properties window will pop up.
4
4.3. Video format setting
Video resolution can be changed by following action.
5
5. Photo
5.1. Photo capture/Shoot
To take a photo, please follow any of the options listed below:
A. Clicks the shoot button on the screen
B. Clicks the small button on the side of the LED dimmer switch
C. Choose from the menu bar File and then click Shoot
After a photo has been taken, it will be auto saved and showed in Type: Picture
6
5.2. Save photos
Please click Setting, and then Picture Path. A Browse window will pop up.
In the dialog, please enter the folder you prefer to save photos.
5.3. Preview photos
Preview stored photos by either of the following ways
A. Open photo files in the folder, which has been set up in the Picture Path before.
7
B. double click the picture in the Type: Picture
6. Video
6.1. Video record
Start/Stop to record video by either of the following ways:
A. Click the video Record Start/Stop button
B. Choose from the menu bar File and then click Record Start/Stop
8
6.2. Save videos
Please follow the steps listed below to choose the folders you prefer to save videos.
In the dialog, please enter the folder you prefer to save videos.
9
6.3. Setting frame rate/frame frequency (FPS)
6.4. Play video
Start to play video by any of the following ways:
A. Click Player to play (only for DZC format video)
10
B. Open video files in the folder, which has been set up in the Video Path before.
Notice: by this way, both WMV and DZC format videos will be found.
C. Double click video on the Type video at the bottom of the screen
Notice: only DZC format video will display in this column.
7. Add Text
Add text on photo by either of the following ways:
A. Choose from the menu bar Setting and then click Add Text
11
B. Click the Add Text button
After clicking Add Text:
1) Move mouse to the place that you want to add text, and then left-click mouse once. An Input Text
window will pop up. Please enter and edit text in the dialog.
2) Then, click OK. The text will display on the screen.
Notice: To add other texts, please repeat step 1) and 2)
12
8. Measurement
8.1.Measurement calibration
Please follow the steps to make measurement calibration,
(1) Put a precision ruler under the microscope, after fix magnification factor and focal length.
(2) Choose from the menu bar Setting and then click Measure setting. The mouse will change to cross.
(3) Draw a 1 mm line (or other length you preferred ) on the screen, according to the ruler:
Left click mouse once to choose a start point, and drag mouse to an end point. Then left click mouse
again.
(4) A Rule setting window will pop up.
(5) The standard length is the real length of the line drawn above.
(6) Enter the ration number in the dialog.
(7) For example, if a 1 mm line was drawn, the standard length is 10 X 0.1 mm = 1mm. Number 10
should be entered in the dialog.
(8) If a 2 mm line was drawn, the standard length is 20 X 0.2 mm = 2mm. Number 20 should be entered
in the dialog.
Notice: every time the focus changed, the ruler needs to be calibrated.
13
8.2. Measure lengthi
Please follow the steps to measure length:
(1) Click the Ruler button.
(2) Left click mouse once to choose a start point, and drag mouse to an end point. Then left click mouse
again.
Note: After measurement, please click Ruler button
again to go back to photo preview.
8.3. Measure arc
(1) Click the arc button.
i
By clicking any of the buttons
, the photo will be fixed. After measurement, please click
save photos. It is the same as photo shoot.
14
to
(2) Left click mouse at the beginning of the arc, and drag mouse to any point on the arc. Then left click
mouse.
(3) Move mouse to make the line match the arc, and left click mouse at the end of the arc. Then, the
length of the arc and diameter of the arc will display on the screen.
The image shows letters on a US dollar
Note: After measurement, please click Arc button again to go back to photo preview.
8.4. Measure angle
(1) Click the angle button.
(2) Left click mouse to choose a start point of an angle, draw the line to another point and then left
click mouse again to create on side of an angle.
(3) Then pull the mouse to any point of the other side of the angle, left click mouse again. The degree
of the angle will display.
15
The image shows letters on a US dollar
Note: After measurement, please click angle button again to go back to photo preview.
8.5. Marker
Marker is an advanced function for fast and simple test, such as PCB angle or arc inspection.
Any desired shape could be stored in JPG or BMP file in advance and copied to folder Marker, which is
at the same folder of Supereyes.exe.
To change marker, select Marker dialog in Option, choose the one you preferred. For more detailed
information about Option, please refer to Chapter Option.
To open marker, click Marker button. Then, the prestored marker will display.
16
Marker Sample
Marker Sample on US dollar
After measure, please click Marker button again to go back to photo preview.
17
9. Paint
If you only want to draw lines, arc, angle on the photo, please unselect Save measure data, and
Diameter show in Option.
10. Option setting
Click the option button. The window of option will pop up. In this window, you can do:
18
(1) Select the photo and output the size
(2) Change output video format
Supereyes software provides two video formats:
A. WMV′general format″can be played by Windows Media Player.
B. DZC (professional high compression ratio format) can only play by Supereyes software and it
provides smaller volume than WMV.
Notice:
Only DZC videos could be found at the Video Column at the bottom of the screen.
19
To open WMV videos, please open video folder
(3) Change marker color
To change the color of the ruler, angle, arc or text, please choose the color you prefer by click it.
(4) Change marker
To change marker, select Marker dialog in Option, choose the one you preferred. For more
information about Marker, please refer to 8.5 Marker.
(5) Change measurement setting
20
A. Select Save Measure line, will only display line you draw on photo.
B. Select Save Measure data, can display the saved measurement data on photo.
21
(6)
Arc setting
A. Select the Center show and save, the center of the circle will display on the screen.
B. Select the Diameter show and save, the diameter of the circle or arc will display on the screen.
22
11. Output
To print the photos, please click Output, and then Print.
12. Display Performance
By clicking Toggle, the screen display could be switched between full screen and the highest pixel
model.
13. Measure image
To make measurement on any image, please click File, Measure image, and then Open.
After clicking open, a dialog will pop up. Please choose the image you prefer in the dialog.
After measurement, click Save or Cancel to save or cancel measuring activities. Or right click mouse,
select
will appear.
23