1
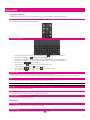
Life’s for Sharing What’s Inside BEFORE YOU GET STARTED...................................................................................................................................................... 3 WELCOME......................................................................................................................................................................................... 3 KEEPING YOUR PHONE SAFE.............................................................................................................................................................. 3 SAFETY WARNINGS AND PRECAUTIONS ............................................................................................................................................. 3 DIMENSIONS ..................................................................................................................................................................................... 4 PARTS DEFINITION ............................................................................................................................................................................. 4 Appearance ................................................................................................................................................................................... 4 Key Definitions............................................................................................................................................................................. 4 Descriptions of icons on status bar ............................................................................................................................................... 5 INSERTING AND REMOVING A SIM CARD ........................................................................................................................................... 5 INSERTING AND REMOVING A MEMORY CARD .................................................................................................................................... 5 USING AND CHARGING THE BATTERY ................................................................................................................................................ 5 Installing the battery ..................................................................................................................................................................... 5 Removing the battery.................................................................................................................................................................... 5 Charging the battery...................................................................................................................................................................... 6 SWITCHING YOUR PHONE ON AND OFF............................................................................................................................................... 6 LOCK / UNLOCK THE KEYPAD ............................................................................................................................................................ 6 USE THE TOUCH SCREEN ................................................................................................................................................................... 6 COMMUNICATING ........................................................................................................................................................................ 7 CALLING ........................................................................................................................................................................................... 7 Make a call.................................................................................................................................................................................... 7 Emergency calls............................................................................................................................................................................ 7 Answering calls ............................................................................................................................................................................ 7 Adjusting the volume.................................................................................................................................................................... 7 Hands-free..................................................................................................................................................................................... 7 Call options................................................................................................................................................................................... 7 MESSAGES ........................................................................................................................................................................................ 8 SMS .............................................................................................................................................................................................. 8 MMS............................................................................................................................................................................................. 9 Voicemail server ......................................................................................................................................................................... 10 PHONEBOOK ................................................................................................................................................................................... 10 Quick searches ............................................................................................................................................................................ 10 Add new contact ......................................................................................................................................................................... 10 Caller groups............................................................................................................................................................................... 10 Phonebook settings ..................................................................................................................................................................... 10 CALL HISTORY .................................................................................................................................................................................11 View.............................................................................................................................................................................................11 Delete Call Log............................................................................................................................................................................11 Call timers....................................................................................................................................................................................11 ENTERTAINMENT ....................................................................................................................................................................... 12 WAP............................................................................................................................................................................................... 12 W’N’W ............................................................................................................................................................................................ 12 GAMES ............................................................................................................................................................................................ 12 MULTIMEDIA .................................................................................................................................................................................. 12 Image viewer .............................................................................................................................................................................. 13 Video player................................................................................................................................................................................ 13 Audio player ............................................................................................................................................................................... 13 Sound recorder............................................................................................................................................................................ 14 FM Radio.................................................................................................................................................................................... 14 CAMERA ......................................................................................................................................................................................... 15 Camera........................................................................................................................................................................................ 15 Video recorder ............................................................................................................................................................................ 15 APPLICATIONS............................................................................................................................................................................. 16 USER PROFILES ............................................................................................................................................................................... 16 ORGANISER..................................................................................................................................................................................... 16 Calendar...................................................................................................................................................................................... 16 Tasks ........................................................................................................................................................................................... 16 Alarm .......................................................................................................................................................................................... 16 World clock................................................................................................................................................................................. 16 Calculator.................................................................................................................................................................................... 16 Currency converter ..................................................................................................................................................................... 16 FILES .............................................................................................................................................................................................. 16 BLUETOOTH .................................................................................................................................................................................... 17 SETTINGS ........................................................................................................................................................................................ 17 Phone settings ............................................................................................................................................................................. 17 Call Settings................................................................................................................................................................................ 18 Network Settings ........................................................................................................................................................................ 18 Security Setting........................................................................................................................................................................... 18 Connectivity................................................................................................................................................................................ 19 Pen calibration ............................................................................................................................................................................ 19 Restore factory settings............................................................................................................................................................... 19 1 PC CONNECTION......................................................................................................................................................................... 20 MASS STORAGE............................................................................................................................................................................... 20 APPENDIX ...................................................................................................................................................................................... 21 SPECIAL FUNCTIONS ....................................................................................................................................................................... 21 SHORTCUTS..................................................................................................................................................................................... 21 CLEARANCE AND MAINTENANCE .................................................................................................................................................... 22 HEALTH AND SAFETY INFORMATION ............................................................................................................................................... 22 SAR certification information..................................................................................................................................................... 22 Near Body operation................................................................................................................................................................... 22 Limiting exposure to radio frequency (RF) fields....................................................................................................................... 22 DECLARATION OF ROHS COMPLIANCE ........................................................................................................................................... 23 DISPOSAL OF YOUR OLD PHONE ...................................................................................................................................................... 23 EC DECLARATION OF CONFORMITY ................................................................................................................................. 23 WARRANTY ................................................................................................................................................................................... 24 ARTICLE 1....................................................................................................................................................................................... 24 ARTICLE 2....................................................................................................................................................................................... 24 ARTICLE 3....................................................................................................................................................................................... 24 ARTICLE 4....................................................................................................................................................................................... 24 FAILURE ANALYSIS .................................................................................................................................................................... 25 2 Before you get started Welcome Thanks for choosing the T-Mobile Vairy Touch II. This User guide is designed to help you familiarise yourself in detail with the mobile phone's basic functions. Keeping your phone safe Don’t make it easy for thieves to steal or abuse your phone. Don’t leave it lying around and set a PIN code that you change from time to time. If your phone is lost or stolen, tell your network provider straight away. You’ll need to give them your phone’s IMEI – the identity number you’ll find on the back of your mobile when you take out the battery. Remember to make a note of it and keep in a safe place. Safety warnings and precautions Precautions for using your mobile phone You don’t need a license to use your phone, but there are some laws and precautions you need to follow. On the road Take note of the local laws and regulations while driving. In the UK, that means no chatting on your phone without a hands-free kit. Out and about Your mobile phone can cause some electronic devices to malfunction, so think twice before using it near a pacemaker or other electronic medical devices, fire detectors and auto-control equipment. For details on how your mobile phone can affect electronic medical devices, ask the manufacturer or your local distributor. Also be aware that using your mobile phone near TV sets, radios and automated office equipment can interfere with signals. In the air Turn off your mobile phone on any airplane where it’s forbidden to use it. It can affect the normal operation of electronic devices. In hospital Turn off your mobile phone in hospital where it’s forbidden to use it. When filling up Don’t use your mobile phone at the petrol station. And turn it off anywhere near fuels or chemicals. At the beach Keep your mobile phone away from water. If it gets wet, it could overheat or cause electrical parts to leak or malfunction. Near children Don’t let kids play with your mobile phone – it’s not a toy and could cause an injury. Explosion areas Follow relevant laws and regulations to the letter when they concern turning off your mobile phone in or near explosion areas. Antenna Do not use your mobile phone if your antenna is damaged – it may cause you injury. Original accessories There’s a good reason for using only original accessories or ones authenticated by the manufacturer. Any others may affect the mobile phone’s performance, violate your warranty provisions or breach national regulations. They could even cause injury. Emergency calls Turn on your phone, make sure you’re in a reception area, type in the emergency number and press the Send key to dial. Precautions for using the battery Store the battery in a cool, ventilated place away from direct sunlight. All batteries have a limited life – which becomes shorter and shorter the more your recharge it. If charging fails several times, it’s time for a replacement. Don’t just throw your worn-out battery in the bin. Dispose of it in designated places according to specified regulations. Do not throw your worn-out batteries into fire. It will ignite or explode. When you’re installing the battery, be gentle. Pressing too hard can cause it to leak, overheat, explode or ignite. Do not disassemble or reassemble the battery. It may result in leakage, overheating, explosion or fire. If the battery becomes hot, changes in color or gets deformed during the course of use, charging or storage, stop using it immediately and replace it. Keep the battery away from dampness to prevent overheating, smoldering or erosion. Do not leave the battery in direct sunlight, in a car or other high-temperature places, as this may result in leakage or overheating – and could affect the battery’s performance and shorten its life. Do not keep charging the battery continuously over 24 hours. Note: If the battery is damaged, avoid touching it. If your skin comes into contact with any of the materials inside the battery, flush it with lots of water and seek help from a doctor if necessary. 3 Precautions for using the charger Use the power voltage between 110VAC and 220VAC. Using voltage beyond this range may cause leakage, fire or damage to the phone and charger. Do not short-circuit the charger. It might cause electric shock, smoldering or damage. Do not charge the battery in direct sunlight, near dampness, dust, vibration, TV sets, or radios. Do not use the charger if the power cable is damaged. It might cause fire or electric shock. Do not place water containers near the charger. If water or any other kind of liquid splashes on the charger, immediately remove the charger from the power socket to avoid overheating, fire, electric shock or power failure. Do not disassemble or reassemble the charger. It might cause injury, electric shock, fire or damage. Do not touch any charger, power cable or power socket with wet hands. It might cause electric shock. Do not place heavy objects on top of power cables or refit power cables. It might cause electric shock or fire. Remove the power plug from the socket before cleaning and maintenance. Hold the charger rather than pull the power cable while removing the plug from the socket. Failure to do say might cause damage, electric shock or fire. Dimensions Dimension 102mm×50mm×12.5mm Weight (with battery) 83g Display QVGA 2.8', 240*400 Parts definition Appearance Power key Receiver Touch screen Send key End key USB interface Camera lens Volume keys Camera key Key Definitions 4 Send key Dials a number or press to connect an incoming call. From the home screen, press the key to view your call history. End key Press to end a call or reject an incoming call. When performing functions, press this key to return to the home screen. Volume keys Adjusts the volume. Can be pressed to scroll through options when using your phone. Camera key From the home screen, press this key to access the camera, and then press the key again to take a photo. Power key Hold this key to turn power on/off. USB interface Connect the USB cable to charge the phone or connect the phone to the computer. Descriptions of icons on status bar Icons Descriptions Icons Descriptions Network signal strength Battery capacity Unread SMS Unread MMS Outdoor Calling or in call In Roaming Alarm On Meeting GPRS Bluetooth On Silent Audio player is playing General Note: In this user manual: “Press” means pressing the key and then releasing. “Hold” means pressing and holding the key for about 2 seconds or more. “Click” means clicking the corresponding icon on the screen. “Select” means sliding on the screen with your finger to let the highlight bar stay in the option you want to view. If there is not a left key “Options” on the screen, “Select” means clicking the option you want to view directly. Inserting and removing a SIM card You need to insert a valid SIM card into your mobile phone before you can make and receive calls. All your information regarding network connection plus many of your contacts are saved on the SIM card. So it makes sense to keep it safe from harm – don’t touch the metal surface and keep it far away from electricity or magnetism. 1. Turn off your mobile phone, remove the battery and disconnect any external power sources. 2. Put your SIM card into the socket as shown in the figure. 3. Turn off your mobile phone and remove the battery before taking out your SIM card. Inserting and removing a memory card 1. 2. 3. 4. Turn off your mobile phone, and disconnect any external power sources. Remove the battery cover. Insert the memory card into the slot. Replace the battery cover and close it gently until you hear a click. Using and charging the battery There’s no need to charge the battery first – you can use it as soon as you’ve removed the packaging. To help your battery live a long and healthy life, exhaust it completely before fully recharging it for the first three times. Installing the battery 1. 2. 3. 4. Pull the battery cover off gently using the notch on the top right edge and remove the cover. Insert the battery by aligning the gold coloured contacts with the contacts in the battery slot. Push down the upper section of the battery until it clicks into place. Replace the battery cover and close it gently until you hear a click. Removing the battery 1. 2. 3. Make sure that your mobile phone is switched off. Remove the battery cover. Pull the battery up and remove it from the mobile phone. 5 Note: Please turn off your mobile phone before taking out the battery, otherwise your mobile phone might be damaged. Charging the battery Connect your travel adapter to the bottom of your mobile phone as shown in the diagram. The side with arrow should be facing downwards while connecting. 2. Connect the other end of the travel adapter to the mains socket. 3. When you charge the battery, the battery charging indicator appears as follow if the phone is off. 1. 4. When the battery is fully charged, disconnect the charger. Note: Keep your phone in a ventilated, room-temperature place during charging. Use the original charger or one authenticated by the manufacturer – if you don’t you could violate the warranty provisions or cause damage to the phone. Charge your mobile as soon as it switches off automatically or warns that power is low. Switching your phone on and off Hold the Power key to turn your phone on or off. In “Menu”→ “Settings”→ “Phone settings”→ “Misc. settings”→ “LCD backlight”, set the LCD backlight time. If the phone is not operated within this time, the screen will turn black. Press the Power key, Volume keys or Camera key to wake up your phone. Note: The icon for “Menu” is at the home screen. Lock / unlock the keypad In “Menu”→ “Settings”→ “Security settings”→ “Auto keypad lock”, set the auto keypad lock time. If the phone is not operated within this time, the keypad will be locked. To unlock the keypad, press the Power key and then click . Locking the keypad can prevent unintentional operations on it. You can answer an incoming call with the regular operation when the keypad is locked. Use the Touch screen Your phone supports touch screen functionality. Tap any application to open it. 6 Communicating Calling Make a call Direct dialling From the home screen, select Dial icon. Tap the numeric buttons to input the number and press the Send key to dial. Dialling from Contacts Go to “Menu”→ “Phonebook”. Find the name of the person you want to call, and press the Send key. Dialling from call history 1. 2. From the home screen, press the Send key to enter “Call history”. Select the number you want to dial in “Call history” and press the Send key to dial. Saving a number In the dialing interface, type in a contact's phone number, press “Save” to save it as a new contact, or save it over an existing contact. Dialling an extension Sometimes you can’t dial an extension directly. If this happens, dial the direct line first, click * button continuously until “P” appears on the screen and then dial the extension number. Making international calls To dial an international call, click the * button continuously until “+” appears on the screen. Then type in the full number including the international dialing code. Clearing wrong inputs Press the “Clear” to clear only the previous input and hold the “Clear” to clear all inputs. Emergency calls You can make emergency calls without a SIM card as long as you are in an area covered by the network. Answering calls Press the Send key to answer a call. If the headset is connected, you can press the key on the headset to answer the call. Adjusting the volume 1. 2. 3. During the conversation, press the Volume keys to adjust the voice volume. From the home screen, press the Volume keys to adjust the key volume. When the Audio player is playing or you are listening to the radio, press the Volume keys to adjust the volume. Hands-free 1. 2. During the conversation, tap the “H-Free” button to enter hands-free mode. Tap “H-Held” to return to normal status. Call options During the conversation, press “Options” to enter the menu. You can perform the following operations: Hold single call: Hold the current conversation. End single call: End the current conversation. New Call: Enter a new dialing interface. Phonebook: Enter phonebook. Messaging: Enter “Messaging”. Sound recorder: Record the current conversation. Mute: When “Mute” is on, the other party can’t hear your voice. DTMF: Set On/Off to send or stop sending DTMF. 7 Messages SMS Writing messages 1. Enter “Write message” to compose a short message. 2. Press “Options” to select: Send to: Choose “Enter recipient”, enter the recipient’s number or “Add from Phonebook” (you can select multiple numbers from “Phonebook”). Writing language: You can choose the input method. Switch to MMS: Switch SMS to MMS. Advanced: You can insert an attachment, contact number, contact name or bookmark. Save: Save the message in “Drafts”. Details: Displays the information about the message. Note: Some cities or regions do not support short messages containing more than 160 characters. Only mobile phones with EMS functionality can send and receive static icons, animated icons and music files. Inbox 1. Enter “Inbox” to view the received messages. 2. Select the message and press “Options” to select: View: Read the message. Reply: Reply to the sender. Call sender: Dial the sender’s number. Forward: Forward the message to another recipient. Delete: Delete the message. Delete all: Delete all messages from Inbox. Save to Phonebook: Save the sender’s number to Phonebook. Mark as unread: Mark the message as an unread one. Advanced: You can copy or move the message you select from SIM/phone to phone/SIM. And you can copy or move all the messages from SIM/phone to phone/SIM. Sent messages 1. 2. Enter “Sent messages” to view the sent messages. Select the message and press “Options” to select “View”, “Forward”, “Delete”, “Delete all” or “Advanced”. Outbox 1. 2. Enter “Outbox” to view the messages have not been sent successfully. Select the message and press “Options” to select “View”, “Edit”, “Resend”, “Delete”, “Delete all” or “Advanced”. Delete messages To delete messages, Select “Inbox”, “Drafts”, “Outbox” or “Sent messages”, “Archive” or “All messages”, choose “Yes” to continue. Message settings 8 Profile settings: This is automatically set by the service provider, but please contact us if this is not available. Common settings: Select On/Off for “Delivery report”, “Reply path” and “Save sent message”. When “Delivery report” is on, the SMS centre will return status reports to you, so you can see whether or not the other party has received your message. When “Save sent message” is on, your phone will save the sent message in “Sent messages”. Memory status: Displays the memory space for SMS on your SIM card and phone. Preferred storage: Select “SIM” or “Phone” as the default storage media for SMS. Preferred connection: Select “Prefer GPRS”, “Prefer GSM” or “GSM only” as the connection mode. Character set: Select “Automatic” or “7bit” for “Character”. MMS MMS is short for Multimedia Messaging Service, which lets you send messages that include text, images, audio, plus more. Note: MMS requires network support. Make sure your SIM card supports MMS before you try to send one, or consult your network provider. Make sure you set your Service Centre address and complete the MMS setting before you send an MMS. If the MMS is too large, the mobile phone might not be able to send or receive it. Writing a message Enter “Write Message” , press “Options” and choose “Switch to MMS”, then press “Options” to select: (or you can press “Options” and choose “Add picture”, “Add sound”, “ Add video” or “Add subject” to directly insert multimedia contents to the message and it will be switched to MMS automatically”). Send to: Choose “Enter recipient”, enter the recipient’s number or “Add from Phonebook” ( you can select multiple numbers from “Phonebook”). Writing language: You can choose the input method. Add picture: Add picture in the message. Add sound: Add sound in the message. Add video: Add video in the message. Add subject: Add subject in the message. Preview MMS: You can preview the MMS before you send to others. Slide options: Add a new slide before or behind the text and set the slide time. Switch to SMS: Switch MMS to SMS. Advanced: You can insert an attachment, contact number, contact name or bookmark. Save to Drafts: Save the message in “Drafts”. Details: Displays the information about the message. Inbox Incoming MMS are saved in the inbox. You can perform the following operations: View: View the current MMS content. Reply: Reply to the sender. Call sender: Dial the sender’s number. Forward: Forward the current MMS. Lock: Lock the MMS to prevent it from being forwarded to others. After the MMS is locked, you can select “Unlock” to unlock it. Move to archive: Move the MMS to “Archive”. Delete: Delete the current MMS. Delete all: Delete all messages from Inbox. Save to Phonebook: Save the sender’s number to Phonebook. Details: View the details of MMS. Note: To save attachments from an MMS, select “View”, after the MMS is shown completely, press “Options” →“Save objects”, then select the attachment you want to save and select “Phone” or “Memory card” to save the attachment in. At last, rename the attachment, then press “Options” →“Done”. The attachment has been saved, then you can select “View” to view it or “Use as” to use it as “Wallpaper”, etc. When you attach music to an MMS, the side keys can’t be used to adjust the volume. Sent messages 1. 2. Enter “Sent messages” to view the sent multimedia messages. Select the message and press “Options” to select “View”, “Forward”, “Move to Archive”, “Delete”, “Delete all” or “Details”. Outbox Select “Outbox” option to view the multimedia messages have not been sent successfully. Press “Options” to select “View”, “Resend”, “Edit”, “Delete”, “Delete all”, “Message status” or “Details”. Drafts Drafts stores messages you are not yet ready to send. You can edit the messages again and send later. Press “Options” to select “View”, “Send”, “Edit”, “Delete”, “Delete all”, “Move to Archive” or “Details”. Message settings Note: MMS settings for T-Mobile users will be preconfigured. If you change to a SIM from a different provider, you may need to change these settings. Before using MMS, you must choose some necessary settings. Enter “Multimedia message”, “Common settings” to select: Compose: You can set “Slide time”, “Creation mode”, “Picture resizing”, “Auto signature” and “Signature”. Sending: You can set “Validity period”, “Delivery report”, “Read report”, “Priority”, “Delivery time”, “Hide sender” and “Send and save”. Retrieval: You can set “Home network”, “Roaming”, “Read report”, “Delivery report” and “Filters”. In “Filters”, you can set “Anonymous” and “Advertisement”. Memory Status: You can check the memory status. Note: The use of “Delivery report” and “Anonymous” depends on your network service provider. Consult them for more details. Your mobile phone has reserved some usable space to save MMS, which may become full if you store a lot of multimedia messages. If your phone prompts with “storage full”, delete some redundant messages to make sure there is enough space to store new multimedia messages. 9 Voicemail server When you are unable to answer the call, you can let the caller leave a message for you on voicemail to listen to later. You can set a voicemail number. From the home screen, select Dial icon, then hold the “1” key to dial the voicemail number you’ve set. Note: Make sure you apply for the service before use because it requires network support. Phonebook Use Phonebook to save your contacts’ names, home numbers, mobile phone numbers and more relevant details. The numbers can be saved either in your phone or on the SIM card. In idle mode, enter the main menu. Under “Phonebook”, you can select the following functions: Quick searches Tap the input box, click the first letter of your desired contact on the screen and quickly search for the contacts, or view all contacts in the contacts list. You can perform the following operations on your selected contact: “Call”, “Send message”, “View”, “Edit”, “Delete”, “Copy”, “Move” and “Send contact”. Add new contact You can add a new contact to “SIM” or “Phone”. If you want to add a new contact to your SIM card, you need to go to “Phonebook settings” → “Preferred storage”, select “SIM”. Or you can select “Phone”, and the new contact will be added to your phone. If you select “Both”, you need to choose to add the new contact to your phone or SIM card. You can also edit the following: Caller group Add the phone number to any kind of caller groups. Caller picture Set your personalised caller picture for the current number, choosing a picture from “System picture” or “From file”. Caller video Set your personalised caller video for the current number, choosing a video from “System video” or “From file”. Caller ringtone Select the proper ringtone from “System ringtone”. Caller groups Your mobile phone supports caller grouping functionality, which allows you to select “View members”, “Group settings”. Note: You can only add/delete members who are saved as contacts on your phone. Phonebook settings Select “Options”, “Phonebook settings”. Preferred storage You can set the preferred storage location (phone, SIM or both) for the current number. My number You can edit my number and send it. vCard version You can set the vCard version. Extra numbers You can edit “Owner number”, view and call the “Service dialing number” or “SOS number”. Save contact notify Select On/Off for “Save contact notify”. Memory status You can check the memory status of both the phone and SIM. Copy contacts Select “SIM to phone” to copy your selected contacts from your SIM card to your phone, or select “Phone to SIM” to copy your selected contacts from your phone to your SIM card. Note: When copying the contacts from your phone to your SIM card, only the name and number will be copied. 10 Move contacts Select “SIM to phone” to move your selected contacts from your SIM card to your phone, or select “Phone to SIM” to move your selected contacts from your phone to your SIM card. Delete all contacts Select “From SIM” to delete all contacts saved in your SIM card, and select “From Phone” to delete all contacts saved in your phone. Note: You need to input a password before the contacts are deleted. Your default password is 0000. Call history “All calls”, “Missed calls”, “Dialed calls” and “Received calls” are saved in “Call History”. If the records are full, the earliest saved records will be deleted. From the home screen, press the menu icon to enter the main menu and then select “Call history”. Or from the home screen, press the Send key to enter the “Call history”. View 1. 2. 3. Select “Call History” in the main menu to choose “All calls”, “Missed calls”, “Dialed calls” or “Received calls”. Select the record you want to view from the list. Press “Options”. You can then select: View: View the detailed information. Call: Call the number. Send message: Send a message to the number. Save to Phonebook: Save the number to phonebook. Edit before call: Edit the number before call. Delete: Delete the record. Delete all: Delete all the records of the same group. Advanced: You can view the “Call timers”, “Call cost”, “Text message counter” and “GPRS counter”. Delete Call Log 1. 2. Select “Call history” in the main menu. Select “All calls”, “Missed calls”, “Dialed calls” or “Received calls”, then press “Options”, choose “Delete all”. Call timers Under “Call Timers”, you can select “Last call”, “Dialed calls”, “Received calls” or “Reset all”. 11 Entertainment Your mobile phone supports video and image, audio and game. Category Video and image Audio Game Description Support Video Encode (record) (formats supported ) MPEG4, H.263 baseline Video Decode (playback) (formats supported ) H.263 baseline, MPEG4 Image (Formats supported ) JPEG, JPG, BMP, GIF, PNG Audio Encode (record) (formats supported) AMR, WAV, AWB Audio Decode (ringtone or playback) (formats supported) AMR-NB, AMR-WB+, WAV, AAC, AAC+, MP3, MIDI FM radio Yes, with FM recording Game Preinstalled: Magic Sushi, Puzzle WAP Your phone supports Wireless Application Protocol (WAP). You can get access to this service through your network provider. WAP lets you get information about news, weather forecasts and more. Note: WAP service requires network support. Please consult your network operator or service provider for details on usability and quotation of WAP services. Your service provider should provide you with all the instructions you need on how to use this service. You can use the value-added services provided by your network operator. Go to “Menu”→ “Services” →“WAP”. You can perform the following operations: Homepage: Homepage is a WAP site you set in “Settings” →“Profiles”. Please note that your phone comes pre set with the T-Mobile WAP settings. Bookmarks: Access your phone’s preset websites. Select a bookmark and press “Go to” to load the website or you can select “Edit”, “Send”, “Delete”, “Delete all” or “Add bookmark”. Note: Bookmarks will not work if your bookmark list is empty. Recent pages: Displays the pages you’ve visited recently. Select an item and choose “Go to” to visit the page again. Offline pages: Web pages saved on your mobile phone can be viewed while your phone is offline. Input address: Input a URL and press “Done” to visit the site. Service inbox: Check the service information sent by your service provider. Settings: You can select “Profiles”, “Browser options”, “Service message settings”, “Clear cache”, “Clear cookies” or “Trusted certificates”. w’n’w w’n’w is a Web Browser named Opera. Go to “Menu”→ “w’n’w” to open it. Note: You must insert the T-Mobile SIM card if you want to use it. Games Your mobile phone is preset with two classic games. Go to “Menu”→ “Fun & Games” →“Games”. Select a game and start it, you can view “Help” to see the rules of the game. Multimedia 12 Image viewer Select “Image viewer” to view the photos you’ve taken or to see the other pictures saved in “Photos”. Note: You can only view the photos in “Image viewer” when they are saved in the “Photos” folder of your Phone or Memory Card. Select a photo and then press “Options” to select: View: View the picture. Edit: Edit the picture. Browse style: Choose in what way you want to browse your pictures. You can choose “List style” or “Matrix style”. Send: Send the picture somewhere else, either “As multimedia message”, “As Email” or “Via Bluetooth”. Whether it can be sent or not depends on your MMS space. Use as: Use the picture as “Wallpaper”, “Power on display”, “Power off display” or “Caller picture”. Rename: Change the name of the selected photo. Delete: Delete the selected photo. Sort by: You can organise your pictures by “Name”, “Type”, “Time” or “Size”. You can also choose “None” if you want them to be organised by the date you take the photo. Delete all files: Delete all of your photos. Storage: Selects where to store your picture, in your “Phone” or “Memory card”. Video player Select “Video player” to enter a list of your video files. Select the file you want to play, then press “Options”. You can then press: Play: Plays the selected video. Use as: Use the selected video as “Caller video”. Send: Send your video “As multimedia message”, “As Email” or “Via Bluetooth”. Rename: Change the name of the video file. Delete: Delete the selected video. Delete all files: Delete all your videos. Sort by: You can organise your videos by “Name”, “Type”, “Time” or “Size”. You can select “None” if you want them to be organised by the date you shot the video. Storage: Select either “Phone” or “Memory card” as the location where your videos are stored. When the video is played, you can click: To “Pause” the video. To switch to full screen mode (just click any space on the screen to return to normal mode). To rewind and forward. Audio player Your mobile supports audio file formats such as MP3, MIDI and AMR. 1. If you need to edit a new playlist, add the audio files in your phone or Memory card to the playlist. Go to “My playlists”→ “Options” →“New 13 playlist”, edit the name of the playlist, then press “Options” →“Load” → “Options” →“Add”, select the audio files from your phone or Memory card. If you have edited several playlists, Press “My playlists”, select a playlist, then press “Options” →“Load” →“Options” →“Play”. Press “Now playing” to play the audio files you listened to at the last time. You can perform these operations by clicking the screen: 2. 3. Click Click Click to play. to enter the “Playlist”. to play the next file; click to play the previous file. Note: Turn it down! For safety reasons, please select medium volume when you’re listening to music. 4. To set your audio player, select “Now playing” on the interface, and press “Options” to select: Player settings: Select from “Off”, “One” or “All” for “Repeat”, select “On” or “Off” for “Shuffle” and “Background play”. Sound effects: Select from “Equalizer”, “Reverb effect”, “3D surround” and “Off” for “Audio effect”. Select “On” or “Off” for “Bass enhancement”. Select “Normal”, “Slow”, “Slowest”, “Fastest” or “Fast” for “Play speed”. Bluetooth settings: Select “On” or “Off” for “BT stereo output”. If your Bluetooth stereo headset has successfully paired with your phone, and “BT stereo output” is activated, select “BT stereo headset” to listen to music using your Bluetooth headset. Sound recorder Go to “Sound recorder” →“Options” to select: New record: To start recording. List: View all the recorded files in the list. Settings: Set “Storage”, “File format” and “Audio quality” of your recordings. You can then select one of your recorded files and press “Options” to: Play: Plays the selected file. Append: Continues to record files on the current file. Rename: Change the name of the recorded file. Delete: Delete the selected file. Delete all files: Delete all recorded files. Use as: Use the selected file as user profiles. Send: Send the selected file “As multimedia message”, “As Email” or “Via Bluetooth”. FM Radio Note: You can only listen to the radio when using a stereo headset. Go to “FM radio” →“Options” to select: Channel list: You can edit up to 9 radio channels. Manual input: Manually find and input a channel. Auto search: Automatically searches for channels. Settings: Select “On” or “Off” for “Background play” and “Loudspeaker”. Set “Record format” ,“Record storage”, “Audio quality” and “Channel effect”. Append: Record what’s playing on the current channel on the file you select. File list: Displays the list of recorded files. You can also click the screen to operate your radio: 14 Click , then you can click to change to another channel automatically. Click to begin listening to the radio. Click Click to change the channel. to record the current channel. Camera Camera 1. Press the side camera key to access the camera. 2. Press Switch to video record: Switch camera to video record. Photos: Enter the Image viewer to view the photos you’ve just taken. Camera settings: Set “Shutter sound”, “EV”, “Night mode”, “Anti-flicker”, “Delay timer” and “Cont. shot”. Image settings: Set the “Image size” and “Image quality” of your picture. White balance: Choose between “Auto”, “Daylight”, “Tungsten” and more. Scene mode: Select “Auto” or “Night”. Effect settings: Select from “Normal”, “Grayscale”, “Sepia” and more. Storage: Select “Phone” or “Memory card”, depending where you want to save your photo. for “Options”: Restore default: This restores the factory settings of your camera. Click to complete Capturing the picture, click to exit from the preview interface. Once you have pressed the side camera key to access the camera, you can also perform the following actions by clicking the icons on the screen: 3. Click to set “Image size”. Click to set the “Image quality” of your picture. Click Click to set “Night mode”. to set “White balance”. Click to set the “Delay timer”. Click to set “Cont. shot”. Video recorder 1. Select “Video recorder” to take a video, then press Camcorder settings: Choose from a number of recording tools, including “Night mode”, “EV” and “Anti-flicker”. to access the “Options”: Video settings: Set the “Video quality”, “Record audio”, “Encode format” and more. White balance: Choose between “Auto”, “Daylight”, “Tungsten” and more. Effect Settings: Select from “Normal”, “Grayscale”, “Sepia” and more. Storage: Select “Phone” or “Memory card”, depending where you want to save your video. Restore default: Restores the Video Recorder’s factory settings. On the preview interface, click to record a new video, click to pause, click to exit from the preview interface. Once in the video screen, you can also perform the following actions by clicking the screen: 2. Click to set the “Video quality” of your video. Click Click to set “Night mode”. to set “White balance”. Click to set “Record audio”. 15 Applications User profiles Your mobile phone provides multiple profiles, which allow you to choose personalised settings according to different occasions. 1. Go to “Menu” →“User profiles”. Your optional profiles include “General”, “Meeting”, “Outdoor”, “Silent”, “Headset” and “Bluetooth”. 2. The default settings for each individual profile are preset. You can change them in “Options” →“Customise”. Tone settings: Set the tone for various conditions. Volume: Set the “Ringtone” and “Key tone”. Alert type: Choose from four modes based on ring and vibration. Ring type: Choose from “Single”, “Repeat” and “Ascending”. Extra tone: Let the phone alert you when an error or warning occurs. Note: The Headset mode can only be activated when the stereo headset is connected. And the Bluetooth mode can only be activated when the Bluetooth headset is connected. 3. Press “Options” and select “Activate” to start using a selected profile. Organiser Calendar When you enter “Calendar”, the current month is displayed on the screen and the current date is marked by a background box in a special colour. You can click the dates, browse the dates, and click the direction arrows on the screen to switch the year and month. Tasks You can add tasks such as “Date”, “Call” and “Anniversary”. Alarm Your mobile phone can set up to 5 alarms. To set an alarm: 1. In the list of alarms, select one to edit. 2. Select and amend each of the following: “On” or “Off”. “Time”, “Repeat”, “Alarm tone”, “Snooze” and “Alert type”. 3. Press “Done”, then choose “Yes”. World clock You can view the time in different cities. Calculator Your mobile phone provides a calculator to perform simple calculations. You can add, subtract, multiply or divide, and select M+, M-, MR and MC to perform relevant operations. MR: Memory Recall. Let you read the data saved in the calculator’s current memory. MC: Memory Clear. Deletes the data saved in the calculator’s current memory. M+: Add Memory. Adds the displayed data to the currently saved data, and saves the result. M-: Remove Memory. Subtracts the displayed data from the data saved in current memory and saves the result. Currency converter Your mobile phone provides you with basic functions of currency conversion. Input the Rate, select “OK” and input a figure in the Local field, and then press “OK” to get the result. Files If you enter your “Files”, you can view the files in your “Phone” and “Memory card”. The Total and Free memory space will be displayed on the upper part of the screen. You can then press “Options” to select: Open: Displays a list of your folders. Format: Formats the selected storage. It means that all the data saved in the selected storage will be deleted. So you must make sure you want to do it! Rename: Rename the “Memory card”. Details: View the details of “Memory card”. Note: If you select the “Phone”, there are not “Rename” or “Details” in the “Options”. 16 Bluetooth Bluetooth lets you transfer data from your phone to other Bluetooth devices, and you can listen to music or talk hands-free with a Bluetooth Headset. Just make sure the distance between your phone and other Bluetooth devices doesn’t exceed 10 metres. Note: Your Bluetooth connection may experience interference caused by certain obstructions or other electronic devices Go to “Menu” →“Settings” →“Connectivity” →“Bluetooth”. Power Select “On” or “Off” for Bluetooth. When Bluetooth is turned on, you can see the Bluetooth icon on the status bar. Inquire audio device This lets you search for Bluetooth Headsets, so you can listen to music or talk hands-free. My device In “My device”, you can view the Bluetooth devices that have pared with your phone successfully before. 1. To search for new devices, press “Inquiry new device”. 2. When your phone has finished searching for devices, choose a device and press “Pair” to connect the phone with the device. 3. When the phones are connecting, each device must enter the same password to successfully connect between the phone and the device. 4. After successful connection, you can communicate with the device. Note: Some devices such as Bluetooth headsets might have the fixed password “0000”. You need to input this password if your phone needs to connect to the device. Active devices Display the names of Bluetooth devices that are transmitting data with your phone. Settings You can choose the following settings for your Bluetooth phone: Visibility: Turn On/Off. If you select “Off”, other Bluetooth devices can’t search for your mobile phone. Change device name: When other Bluetooth devices search for your mobile phone, the name of your mobile will be displayed. Audio path: Select where you want your phone sounds to end up, choose “Leave in phone” or “Forward to Bluetooth headset”. Block list: View the devices in the block list. Storage: Select where you want to store the files received by Bluetooth. FTP setting: Select “Shared folder” and “Access right”. Note: If a memory card isn’t inserted, received files will be automatically saved in the “Received” folder of your phone. About It displays the details of the device. Settings Phone settings Time and date You can “Set home city”, “Set time/date” and “Set format” for your desktop clock and display of date. Scheduled power on/off Save battery by editing up to 4 groups of power on/off time. Press “Edit” to set “Status”, “Power on/off” and “Time”. Note: The times should be set differently to avoid conflict. Language Set your phone’s language. Writing languages Set the preferred Writing language. Display 17 Wallpaper: Your phone comes with a preset wallpaper photo. You can choose your own picture from “System” or “User defined”. These can all be previewed before you choose one as your wallpaper. Power on display: Your phone comes with a preset photo when it is powered on. You can choose your picture from “System” (pre installed photos) or “User defined”. These can all be previewed before you choose one as your power on display. Power off display: Your phone comes with a preset photo when it is powered off. You can choose your picture from “System” (pre installed photos) or “User defined”. These can all be previewed before you choose one as your power off display. Virtual Keyboard Vibrator: Select “On” or “Off” for virtual keyboard vibrator. Clock type: Select “Analog” or “Digital” for desktop clock. Greeting text Set “Status” and “Greeting text”. If “Status” is “On”, the greeting text you have edited will display when your phone is powered on. Flight mode Select “Normal mode”, “Flight mode” or “Query when power on” when your phone is powered on. Misc. settings Set the “Brightness” and “Time” for “LCD backlight”. Call Settings Caller ID You can select “Set by network”, “Hide ID” or “Send ID”. Call waiting After this function is activated, the system will inform you if there is another incoming call. Call divert This function allows you to divert incoming calls to another designated number. Note: This function requires network support, so please contact your network provider for details. You can also select “Divert all voice calls”, “Divert if unreachable”, “Divert if no answer”, “Divert if busy” or “Divert all data calls”. If you don’t need to divert, you can select “Cancel all diverts”. Call barring Note: You may need to contact your network provider for details about call barring, as some providers might not offer the service. Your default password is 0000 When you have access, you can press “Call barring” to select: Outgoing calls: The “Outgoing calls” include “All calls”, “International calls” and “International calls except to home PLMN”. Select one, then you can select “Activate” to bar the calls, “Deactivate” to allow the barred calls can be called again and “Query status” to check whether outgoing calls are currently barred. Incoming calls: The “Incoming calls” include “All calls” and “When roaming”. You can set them as per the above. Activate all: Enter your password to activate all numbers. Cancel all: Enter your password to cancel all activated call barring. Change barring password: This lets you set a new call barring password. Closed user group Add numbers to the Closed user group. The numbers in one group can call each other, but can not call numbers in other groups. Advance settings Set “Auto redial”, “IP dial”, “ Call time display”, “Call time reminder ” and “Auto quick end”. Network Settings Network selection There are three modes in Network selection: “New search” lets you find available networks, “Select network” lets you choose one. You can select “Automatic” or “Manual” for “Selection mode”. Preferences This list lets you “Add from list”, “New”, “Change priority” or “Delete” your preferred networks. GPRS connection You can press the “Change” key to switch between “When needed” and “Always” for having a GPRS connection. Security Setting SIM lock If “SIM Lock” is currently set “Off”, you can press “On” to input a PIN code to activate “SIM Lock”. The next time you turn on your mobile, you’ll need to input the correct PIN code to unlock your SIM card. If “SIM Lock” is set “On”, you can press “Off” to cancel the protection. Note: Your SIM card will be locked if you input the PIN code wrongly three times in a row. If this happens, you’ll need a PUK code to unlock your SIM card. Your PIN code, PUK code and SIM card are usually provided together. If you’re missing your PUK code, contact your network provider. 18 Phone lock A Phone lock is a useful tool to help prevent your mobile phone from being used without your permission. Click “On” and input your password. You need to input the correct password to unlock your mobile phone when you next turn it on. Click “Off” to cancel the protection. Note: Your default password is 0000. You should change this to your own password. Auto keypad lock Select a time for auto keypad lock, and the phone will automatically lock the keypad to prevent unintended use. Fixed dial If your SIM card supports this function and this function is enabled, the phone can only dial those numbers starting with the fixed dial number you set. For example, if you set the fixed dial number to 139, then the phone can only dial numbers starting with 139. Note: You need to input your PIN2 code to turn on or off Fixed dial. You’ll need to contact your network provider to get your PIN2 code. Barred dial You can edit the barred dial list and set the bar mode. Please consult the network provider for this function. Change password Change the “PIN”, “PIN2” and “Phone password”. Certificate manager View the list of certificates. Connectivity Bluetooth See the section on “Bluetooth”. Conn. management You can view your GPRS connectivity actions. Date account 1. GSM date Under “GSM date”, press “Options” →“Add”: Account name: Edit the account name. Number: Edit the connection number of your current account. User name: Edit your user name for dial servers (not WAP gateway). Password: Edit your password for dial servers (not WAP gateway). Line type: Select the line type “ISDN” or “Analogue”. Speed: Select the data connection speed. Primary DNS: Select your WAP’s primary DNS. Secondary DNS: Select your WAP’s secondary DNS. 2. GPRS In “GPRS”, you can see a list of data accounts. You can select one and press “Options” →“View” to view the details of it. If you want to add a new data account, press “Options” →“Add”: Account name: Edit the account name. APN: Edit the access point name. User name: Edit your user name. Password: Edit your password. Auth. type: Select the Auth. type “Normal” or “Secure”. Primary DNS: Select your WAP’s primary DNS. Secondary DNS: Select your WAP’s secondary DNS. You can “Edit” or “Delete” the new account. Pen calibration If you feel your phone doesn’t react properly when you click the screen, you may need to calibrate the touch screen. Click complete. until the calibration is Restore factory settings To restore factory settings, you need to enter the correct phone lock password and then press “OK”. 19 PC connection Mass storage Your mobile phone supports mass storage. To use this function, you need to connect your phone to your PC using a USB cable. You can do this in two ways: 20 When your phone is off, you can use it as a U-disk. When your phone is on, and a memory card is inserted, the phone and memory card can be used as a Mass storage at the same time. Appendix Special functions As a multimedia mobile, your phone not only supports basic functions, but rich and practical multimedia functions like: Touch screen This provides you with a much more user-friendly interface. Using Virtual keyboard 1. Display virtual keyboard: When you are in an input interface, click 2. Change Writing language: Click to display the virtual keyboard. 3. Input Letters: In every method except 123 method, click the corresponding letter to input your desired letter. 4. Input Digits: In 123 method, click the corresponding number on the screen to input your desired number. to change the Writing language. 5. Input Space: Click 6. Delete Character: Click to input the space. 7. Delete all Characters: Press and hold 8. Move Cursor: Click 9. Input symbols: Click to delete the previous character before the cursor. to delete all characters. to move the cursor, click to change to the next line. to input symbol. T-Mobile toolkit SIM card Toolkit (STK) services are value-added services provided by your network provider. Your mobile phone supports STK service, but if your SIM card and network provider do not support the service, these functions can’t be used. Opera Opera is a Web Browser, go to “Menu”→ “Fun & Games”→ “Java”→ “w’n’w” to open it. Note: You must insert the T-Mobile SIM card if you want to use it. Bluetooth Your mobile phone supports Bluetooth transfers. Equaliz You can choose different settings under Equalizer to get different sound effects. Writing languages Your mobile supports multiple Writing languages. Shortcuts Lock the keypad From the home screen, press the Power key to quickly lock the keypad. Unlock the keypad After the keypad is locked, you can press the Power key, and then click to unlock it. 21 Idle Shortcut You can set six icons on the idle screen such as “Tasks”, “Calendar”, “Music” and “w'n'w”. Clearance and maintenance Your phone is delicately designed, so please treat and maintain it with care. The following maintenance tips might help you extend the life of your mobile phone. 1. Clean your mobile phone, battery and charger with a soft dry cloth. 2. Do not clean your mobile phone with alcohol, dilution agent or benzene (or other liquors). 3. Clean the socket from time to time because a dusty socket might cause disconnection, power failure, or even charging failure. 4. Do not press the keys with needles, pen points or other sharp objects – this might cause damage to the phone, which in turn might mean the phone doesn’t work properly. 5. Keep tiny metal objects like pins away from the phone receiver. The phone speaker is magnetic and thus magnetizes those metal objects, which may hurt people or damage the phone. 6. Keep your mobile phone dry. Rain, moisture or any kind of liquid containing minerals might corrupt the circuit. 7. Do not touch the mobile phone with wet hands because this might cause electric shock. 8. Don’t use or put your mobile phone in a dusty or dirty environment, as this might damage the phone’s precision components. 9. Don’t let your mobile get too hot, as this might shorten the life of electronic devices, damage the battery, twist or melt some plastic parts. 10. Don’t let your mobile get too cold, as water vapour can form inside the phone, damaging the phone when it returns to normal temperature. 11. Don’t put your mobile in or on any heating devices (microwave oven, toaster or radiator) – overheating might result in an explosion. 12. Please send your mobile to the nearest service centre for inspection if there is anything wrong with it, the battery, charger or accessories. The service centre staff will give you all the help you need. Health and Safety information SAR certification information THIS MODEL MEETS INTERNATIONAL GUIDELINES FOR EXPOSURE TO RADIO WAVES. Your mobile phone is a radio transmitter and receiver. It is designed not to exceed the limits for exposure to radio waves recommended by international guidelines. The guidelines were developed by the independent scientific organisation ICNIRP and include margins designed to assure the protection of all persons, regardless of age and health. These guidelines use a unit of measurement known as Specific Absorption Rate, or SAR. The SAR limit for mobile devices is 2.0 W/kg and the highest SAR value for this device when tested at the ear was 0.453 W/kg. As mobile devices offer a range of functions, they can be used in other positions, such as on the body as described in this user guide. As SAR is measured using the device’s highest transmitting power, the actual SAR of this device while operating is typically below that indicated above. This is due to automatic changes to the power level of the device to ensure it only uses the minimum level required to reach the network. The World Health Organisation has stated that present scientific information does not indicate the need for any special precautions for the use of mobile devices. Near Body operation Important safety information regarding radio frequency (RF) radiation exposure. To ensure compliance with RF exposure guidelines the phone must be used with a minimum of 1.5 cm separation from the body. Failure to observe these instructions could result in your RF exposure exceeding the relevant guideline limits. 1 The tests are carried out in accordance with IEC standard PT62209-1. Limiting exposure to radio frequency (RF) fields For individuals concerned about limiting their exposure to RF fields, the World Health Organisation (WHO) provides the following advice: Precautionary measures: Present scientific information does not indicate the need for any special precautions for the use of mobile phones. If individuals are concerned, they might choose to limit their own or their children’s RF exposure by limiting the length of calls, or using ‘hands-free’ devices to keep mobile phones away from the head and body. Further information on this subject can be obtained from the WHO home page. http://www.who.int/peh-emf WHO Fact sheet 193: June 2000. 22 Declaration of RoHS Compliance To minimise the environmental impact and take more responsibility for the earth we live on, this document shall serve as formal declaration that the Vairy Touch II manufactured by ZTE CORPORATION is in compliance with Directive 2002/95/EC of the European Parliament -RoHS (Restriction of Hazardous Substances) with respect to the following substances: (1) Lead (Pb) (2) Mercury (Hg) (3) Cadmium (Cd) (4) Hexavalent Chromium (Cr (VI)) (5) Polybrominated biphenyls (PBB’s) (6) Polybrominated diphenyl ethers (PBDE’s) (Compliance is evidenced by written declaration from our suppliers, assuring that any potential trace contamination levels of the substances listed above are below the maximum level set by EU 2002/95/EC, or are exempt due to their application.) The Vairy Touch II manufactured by ZTE CORPORATION, meets the require-ments of EU 2002/95/EC. Disposal of your old phone 1. When this crossed-out wheeled bin symbol is attached to a product it means the product is covered by the European Directive 2002/96/CE. 2. All electrical and electronic products should be disposed of separately from general household waste via designated collection facilities appointed by the government or the local authorities. 3. The correct disposal of your old phone will help prevent potential negative consequences for the environment and human health. For this product’s Recycling Manual based on WEEE directive, please send an email to [email protected], or visit the website below to download the document: http://ensupport.zte.com.cn. EC DECLARATION OF CONFORMITY It is hereby declared that the following designated product: Product Type: GSM Dual-band GPRS Digital Mobile Phone Model No.: T-Mobile Vairy Touch II/ZTE-G N281 Complies with the essential protection requirements of the Radio and Telecommunication Terminal Equipment Directive (EC Directive 1999/05/EC), Low Voltage Directive (EC Directive 2006/95/EC), Electromagnetic Compatibility Directive (EC Directive 2004/108/EC) and their amendments. This declaration applies to all specimens manufactured identical to the samples submitted for testing/evaluation. Assessment of compliance of the product with the requirements relating to Low Voltage Directive (EC Directive 2006/95/EC), Electromagnetic Compatibility Directive (EC Directive 2004/108/EC), and the Radio and Telecommunication Terminal Equipment Directive (EC Directive 1999/05/EC) was performed by American TCB,Inc. GmbH(Notified Body No. 1588). Based on the following standards: Safety EN60950-1:2006 EMC EN 301 489-1 V1.8.1 EN 301 489-17 V1.3.2 EN 55013:2001+A2:2006 EN 301 489-7 V1.3.1 EN 55020:2007 Radio Spectrum EN 301 511 V9.0.2 EN 300 328 V1.7.1 Health EN 50360:2001 IEC 62209-2:2008 EN 62209-1:2006 Acoustic Safety EN 50332-1:2000 EN 50332-1:2003 This declaration is the responsibility of the manufacturer: ZTE Corporation ZTE Plaza, Keji Road South, Hi-Tech, Industrial Park, Nanshan District, Shenzhen, Guangdong, 518057, P.R.China Authorised person signing for the company: Xu feng Quality Director Of ZTE Corporation Name in block letters & position in the company Shenzhen, 15th Dec. 2009 Place & date Legally valid signature 23 Warranty Article 1 The guarantee for this ZTE device (here on in referred to as Device) covers 24 (twenty four) months from the date the Device was purchased. The manufacturer guarantees that the Device will properly function with proper usage and maintenance according to the instructions of the manufacturer. The guarantee covers all Device faults which came to be because of eventual errors in the material and/or the manufacturing of the Device. The guarantee can be used against presentation of the verified guarantee certificate and purchase invoice. The guarantee does not affect other rights belonging to the buyer on other legal bases. The guarantee is valid in the territory of the UK. Article 2 The guarantee does not cover: faults occurring because of unauthorised modifications to the software, mechanical damages, improper handling, and higher forces (lightning, fire, unsuitable voltage and polarities, traffic accidents, humidity, water and alike), batteries and consumable material including *: a) Damages caused by using the Device outside of the instructions of the manufacturer and other documentation which is enclosed with the Device as well as damages caused by using with other products of another manufacture which the manufacturer did not approve; b) Damages caused by accidents, improper and wrong usage, floods, fire, earthquakes and superficial damages which include but are not limited to scratches, dents, broken plastic and alike; c) Damages caused by servicing (including upgrading and extension) by an unauthorised person as well as a fault of the Device or any part of it if they are altered because of the change of the functionality or other properties without prior written authorisation of the manufacturer; d) Consumable parts other than in the case of damage brought on because of faults in the material or manufacturing; e) Impossibility of partial and/or complete usage of the Device because of unauthorised modification of the software. Article 3 ZTE is obliged during the guarantee, within a reasonable time frame, to remove all reported faults and defects of the Device covered with this guarantee certificate which have come to be with the proper and regular use of the Device, to repair the Device in an authorised service centre or a replacement of the faulty Device with the same but properly working Device if a repair is not possible. Article 4 The guarantee stops being valid if: 1. the information from the invoice and/or the guarantee are erased or altered; 2. the information on the Device (type, and serial number of the manufacturer) are erased or altered; 3. it is established that the Device was opened by an unauthorised person. Note: customers can report faults and establish the guarantee with the salesman or relevant T-Mobile Customer Services representative *Concrete cases of faults or damages which are not covered by the guarantee include: 4. Damages caused by intentional separation, opening or dissembling the enclosure; 5. Damages or faults with the operation caused by the removal and insertion of exterior and interior parts of the Device; 6. Damages caused by holes in the enclosure; 7. Cracked glass or LCD because of outside factors; 8. Damages or faults caused by an outside force; 9. Damages or faults caused by liquids; 10. Damages or faults caused by liquid or dry chemical substances (such as gasoline, acids, corrosive material), dust, dirt and other foreign objects; 11. Damages or faults caused by outside heat or fire (damage by interior heat is covered if it did not occur through an outside reason); Superficial damages occurring through external reasons, including dents, shabbiness, scratches on the enclosure, discoloration, cracks, peeling or metal or plastic parts of the enclosure. ** The customer is advised to regularly make copies of his information and other contents on the Device and to erase the same from the memory of the Device before handing the Device over to any relevant service third party. If the customer does not do this, ZTE is not responsible for the loss of information in the memory of the Device to the customer or a third party. 12. 24 Failure analysis Symptoms Possible Causes Solutions Inadequate battery capacity Charge the battery Poor contact Reinstall the battery Seriously poor battery capacity Recharge the battery Decreasing battery performance Replace the battery Poor network signal Turn off the phone if the signal is poor Poor network signal Move to other areas Out of the service area Make sure your phone is in a network service area Call drop Poor network signal Move to other areas Does not ring upon incoming calls Set “Silent” or minimum volume Enter “User profiles” to set General or check the ringer volume Prompt to input PUK SIM card locked due to entering the wrong PIN code three times Contact your network operator Unable to view some photos Your phone doesn’t support the photo format, or the size of Change the photo format or size the photo is too big Unable to turn the phone on Automatic power-off Inadequate standby time Unable to connect to the network 25 Life’s for Sharing