1
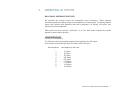
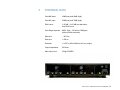
USER MANUAL
GOLDMUND PH3
Phono Preamplifier
Congratulations.
Thank you for purchasing the Goldmund PH3 Phono Preamplifier.
You have acquired the best Phono Preamplifier ever made for professional and domestic uses.
Please take some time to read this manual. It may provide you with useful information to make your
pleasure of listening to the PH3 even higher.
INTRODUCTION
GOLDMUND PH.3 Phono Preamplifier
Goldmund was founded in 1978 and has ever since been dedicated to the accurate reproduction of
sound and image.
At Goldmund, we strive to lead in the creation, development and manufacture of the industry’s most
advanced technologies, including audio and video systems, home-networking and music
distribution.
The guiding principle at Goldmund is to produce a precise sound with the latest possible loss of
quality through the different stages. Goldmund will never adopt a technology before it is sufficiently
developed to satisfy the high quality standards we set. This is why Goldmund has often rejected
mainstream technologies and developed its own.
User manual – Goldmund PH3 Phono Preamplifier
1
W
A
R
N
I
N
G!
No connection or manipulation must be done
before reading these instructions. Damage to
the Phono Preamplifier may result if the
following instructions are not consciously
understood and applied.
This extremely high quality Preamplifier
possesses new technical features which are a
necessity for accurate sound reproduction in
the best audio systems.
Only careful installation and use can provide
the satisfaction you are expecting.
The installation instructions must be carried out
in full and the mentioned precautions taken to
get the expected result and to avoid impairing
performance.
User manual – Goldmund PH3 Phono Preamplifier
2
1
SETTING UP THE PH3
1.1
UNPACKING
You will find in the GOLDMUND PH3 box:
- The Phono Preamplifier.
- The power cord.
- This manual.
ATTENTION
Please keep the packaging in case you need to transport the PH3 at a later date or if you
have to send it for maintenance.
This packaging has been designed specifically to protect the PH3 in transit. Use of
alternative packaging is likely to result in damage, invalidating warranty cover.
1.2
CHOICE OF PHONO PREAMPLIFIER LOCATION AND COOLING
The Goldmund PH3 phono preamplifier does not generate a significant amount of heat. The
performance of the phono preamplifier is however directly related to its thermal stability. The
PH3 must therefore be located to allow adequate cooling of the heatsink without overventilation.
Avoid stacking the PH3 with equipment generating heat.
Avoid locating the PH3 in direct proximity to any power amplifier, as the field generated by
some units can be detrimental to performance of phono preamplifiers.
User manual – Goldmund PH3 Phono Preamplifier
3
1
SETTING UP THE PH3
1.3
LINE VOLTAGE ADJUSTMENT
The factory setting for the line voltage is indicated on the serial number plate. Please verify
that this is appropriate for your AC line voltage before connecting mains power. The
selection can be changed using the line-voltage selector on the rear panel.
ATTENTION
At the 220V position, the GOLDMUND PH3 Phono Preamplifier will function properly for
main line voltages in between 200V and 250V.
At the 110V position, the main line must deliver between 95V and 125V.
If your AC line is usually outside of these tolerances, please consult your GOLDMUND
dealer.
Please check the value of the AC line fuse. This fuse is located in the power cord
receptacle. The lid can be removed with a small flat-head screwdriver when the powercord
is removed.
Use a 0.5A delayed fuse for 220V and 1A delayed fuse for 110V.
User manual – Goldmund PH3 Phono Preamplifier
4
1
SETTING UP THE PH3
1.4
CONNECTIONS
Connect the power cord to the back of the PH3 and plug it into the nearest wall socket. Use
a 3 lug grounded plug for safety.
To get the best sound from the PH3, avoid any multiple plugs or extension cords.
Connect the input interconnects between the phono preamplifier and the turntable.
If you are using a moving-coil cartridge select the inputs marked MC-L and MC-R. To
connect a moving-magnet cartridge use the inputs marked MM-L and MM-R.
Note: Both inputs can be connected simultaneously if no hum is generated. In that case, the
front panel selecting the inputs acts a source selector between the two cartridges or tonearms.
Plug the output interconnects from the RCA female sockets (labeled “output”) to the
preamplifier.
User manual – Goldmund PH3 Phono Preamplifier
5
2
OPERATING UP THE PH3
2.1
REAR PANEL CONTROLS
POWER ON
When first powered on, the preamp will become operative only after approximately two
minutes of warm up. This ensures proper stabilization of the circuitry and avoids any
unwanted noise. After this delay, the output of the preamplifier is connected to the output
connectors.
Note: The GOLDMUND PH3 phono preamplifier should remain connected at all times.
If the power cord is accidentally disconnected, a special safety circuit switches the preamp
to muting, to avoid any disturbance to reach the power amplifier and the speakers, even in
case of a power failure in the building.
It is normal for a slight sound to be heard from the speakers when the Phono Preamplifier is
turned ON or OFF. The PH3 is self-protected and the sound heard is corresponding to the
charging and discharging of the capacitors.
INPUT MM/MC SELECTOR
This front panel switch controls which input is used: the Moving Magnet or the Moving Coil
input.
GAIN
Level adjustment acting simultaneously on both channels for both the moving coil and the
moving magnet sources.
User manual – Goldmund PH3 Phono Preamplifier
6
2
OPERATING UP THE PH3
BACK PANEL IMPEDANCE SWITCHES
Six switches are located around the preamplifier input connectors. These switches
individually adjust the loading of each input separately for each channel. For Moving Magnet
inputs, both resistive and capacitive load can be adjusted. For Moving Coil inputs, only
resistive load can be adjusted.
Each switch has nine positions, numbered 1 to 9. The table below indicates the values
applied for each selector position:
* Selector MC R-Load
(Moving Coil Resistance)
The following values are parallel resistance load applied to the MC inputs.
One selector controls the right input, the other one the left input.
Switch position
1
2
3
4
5
6
7
8
9
Load applied on the input
-
10 Ohms
20 Ohms
50 Ohms
100 Ohms
470 Ohms
1.5 kOhms
4.7 kOhms
15 kOhms
47 kOhms
User manual – Goldmund PH3 Phono Preamplifier
7
2
OPERATING UP THE PH3
* Selector MM R-Load
(Moving Magnet Resistance)
The following values are parallel resistance load applied to the MM inputs. One selector
controls the right input, the other the left one.
Switch position
1
2
3
4
5
6
7
8
9
Load applied on the input
50 Ohms
- 220 Ohms
1 kOhms
5 kOhms
- 10 kOhms
- 20 kOhms
- 33 kOhms
- 47 kOhms
- 100 kOhms
* Selector MM C-Load
(Moving Magnet Capacitance)
The following values are parallel capacitors load applied to the MM inputs. One selector
controls the right input, the other the left one.
Switch position
1
2
3
4
5
6
7
8
9
Load applied on the input
20 pF
50 pF
100 pF
220 pF
470 pF
1 nF
2.2 nF
4.7 nF
Off
User manual – Goldmund PH3 Phono Preamplifier
8
2
OPERATING UP THE PH3
2.2
FRONT PANEL CONTROLS
On the front panel of the GOLDMUND PH3 Phono Preamplifier you will find only one switch
and two Leds.
To start playing the Phono Preamplifier, turn the power switch ON. The Phono Preamplifier
is operative immediately and the green Led indicates it is operating normally.
The yellow Led indicates that the digital signal is locked on a source when the digital input is
in use.
2.3
SOUND QUALITY OPTIMIZATION
If the PH3 has been left unpowered for some time, the optimum sound quality may only be
reached after many hours. The critical circuits must warm to around +50 degrees C (+120
degrees Fahrenheit) for optimum performance.
2.4
MAINTENANCE
The GOLDMUND PH3 Phono Preamplifier usually requires no maintenance.
Always turn the power off before cleaning your Phono Preamplifier. Use only a clean, soft,
damp cloth. Dampen with water or a mild detergent solution. Avoid abrasive or harsh
cleansers (eg. products containing sodium carbonate).
User manual – Goldmund PH3 Phono Preamplifier
9
3
TECHNICAL DATA
Gain MM input:
43dB (low) and 50dB (high).
Gain MC input:
63dB (low) and 70dB (high).
RIAA curve:
-0.03 dB / +0.06 dB max derivation
from RIAA curve.
Gain Stage response: - 3dB 0.12Hz - 760 kHz at 70dB gain
(without RIAA correction).
Slew rate:
> 80 V/us.
Rise time:
< 400 ns.
Distortion:
< 0.007% (20Hz-20kHz at 4V rms output).
Output Impedance:
50 Ohms.
Max output level:
32Vpp POWER.
User manual – Goldmund PH3 Phono Preamplifier
10


![[输入书名]](http://vs1.manualzilla.com/store/data/005783394_1-fc20c72617a19a0d7587a472ef1576a7-150x150.png)