1
1
Yeti Cross
user manual
v1.0 10/2014
2
Optimized for
stable decent
3
Contents
Thank you ...................................................................5
Warning .....................................................................6
About Gin Gliders ........................................................7
Introducing the Yeti Cross ..........................................8
Technical specification ...............................................9
Before you fly ............................................................10
Installing in the harness ...........................................18
Deployment procedure .............................................22
Care and maintenance ...............................................23
Final words ..............................................................25
4
Thank you...
...for choosing Gin Gliders. We are confident you’ll enjoy many rewarding experiences in the air
with your GIN rescue.
This manual contains important safety, performance and maintenance information. Read it
before your first flight, keep it for reference, and please pass it on to the new owner if you ever
re-sell your rescue.
Any updates to this manual, or relevant safety information, will be published on our website:
www.gingliders.com. you can also register for e-mail updates via our website.
Happy flying and safe landings,
GIN team
5
Warning
Like any extreme sport, paragliding involves unpredictable risks which may lead to injury or
death. By choosing to fly, you assume the sole responsibility for those risks. You can minimize the
risks by having the appropriate attitude, training and experience and by properly understanding,
using and maintaining your equipment. Always seek to expand your knowledge and to develop selfreliance. If there is anything you do not understand, consult with your local dealer as a first point of
contact, with the GIN importer in your country or with Gin Gliders directly.
Because it is impossible to anticipate every situation or condition that can occur while
paragliding, this manual makes no representation about the safe use of the paragliding equipment
under all conditions. Neither Gin Gliders nor the seller of GIN equipment can guarantee, or be held
responsible for, the safety of yourself or anyone else.
Many countries have specific regulations or laws regarding paragliding activity. It’s your
responsibility to know and observe the regulations of the region where you fly.
6
About Gin Gliders
Dream
In forming Gin Gliders, designer and competition pilot Gin Seok Song had one simple dream:
to make the best possible paragliding equipment that pilots all over the world would love to fly—
whatever their ambitions.
At Gin Gliders, we bring together consultant aerodynamists, world cup pilots, engineers and
paragliding school instructors, all dedicated to fulfilling this dream.
Touch
We’re a “hands-on” company that puts continuous innovation and development at the center of
everything we do.
At our purpose-built R&D workshop at head office in Korea, we are able to design, manufacture,
test-fly and modify prototypes all in a matter of hours. Our international R&D team is on hand both
in Korea and at locations worldwide. This guarantees that your equipment has been thoroughly
tested to cope with the toughest flying conditions.
Our own production facilities in East Asia ensure the quality of the finished product and also the
well-being of our production staff.
Believe
We believe that the product should speak for itself. Only by flying can the pilots understand
their equipment and develop trust and confidence in it. From this feeling comes safety, comfort,
performance and fun. The grin when you land should say it all!
7
Introducing the Yeti Cross
The new design of the Yeti Cross allows for the most stable decent after parachute deployment.
The square shape parachute has been developed and used for military uses for years. The Yeti
Cross has improved on those designs and modified the parachute features to meet the needs of
paragliders in todays market.
No pendulum motion
Because of the square shape and placement of the air dispersement vents, the Yeti Cross very
quickly dissipates the pendulum motion typically seen with ordinary circular chutes. Shortly after
the initial deployment of the reserve the pilot will reach a steady, pendulum free decent.
Slower decent
The unique design of the canopy maximizes the fabric area and efficiency. The larger
surface area and better air channeling decreases the decent rate to well below the certification
requirements of 5.5m/s. Improvements to the canopy profile and rescue packing procedure have
also decreased the canopy opening time.
Pilot safety
With a faster opening time, slower decent rate and decreased pendulum motion, pilots who are
faced with an emergency deployment will have a larger margin of safety. We believe that confidence
in your equipment leads to happier and safer pilots.
8
Technical specification
The Yeti Cross has EN certification
EP 107.2013
Size
#26
#31
#38
Area (M²)
26.07
31.62
38.08
Line length (M)
5.62
5.79
6.35
Center line (M)
5.34
5.88
6.45
Weight (kg)
1.3
1.5
1.7
Sink Rate (M/sec.)
5.03
4.87
4.8
86
104
126
Max load (kg)
9
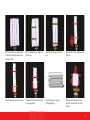
Before you fly
NOTE: Carabiners are useful, but not
necessary, to attach the APEX and lines to
an attachment point.
Gin Gliders GIN rescue parachutes are inspected and packed at the factory. It is recommend
that the reserve is repacked by a suitably qualified and experienced paragliding professional or
parachute rigger prior to installation into your harness. The efficacy of the rescue, and your life,
depend on the correct packing procedure. If in any doubt whatsoever, please seek professional
advice from your instructor, GIN dealer or importer.
Airing
Before packing, the canopy should be aired. Ideally, the canopy should be hung by its apex from
the ceiling for between 6 and 24 hours in a cool, dry room.
Preparation
The packing area must be spacious, clean, smooth and dry.
Preliminary Materials
Before starting the packing procedure, make sure you have the following materials:
2 solid weights or sandbags, which should be smooth and clean (2-2.5kg)
Elastic bands
Layout
Check the serial number that is written on the top center panel and on the re-packing card
first (re-packing card is attached at the end of this manual). Fix the risers to a solid point using
carabiners.
10
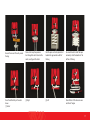
Packing instructions
NOTE: Be sure all lines are free of damage
and tangles.
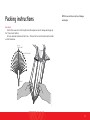
Line check
Stretch the rescue out to its full length. Check the suspension lines for damage and tangles by
the “4 lines check” method.
All lines should be located inside the 4 lines – first and last lines at both sides from the bridles
as illustrated below.
hwlGVG
jlu{lyGspul
Y
X
X_
X^
X]
[
z|zwluzpvuGspul
X\
\
X[
XZ
]
^
_
XX
`
XW
iypksl
11
IMPORTANT: The line placement is very
important and must be done according to
the manual.
Folding the panels
Gather up the lines and begin to arrange the parachute on the folding surface.
Put the suspension lines on the line separator such that half of them are on the left, and half are
on the right. Put a weight on the skirt to fix the canopy. (1)
And follow the outer suspension line to find the center panels to start folding with. (2)
1
2
12
Dividing the panels
First fold all the panels one by one to the right side of the suspension lines, to prepare for
the careful folding. While doing this, check for any signs of damage or deterioration of the canopy
fabric.
IMPORTANT: Take care to make all folds
clean and even.
13
By folding each panel to the left side of the suspension lines again one by one, check carefully
that each panel is laid evenly and without creases. Check the center seams and inside the panels,
too.
IMPORTANT: Make sure that all the skirts
are even and all the loops lie in the same
direction.
14
After you finish the left half, do the same for the right half of the canopy. Move the rest of the right
half to the left, and fold each panel one by one to the right side of the suspension lines. Check the
same carefully that each panel is laid evenly and without creases. Check the center seams and inside
the panels, too.
IMPORTANT: After folding all the panels,
check again that the center seams and the
inside of the panels are even and lie in the
same direction.
NOTE: Use the numbers printed on the
panels as a guide. Arrange the panels and
lines so that #11 is on bottom and #1 is
on top.
15
With your panels now evenly folded
continue by folding the outer edges
into the mid-line
Start by folding the right edge in to
the mid-line
Then fold the left edge to the midline
Now fold the rescue in half along the
mid-line
Place the rescue bag under the chute
Carefully fold the rescue onto itself
in a zig-zag pattern
Fold the rescue in a zig-zag
(S-shaped) pattern
Make sure all folds are even and
symmetrical and match the size of
the bag
16
Be sure the rescue fits neatly inside
the bag
Place a 3cm loop of suspension
line through the elastic band in the
center, neatly pack the slider
Fold the para-cord into symmetrical
bundles the approximate width of
the bag
Use elastic bands to hold the loops
and neatly stack the bundles at the
bottom of the bag
Close the bottom flap in the order
shown
(1) Center
(2) Right
(3) Left
Check that all of the lines are even
and free of tangles
17
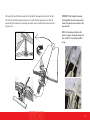
Installing in the harness
The Yeti Cross is compatible with GIN harnesses. It may also be compatible with most other manufacturer’s harnesses, but there is no guarantee of this and you should check with your instructor
or dealer.
Outer container attachment
The Yeti Cross can be attached to harnesses which do not have a built-in rescue container, like
the speed glider harnesses. Use of a rescue on these harnesses requires an outer container bag.
You must follow the harness and outer container bag instructions for proper attachment. If in
doubt, consult with a professional.
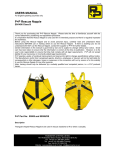
Attaching the rescue bridle to the harness webbing
The Yeti Cross can be used with the new Soft Shackle rescue bridle attachment. This helps to reduce the weight of the harness while maintaining the strength and reliability of the rescue attachment. You may choose to use a Maillon Rapid type 7mm Stainless Steel carre (square). But in any
case, the connector should be rated at least 9 times the maximum weight. Our recommended 7mm
connector for example has a minimum breaking load of 3125kg and an EN certificate of conformity.
Be sure to inspect the your connector during normal maintenance and safety checks. Replace
after any signs of wear and check with a professional after any use. We recommend that you cover
the connection using the Maillon rapid cover to prevent excess friction, tape and/or rubber-bands
should also be used to secure the attachment and prevent excess friction.
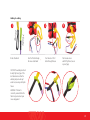
18
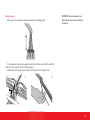
Soft shackle connection
2
Bridle attachment
Attach the soft shackle and
tape the ends
Maillon connection
2
WARNING: Soft shackles must
be installed correctly or they
may fail. Follow the soft
shackle user manual.
Cover with the Maillon rapid
cover to prevent friction
3
4
Y bridle
R es c u e
1
Bridle attachment
3
Y bridle
R es c u e
1
Attach the Y bridle to the maillon
and secure it with a rubber band
Attach the rescue to the maillon
and secure with a rubber band
Check your connection and close
the maillon firmly
19
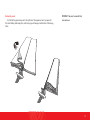
Webbing to webbing
2
3
4
Y bridle
Rescu e
1
Bridle attachment
Pass the Y bridle through
the rescue attachment
Pass the ends of the Y
bridle through the base
Pull to make a clean
and VERY tight knot, secure
in place (tape)
CAUTION: The webbing knot must
be kept tight using tape. If the
knot becomes loose then the
webbing may burn when put
under load, causing catastrophic
failure.
WARNING: If the knot is
incorrectly connected then the
fabric may burn and cut upon
rescue deployment.
20
Attaching the deployment handle
Most harnesses come with their own deployment handle. This handle and its strap must be
connected to the inner deployment bag of the parachute. If your harness does not have the proper
handle, please contact your harness dealer.
The GIN rescue has a choice of 2 loops by which to attach the harness deployment handle. The
choice of one or the other depends on the position of the rescue container in your harness. Front or
back mounted rescue systems or when you use the outer container rescue are generally attached
by the center loop, whereas side mounted systems are attached by the loop at the top. Under seat
mounted systems are attached by the loop at the side. THE CORRECT ATTACHMENT POINT DEPENDS ON
THE HARNESS!! If in doubt, consult with a professional.
Preflight checks
For maximum safety, use a complete and consistent system of preflight checks of your equipment and repeat the same mental sequence at every flight.
Specifically for the rescue, check that:
- There is no visible damage that could affect its airworthiness.
- The rescue parachute container is closed correctly with the pin(s) in place.
- The deployment handle is secured correctly and all parts are in good condition. If any part
of the harness/reserve/handle system include Velcro, then this must be separated and re-attached
regularly to prevent Velcro ‘bedding in’ over time which can make rescue deployment much more
difficult.
21
Deployment procedure
IMPORTANT: Always maintain an upright
position before landing and perform a PLF
landing to help minimize injury.
Rescue deployment
It is vital to periodically feel the position of the rescue handle in normal flight, so that the
action of reaching for the rescue is instinctive in an emergency.
In the event of an emergency, the pilot must quickly evaluate his or her height and the seriousness of the incident. On that basis, an instantaneous decision to deploy the rescue or not must be
taken. Deploying the rescue when the glider is recoverable may increase the danger of injury. If you
have sufficient height and the glider is in a flat spin, it is preferable to first try to stop the spin (e.g.
full stall), due to the risk of entanglement. On the other hand, a second’s hesitation in deploying the
reserve could prove costly if there is insufficient height.
Procedure
If the rescue is to be deployed, the procedure is as follows:
- Look for the rescue handle and grasp it firmly with one hand
- Pull firmly upwards/side wards on the handle. This action undoes the Velcro or handles closure
and allows the release pins to be pulled out of the release loops, so that the inner container can be
released from the harness’ rescue compartment.
- Look for a clear area, and in a continuous motion, throw (and RELEASE!) the rescue as quickly
and forcefully as possible away from yourself and the glider. Throwing the rescue in the direction
of the air stream will speed opening, and throwing it against the direction of spin will help prevent
tangling with the glider.
- After deployment, avoid entanglement and pendulum motions by pulling in the glider as
symmetrically as possible with the B, C, D or brake lines
- On landing, be sure to do a PLF (Parachute Landing Fall) to minimize the risk of injury
- Once on the ground, deflate the canopy by pulling one of the rescue lines to avoid the possibility of being dragged.
22
Care and maintenance
The Gin rescue parachute should be repacked at least every 6 months, as detailed in the packing
instructions. We always recommend that this rescue parachute is inspected and repacked by a
trained professional repacker. Additional inspections should be performed if there is any suspicion
of damage or undue wear.
After a deployment, the rescue should be checked by the distributor or manufacturer. Always
seek professional advice whenever in doubt.
The materials used in the GIN rescue have been carefully selected for maximum durability. Nevertheless, maintaining your rescue following the guidelines below will extend its lifetime.
It is recommended that a rescue is replaced after 10 years, even if it has never been used.
Care and maintenance
Unnecessary exposure to UV rays, heat and humidity should always be avoided. Keep your
harness and rescue in your rucksack when not in use.
Store all your paragliding equipment in a cool, dry place, and away from solvents such as
grease, acid, oil and paint.
Never put your rescue away while damp or wet.
If your rescue parachute does ever get wet (i.e. water landings or snow) you must remove it
from the harness, dry it naturally in the air, and repack it before putting it back into the container.
A dirty rescue canopy or container can be cleaned with lukewarm water. Mild, neutral soap may
be used if necessary, but do not rub the fabric. Rinse the canopy thoroughly and allow it to dry
naturally. If the canopy shows signs of mildew or mold, it must be sent to the distributor or manufacturer for repairs, as the strength could be compromised.
If the rescue is to be stored for an extended period, the canopy should be opened and loosely
rolled.
IMPORTANT: Any repairs should only be
carried out by the manufacturer or by an
approved agent. This will ensure that the
correct materials and repair techniques
are used.
23
GIN quality and service
We take pride in the quality of our products and are committed to putting right any problems affecting the safety or function of your equipment and which are attributable to manufacturing faults.
Your GIN dealer is your first point of contact if you have any problems with your equipment. If you
are unable to contact your dealer or GIN importer, contact Gin Gliders directly via our website.
Care of the environment
We are privileged to fly in areas of outstanding natural beauty. Respect and preserve nature by
minimizing your impact on the environment. When visiting an area, contact the local club for details
of environmentally sensitive areas and local restrictions.
When your paraglider eventually reaches the end of its useful life, dispose of it with consideration and follow any local regulations.
24
Final words...
Most of us today live in a dependent society where we are regulated and protected. There are
few opportunities for individuals to develop the self-responsibility that is the foundation of safety
in extreme sports such as paragliding.
Most accidents are caused by getting into situations that are too demanding for your level of
experience. This happens if you lack fundamental understanding, are incapable of assessing the risk
or simply do not pay sufficient attention to your surroundings or your own state of mind.
To stay safe, the best you can do is to increase your understanding, skill and experience at a
rate you can manage safely. There is no substitute for self-responsibility and good judgement.
In the end, paragliding offers a unique opportunity to learn to take control of your own destiny.
Memento mori, carpe diem!
Fly safely, and...E N J O Y!
GIN team
25
www.gingliders.com
Dream. Touch. Believe
26