1
Version 12 – Look & Feel
CONTENTS
Version 12
Look & Feel
Date Created: 02 November 2004
Last Revised: 6 March 2003
1. OBJECTIVES OF THIS TRAINING SESSION ...............................................................2
2. OVERVIEW OF VERSION 12 .........................................................................................2
3. HOW TO LOG IN AND OUT ITS VERSION 12.............................................................2
3.1.
HOW TO LOG INTO THE SYSTEM......................................................................2
3.2.
HOW TO LOG OUT OF THE SYSTEM .................................................................3
4. MENU NAVIGATION......................................................................................................3
4.1.
MENU STRUCTURE...............................................................................................3
4.2.
COMMAND INPUT BOX .......................................................................................4
5. NAVIGATION OPTIONS.................................................................................................4
5.1.
MENU BAR .............................................................................................................4
5.2.
TOOLBAR................................................................................................................4
5.3
KEYBOARD ............................................................................................................5
6. USER BUTTONS..............................................................................................................6
6.1.
CREATING YOUR OWN USER BUTTONS .........................................................6
6.2.
EDIT THE DESCRIPTION OF THE USER BUTTONS.........................................6
6.3.
DELETE OR REMOVE A USER BUTTON ...........................................................6
6.4.
CHANGE THE ORDER OF THE BUTTONS.........................................................7
7. OPTION NAVIGATION...................................................................................................7
7.1.
TABS ........................................................................................................................7
7.2.
BLOCKS...................................................................................................................8
8. TYPES OF BUTTONS......................................................................................................8
8.1.
RADIO BUTTONS...................................................................................................8
8.2.
DROP DOWN LIST .................................................................................................8
8.3.
LIST OF VALUES ...................................................................................................8
8.4.
DRILLDOWN FACILITY .......................................................................................9
9. ONLINE HELP..................................................................................................................9
10. REPORTS..........................................................................................................................9
10.1. RDF REPORTS ........................................................................................................9
10.2. C/SQL REPORTS.....................................................................................................9
11. RESET YOUR LOGIN SESSION...................................................................................10
11.1. SYSTEM ADMINISTRATOR ...............................................................................10
11.2. RESET YOUR LOGIN SESSION..........................................................................10
12. UPDATE USER ACCESS...............................................................................................11
Page 1 of 11
Version 12 – Look & Feel
1.
OBJECTIVES OF THIS TRAINING SESSION
After this session, you will be able to:
•
•
•
•
•
2.
log on and off from the ITS system
navigation to menu’s / options
navigation by using the mouse and / or the keyboard in an Oracle form
build / remove / re-arrange personalised user buttons
print reports
3.
HOW TO LOG IN AND OUT ITS VERSION 12
3.1.
HOW TO LOG INTO THE SYSTEM
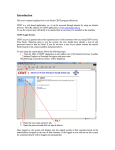
STEP 1
Load Internet Explorer or Netscape Navigator by double clicking on the applicable icon.
Enter the web address for the ITS version 12 system. The following screen will display:
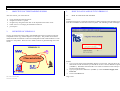
OVERVIEW OF VERSION 12
Version 12 of the ITS system is fully web-enabled and can be accessed via an Oracle
compatible browser (e.g. Internet Explorer or Netscape). The product moved from a
character-based environment to a browser-based platform with a full WindowsTM “look
and feel” to the product. Direct access to fields on blocks is gained through use of the
mouse.
VERSION 12
WWW
Characteristics
Crtl+V
IE or Netscape
Date Created: 02 November 2004
Last Revised: 6 March 2003
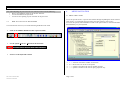
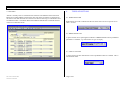
STEP 2
• Type your user name in the field Please Supply Your User ID. This user ID is the
same as the second user ID that you entered on version 11 and as defined on option
{USERS-5}. Remember that this field is case sensitive and the user ID is likely to
be all in lowercase letters.
• Type your password as defined on {USERS-5} in the field Please Supply Your
Password.
• Click on the OK button.
Page 2 of 11
Version 12 – Look & Feel
Note: When defining the password, the user will not be able to do the following:
o Have a non-alphabetic character as the first character
o Use the username as the password
o Use the reverse spelling of your username as the password
3.2.
HOW TO LOG OUT OF THE SYSTEM
To exit from ITS version 12, one of the following methods can be used:
Click on the GREEN DOOR icon that represents EXIT
Use the option ACTION – EXIT from the menu bar
Press F4 on the keyboard to EXIT
4.
4.1. MENU STRUCTURE
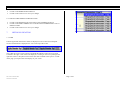
Access to specific menu’s or options can be done through expanding the menu structure.
Click on the + to expand the structure and to close the structure, click on the -.
To access the option, either DOUBLE CLICK on the option name or click ONCE and hit
the ENTER key on your keyboard.
Date Created: 02 November 2004
Last Revised: 6 March 2003
MENU NAVIGATION
+
#
>
<
=
=
=
=
selection will lead to another set of menus
the user have no access to the option
options accessible to the user for update purposes
options accessible to the user for query purposes only
Page 3 of 11
Version 12 – Look & Feel
4.2. COMMAND INPUT BOX
5.
Type the name of the menu (prefixed with a /) in the COMMAND INPUT box and press
the ENTER key on your keyboard.
NAVIGATION OPTIONS
Navigation can be done through the use the mouse or keyboard shortcut keys. The
mouse can be used on the following navigation options:
5.1. MENU BAR
The menu bar at the top of the screen works in the same way as any menu in a Windows
application. You may point to the word and click your MOUSE BUTTON to access the
menu, or press the ALT KEY and tap the underlined key.
5.2. TOOLBAR
The toolbar gives you shortcut icons for commands. Notice that some of the icons are
“greyed out”, this means that the command is not active in the particular screen.
For example, you cannot cancel a query that does not exist, so the CANCEL QUERY
icon is greyed out until a query is entered.
If you are not sure what the icon represents you can point to the icon and a tool tip will
display the name of the icon.
The more commonly used icons are briefly described below:
Save: will commit or save your changes.
Date Created: 02 November 2004
Last Revised: 6 March 2003
Page 4 of 11
Version 12 – Look & Feel
Print: will print the SCREEN. Note that this icon is NOT used for reports.
5.3 KEYBOARD
Exit: You use this icon to exit one menu at a time and to logout out of the
system.
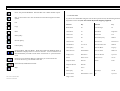
If you are not comfortable using the icons at the top of the screen, the following shortcut
keystrokes can be used (See PowerPoint Keyboard Mapping Supplied):
Cut:
Copy
Paste
Enter Query:
Execute Query:
Cancel Query
Previous Block, and Next Block: When ITS reads from different tables in
the database it displays these on screen in “blocks”. To move between one
table and another you need to click on the “next block” or “previous block”
icons.
Previous record, and Next Record: Will allow you to move from one
record to the next e.g. one student to the next
Insert Record, and Remove Record:
Help:
Date Created: 02 November 2004
Last Revised: 6 March 2003
Function
Key
Function
Key
Block Menu
F9
List Tab Pages
F2
Clear Block
F7
Next Block
Page Dwn
Clear Field
F5
Next Field
Tab
Clear Form
F8
Next Primary Key
Shift F7
Clear Record
F6
Next Record
Down arrow
Commit/Save
F3 / Ctrl S
Next Set of Records
Shift F8
Count Query
F10
Previous Block
Page Up
Delete Record
Delete Button
Previous Field
Shift Tab
Display Error
Shift Ctrl E
Previous Record
Up arrow
Down
Down Arrow
Print (screen)
Ctrl+P
Duplicate Field
Shift F5
Return
Enter
Duplicate Record
Shift F6
Edit
Ctrl E
Enter Query
F11
Show Keys
Ctrl K
List of Values
Home Button / Ctrl L
Up
Up arrow
Page 5 of 11
Version 12 – Look & Feel
Execute Query
F12
Update record
F3
Insert Record
Insert Button
Exit
Minus on key
pad / F4
6.2. EDIT THE DESCRIPTION OF THE USER BUTTONS
6.
USER BUTTONS
If you use a specific menu option regularly you may prefer to have your own button as a
shortcut. You will be restricted to a maximum of six buttons.
a button will be created in the USER BUTTON block, which will remain there for
you to use in subsequent logins
CLICK on the RED BUTTON at the bottom of the USER BUTTONS block and
the CUSTOM BUTTONS tag is displayed
CLICK in the BUTTON LABEL box and type in the description to display on the
user button. Up to 11 characters are allowed
To change the tool tip (i.e. the text that appears on screen to describe what is in a
button), change the text in the TOOLTIP box
CLICK on the SAVE icon to store your changes
6.1. CREATING YOUR OWN USER BUTTONS
6.3. DELETE OR REMOVE A USER BUTTON
CLICK on the menu option required
then CLICK on the GREEN BUTTON next to the help option
Date Created: 02 November 2004
Last Revised: 6 March 2003
CLICK on the RED BUTTON at the bottom of the USER BUTTON box
select the record of the button to be removed
Page 6 of 11
Version 12 – Look & Feel
CLICK on the REMOVE RECORD icon
CLICK on the SAVE icon to store your changes
6.4. CHANGE THE ORDER OF THE BUTTONS
7.
CLICK on the RED BUTTON at the bottom of the USER BUTTON box
CLICK on the DOWN ARROW next to the BUTTON NUMBER field to select a
different number
CLICK on the SAVE icon to store your changes
OPTION NAVIGATION
7.1. TABS
If all the applicable information cannot be displayed on one screen each subsequent
section of information is displayed as a “tab” at the top of the screen.
Notice that the arrows on the extreme right hand side indicate if there are more pages
available to the right or left of the ones displayed. Clicking on the arrow pointing to the
right will result in a drop down menu of the other tabs available in this option. CLICK
on the page you require and it will display on your screen.
Date Created: 02 November 2004
Last Revised: 6 March 2003
Page 7 of 11
Version 12 – Look & Feel
7.2. BLOCKS
“Blocks” normally refers to information that is drawn from different tables within ITS.
Blocks are normally hidden one below the other but where two blocks are displayed on
the same screen then the blocks are enclosed in a thin line showing it is information from
two different tables. The NEXT BLOCK and PREVIOUS BLOCK commands must be
used to move between blocks.
8.
TYPES OF BUTTONS
8.1. RADIO BUTTONS
Radio buttons are used to indicate that the user must select one of two options on an
either / or basis.
8.2. DROP DOWN LIST
A square with an arrow pointing down indicates a DROP DOWN LIST of predefined
parameters is available, e.g. marital status or type of enquiry.
8.3. LIST OF VALUES
A square with no picture indicates that a list of predefined values is available. This is
user-defined values.
Date Created: 02 November 2004
Last Revised: 6 March 2003
Page 8 of 11
Version 12 – Look & Feel
8.4. DRILLDOWN FACILITY
10.1.
A small red square that appears next to a “code field”. Available on some of the finance
options, especially procurement management system. When you click on this button, the
user will access the option where these codes are defined or in the case of more detail of
the invoice/order will see the detail. Just remember that the normal rules apply regarding
user access. If the user does not have access to the specific option, the drill down button
will not allow access.
Most of the RDF reports can be generated in different formats:
• PDF (Portable Document Format) is default format
o PDF’s requires Acrobat Reader (Resides on client PC, opens
automatically, no license fees)
o PDF is an image, cannot be changed, sections cannot be copied or cut
from report. Full PDF can be copied
• Other Formats – Comma Delimited, HTML, HTML style Sheet, RTF and XML
• Comma delimited reports can be converted to Excel, Word, etc.
10.2.
9.
C/SQL REPORTS
ONLINE HELP
To access the section of the user manual, available for the specific option, the user will
highlight the option on the menu and click on the help button below your user ID. This
can be printed to your local printer or just used as a reference. After completion, the
window can be closed to continue on the ITS system.
10.
RDF REPORTS
•
•
•
Acrobat Reader not used to view reports
Content can be copied, cut, etc. directly from the report
All other general report features are applicable
REPORTS
There are two types of reports that can be run:
• RDF reports (version 11 – the RPT reports)
• C/SQL reports
Reports can be re-generated using different selection criteria without having to
revert back to the report menu.
Each generated report has unique “Sequence/Request” number - input criteria
retained per “sequence/request” number.
List function available on selection criteria.
Date Created: 02 November 2004
Last Revised: 6 March 2003
Page 9 of 11
Version 12 – Look & Feel
11.
11.1.
RESET YOUR LOGIN SESSION
11.2.
RESET YOUR LOGIN SESSION
SYSTEM ADMINISTRATOR
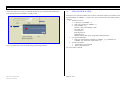
If a power failure for example occurs and a users session is terminated, the user himself
can use this option to log on again. Click on the “Reset Your Login Session”.
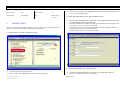
If a power failure for example occurs and a users session is terminated, the system
manager can log in on V12 and query the user on option USERS-24. If a user record is
found, it means that the user is still ‘logged in’. If the record is deleted on the app the
user is then terminated. Do not terminate yourself whilst logged in
The following pop-up screen will appear. Type in your ID and password.
Date Created: 02 November 2004
Last Revised: 6 March 2003
Page 10 of 11
Version 12 – Look & Feel
This action will see to it that you will find another pop-up screen that will confirm that
your session has been terminated. CLICK on OK.
Now you will be able to log on again using your ID and password.
Date Created: 02 November 2004
Last Revised: 6 March 2003
12.
UPDATE USER ACCESS
This option was created to link the users to tables. This must be done over and above the
function linkage of {USERS – 3} when a new user is created or the users password has
changed.
Activate new users
1. Create user on {USERS – 5}
2. Link user to functions {USERS – 3}
3. Run {USERS – 25}
Systems ‘ Password: Manager (ITS)
For single user
Grants Only N
Keep SQL File Y
Run SQL File Y
Default / Temp Table space as agreed by DBA personnel
User password changes
1. If the user password was changed on {USERS – 5}, you MUST run
{USERS –25} for the user, with Grants = Y.
Activate new tables
1. Choose Roles: Access Roles
2. Enter system password
No “users” data is entered.
Page 11 of 11