1
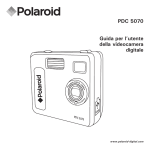
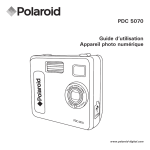
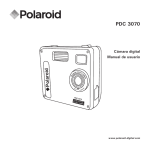
PDC 3030
2.
8
m
F
m
Digital Camera
User Guide
f=8
.4
www.polaroid-digital.com
Product Overview
1.
2.
3.
4.
5.
Flash
Lens
Self-timer LED
USB port
Viewfinder
1
5
1.
2.
3.
4.
5.
6.
7.
8.
9.
Status LED
Viewfinder
LCD screen
Menu/OK button
Up / Zoom out button
Down / Zoom in button
SMC slot
Power button
Capture/Playback selector
1
2.
8
f=8
.4
4
9
2
8
3
7
4
5
2
F
m
3
m
2
6
Polaroid PDC 3030 Digital Camera User Guide
www.polaroid-digital.com
1. Flash/Previous button
2. Quality/Next button
3. Shutter button
1
3
2
1. Battery compartment
2. Hand strap holder
3. Tripod mount
1
3
2
1. SMC slot
2. Microphone
2
1
Polaroid PDC 3030 Digital Camera User Guide
www.polaroid-digital.com
3
Table of Contents
1 Getting Started ........................................................................... 6
• What can I do with my Camera?............................................... 6
• What can I do with my Digital Pictures? .................................... 6
• What can I do with my Audio Clips and Video Clips?................... 7
• Camera Package Contents ....................................................... 7
• Attaching the Hand Strap ........................................................ 8
• Installing the Batteries ............................................................. 8
• Turning the Camera On and Off ................................................ 9
• Checking the Battery Level ...................................................... 9
• Automatic Power Off Saves Battery ........................................ 10
2 Camera Setting ......................................................................... 11
• Checking Camera Status........................................................ 11
• Setting the Display Language ................................................. 12
• Setting Date and Time........................................................... 13
3 Taking Pictures ......................................................................... 14
• Taking a Picture.................................................................... 14
• Setting the Picture Quality ..................................................... 14
• Setting the Picture Size ......................................................... 15
• Setting the Flash Mode.......................................................... 16
• Zoom in and out ................................................................... 16
• Setting Self-timer.................................................................. 17
• Setting the Date Stamp ......................................................... 18
• Setting the Exposure Compensation ....................................... 19
• Setting the White Balance...................................................... 20
• Setting Sharpness................................................................. 21
• Setting Frequency................................................................. 22
• Reviewing the Pictures .......................................................... 22
• Zooming the Displayed Picture ............................................... 22
• Rotate the Displayed Picture ................................................. 23
• Protecting/Unprotecting the Pictures from Deletion ................... 24
• Deleting One Picture or All Pictures ......................................... 25
4
Polaroid PDC 3030 Digital Camera User Guide
www.polaroid-digital.com
4 Recording Audio and Video Clips ................................................. 26
• Recording Audio Clips .......................................................... 26
• Recording Video Clips ........................................................... 27
• Playback Video Clips on LCD Screen ....................................... 27
• Protecting/Unprotecting Audio Clip(s) and Video Clip(s) ............. 28
• Deleting One Audio Clip or Video Clip...................................... 30
• Using the SMC (SmartMedia™ Card) ........................................ 32
• Formatting Memory............................................................... 34
5 Installing the Software into a Computer ....................................... 35
• Installing the Software .......................................................... 35
• Software included with Your Camera ...................................... 37
• Computer System Requirements ............................................. 38
6 Transferring Pictures, Audio and Video Clips To Your Computer ...... 39
• Before Transferring Pictures ................................................... 39
• Connecting to Your Computer ................................................ 39
• Transferring and Viewing the Pictures, Audio Clips and Video Clips on PC. 40
• Transferring and Viewing the Pictures, Audio Clips and Video Clips on MAC 40
7 Using the Camera as a Web Cam ................................................ 41
• Setting up NetMeeting™......................................................... 41
• Start NetMeeting™ ................................................................ 41
8 Troubleshooting Problems........................................................... 42
9 Getting Help ............................................................................. 44
• Polaroid-digital Online Services ............................................... 44
• ArcSoft Software Help .......................................................... 44
10 Appendix................................................................................ 45
• Technical Specifications ........................................................ 45
• Capacity of SMC card ........................................................... 46
• Using Your Batteries ............................................................. 47
• Tips, Your Safety & Maintenance............................................ 47
• Uninstalling the Camera Driver (PC only).................................. 47
• Regulatory Information .......................................................... 48
Polaroid PDC 3030 Digital Camera User Guide
www.polaroid-digital.com
5
1 Getting Started
• What can I do with my Camera?
Capture
Enjoy point & shoot operation. Store
pictures, audio clips and video clips to the
internal memory or a SMC.
Set Up
Select various camera and video recording
settings.
Communicate
Use the camera as a web camera.
• What can I do with my Digital Pictures?
View
View pictures on the LCD screen or on
a computer using the Arcsoft® software
supplied.
Save
Save pictures to the computer memory by
Mass Storage interface.
Communicate
Send the pictures over the Internet to
family and friends.
6
Polaroid PDC 3030 Digital Camera User Guide
www.polaroid-digital.com
• What can I do with my Audio Clips and Video Clips?
Playback
Playback audio clips and video clips on
a computer using the Windows® Media
Player or other Media software supplied.
Save
Save audio clips and video clips to the
computer memory by Mass Storage
interface.
Communicate
Send the audio clips and video clips over
the Internet to family and friends.
• Camera Package Contents
2.
8
m
m
Digital Imaging Products
201 Burlington Road
Bedford, MA 01730-1434
F
f=8
.4
Registration Card
PDC 3030
The CD-ROM includes
Polaroid PDC 3030 Camera (PC)
PhotoImpression™ 4.0 (PC & Mac)
MicroSoft NetMeeting™ (PC)
Adobe Acrobat Reader (PC & Mac)
User’s manual in PDF format.
2.
8
m
m
PDC 3030
F
f=8
.4
Quick Start Guide
Guide de Démarrage rapide
Schnellanleitung
Guida Rapida
Guía Rápida de Inicio
Guia de Início Rápido
ML 0403
Part no.: OM837657 R1
Printed in China
Quick Guide
Hand Strap
USB Cable
Polaroid PDC 3030 Digital Camera User Guide
www.polaroid-digital.com
Pouch
4 x AAA Alkaline
Batteries
7
• Attaching the Hand Strap
• Installing the Batteries
4 x AAA Alkaline batteries are supplied with the product. For more
guidelines on battery usage, please see Using your batteries.
1. To open the battery door, slide the button in the direction as shown to
release.
2. Insert the batteries as shown, ensuring you follow the +/- signs
correctly.
3. Close the battery door.
8
Polaroid PDC 3030 Digital Camera User Guide
www.polaroid-digital.com
• Turning the Camera On and Off
Status LED
Power button
To turn on the camera, fully press and hold the
Power button until the Status LED turns green.
When LCD screen comes on, the Status LED will
be off. Press and hold the Power button again,
“Good Bye” will show on the LCD screen and the
camera will be off.
• Checking the Battery Level
Check the battery power level before taking pictures.
1. Turn on the camera.
2. Check the power status level that appears on the
camera LCD screen.
Batteries have adequate power.
Batteries need to be replaced.
Polaroid PDC 3030 Digital Camera User Guide
www.polaroid-digital.com
9
• Automatic Power Off Saves Battery
Your camera is designed to switch off automatically after 60 seconds
(default setting) of inactivity. You can change the Auto Power Off setting
by the following steps:
Turn on the camera, set the Mode selector to Capture mode (the Status
LED blinks once).
Press
Press
Press
Or set the Mode selector to Playback mode.
Press
Press
10
Press
Polaroid PDC 3030 Digital Camera User Guide
www.polaroid-digital.com
2 Camera Setting
• Checking Camera Status
Turn on the camera, view the camera LCD screen to check which camera
settings are active. If feature icon is not displayed, that particular feature
is not activated.
Picture Quality
Camera Status
Fine Quality
Normal Quality
Image size
ONF
1280 X 960
SMC Card inserted
Self-Timer On
Pictures can be taken
Auto Flash Mode
Still Picture
2048 X 1536
1600 X 1200
Other Features
OFFF
Flash Mode On
Locked file
Flash Mode Off
Unlocked file
Full
Low
800 X 600
Video Mode
Audio Mode
NOTE:
Some settings will remain even after the camera is turned off, e.g. Image
Quality/Image Size/Flash Mode/Auto off/Date and time/Date stamp/
Frequency/Display Language settings.
Polaroid PDC 3030 Digital Camera User Guide
www.polaroid-digital.com
11
• Setting the Display Language
Under this setting, you can select the language you prefer for the LCD
screen.
Turn on the camera, set the Mode selector to Capture mode (the Status
LED blinks once).
Press
Press
Press
• Setting Date and Time
Turn on the camera, set the Mode selector to Capture mode (the Status
LED blinks once). Use Previous or Next button to select a field, such as
year, month, day, hour, minute, second. Use the Up or Down buttons to
adjust the value in the field. Press the OK button after all fields are set.
Press
Press
Press
Press
Press
Press Previous
or Next button
to shift to the
item
3 Taking Pictures
• Taking a Picture
1. Turn on the camera.
2. Set the Mode selector to Capture mode (the Status LED blinks once).
3. Frame your subject using the LCD
Shutter button
screen or viewfinder.
4. Press the Shutter button to take a
picture. Hold the camera steady.
Status LED will be on and a beep will
sound when the picture has been
taken.
• Setting the Picture Quality
A digital picture’s quality depends on both its resolution and the JPEG file
compression that the camera applies when you take the picture. Resolution
refers to the number of pixel in a digital picture. Higher resolution and less
compression makes better quality which occupies more memory space.
Smaller size pictures and normal quality are easier to email while larger
size and fine quality are better for printing.
1. Turn on the camera.
2. Set the Mode selector to Capture mode (the Status LED blinks once).
3. Press the Quality button will alter the picture quality setting.
Fine -
high resolution and fine quality are good for printing
photo.
Normal - low resolution and normal quality are efficient for email or
posting to web.
14
Polaroid PDC 3030 Digital Camera User Guide
www.polaroid-digital.com
• Setting the Picture Size
Turn on the camera, set the Mode selector to Capture mode (the Status
LED blinks once).
Press
Press
Press
Here are the approximate number of pictures you can expect the camera
to hold at each setting based on 8MB internal memory. You can expand
the memory with SMC, please refer to Capacity of SMC Card.
H: 2048 X 1536
Fine:
Approx. 5 pictures
H: 2048 X 1536
Normal: Approx. 11 pictures
M: 1600 X 1200
Fine:
Approx. 9 pictures
M: 1600 X 1200
Normal: Approx. 20 pictures
L: 1280 X 960
Fine:
Approx. 14 pictures
L: 1280 X 960
Normal: Approx. 30 pictures
E: 800 X 600
Fine:
Approx. 36 pictures
E: 800 X 600
Normal: Approx. 86 pictures
NOTE:
Scene complexity affects a picture’s file size. For example, a picture of
trees in autumn has a larger file size than a picture of blue sky at the same
resolution and quality setting. Therefore, the number of pictures you can
store on a memory card may vary. The number of pictures on the LCD screen
is for reference only.
Polaroid PDC 3030 Digital Camera User Guide
www.polaroid-digital.com
15
• Setting the Flash Mode
The Flash Range is approximately 3.2 feet to 6.5 feet (1 to 2 metres).
1. Turn on the camera.
2. Set the Mode selector to Capture mode (the Status LED blinks once).
3. Press Flash button to cycle through the flash mode until the one you
want is shown on the LCD screen.
Flash mode on, the flash fires for every picture. Use this setting
indoors in low light.
Flash mode off, the flash does not fire. Use this setting for outdoor
pictures or where flash is prohibited or may be distracting. Also use
when shooting toward a reflective surface, such as a window or
mirror. If you do not have enough light when using this setting, your
pictures will be too dark.
Auto Flash mode, the flash fires automatically as needed. Use this
setting to take most pictures.
Please note that when flash mode is selected, the Status LED turns green
and blinks until the flash finishes charging, then the Status LED will be on
until pressing Shutter button to take a picture.
• Zoom in and out
Your camera is designed to have 3X digital Zoom. This feature lets you
“zoom” in on the central area of a photo and photograph only the enlarged
portion of the picture. Digital zoom applies to only one photo at a time. To
Zoom in and out the picture, press Down/Up button.
NOTE:
This feature is available in Capture and Playback mode.
16
Polaroid PDC 3030 Digital Camera User Guide
www.polaroid-digital.com
• Setting Self-timer
Your camera is designed with a self-timer function which will allow you to
take picture with the 10 seconds build in timer.
1 Turn on the camera.
2 Set the Mode selector to Capture mode (the Status LED blinks once).
Press
Press
The icon
appears on LCD screen. Press Shutter
button to perform self-timer. A timer appears in the
centre of LCD screen and the camera beeps indicating
self-timer is activating.
Press
NOTE:
Self-timer feature is only applied to next picture. When
self-timer is activated, status LED turns green, while the
self-timer LED turns red and blinks slowly for 8 seconds,
then blinks quickly for 2 seconds before the picture is
taken. Please place the camera on a flat surface or use
a tripod.
Polaroid PDC 3030 Digital Camera User Guide
www.polaroid-digital.com
17
• Setting the Date Stamp
Turn on the camera, set the Mode selector to Capture mode (the Status
LED blinks once).
Press
Press
Press
18
Polaroid PDC 3030 Digital Camera User Guide
www.polaroid-digital.com
• Setting the Exposure Compensation
Turn on the camera, set the Mode selector to Capture mode (the Status
LED blinks once).
Press
Press
Press
Press
You can adjust the exposure compensation value (EV) within the range of
-1.5EV to +1.5EV in order to compensate for current lighting conditions.
This setting can be used to obtain better result when shooting with
backlighting, indirect indoor lighting, a dark background, etc.
NOTE:
• A higher EV value is best used for light-coloured subjects and backlit
subjects. A lower EV value is best for dark-coloured subjects and for
shooting outdoors on a clear day.
• When shooting under very dark or very bright conditions, you may not
be able to obtain satisfactory results even after performing exposure
compensation.
• Exposure compensation returns to its standard default setting (AUTO) after
you turn off and turn on the camera again.
Polaroid PDC 3030 Digital Camera User Guide
www.polaroid-digital.com
19
• Setting the White Balance
Selecting the right type of white balance can help to make the colours of a
subject appear more natural under the type of lighting that is available.
Turn on the camera, set the Mode selector to Capture mode (the Status
LED blinks once).
Press
Press
Press
Press
NOTE:
White balance returns to its default setting (AUTO) after you turn off the
camera and turn it on again.
20
Polaroid PDC 3030 Digital Camera User Guide
www.polaroid-digital.com
• Setting Sharpness
Use the Sharpness setting to highlight or blend the edges of the subject
in pictures.
Turn on the camera, set the Mode selector to Capture mode (the Status
LED blinks once).
Press
Press
Press
Press
Normal Use when no special effect is needed. Ideal for everyday
pictures.
Sharp
Increases contrast on the edges of the picture. Ideal when you
want to improve the clarity of an picture, or if you later may
want to crop or cut out specific areas in the picture.
Soft
Softens the edges of the picture, creating a “soft focus” effect.
Polaroid PDC 3030 Digital Camera User Guide
www.polaroid-digital.com
21
• Setting Frequency
In order to take a better indoor picture, the camera needs to be set to suit
the lighting frequency, for US, set the frequency to 60Hz, for Europe, set
the frequency to 50Hz.
Turn on the camera, set the Mode selector to Capture mode (the Status
LED blinks once).
Press
Press
Press
• Reviewing the Pictures
1. Turn on the camera.
2. Set the Mode selector to Playback mode (the Status LED blinks
once).
3. Press Previous and Next button to view the pictures taken.
• Zooming the Displayed Picture
1. Turn on the camera.
2. Set the Mode selector to Playback mode (the Status LED blinks
once).
to zoom in.
3. Press Down button
to zoom out.
4. Press Up button
22
Polaroid PDC 3030 Digital Camera User Guide
www.polaroid-digital.com
• Rotate the Displayed Picture
This function enables you to view the picture taken at a better angle.
Turn on the camera, set the Mode selector to Playback mode (the Status
LED blinks once).
Press
Press
Press
NOTE:
This function only keeps the picture rotated while the camera is on. The
picture will return to its original angle after the camera is turned off.
Polaroid PDC 3030 Digital Camera User Guide
www.polaroid-digital.com
23
• Protecting/Unprotecting the Pictures from Deletion
Following the steps below to protect a picture:
Turn on the camera, set the Mode selector to Playback mode (the Status
LED blinks once).
Press
Press
Press
Press
NOTE:
icon will appear. To unprotect the
When a picture is protected, the
protected picture, please repeat the above steps and select “UNLOCK”. The
icon will appear.
ONF
OFFF
24
Polaroid PDC 3030 Digital Camera User Guide
www.polaroid-digital.com
• Deleting One Picture or All Pictures
Following the steps below to delete one picture:
Turn on the camera, set the Mode selector to Playback mode (the Status
LED blinks once).
Press
Press
NOTE:
• The protected file(s) can not be deleted.
• To delete all the pictures, please repeat the above
steps and select “ALL”. All unprotected files
(pictures, audio and video clips) in the current
memory will be deleted.
Polaroid PDC 3030 Digital Camera User Guide
www.polaroid-digital.com
Press
25
4 Recording Audio and Video Clips
• Recording Audio Clips
1. Turn on the camera, set the Mode selector to Capture mode (the Status
LED blinks once).
2. Set the camera to Audio mode by the following steps.
Press
Press
Press
3. Press Shutter button to start, if you want to stop,
press the Shutter button again. Please note that
recording time displays on LCD screen.
26
Polaroid PDC 3030 Digital Camera User Guide
www.polaroid-digital.com
• Recording Video Clips
1. Turn on the camera, set the Mode selector to Capture mode (the Status
LED blinks once).
2. Set the camera to Video mode by the following steps.
Press
Press
3. Frame your subject using the LCD screen.
4. Press Shutter button to start, if you want to stop,
press the Shutter button again.
Press
NOTE:
The recording time displays on the LCD screen will
increase and the status LED turns green while recording
video clip.
• Playback Video Clips on LCD Screen
IMPORTANT!
Audio clips can only be played in PC/MAC when connected to the computer.
Please refer to Transferring Pictures, Audio and Video Clips to Your
Computer for further detail.
1. Turn on the camera.
2. Set the Mode selector to Playback mode (the Status LED blinks
once).
3. Press Previous and Next button to select the video clip you want to
playback.
4. The LCD screen shows “PLAY AVI? YES NO”, use Up or Down button
to select “YES” and press OK button to play the video clip. Press OK
button again to stop playback.
NOTE:
There is no sound during video playback as it has no built-in speaker.
Polaroid PDC 3030 Digital Camera User Guide
www.polaroid-digital.com
27
• Protecting/Unprotecting Audio Clip(s) and Video Clip(s)
Following the steps below to protect an Audio Clip:
1. Turn on the camera.
2. Set the Mode selector to Playback mode (the Status LED blinks
once).
3. Use Previous or Next button to select the audio clip you want to
protect.
Press
Press
Press
Press
NOTE:
icon will appear. To unprotect the
When an Audio clip is protected, the
protected Audio clip, please repeat the above steps and select “UNLOCK”.
The
icon will appear.
ONF
OFFF
28
Polaroid PDC 3030 Digital Camera User Guide
www.polaroid-digital.com
Following the steps below to protect a Video Clip:
1. Turn on the camera.
2. Set the Mode selector to Playback mode (the Status LED blinks
once).
3. Use Previous or Next button to select the video clip you want to
protect.
Press
Press
Press
Press
Press
NOTE:
icon will appear. To unprotect the
When a Video clip is protected, the
protected Video clip, please repeat the above steps and select “UNLOCK”.
The
icon will appear.
ONF
OFFF
Polaroid PDC 3030 Digital Camera User Guide
www.polaroid-digital.com
29
• Deleting One Audio Clip or Video Clip
Deleting One Audio Clip
1. Turn on the camera.
2. Set the Mode selector to Playback mode (the Status LED blinks
once).
3. Use Previous or Next button to select the video clip you want to
delete.
Press
Press
Press
NOTE:
• The protected file(s) can not be deleted.
• Please note that selecting “ALL” will delete all unprotected files (pictures,
audio and video clips) in the current memory.
30
Polaroid PDC 3030 Digital Camera User Guide
www.polaroid-digital.com
Deleting One Video Clip
1. Turn on the camera.
2. Set the Mode selector to Playback mode (the Status LED blinks
once).
3. Use Previous or Next button to select the audio clip you want to
delete.
Press
Press
Press
Press
NOTE:
• The protected file(s) can not be deleted.
• Please note that selecting “ALL” will delete all unprotected files (pictures,
audio and video clips) in the current memory.
Polaroid PDC 3030 Digital Camera User Guide
www.polaroid-digital.com
31
• Using the SMC (SmartMedia™ Card)
Your camera comes with 8MB of built-in Nand flash memory for storing
pictures, audio clips and video clips as you record them. You can expand
the memory using a commercially available SMC (up to 128MB). The
camera senses whether a memory card is inserted, and automatically
saves pictures, audio clips or video clips accordingly. Note that you
cannot save pictures, audio clips or video clips to the built-in Nand flash
memory while a memory card is installed in the camera.
IMPORTANT!
• Files contained in the SMC card recorded by other cameras may conflict
with the PDC 3030 camera, and valuable data in your existing SMC card
may be distorted or lost when the card is inserted in the PDC 3030 camera.
We strongly recommend the user to use a NEW or formatted SMC card for
the SMC camera. We will not guarantee any valuable data or files (other
than PDC 3030 camera’s) in your SMC card.
• Make sure you turn off the camera before inserting or removing a memory
card.
• Be sure to orient the card correctly when inserting it. Never try to force a
memory card into the slot when you feel resistance.
Memory card precautions:
1. Use only a SMC memory card with this camera. Proper operation is not
guaranteed when any other type of card is used.
2. Electrostatic charge, electrical noise, and other phenomena can cause
data corruption or even loss. Always make sure that you always back
up important data on other media (MO disc, computer hard drive, etc.).
3. If a memory card starts to behave abnormally, you can restore normal
operation by formatting it. However, we recommend that you always
take along with you more than one memory card whenever using the
camera far away from your home or office.
4. We recommend that you format a memory card when using it for the
first time, or whenever the card you are using seems to be the cause of
abnormal pictures. Remember to format a memory card if it was used
in another digital camera or other devices.
32
Polaroid PDC 3030 Digital Camera User Guide
www.polaroid-digital.com
Inserting a SMC (not included)
Turn off the camera and open the SMC slot cover as illustrated. Insert
the SMC ensuring the card is inserted the correct position as illustrated.
On the inner side of the SMC slot cover, there is a diagram showing the
proper insertion orientation.
Notched corner
of SMC card
NOTE:
The camera will turn off automatically if you insert the SMC card while the
camera is turned on.
Removing the SMC (not included)
To remove the SMC, turn off your camera , open the SMC slot cover,
gently push the SMC inwards and then release it for the SMC to eject.
Take the SMC out and close the card slot cover.
Polaroid PDC 3030 Digital Camera User Guide
www.polaroid-digital.com
33
• Formatting Memory
Turn on the camera, set the Mode selector to Playback mode
Press
Press
IMPORTANT!
• Formatting the internal memory and a SMC erases all
the pictures, audio and video clips, including protected
ones.
• You can format a memory card on the camera or on
a computer. However formatting a memory card on a
computer takes much longer.
• Note that data deleted by a format operation can not be
recovered. Make sure you do not have any useful data
currently stored on a memory card before you format it.
34
Press
Polaroid PDC 3030 Digital Camera User Guide
www.polaroid-digital.com
5 Installing the Software into a Computer
• Installing the Software
For Windows® Users:
PC
IMPORTANT! (For Windows® 98SE)
On Windows® 98SE Mass Storage function needs to install the PDC 3030
Driver.
IMPORTANT! (For Windows® ME, 2000, XP)
Directly plug-in the camera to transfer and play the pictures, video clips or
audio clips, no need to install the driver, but if you want to use NetMeeting™
function, please install the driver first.
IMPORTANT! – If the computer requests you to install the Windows®
operating system during the software installation, place the Windows® CD
into the computer CD-ROM drive. The computer will install the necessary files
from the CD automatically. When the Windows® software appears to have
finished the operation, close the Windows® screen. Remove the Windows® CD
and store safely.
NOTE:
Microsoft® NetMeeting™ is already bundled with Windows® 2000 and XP OS.
Users using Windows® 2000 or XP do not need to install this software from
the CD-ROM.
Polaroid PDC 3030 Digital Camera User Guide
www.polaroid-digital.com
35
1. Before you begin, close all other software
applications open on your computer.
2. Insert the CD supplied into the computer CDROM Drive.
3. The CD User Interface Screen will
automatically launch.
4. With the mouse, click on each software
interface button in turn and follow the on
screen instructions.
Open & Close
NOTE:
If the setup screen doesn’t appear after loading
the CD, then you can manually start it by doubleclicking the “My Computer” Icon on your desktop,
then double-clicking the icon for the CD-ROM drive.
When the CD-ROM window opens, double-click the
“INSTALL-E.EXE” icon.
For Macintosh® Users:
MAC
1. Before you begin, close all other software applications opened on your
computer.
2. Insert the CD supplied into the computer CD-ROM Drive.
3. Double click the CD-ROM icon “Polaroid”.
4. Install the software included.
36
Polaroid PDC 3030 Digital Camera User Guide
www.polaroid-digital.com
• Software included with Your Camera
PDC 3030 Driver Plug & Play removable disk
Easy to use, just plug the camera to a computer and use it as a removable
disk. Use the Arcsoft® software suite to edit and print the Pictures.
ArcSoft PhotoImpression™ 4.0 Picture Editing Software
ArcSoft PhotoImpression™ is an easy to use digital video and imageediting program. This program enables users to upload still image and
movie clips store in your camera. You could also edit and retouch your
photos, then add special effects or place them in cards, calendars, frames
and fantasy templates. ArcSoft PhotoImpression™ also includes a wide
variety of printing options.
Microsoft® NetMeeting™ Web Cam software
NetMeeting™ provides the most complete conferencing solution for the
Internet and corporate intranet. Powerful features let you communicate
with both audio and video, collaborate on virtually any Windows-based
application, exchange graphics on an electronic whiteboard, transfer files,
use the text-based chat program, and much more. Using your PC and the
Internet, you can now hold face-to-face conversations with friends and
family around the world.
Adobe® Acrobat® Reader .PDF File Reading Software
Adobe® Acrobat® Reader lets you view and print Adobe Portable Document
format (PDF) files on all major computer platforms, as well as fill in and
submit Adobe PDF forms online.
Polaroid PDC 3030 Digital Camera User Guide
www.polaroid-digital.com
37
• Computer System Requirements
For acceptable picture transfer and editing performance, we recommend
the following minimum requirements;
For Windows® Users
•
•
•
•
•
•
•
•
•
Compatible with Microsoft® Windows® 98SE, Me, 2000 or XP
Pentium® II 333MHz or equivalent processor
64MB RAM (128MB recommended)
USB Port
200MB free disk space
Colour monitor with high colour (16-bit) graphic capability or higher
CD-ROM drive
Standard mouse and keyboard
Stereo speakers
For Macintosh® Users
•
•
•
•
•
•
•
•
•
PC
MAC
PowerPC® Processor
Mas OS Version 9.2~X
USB Port
64MB RAM (128MB recommended)
150MB Free disk space
Colour monitor with high colour (16-bit) graphic capability or higher
CD-ROM drive
Standard mouse and keyboard
Stereo speakers
38
Polaroid PDC 3030 Digital Camera User Guide
www.polaroid-digital.com
6 Transferring Pictures, Audio and Video Clips To Your Computer
• Before Transferring Pictures
IMPORTANT! Before you transfer your pictures make sure you have installed the software
from the CD.
For Windows® and Macintosh® Users:
PC
MAC
• Connecting to Your Computer
Connecting with the USB Cable.
1. Turn on the camera.
2. Plug the labelled end
of the USB cable into the socket marked
on your computer.
3. Plug the other end of the USB cable into the port on your camera.
Polaroid PDC 3030 Digital Camera User Guide
www.polaroid-digital.com
39
PC
For Windows® Users:
• Transferring and Viewing the Pictures, Audio Clips and Video
Clips on PC
1. Turn on the camera
2. Set the camera to Playback mode.
3. Connect the camera to a computer via the USB cable.
4. Open the Windows® Explorer and then you can see a “Removable Disk”
drive.
5. Double click “Removable Disk” -> double click “DCIM”-> double click
“100MEDIA”.
6. All the pictures, video clips and audio clips are in the “100MEDIA”
folder. Highlight the pictures, video clips or audio clips and drag them
to a folder of your choice. You can also create sub-folders to group
them or use the Arcsoft software to edit and manage the pictures or
video / audio clips.
For Macintosh® Users:
MAC
• Transferring and Viewing the Pictures, Audio Clips and Video
Clips on Mac
NOTE:
For MAC user, directly plug-in the camera, no need to install the driver.
1. Turn on the camera
2. Set the camera to Playback mode.
3. Connect the camera with MAC via USB cable, the systems will
automatically recognize the MASS STORAGE drive named “untitled”.
NOTE:
This Drive name will be varied from different version of MAC OS system.
4. Double click the folder “untitled” to enter sub-folder “DCIM”.
5. Double click the folder “DCIM” to enter sub-folder “100MEDIA”.
6. You can copy the pictures, audio clips and video clips from this folder
“100MEDIA” and paste to the hard disk.
40
Polaroid PDC 3030 Digital Camera User Guide
www.polaroid-digital.com
7 Using the Camera as a Web Cam
• Setting up NetMeeting™
NOTE:
Set the camera to Capture mode before starting NetMeeting™.
1. Connect your PDC 3030 to the USB cable on one end.
2. Connect the USB cable to a USB port on your PC on the other end.
3. Put your PDC 3030 on top of your PC monitor or another flat surface.
4. Connect your Microphone and your Speaker to your audio card’s Mic in
jack and Speaker out jack respectively.
• Start NetMeeting™
NOTE:
For Windows® XP / 2000 users who use NetMeeting™ for the first time, Go to
Start -> Run ->type in “conf” ->click “OK” and then follow the on-screen set
up instruction to set up NetMeeting™.
�
�
2.
8
m
F
�
m
1. Double click the “NetMeeting” icon on the desktop or select the
“NetMeeting” icon from the Windows® Start Menu.
2. If you need further help on how to use Microsoft® NetMeeting™, select
the “Help” under the menu bar and choose the topic you need. You
can also refer to the Polaroid “EASY TO USE GUIDE TO MICROSOFT®
NETMEETING™” or visit the website: http://www.microsoft.com/
windows/netmeeting.
f=8
.4
�
Polaroid PDC 3030 Digital Camera User Guide
www.polaroid-digital.com
41
8 Troubleshooting Problems
The troubleshooting guide is designed to help you. If problems continue,
please contact your local customer support hot-line. See your registration
card for help line contact details.
Symptom
Problem
Solution
Shut down all other applications
and attempt to reinstall the
driver.
Check the USB controller in
your BIOS if they are activated.
If these do not work, contact
your national customer support
representative.
failure
or Check all cable connections are
I cannot upload images to Connection
the camera is not set to secured or set the camera to
the PC.
Capture Mode.
Playback Mode.
The camera is set to the Set the camera to Playback
Capture mode.
mode.
I cannot run the PDC 3030 Conflict
with
another If you have any other camera
Camera Driver.
camera
driver
capture installed on your computer,
device.
remove the camera and its
driver completely from your
system to avoid conflict with
PDC 3030.
I receive an error message
when I am installing “PDC
3030 Camera Driver”.
“PDC 3030 Camera Driver”
does not load.
I cannot upload the images The SMC card is inserted
from the internal memory inside the SMC card slot.
of the PDC 3030 camera
to PC.
I cannot switch on my The SMC card is not inserted
PDC 3030 Camera after all the way in or card slot
inserting a SMC card.
door is not closed properly.
The memory card has a higher
priority
than
the
internal
memory for image storage,
image transfer or deletion.
Make sure the SMC card is
inserted all the way in and close
the slot door properly.
I press the shutter button The PDC 3030 camera is
but no response.
processing data.
Or
The internal memory or
SMC card memory is full.
Wait for
complete.
42
this
process
to
Or
Delete some images in the
internal memory of the camera
or SMC.
Polaroid PDC 3030 Digital Camera User Guide
www.polaroid-digital.com
Symptom
Problem
The Flash icon and the The PDC 3030 Camera is
image counter on the LCD processing the image and
is flashing after I took my recharging the flash unit.
last image using the Flash
Mode.
I get a blurred image when There may be a momentary
uploading my images to my delay between pressing
the shutter button and the
computer.
actual exposure.
The battery indicator icon This
means
there
is
on the 1.4” LCD screen will insufficient power.
go “blank”.
My image quality is grainy. You may have selected the
wrong camera frequency
setting.
My CD installation wizard The auto installation file is
switched to off.
does not work.
Or
The
CD
ROM
is
disconnected.
The LCD on my PDC 3030 No response from any of
Camera has frozen when the function buttons.
you insert a SMC card into
your PDC 3030 camera.
No web camera function.
Solution
Wait for the flash icon on the
status LCD to stop flashing and
then take another image.
Hold your PDC 3030 camera
steadily until you hear a “beep”
which indicates the exposure is
completed.
You need to change the new
batteries.
Using the different frequency
setting.
Pal for 50 Hz
NTSC for 60 Hz
Go to the computer desktop,
Right click on “My Computer”.
Click
“Properties”.
Select
“Device
Manager”.
Double
click on “CD-ROM”, double
click on "CD-R" (Normally the
manufacturer’s name). Click on
" Setting “. Ensure "Auto insert
notification " is ticked and the
" disconnect " is ticked. If
you change the settings the
computer will ask you to restart
your PC. Click " Yes " (Only for
Windows® 98SE & ME user)
Ensure you only use a new or
formatted SMC card for use
with your PDC 3030 camera.
The camera is set to Set the camera to Capture
mode
Playback mode
Or
Or
Have not installed the PDC Install the PDC 3030 Driver.
3030 Driver.
Please also refer to the help files & User Guide that accompany the enclosed applications. For
further information and support, please visit our website: http://www.polaroid-digital.com.
Polaroid PDC 3030 Digital Camera User Guide
43
www.polaroid-digital.com
9 Getting Help
• Polaroid-digital Online Services
Website: http://www.polaroid-digital.com
• ArcSoft Software Help
For North America
For South & Central America
For China
For Japan
For Oceania
For Europe/Middle East/
ArcSoft HQ Support Centre
(Fremont California, CA)
Tel: 1-800-762-8657
(toll free number)
Fax: 1-510-440-1270
E-mail: [email protected]
Tel: 1-510-979+5520
Fax: 1-510-440-1270
E-mail:[email protected]
ArcSoft China Support Centre (Beijing)
Tel: 8610-6849-1368
Fax: 8610-6849-1367
E-mail: [email protected]
ArcSoft Australian Support Centre
(Baulkham Hills, New South Wales)
Tel: 61 (2) 9899-5888
Fax: 61 (2) 9899-5728
E-mail: [email protected]
ArcSoft Japan Support Centre (Tokyo)
Tel: +81-03-3834-5256
Fax: +81-03-5816-4730
Web: http://www.mds2000.co.jp/
arcsoft
E-mail: [email protected] and
[email protected]
Africa & Rest of the World
ArcSoft Europe Support Centre
(Ireland)
Tel: +353-(0) 61-702087
Fax: +353-(0) 61-702001
E-mail: [email protected]
Visit http:// www.arcsoft.com for technical support and frequently asked
questions (FAQ’s).
44
Polaroid PDC 3030 Digital Camera User Guide
www.polaroid-digital.com
10 Appendix
• Technical Specifications
• Internal Memory: 8MB NAND FLASH
• External Memory: support SMC memory card up to 128MB (not included)
• Still Picture Resolution (based on 8 MB internal memory):
• Fine quality 2048 x1536 pixel -Approx. 5 pictures
1600 x 1200 pixel -Approx. 9 pictures
1280 x 960 pixel -Approx. 14 pictures
800 x 600 pixel
-Approx. 36 pictures
• Normal quality - 2048 x1536 pixel -Approx. 11 pictures
1600 x 1200 pixel -Approx. 20 pictures
1280 x 960pixel
-Approx. 30 pictures
800 x 600 pixel
-Approx. 86 pictures
• Video Clip:
• Unlimited when connected to the computer via video capture software
• Limited when using the 8MB internal memory:
Approximately 1.5 minutes in CIF mode 10fps @ 320 X 240 pixel
• Using SMC card:
16 M - Approx. 3 minutes
32 M - Approx. 8 minutes
64 M - Approx. 16 minutes
128 M - Approx. 32 minutes
• Audio Clip:
8KHZ, 4bit, Approximately 30 minutes based on 8MB internal memory
• File Format:
• Still Picture - Compression in JPEG format after download to PC via
USB (depend on application used)
• Video Clip - AVI format
• Audio Clip - WAV format
• External Connector: USB, SMC slot
• Auto Power Off: After 30, 60, or 90 seconds inactivity
• Power Supply: USB Port, 4 X AAA batteries
• Operating System:
• For Windows® Users: Microsoft® Windows® 98SE, Me, 2000 or XP
• For Macintosh® Users: Mac OS 9.2~X
Polaroid PDC 3030 Digital Camera User Guide
45
www.polaroid-digital.com
• Capacity of SMC Card
SMC Card
16M
32M
64M
128M
High
(2048x1536)
Middle
(1600x1200)
Low
(1280x960)
Economic
(800x600)
High
(2048x1536)
Middle
(1600x1200)
Low
(1280x960)
Economic
(800x600)
High
(2048x1536)
Middle
(1600x1200)
Low
(1280x960)
Economic
(800x600)
High
(2048x1536)
Middle
(1600x1200)
Low
(1280x960)
Economic
(800x600)
Fine quality pictures
Normal quality
can be taken
pictures can be taken
9
23
18
41
28
60
72
172
19
48
37
84
57
122
145
346
39
98
75
170
115
246
291
694
79
198
151
342
231
494
583
1390
NOTE:
Scene complexity affects a picture’s file size. For example, a picture of trees in
autumn has a larger file size than a picture of blue sky at the same resolution and
quality setting. Therefore, the number of pictures you can store on a card may vary.
46
Polaroid PDC 3030 Digital Camera User Guide
www.polaroid-digital.com
• Using Your Batteries
WARNINGS!
• Batteries should be replaced by an adult.
• Do not mix different types of batteries or new and used batteries.
• Use recommended or equivalent type of batteries only.
• Insert the batteries with the correct polarity.
• Remove exhausted batteries from the camera immediately.
• Do not short the supply terminals.
• Do not dispose the batteries in fire.
• Remove batteries from the camera when not in use.
These instructions should be retained for future reference.
• Tips, Your Safety & Maintenance
Your Camera should only be operated within the following environmental conditions;
• 41 - 104º Fahrenheit; 5 - 40º Celsius
• 20% - 85% relative humidity, non condensing
Battery life or image quality may be affected outside these conditions
Camera Cautions
• NEVER immerse any part of the Camera or its accessories into any fluid or liquid.
• ALWAYS disconnect the Camera from your PC or TV before cleaning it.
• ALWAYS remove dust or stains with a soft cloth dampened with water
or neutral detergent.
• NEVER place hot items on the surface of the Camera.
• NEVER attempt to open or disassemble Camera as this will affect any
warranty claim.
• Uninstalling the Camera Driver (PC only)
1.
2.
3.
4.
Unplug the camera from the computer.
Go to Start -> Setting -> Control Panel.
Double click Add / Remove Programs.
In Add / Remove Programs, select “Polaroid Digital Cam” and click the
Remove button.
5. Restart the computer.
Polaroid PDC 3030 Digital Camera User Guide
www.polaroid-digital.com
47
• Regulatory Information
FCC Notice
This device complies with Part 15 of FCC Rules. Operation is subject
to the following two conditions: (1) This device may not cause harmful
interference, and (2) This device must accept any interference received,
including interference that may cause undesired operation.
Warning: Changes or modifications to this unit not expressly approved
by the party responsible for compliance could void the user’s authority to
operate the equipment.
NOTE: This equipment has been tested and found to comply with the
limits for Class B digital device, pursuant to Part 15 of the FCC Rules.
These limits are designed to provide reasonable protection against harmful
interference in a residential installation. This equipment generates, uses
and can radiate radio frequency energy and, if not installed and used in
accordance with the instructions, may cause harmful interference to radio
communications.
However, there is no guarantee that interference will not occur in a
particular installation. If this equipment does cause harmful interference
to radio or television reception, which can be determined by turning
the equipment off and on, the user is encouraged to try to correct the
interference by one or more of the following measures:
• Reorient or relocate the receiving antenna.
• Increase the separation between the equipment and receiver.
• Connect the equipment into an outlet on a circuit different from that to
which the receiver is needed.
• Consult the dealer or an experienced radio/TV technician for help.
Shielded cable must be used with this unit to ensure compliance with the
Class B FCC limits.
Under the environment with electrostatic discharge, the product may
malfunction and require user to reset the product.
48
Polaroid PDC 3030 Digital Camera User Guide
www.polaroid-digital.com
UK 1103
Part No.: OM3244UK001
Polaroid PDC 3030 Digital Camera User Guide
www.polaroid-digital.com
49