1
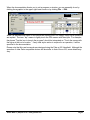
PLM
Global Logger for Palm OS
3/15/2002
Copyright © Global Water Instrumentation, Inc. 2002
Global Water ● (800)876-1172 ● www.globalw.com
Page 1
Requirements
PDA
• Palm OS* software version 3.5 or above
PC
• Windows 95, 98, ME, NT, 2000 or XP**
• 486DX 66MHz, 16MB RAM (Windows 95 base machine; newer operating systems may require higher specifications)
• Available COM port
Contact Information
Global Water Instrumentation, Inc.
11257 Coloma Road
Gold River, CA 95670
Toll Free:
Local/International:
Fax:
E-mail:
Web:
1(800)876-1172
1(916)638-3429
1(916)638-3270
[email protected]
www.globalw.com
Terminology
In order to better understand this product manual, please be aware of the following terminology
and formatting standards.
Bolded terms (i.e. bold) indicate either a keyboard key, a word or icon that appears on your handheld Palm* device or computer monitor screen or a phrase to be emphasized. Context will dictate
which is indicated.
Since it is assumed that users of this manual are familiar with mouse usage, many mouse operations are implied. The term “click” or “clicking” means to press and release the left mouse button.
Similarly, “double-click” means to press and release the left mouse button twice in quick succession. For example, the phrase “Click the start button” should be interpreted as “Move the mouse
pointer to the task bar and click the start button.” If any other mouse button is used in an operation, it will be specified in the documentation.
The term “select” means to move the mouse pointer over the indicated target. For example the
phrase “Select Toolbars from the View menu” means to move the mouse pointer over View, click
View and then move the mouse pointer over Toolbars. This action provides access to the Toolbars menu. “Select” is normally used when the mouseover action will cause additional menus to
display.
The → symbol is used with submenu operations where the user should click the first and last
items in the string separated by →. For example, the phrase “Click on File → New → Folder”
means click on File, select New and click on Folder.
* PalmTM and Palm OSTM are registered trademarks of Palm, Inc.
**Windows 95TM, 98TM, METM, NTTM, 2000TM and XPTM are registered trademarks of the Microsoft Corporation
Page 2
Global Water ● (800)876-1172 ● www.globalw.com
When the documentation directs you to exit a program or window, you can generally do so by
clicking the x graphic in the upper right-hand corner or by clicking File → Exit.
x graphic
Since it is assumed that users of this manual are familiar with PDA usage, many stylus operations
are implied. The term “tap” means to lightly touch the PDA screen with the stylus. For example,
the phrase “Tap the icon to launch the program” should be interpreted as “Touch the screen with
the stylus at the icon’s location.” If any other stylus action is required in an operation, it will be
specified in the documentation.
Please note that this user’s manual was designed using the Palm m105 Handheld. Although the
operation of other Palm compatible devices will be similar to that of the m105, some details may
vary.
Global Water ● (800)876-1172 ● www.globalw.com
Page 3
Table of Contents
CHAPTER 1: INTRODUCTION .............................................................................. 5
GLOBAL LOGGER FOR PALM OS .................................................................................................. 5
FEATURES .................................................................................................................................... 5
CHECKLIST ................................................................................................................................... 5
Package Contents for PLM-WL ............................................................................................... 5
Package Contents for PLM-GL ................................................................................................ 6
GETTING TO KNOW THE PLM ADAPTOR CABLE ............................................................................ 6
CHAPTER 2: SETUP .............................................................................................. 7
INSTALLING GLOBAL LOGGER FOR THE PALM OS ......................................................................... 7
INSTALLING GLOBAL LOGGER CONVERTER ................................................................................. 10
HARDWARE CONNECTION ........................................................................................................... 14
WL15 Connection .................................................................................................................. 14
GL400 Connection ................................................................................................................. 15
Hardware Connection Alternatives ........................................................................................ 17
CHAPTER 3: USING GLOBAL LOGGER FOR PALM OS .................................. 18
GLOBAL LOGGER STARTUP ........................................................................................................ 18
GLOBAL LOGGER CONTROL SCREEN .......................................................................................... 19
GLOBAL LOGGER FUNCTIONS ..................................................................................................... 21
Continuous............................................................................................................................. 21
Get Settings ........................................................................................................................... 22
Get History Data .................................................................................................................... 22
Clear Memory ........................................................................................................................ 24
Synchronize Time .................................................................................................................. 25
Setup ..................................................................................................................................... 25
Global Logger Setup ........................................................................................................................................25
Pulse Channel Setup .......................................................................................................................................30
Analog Channel Setup (1 – 8) ..........................................................................................................................30
IMPORTING DATA TO PC ............................................................................................................. 34
DELETING READINGS FROM PALM DEVICE................................................................................... 38
CHAPTER 4: TROUBLESHOOTING ................................................................... 41
COMM FAILURE .......................................................................................................................... 41
GLOBAL LOGGER NOT WORKING CORRECTLY ............................................................................ 41
PALM DEVICE FREEZES .............................................................................................................. 42
DELETED GLOBAL WATER DATABASE FILES ............................................................................... 42
OTHER ISSUES ........................................................................................................................... 42
CHAPTER 5: WARRANTY ................................................................................... 43
APPENDIX A: WORKSHEETS ............................................................................. 44
CALIBRATING THE BAR GRAPH TO HIGHER OR LOWER RANGE .................................................... 44
CALIBRATING LEVEL SENSORS FOR DEPTH TO WATER READINGS ............................................... 45
Page 4
Global Water ● (800)876-1172 ● www.globalw.com
Introduction
1
Introduction
Global Logger for the Palm OS
Congratulations on your purchase of Global Logger* for the Palm OS. This software has been quality
tested and approved. We are confident that you will find the logger software to be a valuable asset for your
application. Should you require assistance, our technical staff will be happy to help.
Features
•
•
•
•
Tabular display
Global Logger data can be converted to standard spreadsheet format
Adaptor cable included
Compatibility with WL15 and GL400 Global Water dataloggers
Checklist
Your Global Logger software package was carefully inspected and certified by our Quality Assurance Team
before shipping. If any damage has occurred during shipping, please notify Global Water Instrumentation,
Inc. and file a claim with the carrier involved. Use the checklist to ensure you have received everything
needed to operate the Global Logger for the Palm OS. Note, there are two varieties of the software package. One contains the WL15 adaptor cable and the other the GL400 adaptor cable. Use the checklist appropriate to your model number.
Package Contents for PLM-WL
User Manual
Adaptor Cable
•
•
•
Global Logger
software
User Manual
Adaptor Cable
Global Logger software
(3 1/2” Floppy Diskette)
*Copyright © Global Water Instrumentation, Inc. 2002
Global Water ● (800)876-1172 ● www.globalw.com
Page 5
Chapter 1
Package Contents for PLM-GL
Adaptor Cable
User Manual
•
•
•
User Manual
Adaptor Cable
Global Logger software
(3 1/2” Floppy Diskette)
Global Logger
software
Getting to Know the PLM Adaptor Cable
Adaptor cables designed for the WL15 have two dissimilar connectors. Connect the 4-pin mini socket to
the datalogger and the 9-pin male serial socket to the HotSync* Cradle cable.
4-pin mini socket
9-pin male
serial socket
Adaptor cables designed for the GL400 have two similar connectors. Connect the gray 9-pin serial socket
to the datalogger and the black 9-pin male serial socket to the HotSync Cradle cable. Verify that the connectors are attached in the specified manner.
black 9-pin male
serial socket
gray 9-pin male
serial socket
*HotSyncTM is a registered trademark of Palm, Inc.
Page 6
Global Water ● (800)876-1172 ● www.globalw.com
Setup
2
Setup
Installing Global Logger for the Palm OS
If the Palm Desktop software has not been installed, do so now. This application is provided with all Palm
devices. To obtain Palm Desktop, go to http://www.palm.com/.
Insert the floppy disk labeled Global Logger for the Palm OS into the PC’s floppy drive.
Open Palm Desktop, by clicking Start → Programs → Palm Desktop → Palm Desktop.
click Palm Desktop
Click on the Install icon located on the left-hand menu bar in the Palm Desktop window.
click Install
Global Water ● (800)876-1172 ● www.globalw.com
Page 7
Chapter 2
click Add
Click on the Add button in the Install Tool
window.
click 3 1/2 Floppy (A:)
Click the down carrot of the Look in: field in
the Open window. Click on the 3 1/2 Floppy
(A:) icon. Most systems fit this profile. If the
PC used to synchronize the Palm device does
not list the indicated drive (i.e. 3 1/2 Floppy
(A:)), click the icon that represents the drive
containing the Global Logger floppy disk.
click Logger.prc
Click the file Logger.prc and click the Open
button.
click Open
Page 8
Global Water ● (800)876-1172 ● www.globalw.com
Setup
After clicking Open, Palm Desktop returns to the Install Tool window. Logger.prc should be listed in the File Name
column. If not, click the Add button and
repeat the previous steps. After the file
appears, click the Done button.
click Done
click OK
Click the OK button in the Install Tool dialog box.
press HotSync* button
Perform a HotSync operation by connecting the Palm
device to the cradle and pressing the HotSync button.
Global Water ● (800)876-1172 ● www.globalw.com
Page 9
Chapter 2
A HotSync Progress dialog box should display. If the HotSync operation is successful, Global Logger will be installed
on the Palm device. See chapter 3* for software operation.
Installing Global Logger Converter
To transfer datalogger readings from Palm OS to PC format, install Global Logger Converter** software.
Insert the 3 1/2” floppy diskette labeled Global Logger Software Version x.xx (where x.xx is a version
number such as 1.38) into the computer’s floppy disk drive. Normally, the floppy is configured as the system’s “A” drive.
Double-click the My Computer icon on the desktop.
Double-click the floppy icon (normally listed as 3 ½ floppy (A:)).
Click on the file LogConvert.exe.
* See Using Global Logger for the Palm OS, pages 18 – 40
**Copyright © Global Water Instrumentation, Inc. 2002
Page 10
Global Water ● (800)876-1172 ● www.globalw.com
Setup
Click Edit → Copy from the menu bar.
Save the file to a directory that will be easy to remember. To save to the directory Global Logger located
on the main “C” hard drive (although “C” is normally the main system drive, the designation can vary from
system to system), start by clicking the down carrot of the address field. Click on the Local Disk (C:) icon
or appropriate main system drive designation.
down carrot
If the directory Global Logger is not
listed, click File → New → Folder from
the menu bar.
Global Water ● (800)876-1172 ● www.globalw.com
Page 11
Chapter 2
The directory New Folder will be created and automatically selected for
typeover. Type Global Logger and press the enter key.
Double-click on the new
Global Logger directory.
Click Edit → Paste from the menu bar.
Page 12
Global Water ● (800)876-1172 ● www.globalw.com
Setup
The file LogConvert.exe will appear in the C:\Global Logger directory.
To create a desktop shortcut,
right-click LogConvert.exe in
the C:\Global Logger (or alternate directory), select Send To
and click on Desktop (create
shortcut).
Global Logger Converter is now accessible directly from the desktop.
Global Water ● (800)876-1172 ● www.globalw.com
Page 13
Chapter 2
To rename the shortcut, go to the desktop and right-click the icon. Click Rename from the pop-up menu.
Type the desired name for the icon and press enter.
Hardware Connection
WL15 Connection
gray 9-pin male
serial socket
If connecting to a WL15, attach the gray
9-pin male serial socket of the Global Logger adaptor cable* to the HotSync Cradle
serial cable.
HotSync*
serial cable
Attach the 4-pin mini socket of the adaptor cable to the WL15 COM port. To attach, align the notches and
twist the securing bolt clockwise.
4-pin mini
socket
align notches
WL15 COM port
twist bolt clockwise
*See Getting to Know the PLM Adaptor Cable, page 6
Page 14
Global Water ● (800)876-1172 ● www.globalw.com
Setup
The image below illustrates a connected HotSync Cradle/WL15 datalogger.
GL400 Connection
black 9-pin male
serial socket
If connecting to a GL400, attach the black
9-pin male serial socket of the Global
Logger adaptor cable* to the HotSync
Cradle serial cable.
HotSync*
serial cable
*See Getting to Know the PLM Adaptor Cable, page 6
Global Water ● (800)876-1172 ● www.globalw.com
Page 15
Chapter 2
9-pin serial
socket
Attach the gray 9-pin male serial socket of the adaptor
cable to the GL400 COM port.
GL400 COM port
The image below illustrates a connected HotSync Cradle/GL400 datalogger.
Page 16
Global Water ● (800)876-1172 ● www.globalw.com
Setup
Hardware Connection Alternatives
HotSync Cable
A connection alternative to the HotSync
Cradle is the HotSync Cable. The cable
maintains all the functionality of the cradle while allowing convenient connection
to dataloggers in the field.
To purchase a HotSync Cable visit you local Palm retailer or go to http://www.palm.com.
Global Water ● (800)876-1172 ● www.globalw.com
Page 17
Chapter 3
3
Using Global Logger for Palm OS
Global Logger Startup
Palm handheld
Insert the Palm handheld device into its HotSync cradle.
HotSync* cradle
power button
Turn on the Palm device by pushing the power button.
If the Logger icon is not visible, tap the pick list in the upper right-hand corner of the screen.
Logger icon
pick list
Page 18
Global Water ● (800)876-1172 ● www.globalw.com
Using Global Logger for Palm OS
tap All
Tap All in the drop down list.
Logger icon
The Logger icon should now appear on the screen. Tap the icon
to launch the program. If the icon does not appear, scroll down
the application list by tapping the downward directional arrow.
If the icon does not appear anywhere in the application list, reinstall* Global Logger software.
downward
directional arrow
Global Logger Control Screen
Global Logger
functions
After launching the program, the Global Logger Control screen
will display. To access the Global Logger functions Continuous, Get Settings, Get History Data, Clear Memory, Synchronize Time and Setup tap the appropriate checkbox or buttons. The name of the datalogger attached to the Palm device is
displayed at the bottom of the Control screen.
datalogger
name
*See Software Installation, pages 7 – 10
Global Water ● (800)876-1172 ● www.globalw.com
Page 19
Chapter 3
If the Get Settings button is the only function displayed on the
Control screen, see Troubleshooting*.
To access Global Logger version information, open the screen menu by tapping the Menu icon or by tapping the Global Logger label at the top of the Control screen. Tap About Global Logger in the Options
menu to display the software version dialog box.
tap home
tap Global Logger
tap About
Global Logger
Tap the OK button to exit.
tap OK
*See Comm Failure, page 41
Page 20
Global Water ● (800)876-1172 ● www.globalw.com
Using Global Logger for Palm OS
tap Info tab
Tap the Info tab to switch to the Info screen. This page reflects
the following datalogger settings: Name, Date/Time, Recording Interval and Recordings in Memory. Dataloggers
with a pulse channel display pulse information on this page.
pulse reading
channel tabs
channel 1
Tap channel tabs (1-2, 3-4, 5-6, 7-8) to switch between various
channel screens. These screens reflect the current status of the
sensor connected to the specified channel. Channel information
is represented by a bar graph as well as the actual value in preprogrammed engineering units. Accessibility of the channel
screens depends on the datalogger. For example 1-channel dataloggers will only be able to access channel tab 1-2 while 8channel dataloggers will be able to access all channel tabs.
channel 2
Global Logger Functions
Continuous
Tap the Continuous checkbox under the Control screen to take
continuous real time readings while connected to the Palm device. Note this does not permanently set the datalogger to read
continuously. The continuous function will stop upon clearing
the checkbox (by tapping), exiting Global Logger or disconnecting the adaptor cable from your datalogger. A “checked” Continuous box indicates the Palm device is monitoring real time
readings while a clear Continuous box indicates the Palm device is not currently monitoring real time readings.
Global Water ● (800)876-1172 ● www.globalw.com
tap Continuous
checkbox
Page 21
Chapter 3
Get Settings
Tap the Get Settings button to refresh datalogger setting information. Tap the Info* tab to view updated settings.
tap Get
Settings
Get History Data
Tap the Get History Data button to download all data from datalogger. A Reading record XXXX of XXXX (where X represents an integer) message will display at the bottom of the Control menu. This process may take several minutes.
tap Get
History Data
number of
recordings
Once the Palm device downloads the logger data, the channel 1
screen displays. The number of recordings for the channel is displayed in the upper left-hand corner under Logger History.
Each recording is listed by date/time and recording depth.
date/time
recording depth
*See Global Logger Control Screen, page 21
Page 22
Global Water ● (800)876-1172 ● www.globalw.com
Using Global Logger for Palm OS
Tap the channel tabs (1, 2, 3, 4, 5, 6, 7, 8, P) to switch between
the various channel screens. Accessibility of channel screens depends on the datalogger. For example 1-channel dataloggers will
only be able to access channel screen 1 while 8-channel dataloggers will be able to access channel screens 1 – 8. Dataloggers
with a pulse channel can access channel screen P. Each screen
reflects the recordings taken on the specified channel. Single tap
the directional arrows to scroll through the data page by page. If
the data window only displays the upward directional arrow, the
data window reflects the bottom of the list. Conversely, if the
data window only displays the downward directional arrow, the
data window reflects the top of the list.
channel tabs
upward
directional arrow
downward
directional arrow
To scroll through the data entry by entry follow these steps. Touch the screen with the stylus at any location in the data window and drag down the data list to just below the window. Reverse this action to scroll
up the list.
drag stylus
below window
touch screen in data
window and drag
tap Save
Tap the Save button to save recordings to a Palm database file. If not saving, tap the Done button to exit to the
Control menu.
tap Done
Global Water ● (800)876-1172 ● www.globalw.com
Page 23
Chapter 3
tap Save history
as: field
To change the Palm database file name, tap the Save history as:
field in the Save History dialog box and type in a new name.
Refer to the Palm device’s user manual for instructions on entering text in the Palm OS. Tap the Save button to save recordings
or the Cancel button to exit without saving.
tap Save
or Cancel
If saving, a Save History dialog box will display confirming the
save operation. Tap the OK button to continue.
tap OK
Clear Memory
tap Clear
Memory
Tap the Clear Memory button on the Control screen to clear
all recordings from the datalogger.
Tap the Yes button to confirm the action or the No button
to cancel. Note that clearing recordings is not reversible.
tap Yes or No
Page 24
Global Water ● (800)876-1172 ● www.globalw.com
Using Global Logger for Palm OS
Synchronize Time
tap Synchronize
Time
Tap the Synchronize Time button on the Control screen to synchronize the datalogger’s clock to the Palm device’s clock.
Setup
tap Setup
Tap the Setup button on the Control screen to calibrate the datalogger or to change the datalogger’s time interval settings. A
Main screen will display.
Global Logger Setup
To change the datalogger’s name, tap the Name field on the
Main screen and type in a new name.
tap Name field
Global Water ● (800)876-1172 ● www.globalw.com
Page 25
Chapter 3
To change warmup time, tap the Sensor Warmup Time field
and enter the desired time (0 –15 seconds).
tap Sensor
Warmup Time field
Global Water recommends that the Sensor Warmup Time field be set at 3 seconds to supply the level sensor with adequate power for accurate data measurements. This setting dictates the length of time power is
applied to the level sensor before the datalogger takes a reading.
For example, if you set your WL15 to record a reading every 20 minutes at fixed intervals and the process
begins at 12:00:00, power will be applied to the level sensor immediately and a reading taken at 12:00:03.
At 12:20:00, power will again be applied to the level sensor, and the datalogger will take a reading at
12:20:03. Note that if the recording interval fields are less than or equal to the Sensor Warmup Time
field, the sensor is powered continuously.
Select the recording interval type by tapping the down carrot in
the Sample field.
tap down carrot
Page 26
Global Water ● (800)876-1172 ● www.globalw.com
Using Global Logger for Palm OS
To repeatedly record values at a specified interval, tap for fixed
interval in the popup menu.
tap for fixed
interval
Note, that if you choose to record at fixed intervals, memory will fill up according to the following productspecific charts. Refer to the battery maintenance chart in the datalogger manual for battery life to available
memory comparisons.
WL15
GL400-1-1
GL400-7-1
Recording Interval
Time
Recording Interval
Time
Recording Interval
Time
1 second
6 hours, 49 minutes
1 second
5 hours, 31 minutes
1 second
2 hours, 20 minutes
1 minute
17 days
1 minute
13 days
1 minute
5 days, 20 hours
5 minutes
84 days
5 minutes
68 days
5 minutes
29 days
15 minutes
254 days
15 minutes
206 days
15 minutes
87 days
30 minutes
509 days
30 minutes
413 days, 30 hours
30 minutes
175 days
1 hour
1018 days
1 hour
827 days
1 hour
350 days
To record values according to a logarithmic curve, tap for logarithmic interval in the popup menu. See chart for timeline
specifications.
tap for logarithmic
interval
Global Water ● (800)876-1172 ● www.globalw.com
Time Frame
Readings per time
unit
Expected total readings
during Time Frame
0-19 seconds
As fast as possible
1000
20-59 seconds
1 per 1 second
40
60-599 seconds
1 per 12 seconds
45
10-99 minutes
1 per 2 minutes
45
100-999 minutes
1 per 200 minutes
45
1000-9999 minutes
1 per 1440 minutes
45
Page 27
Chapter 3
To take readings upon exceeding a specified unit range, tap
upon exception in the popup menu. This setting sets the logger
to record a single reading after detecting a variance from the
previously recorded exception reading.
tap upon
exception
tap large button
To change the exception variance, tap the large exception button.
In the Deadband Compression dialog box, touch the toggle
slider with the stylus and drag it back and forth to select desired
exception range. Tap the OK button to preserve selection or
Cancel to revert to the previous setting.
touch slider and drag
tap OK or
Cancel
Page 28
Global Water ● (800)876-1172 ● www.globalw.com
Using Global Logger for Palm OS
Set the recording interval digit by tapping the every text field
and entering the desired number. Set the recording interval time
unit, by tapping the down carrot in the time unit field (not labeled). Note that these settings apply only to fixed interval recordings.
tap time
unit field
tap every field
Tap the desired time unit (seconds, minutes, hours or days) in
the popup menu. Note that this setting applies only to fixed interval recordings.
tap time unit
To overwrite readings in synchronous order after memory is
filled, click the Wrap records at end of storage checkbox.
Note that Global Logger overwrites the earliest readings first. To
preserve readings and stop recording after memory is filled, leave
box unchecked.
Global Water ● (800)876-1172 ● www.globalw.com
tap Wrap records
checkbox
Page 29
Chapter 3
Pulse Channel Setup
Tap the P tab to access pulse channel settings. The pulse channel records a predetermined value each time the sensor detects a
pulse signal. This feature is often used to track rainfall levels.
tap Sensor
Type or EU field
tap Value for
Single Pulse field
tap Decimal
Places field
tap P tab
To change the displayed unit type (i.e. meters, feet,
etc.), tap the Sensor Type or EU (engineering units)
field and enter the unit type you are calibrating to.
Note that the Sensor Type or EU field only serves
as a text label.
To set the recorded value for a single pulse reading,
tap the Value for Single Pulse field and enter the desired predetermined value.
To set the number of decimal place values to display,
tap the Decimal Places field and enter the number of
decimal places. This setting controls pulse information displayed on the Info screen*.
Analog Channel Setup (1 – 8)
Tap one of the analog channel tabs (1 – 8) to access the specified
channel settings.
tap channel tag
*See Global Logger Control Screen, page 21
Page 30
Global Water ● (800)876-1172 ● www.globalw.com
Using Global Logger for Palm OS
Tap the Enable checkbox to enable or disable the current channel. A check indicates that the channel is enabled.
tap Enable
Before calibrating, record the existing values in the High Raw
and Low Raw fields (in this case 63248 and 12640). These values may be necessary if an error occurs during the calibration
process.
record values
tap Sensor
Type or EU field
If necessary, change the displayed unit type (i.e. meters, feet,
etc.) by tapping the Sensor Type or EU (engineering units)
field and entering the unit type you are calibrating to. Note that
the Sensor Type or EU field only serves as a text label. Tap
the Calibrate button.
tap Calibrate
Enter the maximum unit range of the sensor (30 for a 30’ level
sensor in this example) in the highest value text field and tap
the Next button.
tap highest
value field
Global Water ● (800)876-1172 ● www.globalw.com
Page 31
Chapter 3
If performing a lab calibration, insert the sensor into the appropriate calibration meter and set to full scale
range of the sensor. If performing an environmental calibration, insert sensor into its targeted environment
at conditions of at least 10% of full scale range. For example a 120’ water level sensor should be calibrated
at a water depth of at least 12’. Calibrating at greater percentages (up to 100%) provides greater accuracy.
For both environmental and lab calibrations, wait at least five
seconds for the sensor to adjust to current sensing levels. Tap the
Back button to return to the previous step, the Next button to
continue or the Cancel button to cancel calibration.
tap Next button
tap lowest
value field
Tap the lowest value text field and enter 0.00. Tap the Back button to return to the previous step, the Next button to continue or
the Cancel button to cancel calibration.
tap Next button
For lab calibrations, release the sensor from calibration meter.
For environmental calibrations, take sensor out of targeted environment. For both environmental and lab calibrations, wait at
least five seconds for the sensor to adjust to 0 sensing levels.
Tap the Back button to return to the previous step, the Finish
button to finish calibration or the Cancel button to cancel calibration.
Page 32
tap Finish
Global Water ● (800)876-1172 ● www.globalw.com
Using Global Logger for Palm OS
Verify that High EU and Low EU fields reflect desired unit
readings. Also, verify that the High Raw field reflects a range of
60,000 – 65,000 and that the Low Raw field reflects a range of
10,000 – 15,000.
verify EU and
Raw fields
Adjust the Decimal Places field according to the accuracy percentage rating. The number of decimal places should not exceed
the accuracy of the sensor. See the sensor spec sheet for accuracy rating.
Tap the Main tab, and then tap the OK button. A STANDBY message will display.
Note, that if performing an environmental calibration at a fraction of total sensor range, the bar graphs in the channel menus
(1-2, 3-4, 5-6, 7-8) under the Control screen will interpret full
scale range at maximum calibration readings instead of actual
total sensor range. All other datalogger operations will perform
correctly. To revise calibration settings so that the graphs will
function correctly, follow the worksheet Calibrating the Bar
Graph to Higher or Lower Range in Appendix A*.
*See Appendix A: Worksheets, page 43
Global Water ● (800)876-1172 ● www.globalw.com
Page 33
Chapter 3
Importing Data to PC
Before importing data, install Palm Desktop Software onto a PC. If Global Logger Converter was not installed during setup*, do so now. Save datalogger readings to memory**.
Tap the home button to exit Global Logger for the
Palm OS. Disconnect HotSync cable from adaptor
cable, and connect HotSync cable to COM1 of the
PC.
tap home
button
press HotSync button
Perform a HotSync operation by setting the Palm device
on the cradle and pressing the HotSync button.
Open Global Logger Converter by double-clicking the desktop icon labeled Logger Converter
created during setup*.
* See Installing Global Logger Converter, pages 10 – 14
**See Get History Data, pages 22 – 23
Page 34
Global Water ● (800)876-1172 ● www.globalw.com
Using Global Logger for Palm OS
Global Logger Converter will open a Convert Logger File dialog box.
If the desired Palm database file is not in the current directory, click the down carrot of the Look in: field.
Navigate to the directory containing the file.
click down carrot
Global Water ● (800)876-1172 ● www.globalw.com
Page 35
Chapter 3
Click the file to be converted, and then click the Open button. The filename will appear as it was saved* in
the Palm device. Note that if using the default name format, the forward-slash, space and colon characters
(/, , :) are transformed into the underscore (_) character (i.e. GW_05/01/02 11:58:28 becomes
GW_05_01_02_11_58_28.pdb).
click file
click Open
click File name: field
click Save
A Save Log File As dialog
box will appear. To
change the default name,
click in the File name:
field and type in the desired name. To save the
file to a different directory,
click the down carrot and
navigate to the desired directory. Click the Save
button to save the Palm database file as a comma
separated value file (*.
csv).
*See Get History Data, page 23
Page 36
Global Water ● (800)876-1172 ● www.globalw.com
Using Global Logger for Palm OS
Click the OK button in the Global Water Info dialog box. The
dialog box indicates the file saved in the previous step.
click OK
To convert additional Palm database
files, click File → Convert Logger
File …, and repeat the conversion
procedures*.
To exit Global Logger Converter,
click File → Exit.
*See Importing Data to PC, page 35 – 37
Global Water ● (800)876-1172 ● www.globalw.com
Page 37
Chapter 3
Spreadsheet programs such as Excel* can open comma separated value
files. Excel displays datalogger readings in Date/Time and reading unit
(feet in this example) columns.
Deleting Readings from Palm Device
To delete Global Water database files from the Palm device, go to the home screen by tapping the Home
button. Note that deleting one Global Water database file causes all such database files to be erased.
Furthermore, performing a HotSync operation after deleting database files from the Palm device will
delete parallel database files in the PC’s HotSync directory. It will not affect other Palm database files
or applications. In order to avoid data loss, save a copy of those Global Water database files that need to be
preserved to a PC directory other than the HotSync directory.
tap home
tap time label
Open the home screen menu by tapping the Menu icon or by
tapping the time label at the top of the home screen.
*Windows ExcelTM is a registered trademark of the Microsoft Corporation
Page 38
Global Water ● (800)876-1172 ● www.globalw.com
Using Global Logger for Palm OS
Tap Delete... in the App menu to access the Delete screen.
The Delete screen lists the database file and applications the
user may delete.
tap Delete...
Tap a Global Water database file to delete. The default format
of Global Water database files is GW_<date> <time> (i.e.
GW_05/01/02 10:08:00).
tap a file
Tap the Delete… button to delete the file or the Done button to
exit the Delete screen. Recall that deleting one Global Water
database file deletes all such files.
tap Done
or Delete...
Global Water ● (800)876-1172 ● www.globalw.com
Page 39
Chapter 3
Tap the Yes button in the Delete Application dialog box to delete the Global Water database or the No button to cancel the
delete operation.
tap Yes or No
Tap the Done button to exit the Delete screen.
tap Done
Page 40
Global Water ● (800)876-1172 ● www.globalw.com
Troubleshooting
4
Troubleshooting
Comm Failure
If the Control screen displays Comm Failure at the bottom of
the screen, reattach the adaptor cable*.
tap Get Settings
After the adaptor cable is attached correctly, tap the Get Settings button. If Comm Failure continues to display, replace the
datalogger battery and tap the Get Settings button. Refer to the
datalogger manual for battery replacement instructions. If
Comm Failure continues to display, continue reading the troubleshooting section.
Global Logger Not Working Correctly
Follow all troubleshooting tips in the datalogger manual.
*See Hardware Connection, page 14 – 16
Global Water ● (800)876-1172 ● www.globalw.com
Page 41
Chapter 4
Palm Device Freezes
If your Palm device freezes you may need to reset the unit. Before
continuing, turn off the unit if possible. For Palm m105 devices, flip
the unit over and insert the end of a paperclip (or a similar instrument)
into the hole labeled RESET. Push the paperclip into the hole until
feeling a slight “click.” Other Palm devices can be reset in a similar
fashion. For additional reset operations, refer to the Palm manual.
RESET hole
Deleted Global Water Database Files
Deleting one Global Water database file deletes all such file on the Palm device*. Furthermore, a HotSync
operation deletes all parallel files on the PC. This bug will be fixed in a future version of the software.
Other Issues
•
Call Global Water for tech support: 800-876-1172 or 916-638-3429 (many problems can be solved over
the phone). Fax: 916-638-3270 or Email: [email protected]. When calling for tech support,
please have the following information ready;
1. Model number
2. Unit serial number
3. P.O. number the equipment was purchased on.
4. Our sales number or the invoice number.
5. Repair instructions and/or specific problems relating to the product.
Be prepared to describe the problem you are experiencing including specific details of the application,
installation, and any additional pertinent information.
•
In the event that the equipment needs to be returned to the factory for any reason, please call to obtain
an RMA number (Return Material Authorization). Do not return items without an RMA number displayed on the outside of the package.
Include a written statement describing the problems.
Send the package with shipping prepaid to our factory address. Insure your shipment, since Global
Water’s warranty does not cover damage incurred during transit.
*See Deleting Readings from the Palm Device, pages 38 – 40
Page 42
Global Water ● (800)876-1172 ● www.globalw.com
Warranty
Warranty
5
Global Water Instrumentation, Inc. warrants that its products are free from defects in material and workmanship under normal use and service for a period of one year from date of shipment from the factory.
Global Water’s obligations under this warranty are limited to, at Global Water’s option: (I) replacing or (II)
repairing; any products determined to be defective. In no case shall Global Water’s liability exceed the
products original purchase price. This warranty does not apply to any equipment that has been repaired or
altered, except by Global Water Instrumentation, Inc., or which has been subject to misuse, negligence or
accident. It is expressly agreed that this warranty will be in lieu of all warranties of fitness and in lieu of the
warranty of merchantability.
The warranty begins on the date of the invoice.
Global Water ● (800)876-1172 ● www.globalw.com
Page 43
Appendix A
A
Appendix A: Worksheets
Calibrating the Bar Graph to Higher or Lower Range
With some sensors it is either impractical or unfeasible to reach the full-scale or lower scale of its range.
This will not affect the actual reading of the datalogger but it will cause the bar graph to work incorrectly.
Here are the equations for finding new limits on the bar graph. First take the two coordinates that were
found during calibration*.
(High EU __________, High Raw __________) and
(Low EU __________, Low Raw __________).
Now calculate the slope using this equation:
m = (High Raw – Low Raw) / (High EU – Low EU)
m = ___________
Next find the y-intercept:
b = High Raw - (m * High EU)
b = ___________
Now you can calculate the new “Raw” value for any Engineering Unit.
New Raw = (m * New EU) + b
New Raw = ___________
Finally, enter these new “Raw” values into your datalogger and verify the readings are correct*.
*See Analog Channel Setup, page 33
Page 44
Global Water ● (800)876-1172 ● www.globalw.com
Worksheets
Calibrating Level Sensors for Depth to Water Readings
Note, that to take depth to water readings, the bar graph must be calibrated to the full scale of the sensor. Follow the worksheet Calibrating Bar Graph to Higher or Lower Ranges*.
The first step is to find the Total Depth of the sensor. This is the distance from the end of your sensor to your datum. (Cable lengths from
the factory are not exact. You may need to measure for precise distances.)
Total Depth = _____________
Next, find the maximum Sensor Depth (range of the sensor). In the
Calibration** section of the software, you can find this value by using the following equation:
Sensor Depth = | High EU______ - Low EU______ |
Sensor Depth = ___________
Now you can find your new Engineering Units using these steps:
New Low EU = Total Depth
New Low EU = ___________
New High EU = Total Depth – Sensor Depth
New High EU = __________
Finally, enter these New EU values into your datalogger and verify
the readings are correct**.
* See Appendix A: Worksheets, page 43
**See Analog Channel Setup, page 33
Global Water ● (800)876-1172 ● www.globalw.com
Page 45