1
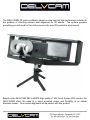
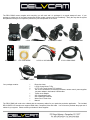
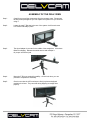
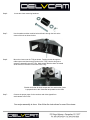
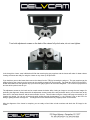
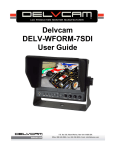
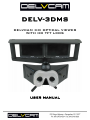
DELV-3DMS
DELVCAM 3-D OPTICAL VIEWER
WITH HD TFT LCDS
USER MANUAL
The DELV-3DMS 3D video confidence viewer is a low cost yet high performance solution to
the problem of checking camera axial alignment for 3D shoots. The system provides
everything you will need for this vital process in the new 3D production environment.
Based on the DELVCAM DELV-HD8TS high quality 8” HD Touch Screen LCD monitor, the
DELV-3DMS offers the ease of a tripod mounted viewer and flexibility of an optical
binocular viewer. Your camera alignment will be perfect with this product.
The DELV-3DMS comes complete with everything you will need and it is packaged in a rugged waterproof case: If your
package is missing any of the listed components please contact customer service immediately. Study the way that the system
was packed so that you can repeat the process for your transportation in the future.
FULL KIT
2 PCS: REMOTE
2 PCS: POWER SUPPLY
1 PC: SOFTWARE
2 PCS: CAR CABLE
Your package contains:
1
1
2
1
1
1
1
1
1
2 PCS: VGA CABLE
2 PCS: AV I/O CABLE
2 PCS: LCD STAND
2 PCS: HDMI CABLE
1 PC: VIEWER HANDLE
Binocular viewer
LCD & Viewer Mount: T-Rig
8” TFT LCD Touch Screen LCD monitors
Set of LCD accessories: touch-screen software, remote control, power supplies
car power adapter, desk stand, USB interface
Tripod mount adapter
Set of thumbwheel bolts
Set of assembly hardware
Water Proof Travel Case
Manual
The DELV-3DMS will need to be outfitted with the necessary cables for your particular production application. The included
DELV-HD8TS LCD monitors can support HDMI video, Composite Video and Audio. You will need to purchase the proper set of
cables for your system. Please contact your dealer for these supplies.
ASSEMBLY OF THE DELV-3DMS
Step1:
Carefully remove all the components from the transport case. Please note
the way it was packaged so you can replace the system once you are done
using it.
Step2:
Locate the main T-Rig that is the core of the system: It will have the two
LCD monitors already in place.
Step3:
The tripod adapter is mounted in the middle of the straight bar. It has been
folded for shipping. Release the swivel tension and re-adjust it
for proper use with a tripod.
Step4:
Mount the T-Rig onto a tripod for stability. Once this is done, you can
proceed to complete the assembly.
Step5:
Check to see that the LCD monitors are firmly in place and aligned
parallel to the frame. They can shift during shipping so realign them
properly.
Step6:
Locate the viewer mounting hardware:
Step7:
Use the washer and the machine bolt and feed it through the hole at the
center of the unit as shown below:
Step8:
Mount the viewer onto the T-Rig as shown. Feeding the bolt through the
rubber spacer and then through the slot in the T-Rig. Use the wing nut to
secure the assembly onto the T-Rig. Make certain that the viewer is located
as far back as it can travel on the slot in the T-Rig:
*Double check that all thumb screws are firm and that the viewer
is perpendicular to the Viewer Bar and parallel to the LCDs.
Step7:
Connect the proper power for the monitors and video signals from
each camera to the LCDs.
Your major assembly is done. Now follow the instructions for use of the viewer.
Turn both adjustment screws on the back of the viewer fully clock wise, do not over tighten.
Look through the viewer, most individuals will find that removing the gray eyepiece and the lenses will make for better clearer
viewing; the lenses are really for using the viewer on very close-up 3D print work.
If you decide to remove the lenses then remove the viewer from the T-Rig by loosening the wing nut. The gray eyepiece can be
easily pulled off the viewer then the lenses can be carefully pressed out and put away. Re-install the viewer onto the DELV3DMS. Individuals who wear glasses may opt to leave the gray eyepiece off the viewer altogether. You will have to play with this
and see which option is best for you.
The adjustment screws on the back can be turned counter-clockwise while viewing an image to converge the two images for
perfecting the alignment. Always start with the adjustment screws turned all the way clockwise and try to turn them both at the
same time in the same direction and the same number of turns. This will make tuning the viewer and image conversion for 3D
viewing very simple. You can use a focus point while looking through the apparatus, i.e.: the “Delvcam” logo on the LCD’s for
aiding in getting the best convergence. This alignment can be done without any images present on the monitor.
After the alignment of the viewer is complete, you are ready to feed video to both monitors and check the 3D image in the
viewer.
NOTES:
DELV-3DMS
DELVCAM 3-D OPTICAL VIEWER
WITH HD TFT LCDS
USER MANUAL