1
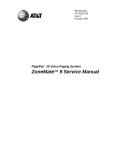
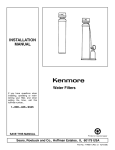
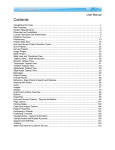
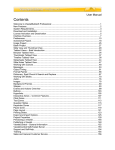
OPERATING INSTRUCTIONS
1.4.1
Station Nomenclature
1.4.2
Station Lamp Signals
1.4.3
DSS Console Lamp Signals
1.4.4
System Tones
1.45
Outside Calls - Outgoing
1.4.6
Outside Calls - Incomming
1.4.6.1
1.4.6.2
1.4.6.3
1.4.6.4
1.4.6.5
1.4.6.6
1.4.7
I
-.
Holding an Outside Call
Exclusive Hold
Transfer After Announcing
Automatic Transfer After Announcing
Transfer Without Announcing (Ring Inward)
Outside Calls - Other Facilities
1.4.8.1
1.4.8.2
1.4.8.3
1.4.8.4
1.4.8.5
1.4.8.6
1.4.8.7
1.4.8.8
1.4.8.9
1.4.9
Incoming Calls
Automatic Incoming Exchange Line Answer (Optional)
Follow Me
Call Forwarding (Optional)
Off-Hook Signalling (Optional)
Night Transfer (Optional)
Outside Calls - Holding and Transferring
1.4.7.1
1.4.7.2
1.4.7.3
1.4.7.4
1.4.7.5
1.4.8
Seizing a Line
Off-HookSeizure
On-Hook Seizure
Outside Line Request
Idle Exchange Line Preference
Single Access On-Hook Dialling (Optional)
Outgoing Calls
On-Hook Dialling
Abbreviated Dialling
Repertory Dialling
Last Number Redial
Last Number Saved
W
Ab ith
so Co
lu m
te pl
Ph im
on en
e ts
&
D
at
1.4.5.1
1.4.5.1.1
1.4.5.1.2
1.4.5.1.3
1.4.5.1.4
1.4.5.1.5
1.4.5.2
1.4.5.3
1.4.5.4
1.4.5.5
1.4.5.6
1.4.5.7
a
1.4
Outside Call Conference
Simultaneous Outside Line Calls
Priority Break-in (Optional)
Change Decadic Dialling to DTMF Signal
PABX RecalVSwitchhook Flash (Optional)
Music-On-Hold (Optional)
Do Not Disturb (Optional)
Data Calls
Power Failure
Intercom Calls - Outgoing
1.4.9.1
1.4.9.2
1.4.9.3
1.4.9.4
1.4.9.5
1.4.9.6
1.4.9.7
1.4.9.8
Making An Intercom Call
Continuous Ring Signal
Direct Station Selection (DSS) Calls
Intercom Step Calls
Intercom Camp-On
Intercom Call Back
Message Waiting
Pilot Number Call
11
BN
Issue 1
1.4.10
Intercom Calls - Incoming
1.4.10.1
1.4.10.2
1.4.10.3
1.4.11
Intercom Calls - Other Facilities
1.4.11.1
1.4.11.2
1.4.11.3
1.4.11.4
1.4.12
Intercom Conference
Intercom Line Hold
Transferring Intercom Calls
Room Monitor (Optional)
Paging
1.4.12.1
1.4.12.2
1.4.12.3
1.4.13
Incoming Intercom Call (Voice)
Incoming Intercom Call (Ring)
Alternate Point Answering
Making a Paging Call
Meet-Me Paging Call
Meet-Me Conference Paging
Other Facilities
1.4.14
Handsfree Station
1.4.15
W
Ab ith
so Co
lu m
te pl
Ph im
on en
e ts
&
D
at
1.4.14.1 Handsfree Operation
1.4.14.2
Dialled Number Display
1.4.14.3 Timer
1.4.14.4 Clock
1.4.14.5 Alarm Clock
1.4.14.6
Incoming Intercom Call Check
1.4.14.7
Message Waiting Check
1.4.14.8
Abbreviated Dial Number Check
1.4.14.9
Repertory Dial Number Check
1.4.14.10 DSS Station Number Check
Headset Station
Headset Operation
1.4.15.1
1.4.15.2 Incoming Calls
1.4.16
DSS Console
1.4.16.1
1.4.16.2
1.4.16.3
1.4.16.4
1.4.16.5
1.4.16.6
1.4.16.7
DSS Call
Automatic Hold of Exchange Line
Paging
Automatic Transfer After Intercom Call
Transfer Without Announcing
Message Waiting
Night Transfer
1.4.17
Door Stations
1.4.18
Standard Telephone Station
1.4.18.1
Outside Calls - Outgoing
1.4.18.2 Outside Calls - Incoming
1.4.18.3 Outside Line Request
1.4.18.4 Enquiry Call
1.4.18.5 Transferring an Outside Call
1.4.18.6
PABX Recall/Switchhook Flash
1.4.18.7
Intercom Calls - Outgoing
1.4.18.8 Intercom Calls - Incoming
1.4.18.9 Intercom Camp-On
1.4.18.10 Intercom Call Back
1.4.19
BN
Issue 1
a
Background Music (Optional)
1.4.13.1
1.4.13.2 Alarm Detection
Call Details Recorder
12
1.4.1
Station Nomenclature
HANDSET \
L’NE KEYS\
1
2
3
4
5
6
7
8
/IN,/ ,- IKNETyERCOM
a
DSS I REPERTORY
DIAL
DESIGNATION LABEL
W
Ab ith
so Co
lu m
te pl
Ph im
on en
e ts
&
D
at
-
*
5
4F//
/’ /’
H
c
F;-
/
-I
VOLUME_/
CONTROL
NOTE:
71
80
91
DIAL CONTROL
KEY
RING INWARD
KEY
RECALLlMON
KEY
DSSlREPERTdRY
DIAL KEYS
LINE KEYS 1 TO 8 AVAILABLE ON TS-BN824-OH
LINE KEYS 1 TO 12 AVAILABLE ON TS-BNl236-OH
LINE KEYS 1 TO 24 AVAILABLE ON TS-BN2464-OH
FIG. 1.4.1 (a) TS-BN824-OH, TS-BNl236-OH
AND TS-BN2464-OH ON-HOOK STATIONS
13
BN
Issue 1
CLOCK KEY
ALARM KEY /
f-
DISPLAY
HANDSET -m-..
YESSAGE
,I ,/-- Io;;rR LAMP
LINE KEYS -.,
/
‘... -.
/’
LAMP
’ / /- g: KOE”:
OS5 I REPERTORY
DIAL
DESIGNATION F ’
LABEL
x’,/
- INTERCOM
KEY
/’
I- HOLO KEY
1”
/
/’
W
Ab ith
so Co
lu m
te pl
Ph im
on en
e ts
&
D
at
a
I’
NOTE:
LINE KEYS 1 TO 8 AVAILABLE ON TS-BN824-HF
LINE KEYS 1 TO 12 AVAILABLE ON TS-BNl236-HF
LINE KEYS 1 TO 24 AVAILABLE ON TS-BN2464-HF
FIG. 1.4.1 (b) TS-BN824-HF, TS-BN 1236-HF
AND TS-BN2464-HF HANDSFREE STATIONS
BN
Issue 1
14
FOLLOW
,/-ME KEY
MlCROPHOnr
KEY
- SET KEY
‘1..
1 :FKER
DIAL CONTROL
KEY
:=:IRING INWARO
KEY
\- RECALLlMON
KEY
INTERNAL ZONE
PAGING KEYS
-EXTERNAL ZONE
PAGING KEYS
ALL CALL
-PAGING KEY
ALARM LAMP
-TRANSFER
KEY
DOOR STATION
KEYS
W
Ab ith
so Co
lu m
te pl
Ph im
on en
e ts
&
D
at
a
055 KEYS
_ SIGNAL CALL/
VOICE CALL KEY
-MESSAGE WAITING
KEY
-NIGHT TRANSFER
KEY
FIG. 1.4.1 (c) DSS-BN824 DSS CONSOLE
15
BN
Issue 1
INTERNAL ZONEPAGING KEYS
-EXTERNAL ZONE
PAGING KEYS
ALARM LAMP -,
\LARM
cl
A--
>1z2
123 124 EZl EZ&
nIInDnnn
W
Ab ith
so Co
lu m
te pl
Ph im
on en
e ts
&
D
at
a
DSS KEYS
-ALL CALL
PAGING KEY
/
DOOR STATIONKEYS
/
/
I
pOORl,JOORZ,
MW
SG/VC k/
NT /
-r----III
---II-
TRANSFER KEY
SIGNAL CALL/
/‘-VOICE CALL KEY
.-tlESSAGE WAITING
KEY
.-NIGHT TRANSFER
KEY
FIG. 1.4.1 (d) DSS-BN 12362464 DSS CONSOLE
_-.-._C_
^~___.. _L.LL ___,_.----..__- _- _.__._
FIG. 1.4.1 (e) DS-BN DOOR STATION
I
CALL BUTTON
1.4.5.1.3
Outside Line Request
When all outside lines in your group are busy, you may request the next free line (refer to Section
2.7.4.1 for programming instructions).
l
l
a
a
Lift the handset or press SPKR key.
Press the HOLD key. The ICM lamp will light and the internal dial tone is heard.
Dial your outside line request group number (0 to 4).
Replace the handset or press SPKR key again.
If the request is accepted the the HOLD lamp will flicker.
If the request is denied then a fast repeating tone is heard.
When a line becomes available a fast repeating warbling tone will sound and the line lamp will
flicker.
l
0
Lift the handset or press SPKR key.
Press the line key.
Idle Exchange Line Preference
W
Ab ith
so Co
lu m
te pl
Ph im
on en
e ts
&
D
at
1.4.5.1.4
a
NOTE: If the free line is not accepted within 20 seconds the request is automatically terminated.
Idle exchange lines may be selected automatically by either of the two methods listed below:METHOD 1
l
Dial 0
An idle exchange line is seized and station is placed into on-hook dialling mode
METHOD 2
Press SPKR key.
Dial an outside line request group number (0 to 4).
An idle exchange line in line request group is seized and station is placed into on-hook dialling
mode.
0
l
NOTE: Method 1 must be performed with the handset on-hook.
1.4.5.1.5
Single Access On-Hook Dialling
Pressing an idle exchange line key will seize that line and place the station into the on-hook
dialling mode.
l
Press idle exchange line key
The exchange line is seized (dial tone will be heard) and station is placed into on-hook dialling
mode.
1.4.5.2
Outgoing Calls
l
l
Seize a line.
Dial the wanted number.
BN
Issue 1
1.4.5.3
On-Hook Dialling
To make a call
0
l
0
l
Seize a line.
Dial the wanted number
When the called party answers, lift the handset to speak
Replace the handset when the call is completed.
To release the line before the connection is established or the handset is lifted, press the SPKR
key.
1.4.5.4
Abbreviated Dialling
W
Ab ith
so Co
lu m
te pl
Ph im
on en
e ts
&
D
at
To call a stored number
.
l
Seize a line.
l
Press DC key.
l
Dial the appropriate abbreviated code (00 to 99).
a
A maximum of 90 numbers (00 to 89)) up to 18 digits each, can be stored as common use
abbreviated numbers. In addition, 10 numbers (90 to 99) can be stored as independent
abbreviated dial numbers for each station.
The stored number will be automatically dialled.
Only station 10 can store numbers for the 90 common use abbreviated dial numbers (00 to 89).
However, all stations may store 10 numbers as independent use abbreviated dial numbers (90 to
99).
To store numbers
l
0
0
l
l
0
a
NOTE:
BN
Issue 1
Lift the handset or press SPKR key
Press DC key. The ICM lamp will light and the intercom dial tone will be heard.
Press the HOLD key. The ICM lamp will remain alight but the intercom dial tone will
cease
Dial the abbreviated dial number e.g. 95
Dial the telephone number to be stored
To store more numbers, press the DC key and repeat the above procedure.
Replace the handset or press SPKR key again when finished.
1.
If your system is an extension frpm a PABX and a pause is required within the
telephone number, press the RL key and continue to enter the remaining digits.
2.
A three second pause is automatically inserted between the trunk access code
and the telephone number when the trunk access code is programmed (refer to
Section 2.7.4.30.4 for programming instructions) and the outside line is
programmed as a PABX line (refer to Section 2.7.4.1 (a)).
3.
If the system comprises any PABX lines, the PABX access code must be
inserted onto all external telephone numbers to be stored. The PABX access
code must also be programmed in accordance with section 2.7.4.30.4. The
PABX access code will be automatically removed when dialling out on a direct
exchange line.
4.
Numbers stored in the common use abbreviated dial (00 to 89) are not subject
to access barring. However, numbers stored as independent use abbreviated
dial numbers (90 to 99) are subject to access barring depending upon the class ot
service of the station (refer to Section 2.7.4.30 for access barring programming).
20
-
1.4.5.5
Repertory Dialling
Stations are provided with 10 DSS keys which are used to store frequently used abbreviated dial
numbers (00 to 99).
To call a Repertory Dial Number
l
Seize a line.
l
Press DC key.
l
Press the required DSS key.
The stored number will be automatically dialled.
To Store Repertory Dial Numbers
l
l
l
0
l
0
1.4.5.6
W
Ab ith
so Co
lu m
te pl
Ph im
on en
e ts
&
D
at
a
l
Lift the handset or press SPKR key
Press the DC key. The ICM lamp will light and the intercom dial tone will be heard.
Press the HOLD key. The ICM lamp will remain alight but the intercom dial tone will
cease.
Press the required DSS key corresponding to the location of the number to be stored.
Dial the abbreviated dial code (00 to 991, corresponding to the number to be stored.
To store more numbers, press the DC key and repeat the above procedure.
Replace the handset or press SPKR key again when finished.
Last Number Redial
l
0
Seize a line.
Press DC key and dial *.
The last number called will be automatically dialled again.
1.4.5.7
Last Number Saved
A frequently called outside number which does not answer, or is engaged, can be saved for
automatic redial.
To save the number after receiving busy tone or no answer
0
0
Press the DC key twice
Replace the handset.
To call the last number saved
l
0
Seize a line.
Press DC key and dial #.
The saved last number will be automatically dialled.
1.4.6
Outside Calls - Incoming
1.4.6.1
Incoming Calls
l
The exchange line lamp will slow flash and ring signalling will be heard through the
station speaker. Two different incoming ring tones are available for ring signalling of
each exchange line (Refer to Sections 2.7.4.2, 2.7.4.3, 2.7.4.6 and 2.7.4.35 for
programming instructions).
0
To answer, lift the handset and press the LINE key or press the LINE key first and
then lift the handset within 3 seconds.
21
BN
Issue 1
1.4.6.5
Off-Hook Signalling (Optional)
If you are engaged on an exchange line call or an intercom call, the audible signal on incoming
exchange lines and intercom calls (if off-hook signalling priority break-in is invoked) will sound
through the station speaker (Refer to Sections 2.7.4.4 and 2.7.4.13 for programming
instructions).
If you are engaged on an exchange line call and an intercom call comes in then your outside call is
held automatically when the ICM key is pressed. If another exchange line call comes in you may
either hold the existing outside call and then answer the new call by pressing the incoming LINE
key, or release the existing outside call by answering the new call by pressing the incoming LINE
key.
If you are engaged on an intercom call and an exchange line call comes in then your intercom call
will be terminated automatically when the outside call is answered.
I1 another intercom call comes in then the ICM lamp will fast flash and the existing intercom call
will be terminated automatically when the new intercom call is answered.
a
Night Transfer (Optional)
When required, the system may be placed into a night service mode disallowing preassigned
stations access to exchange lines for outgoing calls. In addition the audible signalling for incoming
exchange lines is reassigned to pre-determined stations allocated by system programming (Refer
to Section 2.7.4.1 (d), 2.7.4.6 and 2.7.4.7(a) for programming instructions).
W
Ab ith
so Co
lu m
te pl
Ph im
on en
e ts
&
D
at
1.4.6.6
The entire system may be placed into night service mode by a single station or DSS console
(system night service mode). Alternatively, separate groups of stations may be placed into night
service mode (group night service mode) depending upon system programming (Refer to
Section 2.7.4.14 for programming instructions). The station groupings for group night service
mode are the same as for the first assigned incoming line groups as programmed in Section
2.7.4.6.
1.
System Night Service Mode
The entire system may be placed into night service mode by station 10 or by any DSS
console and its associated station.
To place the entire system into and out of night service mode.
a1
b)
from a DSS console
l
Press NT key. The NT lamp will light on all the DSS consoles and the
FW.ME lamp will light on all the stations.
l
Press NT key again to take the system out of night mode. The NT lamps
on the DSS console and the FW.ME lamps on the stations will go out.
from station 10 or an associated station to a DSS console
0
0
l
l
Lift the handset or press SPKR key
Press FW.ME key
Dial #
Replace the handset or press SPKR key again
The FW.ME lamp on all the stations and the NT lamp on the DSS
consoles will light.
23
BN
Issue 1
To take the system out of night service mode:0
0
a
-
Lift the handset or press SPKR key
Press FW.ME key twice
Replace the handset or press SPKR key again
The FW.ME lamp on all the stations and the NT lamp on the DSS consoles will
go out.
Group Night Service Mode
2.
Any station may place itself and the stations within the same incoming line group into
and out of night service mode.
To place your group into night service mode:l
l
l
l
Lift the handset or press SPKR key
Press FW.ME key
Dial #
Replace the handset or press SPKR key again.
W
Ab ith
so Co
lu m
te pl
Ph im
on en
e ts
&
D
at
a
The FW.ME lamp on all the stations with the same incoming line group will light. The
NT lamp of any DSS consoles associated with stations in the group will also light.
To take your group out of night service mode.
a
l
0
Lift the handset or press SPKR key
Press FW.ME key twice
Return the handset or press SPKR key again
The FW.ME lamp on all the stations with the same incoming line group will go out.
The NT lamp on any DSS consoles associated with stations in the group will also go
out.
1.4.1
Outside Calls - Holding and Transferring
1.4.7.1
Holding an Outside Call
l
l
Ask your outside party to wait
Press the HOLD key. The line lamp will fast flash showing I-I101.1) al your still~on
and will flash showing I IOLD at all other stations.
Any other station can take over a held call.
The outside call may be reanswered by pressing the LINE key while oft-hook
Once an outside call has been placed on hold for a pre-programmed length 01‘ time an audible
recall tone will remind you of the held call (Refer to Section 2.7.4.27 I’or programming
instructions). If a station goes off-hook, that is, lifts the handset during the ringback period then
the held call will be automatically reanswered without the riced to press the approprlatc LlNl:
key. The facility is dependent upon system programming (Rcl’cr to Section 2.7.4.31 Ii)1
programming instructions).
BN
Issue 1
24
-
1.4.7.2
Exclusive Hold
Pressing the HOLD key twice places the outside line on Exclusive Hold. The line lamp will flicker
at your station and light steadily at all other stations. In this condition other stations cannot take
over the held call.
The outside call may be re-answered by pressing the LINE key.
Once an outside call has been placed on Exclusive Hold for a pre-programmed length of time an
audible recall tone will remind you of the held call. If the line on exclusive hold is not reanswered
within a pre-programmed time the line will automatically revert to normal hold allowing any
station to answer the line (Refer to Section 2.7.4.25 and 2.7.4.26 for programming instructions).
1.4.7.3
Transfer After Announcing
l
l
0
0
Ask your outside party to wait.
Intercom the station to which the call will be transferred. (Refer to Section 1.4.9). The
outside line is placed on hold automatically.
Announce the call
When the transferred station has taken the call the line lamp will glow steadily.
1.4.7.4
W
Ab ith
so Co
lu m
te pl
Ph im
on en
e ts
&
D
at
a
The transferred station takes over the call by lifting the handset and pressing the held LINE key.
Automatic Transfer After Announcing
After announcing a transferred call and ensuring the transferred station has answered using the
handset, the call can be transferred automatically by pressing the e INW key without the need
li)r the transferred station to press the held LINE key.
This method can be used to transfer calls to standard telephone stations.
1.4.7.5
Transfer Without Announcing (Ring Inward)
0
Ask the outside party to wait
l
l
l
Intercom the station to which the call will be transferred. (Refer to Section 1.4.9). The
outside line is placed on hold automatically.
Press e INW. The line lamp will change to a steady glow
Replace the handset. At the station to which the call is being transferred a fast
warbling tone is heard and the line lamp flickers.
If the call remains unanswered after a predetermined time it will recall to your station with a fast
warbling tone heard over the station speaker. The line lamp will show I-HOLD at your station
and HOLD at all other stations (Refer to Section 2.7.4.28 for programming instructions).
This method can be used to transfer calls to standard telephone stations.
1.4.8
Outside Calls - Other Facilities
1.4.8.1
Outside Call Conference
A maximum of six stations and one outside party can take part in a conference.
To establish a conference
0
Ask the outside party to wait
0
Press the AD.ON key. The outside line lamp flickers
l
Call the second station via intercom
l
Ensure the called party answers by using the handset
0
Press the AD.ON key. The outside line lamp lights steadily
25
BN
Issue 1
A conference is now established. To add more stations to the conference repeat the above
procedure for each station to be included into the conference.
If any party replaces the handset the conference will continue between the remaining parties.
1.4.8.2
Simultaneous Outside Line Calls
Two outside line calls can be conducted simultaneously at a station.
After establishing an outside call, the second call is established as follows:*
l
l
l
Ask the first party to wait
Press the SET key then the AD.ON key. The outside line lamp flickers.
Place the second outside call after seizing an idle exchange line
Press the AD.ON key. The line lamps for both calls light steadily.
The simultaneous outside line call is now established.
To redial the number if the second party is busy or does not answer:Press another LINE key and redial on receipt of dial tone
W
Ab ith
so Co
lu m
te pl
Ph im
on en
e ts
&
D
at
a
*
To return to your first party if the second party is unavailable:0
0
Press the AD.ON key
Press the first party’s LINE key
Either party can be released from the conference by pressing the line key of the party the user
wants to continue the conversation with.
1.4.8.3
Priority Break-In (Optional)
Stations can be assigned a priority break-in level for the purpose of breaking into busy outside or
intercom conversations depending upon programming. (Refer to Section 2.7.4.4 for
programming instructions).
The priority break-in levels are:
Level 1 - Station can break into another station’s outside or intercom call. In addition, the
station can send off-hook signalling to busy stations.
Level 2 - Station can break into another station’s intercom call only. In addition, the station can
send off-hook signalling to busy stations.
Level 3 - Station can send off-hook signalling to a busy station.
After receiving the busy tone when making an intercom call:
0
Press the RL key. The intrusion tone will be heard by both parties and conversation
will be possible if the station breaking in has the necessary priority break-in level
assigned (levels 1 or 21.
Stations with priority break-in levels 1,2 or 3 can send off-hook signalling to a busy station.
After receiving the busy tone when making an intercom call:
l
BN
Issue 1
Dial 1. Off-hook signalling will commence at the called station.
26
1.4.8.4
Change Decadic Dialling to DTMF Signal
While dialling out on an exchange line assigned decadic dialling, the user can change to DTMF
dialling at any stage by dialling #.
Once decadic dialling has been changed to DTMF dialling it cannot be changed back to decadic
dialling while the call is in progress.
1.4.8.5
PABX RecalVSwitchhook Flash (Optional)
If the system is an extension from a PABX, the RL key can be used as an earth recall or
switchhook flash key to obtain hold and transfer features. PABX recall or switchhook flash is
selected for each line in the system with the recall or flashing time being programmable (Refer to
Sections 2.7.4.1 (e) and 2.7.4.19 for programming instructions).
1.4.8.6
Music-On-Hold (Optional)
When an outside line or an intercom line is placed on hold, the caller will hear music while the
call is held.
W
Ab ith
so Co
lu m
te pl
Ph im
on en
e ts
&
D
at
a
The music-on-hold may be the internal electronically synthesised tunes or an external music
source.
There are two internal electronically synthesised tunes available.
They are:11
21
Home on the range
Greensleeves
Station 10 can select either of the two tunes as the music-on-hold for the entire system.
To select the tune from station 1 O:*
l
l
l
1.4.8.7
Lift the handset or press SPKR key
Press SET key, then the HOLD key
Dial 1 for Home on the range or dial 2 for Greensleeves
Replace the handset or press SPKR key again
Do Not Disturb (Optional)
Preassigned stations may enter Do Not Disturb (DND) mode to cancel audible signalling for
incoming exchange line calls or for all calls, including intercom calls, depending upon the
programming (Refer to Section 2.7.4.7(d) for programming information).
There are three modes of operation:Mode 1 Mode2 Mode 3 -
cancel audible signalling for incoming exchange lines
cancel audible signalling for all calls
station may have a choice of DND mode 1 or 2.
To activate DND modes 1 and 2:l
Press DND key with the handset on-hook. The DND lamp will flash for mode 1 and
remain steady for mode 2.
27
BN
Issue 1
To cancel DND modes 1 and 2:@
Press DND key with the handset on-hook. The DND lamp will go out for both modes.
To activate DND mode 3:-
1.4.8.8
0
Press the DND key once with the handset on-hook. The DND lamp will flash
indicating that the station is in DND mode 1.
l
Press the DND key a second time with the handset on-hook. The DND lamp will
glow steadily signalling that the station is in DND mode 2.
0
Press the DND key a third time with the handset on-hook to cancel the DND modes.
The station is returned to the normal mode of operation.
Data Calls
1)
Guarded Data Calls
a
Modems connected in parallel with the A-pair of a key station can make data calls
without interference when the station is placed into the Guarded Data Call mode.
W
Ab ith
so Co
lu m
te pl
Ph im
on en
e ts
&
D
at
The user originates an outside or intercom call using the key station and then passes
control of the A-pair to the modem. Once the station is placed into Guarded Data Call
Mode the station is disabled until the call finishes and the station is taken out of the
Guarded Data Call Mode.
To place a station into Guarded Data Call Mode after a call has been established
0
Press the SET key and then the HOLD key. The HOLD LED will light continuously.
To take the station out of Guarded Data Call Mode:0
Press the SET key and then the HOLD key. The HOLD LED will go out.
NOTE:
For instructions on how to connect modems to the Commander BN systems (Refer to
Sections2.4.13and2.4.14).
2)
Shared Exchange Lines
Modems, facsimile machines or other data transferring equipment, sharing an
exchange line with the system can take control of the exchange line for the duration
of the data or other calls (Refer Sections 2.4.13 and 2.4.14 for installation instructions
and Sections 2.7.4.3 and 2.7.4.23 for programming).
To give the modem or facsimile machine control of the idle exchange line
0
Apply the control voltage to the control input for the shared exchange line. The
shared exchange line LED will light at all stations indicating that the line is busy.
When the modem or facsimile machine is finished with the line
l
BN
Issue 1
Disconnect the control voltage from the control input for the shared exchange
line. The line LED will go out at all stations indicating that the line is idle.
28
Power Failure
When a power failure occurs, outside lines are automatically switched through to
preassigned stations as follows:-
i)
OUTSIDE
LINE
POWERFAIL
STATION
OUTSIDE
LINE
POWERFAIL
STATION
1
2
3
4
5
6
7
8
9
10
11
12
10
11
12
13
14
15
16
17
18
19
20
21
13
14
15
16
17
18
19
20
21
22
23
24
46
47
48
49
50
51
52
53
54
55
56
57
a
1.4.8.9
W
Ab ith
so Co
lu m
te pl
Ph im
on en
e ts
&
D
at
-
TABLE 1.4.8.9 POWERFAIL STATION CONNECTION BN-824/1236/2464
ii)
iii)
iv)
1.4.8.10
Powerfail stations, if equipped, are able to make incoming and outgoing calls during
power failure.
Incoming calls are signalled via a powerfail bell which is equipped with both audible
and visual signalling. One powerfail bell may be provided for each line required for
use during power failure.
All other facilities provided by the system are inoperative during power failure.
Confidence Tone (Optional)
A confidence tone can be provided at the station each time a key is pressed (refer to Section
2.7.4.7 for programming instructions).
To activate the confidence tone:
l
Dial * with the handset on-hook and the speaker off.
Each time a key is pressed a short tone will be heard through the station speaker.
To deactivate the confidence tone:
l
Dial * with the handset on-hook and the speaker off.
29
BN
Issue 1
1.4.9
Intercom Calls - Outgoing
1.4.9.1
Making An Intercom Voice Call
0
0
0
0
Check that the ICM lamp is out (the ICM lamp will glow if all intercom lines are busy).
Lift the handset and press the ICM key. The ICM lamp will glow and intercom dial
tone will be heard
Dial the wanted station number
Speak after hearing a single tone burst
If a double tone burst is heard, the called station has the microphone switched off. Remind the
called party to switch the microphone on to reply.
If a slow repeating tone is heard, then a continuous ring signal is being sent to the called station.
Busy tone means that the party is engaged on another call.
A medium repeating tone means that the called station is in the “Do Not Disturb” mode
(Section 1.4.8.7).
Continuous Ring Signal
W
Ab ith
so Co
lu m
te pl
Ph im
on en
e ts
&
D
at
a
1.4.9.2
If there is no immediate response when a station is called, a continuous ring signal can be
transmitted to the station by dialling “1”. The continuous ring signal can be cancelled and the
voice call re-established by again dialling “1”.
If the system is programmed in the signal call mode, continuous ring is transmitted in the first
instance. Dialling “ 1” reverts the call to a voice call.
1.4.9.3
Direct Station Selection (DSS) Calls.
The Direct Station Selection keys are designated 1 to 10. Ten frequently called station numbers
can be allocated to the DSS keys and can be called by pressing only one of the DSS keys.
To Store a Station Number
0
0
0
a
0
l
Lift the handset or press SPKR key
Press DC key. The ICM lamp will light and the intercom dial tone will be heard.
Press ICM key. The intercom dial tone will cease and the ICM lamp will remain alight
Press the required DSS key where the station number is to be stored
Dial the station number
To store more station numbers in other DSS key locations press DC key and repeat
the above procedure.
To make an intercom call:*
0
Lift the handset
Press the required DSS key
All the normal intercom tones will be received when using Direct Station Selection.
1.4.9.4
Intercom Step Call
When the called station is busy or does not answer, the idle station with the next highest station
number can be called automatically by dialling # after receiving the busy tone or receiving no
answer.
BN
Issue 1
30
1.4.9.5
Intercom Camp-On
If a busy tone is heard when making an intercom call, you can wait for the intercom call to be
automatically established when the busy station becomes free.
l
Dial * after receiving the busy tone and wait with the handset off-hook until the called
station becomes free. The continuous intercom ring tone will be heard through your
station handset when the called station becomes free.
To cancel the Intercom Camp-on
l
l
0
1.4.9.6
Replace the handset then lift the handset again
Dial * and 1
Replace the handset
Intercom Call Back
If a busy tone is heard when making an intercom call, you can wait with the handset on-hook for
the intercom call to be automatically established when the busy station becomes free.
Dial * after receiving the busy tone and replace the handset.
W
Ab ith
so Co
lu m
te pl
Ph im
on en
e ts
&
D
at
a
l
When the called station becomes free your station will ring. Upon answering, continuous
intercom ring tone will be heard at your station until the called station answers.
If the call back is not answered within 20 seconds then it will be automatically cancelled.
To cancel Intercom Call Back
0
0
l
1.4.9.7
Lift the handset or press SPKR key
Dial * and 1
Return the handset or press SPKR key again
Message Waiting
A station may leave a message waiting at a called station if there is no answer.
l
a
0
Make an intercom call
Dial 0 if the called party does not answer
Return the handset
The MW lamp will flicker at your station and fast flash at the called station. If the MW lamp does
not flicker at your station the message waiting has been unsuccessful.
A maximum of one station and one DSS console may leave a message waiting at any one station.
When a called station which has more than one message waiting answers the message waiting
then the DSS console will be answered first.
To answer the message waiting at the called station
l
0
l
Lift the handset
Press the ICM key. The intercom dial tone is heard
Dial *
An intercom signal call will be automatically connected between the station leaving the message
and the station answering the message waiting.
31
BN
Issue 1
The message waiting condition is automatically cancelled by the answering of the intercom call by
the station leaving the message waiting condition.
The message waiting can be cancelled by the station originating the message at anytime. If the
MW lamp continues to fast flash then more than one message waiting was left at the called station.
To cancel:l
0
0
1.4.9.8
Lift the handset or press SPKR key
Dial * and 0
Replace the handset or press SPKR key
Pilot Number Call
Stations may be divided into a maximum of 10 groups of up to 4 stations for pilot number calls
(Refer to Section 2.7.4.9 for programming).
When the pilot number call is implemented the first available station in the group is called in the
same manner as a normal intercom call.
W
Ab ith
so Co
lu m
te pl
Ph im
on en
e ts
&
D
at
a
To establish a pilot number call:l
0
0
Lift the handset
Press the ICM key. The ICM lamp will glow and intercom dial tone will be heard.
Dial # and then the pilot number (0 to 9).
If the station called does not answer, dialling # will call the next available station in the pilot
group.
Exchange line calls can be transferred to a pilot group.
1.4.10
Intercom Calls - Incoming
1.4.10.1
Incoming Intercom Call (Voice)
Incoming. intercom calls are signalled by a single burst of tone followed by the calling party’s
voice through the speaker. The ICM lamp will fast flash indicating that there is an incoming
intercom call. The call may be answered handsfree without lifting the handset.
The microphone may be turned off by pressing the MIC key. The MIC lamp will light steadily
indicating that the microphone is off. Pressing the MIC key again will turn the microphone back
on which is indicated by the MIC lamp going out.
If the status of the microphone is changed during an intercom call then the microphone will
automatically switch back to its original status at the end of the call.
1.4.10.2
Incoming Intercom Call (Signal)
Incoming intercom calls can be signalled by a short repeating ring tone and the ICM lamp fast
flashing. The call can only be answered by lifting the handset.
BN
Issue 1
32
-.
1.4.10.3
Alternative Point Answering
An intercom call to a particular station can be answered by any other station in the system.
To answer another station’s intercom call:*
l
Lift the handset
Dial the called station number
The intercom call is now connected to your station.
If the called station number is in the same paging group as your station then the intercom call can
be answered by a simpler method to the one described above.
To answer another station’s intercom call when the other station is in the same paging group as
your station:a
0
Lift the handset
Dial #
a
The intercom call is now connected to your station.
W
Ab ith
so Co
lu m
te pl
Ph im
on en
e ts
&
D
at
NOTE:
If a Meet-me paging call is heard at your station at the same time you wish to answer
an intercom call to another station, then the above operating procedure will answer
the Meet-me paging call.
1.4.11
Intercom Calls - Other Facilities
1.4.11.1
Intercom Conference
A maximum of six stations can be connected together to form a conference.
a
0
l
l
0
Call the first party and ensure that the called party answers using the handset.
Press the AD.ON key
Listen for intercom dial tone
Dial the second station and ensure that the called party answers using the handset.
Press the AD.ON key
A three station conference is now established. To include more stations into the conference
repeat the above procedures.
If an attempt to include more than six stations into a conference is made then a long single tone
will be heard.
If any party replaces the handset the conference continues between the remaining parties.
The intercom conference facility is lost when the number of intercom lines is increased by
programming (Refer to Section 2.7.4.34).
1.4.11.2
Intercom Line Hold
An intercom call can be placed on hold.
l
l
Ask the internal party to wait
Press the HOLD key. The ICM lamp flickers
33
BN
Issue 1
While holding an intercom line, the holding station must remain off hook and cannot perform
any other operation.
The intercom line may be reanswered by pressing the ICM key.
Music-on-hold is sent to the held station.
The intercom hold facility is lost when the number of intercom lines is increased by programming
(Refer to Section 2.7.4.34)
1.4.11.3
Transferring Intercom Calls
Intercom calls may be transferred to another station by utilising the intercom conference facility
During an intercom call between you and another station
0
0
0
W
Ab ith
so Co
lu m
te pl
Ph im
on en
e ts
&
D
at
l
Press the AD.ON key
Listen for intercom dial tone
Dial the station number to which the call will be transferred and ensure that the called
party answers using the handset
Inform the second party that there is a call to be transferred
Press the AD.ON key again
Replace the handset
a
l
0
The intercom call has been transferred to the second party.
Transferring of intercom calls is not possible when the number of intercom lines is increased by
programming (Refer to Section 2.7.4.34).
1.4.11.4
Room Monitor (Optional)
The monitoring of sound in the vicinity of any key station by any other station is possible (Refer
to Section 2.7.4.22 for programming instructions).
At the key station to be monitored
l
l
l
Lift the handset or press SPKR key
Press the MON key. The MON key lamp fast flashes
Replace the handset or press SPKR key again
At the stations monitoring the sound
l
Press the MON key. The MON lamp will flicker
When room monitoring is in progress an intercom line is used for the monitoring.
Outside calls and intercom calls can still be made at any of the stations involved. However, room
monitoring will be automatically suspended during the progress of the call and will resume when
the call is completed.
Repeat the above procedures to cancel room monitor.
BN
Issue 1
34
1.4.12 Paging
There are four types of paging calls that can be made.
1.
Internal Zone Paging - to make an announcement to stations in one of four internal
paging zones.
2.
External Zone Paging - to make an external public address announcement over one
of two external zones.
3.
All External Zone Paging - to make an external public address announcement over
both external zones.
4.
All Call Paging - to make an announcement to all stations and both external zones.
For internal zone paging programming refer to Section 2.7.4.7.
For external zone paging programming refer to Section 2.7.4.15 and 2.7.4.16.
Making a Paging Call
a
1.4.12.1
W
Ab ith
so Co
lu m
te pl
Ph im
on en
e ts
&
D
at
To make a paging call
0
l
l
l
Lift the handset
Press the ICM key. The ICM lamp will light and intercom dial tone will be heard
Dial the paging code required and make the announcement
Return the handset
Paging Codes
All Call Paging
Internal Zone 1
Internal Zone 2
Internal Zone 3
Internal Zone 4
All External Zone Paging
External Zone 1
External Zone 2
80
81
82
83
84
85
86
87
A double splash tone is optional when a paging announcement is made. For splash tone
programming refer to Section 2.7.4.32.
1.4.12.2
Meet-Me Paging Call
After making an All Call or Internal Zone paging announcement for a called party to “Meet-me”
0
Press #and wait with the handset off hook for the called party to respond.
The called party establishes an intercom connection by lifting the handset and dialling # at any
station receiving the paging call.
35
BN
Issue 1
1.4.12.3
Meet-Me Conference Paging
After making an All Call or Internal Zone paging announcement for the called parties to
“Add-On” and form a conference of up to six stations
a
Press AD.ON key and wait with the handset off hook for the called parties to respond.
To respond to the meet-me conference call
0
l
Lift the handset
Press the AD.ON key at any station receiving the paging call
The called parties must respond to the meet-me conference call within 30 seconds otherwise they
will be excluded from the conference.
1.4.13 Other Facilities
1.4.13.1
Background Music (Optional)
W
Ab ith
so Co
lu m
te pl
Ph im
on en
e ts
&
D
at
a
On systems where background music is provided the music may be heard over a station’s speaker
by dialling #. The background music may be turned off by again dialling # (Refer to Section
2.7.4.21 for programming instructions).
NOTE:
1.4.13.2
Background music is automatically suppressed when incoming or outgoing calls are in
progress.
Alarm Detection (Optional)
The system has two alarm inputs that, when triggered, activate an alarm tone at preassigned
stations and external speakers. There are two different tones to signal the two alarms. Alarm 1
activates a short repeating tone while Alarm 2 activates a repeating triple tone burst (Refer to
Sections 2.7.4.15,2.7.4.23 and 2.7.4.33 for programming instructions).
The alarms are automatically cancelled when the alarm trigger condition is cancelled.
1.4.14 Handsfree Station
Handsfree stations feature a display and the display control keys in addition to the other facility
keys found on the On-Hook station.
The following facilities are available in addition to the facilities described earlier.
1.4.14.1 Handsfree Operation
The station may operate in Handsfree mode for every type of call. To place the station in
Handsfree mode press the SPKR key with the handset on hook. This is equivalent to lifting the
handset. To terminate the call press the SPKR key again.
Lifting the handset during a Handsfree call will automatically switch the conversation to the
handset.
If you wish to change from the handset conversation to Handsfree mode press the SPKR key
before replacing the handset.
The microphone may be disabled at any time during a Handsfree conversation by pressing the
MIC key. The MIC lamp will glow to indicate that the microphone is off. To enable the
microphone press the MIC key again.
BN
Issue 1
36
If the status of the microphone is changed during an intercom or exchange line call the
microphone will automatically switch back to its original status at the end of the call.
If the microphone is initially off and an intercom or exchange line is seized the microphone will
be automatically switched on. At the completion of the call the microphone status will return to
the off condition.
1.4.14.2
Dialled Number Display
When dialling out, the number dialled will be shown on the display. The last 11 digits will remain
displayed during the progress of the call, or can be cleared by pressing the CLOCK or TIMER
keys.
1.4.14.3 Timer
The timer can be used either as a stopwatch or to time a call’s duration in hours, minutes and
seconds.
To start the timer:l
Press the TIMER key
a
-
W
Ab ith
so Co
lu m
te pl
Ph im
on en
e ts
&
D
at
I
To stop the timer:l
l
Press the TIMER key
OR
Replace the handset or press SPKR key if hands free when the duration of a call is
being timed.
Press the CLOCK key to return the display to the clock mode.
1.4.14.4 Clock
When in the clock mode the display will show the month, date, day of the week and the time in
hours and minutes.
The clock can only be set by a Handsfree station or the Test and Programming Unit plugged into
station 10 socket.
To set the clock:-
Lift the handset or press SPKR key
Press SET key
Press CLOCK key
Dial the year (e.g. 19861
Dial *
Dial the month and date (e.g. 0927-27th September)
Dial *
Dial the number corresponding to the day of the week
0 - Sunday, 1 - Monday, . . . . 6 - Saturday
l
l
l
l
Dial *
Dial the time in 24 hour time (e.g. 1315 - 1.15p.m.)
Dial *
Return the handset or press SPKR key
37
BN
Issue 1
1.4.14.5
Alarm Clock
Two alarm clocks are available and when set will go off at the set time every day.
To set the alarms
l
l
l
l
l
l
Lift the handset or press SPKR key
Press the ALARM key
Dial 1 for alarm 1 or dial 2 for alarm 2
Dial the required time in 24 hour time (e.g. 1305 -1.15p.m.)
Dial *
Replace the handset or press SPKR key again.
The symbols ((‘11 for alarm 1 or (t21) for alarm 2 will be displayed to signal that one or both
alarms have been set.
The alarm can be silenced by pressing the ALARM key. If the ALARM key is not pressed, the
tone will continue for approximately one minute.
l
l
l
l
1.4.14.6
Lift the handset or press SPKR key
Press the ALARM key
Dial 1 for alarm 1 or dial 2 for alarm 2
Dial *
Replace the handset or press SPKR key again.
W
Ab ith
so Co
lu m
te pl
Ph im
on en
e ts
&
D
at
l
a
To clear the alarms:-
Incoming Intercom Call Check
The station number of the station originating an intercom call will be automatically displayed
when the display is in the clock mode. When the display is displaying the dialled number then
pressing the CHECK key will display the station number originating the intercom call. If the
display is in a Timer mode then the display must be placed into the Clock mode before pressing
the CHECK key to display the station number originating the intercom call.
1.4.14.7
Message Waiting Check
If the MW lamp is indicating that there is a message waiting by fast flashing then the station
numbers of the stations originating the messages can be displayed.
To display the station numbers:l
l
Press the CHECK key with the handset on hook
Dial *
Press the CLOCK key to return the display to the clock mode.
1.4.14.8
Abbreviated Dial Number Check
The abbreviated dial numbers can be displayed.
l
l
Press the CHECK key with the handset on hook
Dial the abbreviated code (00 to 991. The stored number will be displayed.
If the number exceeds 11 digits, press the * key to display the remaining digits.
Press the CLOCK key to return the display to the clock mode.
f
BN
Issue 1
38
-
1.4.14.9
I
Repertory Dial Number Check
To display the abbreviated dial codes stored for repertory dialling.
l
l
Press the CHECK key with the handset on hook
Press the required DSS key. The abbreviated dial code will be displayed.
Press the CLOCK key to return the display to the clock mode.
1.4.14.10 DSS Station Number Check
The station numbers assigned to the DSS keys can be displayed.
Press the CHECK key with the handset on hook, then the ICM key
Press the required DSS key. The station number assigned to the DSS key will be
displayed.
l
l
Press the CLOCK key to return the display to the clock mode.
_-
a
1.4.15 Headset Station
W
Ab ith
so Co
lu m
te pl
Ph im
on en
e ts
&
D
at
I
Headset stations can be either Handsfree or On-Hook stations which have the Headset Interface
Board installed (refer to Section 2.3.5.4 for installation instructions). A Handsfree station loses
the handsfree facility when the headset interface is installed.
1.4.15.1
Headset Operation
The Headset station can operate in headset mode for every type of call. To place the station into
headset mode press the SPKR key with the handset on-hook. This is equivalent to lifting the
handset. To terminate a call press the SPKR key again.
Lifting the handset during a headset call will automatically switch the conversation to the handset.
If you wish to change from using the handset to the headset press the SPKR key before replacing
the handset.
1.4.15.2 Incoming Calls
Incoming intercom calls (voice) are received via the headset and can be answered without
touching the station. The ICM lamp fast flashes.
Incoming intercom calls (ring) are signalled through the station speaker and by the fast flashing
of the ICM lamp.
To answer
l
l
Press the SPKR key. The SPKR lamp will light.
Press the ICM key. The ICM lamp will light steadily and conversation is possible via
the headset.
Incoming outside line calls are signalled through the station speaker and by the slow flashing of
the LINE lamp.
To answer:
l
l
Press the SPKR key. The SPKR lamp will light.
Press the incoming LINE key. The LINE lamp will light steadily and conversation is
possible via the headset.
39
BN
Issue 1
1.4.16 DSS Console
Up to two DSS consoles can be used with the BN-824 and BN-1236 systems and up to six DSS
consoles can be used with the BN-2464 system.
Each DSS console is assigned to a station (Refer to Section 2.7.4.11 for programming
instructions).
1.4.16.1 DSSCall
An intercom call to any station can be made with a single key operation using the DSS console.
l
l
Lift the handset on the associated station
Press the required direct station selection (DSS) key to establish an intercom call.
To change an intercom voice call to a signal call or an intercom signal call to a voice call press the
SGIVC key.
1.4.16.2
Automatic Hold of Exchange Line
W
Ab ith
so Co
lu m
te pl
Ph im
on en
e ts
&
D
at
a
Pressing a direct station selection key or paging key while having an outside call will automatically
place the outside call on hold.
1.4.16.3 Paging
A paging call to any of the internal or external zones can be made with a single key operation in a
similar manner to a DSS call.
The internal zones are labelled IZl, IZ2, 123, and IZ4 while the external zones are labelled EZl ,
EZ2, and EAZ for external all zone. The All Call paging key is labelled AC.
To make a paging call:l
l
1.4.16.4
Lift the handset on the associated station
Press the required paging key to establish a paging call
Automatic Transfer After Intercom Call
After announcing a transferred call using intercom and ensuring the transferred station has
answered using the handset, the call can be transferred automatically by pressing the TRFR key
without the need for the transferred station to press the held LINE key.
This is a similar method to Automatic Transfer after Announcing, Section 1.4.7.4
1.4.16.5
Transfer Without Announcing
l
l
l
l
Ask the outside party to wait
Press the required direct station selection (DSS) key. The outside line is
automatically placed on hold
Press the TRFR key. The line lamp will change to a steady glow
Replace the handset.
At the station to which the call is being transferred a fast warbling tone is heard and the line lamp
flickers.
BN
Issue 1
40
If the call remains unanswered for a predetermined time it will recall to your station with a fast
warbling tone heard over the station speaker. The line lamp will show I-HOLD at your station
and HOLD at all other stations. (Refer to Section 2.7.4.28 for programming instructions of the
ringback timer).
This transfer method is similar to Section 1.4.7.5 Transfer Without Announcing.
1.4.16.6 Message Waiting
The DSS console may leave a message waiting at another station if the station does not answer
l
l
l
Make an intercom call
Press MW key if the called party does not answer
Replace the handset
The MW lamp on the associated station will flicker and the station lamp on the DSS console will
slow flash.
The MW lamp on the message waiting station will fast flash.
Press the MW key with the handset on hook
Press the DSS key of the station which you want to clear the message waiting
condition.
W
Ab ith
so Co
lu m
te pl
Ph im
on en
e ts
&
D
at
l
a
To cancel the message waiting:l
The message waiting is similar to Section 1.4.9.7 Message Waiting.
1.4.16.7 Night Transfer
The DSS console can place the system or the group that the DSS console is a member of into
night service mode (Refer to Section 1.4.6.6 Night Transfer).
To place the system or group of stations into night service mode:l
Press the NT key with the handset on hook. The NT lamp on the DSS console and the
FW.ME lamp of the stations placed into night mode will light.
To take the system or group of stations out of night service mode:l
Press the NT key again with the handset on hook. The NT lamp of the DSS consoles
and FW.ME lamp of the stations previously placed into night mode will go out.
1.4.17 Door Stations
Door stations provide a chime tone and Handsfree talkback to assigned key stations (Refer to
Section 2.7.4.10 for programming instructions).
A maximum of two door stations may be connected to the system with each door station having a
different chime tone. Door station 1 has a slow chime tone while door station 2 has a quick chime
tone. The length of the chime is selectable between a short tone and a 30 second repeating chime
tone (Refer to Section 2.7.4.24 for programming instructions).
41
BN
Issue 1
To initiate a door station call:l
Press the CALL button. The chime tone will be heard at the door station and the
stations programmed to receive a door station call. The ICM LED will fast flash at
stations receiving the door station call.
To answer a door station call
l
Lift the handset while the ICM LED is fast flashing. The ICM LED will light steadily
indicating an intercom call is in progress with the door station.
To call a door station
l
l
Lift the handset and press the ICM key. The ICM lamp will light and intercom dial
tone will be heard.
Dial 88 for door station 1 or 89 for door station 2
Only one door station can send or receive calls at any one time. The other door station ’
not in use cannot initiate a door station call and the door station appears busy to
calling stations.
W
Ab ith
so Co
lu m
te pl
Ph im
on en
e ts
&
D
at
a
NOTE:
1.4.18
Standard Telephone Station
1.4.18.1
Outside Calls - Outgoing
l
l
l
Lift the handset, listen for special facility tone
Dial 0 to connect to any free line
Listen for outside dial tone, then dial the wanted number
To seize a line allocated to a line request group dial the line request group number 1 to 4 after
obtaining the internal dial tone
To seize a particular line dial 5, then the two digit line number.
01 to 08 for BN-824
01 to 12 for BN-1236
01 to 24 for BN-2464.
1.4.18.2
Outside Calls - Incoming
l
1.4.18.3
Lift the handset to answer incoming calls
Outside Line Request
When all outside lines in your group are busy, the next free line may be requested when the busy
tone is heard.
l
l
Dial the outside line request group number (1 to 4). The special facility tone will be
heard.
Replace the handset.
NOTE: If the busy tone is still heard after dialling the line request group number then the outside
line request has been denied.
BN
Issue I
42
When a line in the group becomes available the station will ring.
0
If the free line is not accepted within 20 seconds the request is automatically
terminated.
NOTE:
1.4.18.4
Lift the handset. The outside dial tone will be heard.
Enquiry Call (Holding An Outside Call)
To make an internal call while holding an outside call:l
l
l
l
l
0
l
Transferring an Outside Call
a
1.4.18.5
Ask the outside party to wait
Quickly depress and release the switchhooks
Listen for special facility tone
Dial 7
Listen for intercom dial tone
Dial the required station number for the enquiry call
Depress and release the switchhooks again to return to the held call.
W
Ab ith
so Co
lu m
te pl
Ph im
on en
e ts
&
D
at
Ask the outside party to wait
Quickly depress and release the switchhooks
Listen for special facility tone
Dial 7
Listen for intercom dial tone.
Dial the required station number to whom the call will be transferred
Announce the call
Replace the handset, the call is automatically transferred.
If the called station is busy or does not answer then you may return to the held line by quickly
depressing and releasing the switchhooks.
1.4.18.6
PABX RecalVSwitchhook Flash
If the system is an extension from a PABX, the hold and transfer facilities of the PABX can be
obtained.
l
l
1.4.18.7
Quickly depress and release the switchhooks. The special facility tone will be heard
Dial 1
Intercom Calls - Outgoing
l
l
l
Lift the handset, listen for special facility tone
Dial 7 to connect to an intercom line
Dial the required station number
If all intercom lines are busy then the busy tone will be heard.
1.4.18.8
Intercom Calls - Incoming
l
Lift the handset to answer incoming intercom calls
43
BN
Issue 1
1.4.18.9 Intercom Camp-On
If the busy tone is heard when making an intercom call
l
Dial 2 and remain off hook
Provided the handset remains off hook, an intercom signal call will be automatically established
when the called station becomes free. Dialling 1 changes the intercom signal call to an intercom
voice call.
1.4.18.10 Intercom Call Back
If the busy tone is heard when making an intercom call
l
Dial 2 and replace the handset
When the called station becomes free your station will ring
If the call back is not answered within 20 seconds then the call is automatically
cancelled.
W
Ab ith
so Co
lu m
te pl
Ph im
on en
e ts
&
D
at
NOTE:
Lift the handset. An intercom signal call is automatically established with the called
station.
a
l
To cancel Intercom Call Back
l
l
1.4.18.11
Lift the handset. The special facility tone will be heard.
Dial 8 and replace the handset
Entering An Account Code
If the call details recorder facility with the account code option is provided (Refer to Section
1.4.19) then an account code can be entered anytime during a call.
To enter an account code
l
Quickly depress and release the switchhooks. The special facility tone will be heard
0
Dial 9
l
Enter an account code
l
Quickly depress and release the switchhooks to return to your call.
1.4.19
Call Details Recorder
The call details recorder facility provides call data printouts via a printer. Details of calls made and
received on the BN systems are printed in five categories.
The call categories and abbreviations are:
l
Outgoing call
l
Incoming call
l
All trunks busy
l
Barred outgoing
l
Buffer full
OTC
INC
ATB
BRD
BFL
The details for each category will include the date, time, line number or group number. duration,
station number, number dialled, ring duration before answer (incoming calls only) and if
required an account code. (Refer to Section 2.5.6 for installation instructions and Sections
~
2.7.4.3, 2.7.4.36 and 2.7.4.37 for programming instructions).
BN
Issue 1
44
The details of 55 calls per page will be printed. The page number is printed on the top right hand
side of the page and the call number (01-55) is printed in the first column.
CDR Printout Example
TIME
15:50:05
15:51:10
15:50:42
15:55:43
15:55:53
15:56:09
16iOO:OO
16:42:54
LINE
01
01
03
01
02
02
14
01
DIALED #
60655
RING
DUR
0o:oo: 11
0o:oo: 10
00:05:00
00:00:06
00:00:03
00:00:30
ST#
20
10
10
02 60683
0
001112136502311
00:00:05
11
60666
20
PAGE 0 0 1
AC
0O:Ol
12345678
Outgoing Calls (OTG)
a
OTG
INC
ATB
OTG
BRD
OTG
BFL
OTG
DATE
2814183
28/4/83
28/4/83
2814183
2814183
2814183
28/4/83
2814183
A maximum of 20 digits dialled can be printed. However, the last 2 digits will not be printed in
order to maintain privacy.
W
Ab ith
so Co
lu m
te pl
Ph im
on en
e ts
&
D
at
01
02
03
04
05
06
07
08
CLASS
The timing of the call commences 1 or 5 seconds after the 1st digit is dialled (set at installation).
NOTE:
Call duration provided by the Call Details Recorder is not used by Telecom to
determine call charging.
Incoming Calls (IN0
The time in the DURation column (hours, mins, secsl indicates call duration after answer. The
time in the RING column (mins, sets) indicates the time the caller waited before answer. The
entry in the ST# column indicates the station number that answered the call. If there is no entry
in the ST# column then the call was not answered.
Al1 Trunks Busy (ATB)
When all lines in a group are in use, the entry in the LINE column indicates the line group
number. See call number 3 of sample printout.
Barred Outgoing (BRD) - Option
When this option is selected, the printout will indicate the station number, line number and the
barred code attempted.
Buffer Full (BFL)
8 buffer memories per outside line are provided to store information while the printer is out of
service. This will occur when changing the paper. When the printer is back in service the call
details will be printed.
If the printer is out of service for a lengthy period the buffers may become full. The number of
calls for which information is lost is printed out on an hourly basis. The entry in the LINE column
indicates the number of calls not printed. See call number 7 of sample printout.
45
BN
Issue 1
Account Code (AC)
If it is necessary to charge calls to a department, individual extension, or a client, account codes
are entered when calls are made and received. The account facility can be compulsory, optional or
not available and is decided upon at installation (refer to Section 2.56 for installation
instructions). Account codes are selected from a range of 1 to any 8 digit number. The person
making or receiving the call enters the account code by dialling *account code* from a key station.
To enter an account from a standard telephone station, quickly depress and release the
switchhooks, dial 9, enter the account code, and then quickly depress and release the
switchhooks to return to your call. The account code can be entered at any time during the call.
NOTE:
1.4.20
If your company has selected the option of inserting the account code before dialling,
outgoing calls cannot be made until the account code is entered.
Service Difficulties and Assistance
1.4.20.1 Service Difficulties
If difficulties are encountered call Service Difficulties on 1100.
W
Ab ith
so Co
lu m
te pl
Ph im
on en
e ts
&
D
at
a
1.4.20.2 Assistance
Telecom Australia has skilled Service Advisors available to assist you with the operation of your
Commander system. For further information, call your Telecom Business Oflice. The free call
telephone number is listed in the information pages of your telephone directory.
1.5
SYSTEM COMPONENTS
1.5.1
General
The system is made up of the following items; Main Equipment (ME), Expansion Rack (ER) if
BN-2464 system, Power Supply if BN-1236/2464 system, Stations and Powerfail Bells. In
addition the following are available; Call Metering Unit (CMU), Two-Wire Extender Unit
(2WEU-AN), Tie Line Unit (RTIU) and the Ring Generator Unit (RGU-AN).
(9
BN-824 Main Equipment
The main equipment consists of a two shelf rack. The lower shelf houses plug-in
PBA’s described in Table 1 S.1 (i) and Amp CHAMP connectors to provide
connection of the SDF to the backplane. The top shelf houses a removable power
supply for the BN-824 and the removable SDF. The power supply is connected to the
backplane via a multipin socket.
(ii)
BN-1236 Main Equipment
The Main Equipment consists of a one shelf rack which houses plug-in PBA’s. Table
1 S.1 (i) contains details of the printed circuit boards housed in the main equipment
and the expansion rack. In addition, the main equipment has AMP CHAMP
connectors below the shelf rack to provide connection between the main equipment
and the SDF. A multipin socket is provided for connection of the BN-1236/2464
Power Supply to the main equipment.
BN
Issue 1
46