1
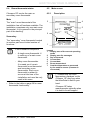
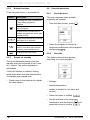
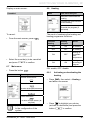
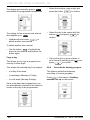
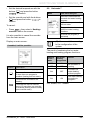
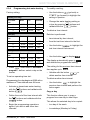
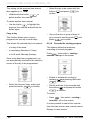
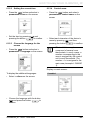
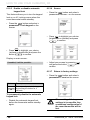
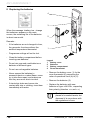
Climapro2RF
User manual
To be left with the user
wireless room thermostat
without receiver
www.glow-worm.co.uk
table of contents
READ CAREFULLY BEFORE USING
1
Introducing your Climapro2 RF.................................................................... 3
1.1
2
Description........................................................................................ 3
Product documentation............................................................................... 3
2.1
2.2
Document storage............................................................................. 3
Explanation of symbols..................................................................... 3
3
Safety.......................................................................................................... 3
4
Guarantee / Responsibility.......................................................................... 4
4.1
4.2
4.3
4.4
5
Detailed guarantee............................................................................ 4
Climapro2 RF / manufacturer responsibility..................................... 4
Protection against frost...................................................................... 5
Thermostat Placement...................................................................... 5
Recycling..................................................................................................... 5
5.1
5.2
Appliance........................................................................................... 5
Packaging.......................................................................................... 5
HOW TO USE YOUR CLIMAPRO2 RF
6
Climapro2 RF use........................................................................................ 6
6.1
6.2
6.3
6.4
6.5
6.6
6.7
6.8
6.9
6.10
6.11
6.12
6.13
General view..................................................................................... 6
Description of buttons........................................................................ 6
Climapro2 RF and its wall support..................................................... 6
Room thermostat status.................................................................... 7
Main screen....................................................................................... 7
Override shortcuts............................................................................. 8
Main menu......................................................................................... 9
Heating.............................................................................................. 9
Hot water**...................................................................................... 13
Cooling function**............................................................................ 17
Holiday............................................................................................ 21
Parameters...................................................................................... 22
Summary of available menus and functions**................................. 25
-1-
table of contents
ANY ASSISTANCE?
7
Trouble-shooting....................................................................................... 27
8
Replacing the batteries............................................................................. 28
9
Maintenance and care of Climapro2 RF.................................................... 29
9.1
9.2
10
-2-
Cleaning.......................................................................................... 29
Spare Parts..................................................................................... 29
Contact your after-sales............................................................................ 29
READ CAREFULLY BEFORE USING
READ CAREFULLY BEFORE USING
1 Introducing your Climapro2 RF
1.1 Description
This Climapro2 RF is a programmable
room thermostat that is used to control
a heating and / or cooling system in
accordance with the temperature of
the room in which it is installed and the
corresponding heating and/or cooling
program; It offers the possibility of
connection to an outdoor sensor. The
room thermostat also controls hot-water
temperature in accordance with the
corresponding programming.
No responsibility or liability can be
accepted for damages caused by failure to
follow the instructions in this manual.
2.2 Explanation of symbols
a
IMPORTANT: Useful
information.
3 Safety
The CE mark indicates that
this appliance has been
manufactured according to
the safety regulations and
techniques in force.
This appliance’s conformity
with the applicable regulations
has been certified.
Glow-worm has specially developed a
range of accessories designed to help
you get the best performance from your
appliance.
2 Product documentation
2.1 Document storage
• Make sure that this manual is stored
close to your Climapro2 RF for future
reference. Should you move home
ensure that this manual is close to this
room thermostat or placed in the home
information pack for future reference by
the new home owners.
• Read these instructions and follow
them carefully for the safe and efficient
use of your room thermostat.
DANGER: Risk of injuries.
a
You must comply with the
following recommendations
and safety instructions:
• Do not attempt to modify Climapro2
RF or its immediate surroundings as
this may have an affect on the safe use
of the appliance.
• Never perform any maintenance or
repair of the room thermostat yourself.
Only qualified engineers are allowed to
work on the room thermostat.
• Do not allow children to operate the
appliance.
Certain home improvements may
adversely affect the operation of your
Climapro2 RF. You should consult your
installer for advice before carrying out any
work.
0020094580_01 - 08/10 - Glow-worm
-3-
READ CAREFULLY BEFORE USING
a
We recommend that you take
great care when adjusting
the hot-water temperature.
Water can be very hot when
it leaves the tap.
4 Guarantee / Responsibility
4.1 Detailed guarantee
The room thermostat that you have
chosen has undergone numerous quality
inspections. This apparatus must be
installed by a qualified professional who
can verify that all the technical constraints
relating to the connection of the appliance
and the requirements of the installation
location have been met. To obtain the
maximum benefit of your room thermostat,
it must be thoroughly checked for
operation and adjustments specific to the
installation it is connected to.
Glow-worm offers a two year parts and
labour guarantee against defects in
manufacture and defective parts.
As a result, we commit to repairing
or replacing the parts recognised as
defective at origin.
The repair or replacement of parts during
the manufacturer’s guarantee period does
not have the effect of prolonging its initial
duration.
4.2 Climapro2 RF / manufacturer
responsibility
The guarantee detailed above
is applicable on the condition
that:
-- The appliance is installed by a qualified
engineer in accordance with installation
instructions.
-- Climapro2 RF is used for normal
domestic purposes and in accordance
with the manufacturer’s operating and
maintenance instructions.
-- Climapro2 RF is not serviced,
maintained, repaired dismantled or
tampered with during the guarantee
period, by anyone other than a qualified
engineer.
-- The repair or replacement of parts
during the guarantee period does not
have the effect of extending the period.
The manufacturer has no
responsibility whatsoever for
any damage resulting from:
-- Faults or damage resulting from an
incorrect or inadequate installation,
inappropriate maintenance or incorrect
settings.
-- Any defects in the system to which the
Climapro2 RF is connected.
The manufacturer’s parts guarantee is
invalidated in the case of an incorrect
installation or inappropriate storage or in
the case of defective operation, damage
to the control box resulting from abnormal,
abusive use or inadequate maintenance.
-- Any defects caused by inadequate frost
protection.
Servicing/maintenance should be carried
out by a competent person approved
at the time by the Health and Safety
Executive in accordance with the rules in
force in the countries of destination.
• For further details, refer to your Terms
and Conditions.
-4-
-- Any deterioration or maladjustment
following changes in the characteristics
of the electrical supply voltage.
0020094580_01 - 08/10 - Glow-worm
READ CAREFULLY BEFORE USING
Climapro2 RF is not designed to be
used by persons (including children) with
physical, sensory or mental restrictions,
or a lack of experience or knowledge. To
ensure the safety of these persons, they
must seek help from and be guided by
persons who are competent to explain the
usage of this room thermostat.
• Make sure that children do not play with
this appliance.
4.3 Protection against frost
The appliance’s frost-protection system
switches the heating on when:
-- The room temperature where the
appliance is installed goes below 5 °C
or if the outside temperature is below
3°C.
For an absence for a determined period:
• Specify the duration of your absence
(see the «holiday» menu).
For an indeterminate or prolonged
absence:
• Deactivate the room thermostats
heating function so that the heating
system uses its own functioning
settings (see the menu «activate/
deactivate the heating»).
5 Recycling
5.1 Appliance
Climapro2 RF contains many recyclable
This symbol indicates that
this room thermostat must
not be disposed of with
household waste, that it
should be selectively collected
for energy recovery, reuse or
recycling.
Take the room thermostat to an
appropriate collection point for processing,
energy recovery and recycling of waste.
By complying with this
directive, you will contribute
to the preservation of natural
resources and the protection of
human health.
5.2 Packaging
-- We recommend that you recycle the
packaging of the Climapro2 RF ina
responsible fashion.
-- dispose of the waste in compliance with
regulations in force.
• Refer to the boiler manual for protection
guidance.
4.4 Thermostat Placement
To ensure correct functioning of the
heating system, whenever possible the
Climapro2 RF should be placed in the
room thermostat support that is mounted
in the temperature reference room of the
property.
0020094580_01 - 08/10 - Glow-worm
-5-
HOW TO USE YOUR CLIMAPRO2 RF
HOW TO USE YOUR CLIMAPRO2 RF
6 Climapro2 RF use
6.1 General view
7
6
5
4
3
2
6.2 Description of buttons
Buttons
Description
Scroll (up / down) buttons
The buttons allow:
- To browse menus.
- To decrease / increase value
to be adjusted.
- To enable (ON) or disable
(OFF) a function.
Selection button
The button allows:
- To validate the selection or
setting.
Back button
The button allows:
- To return to the previous menu.
- To return to the previous
setting.
Menu button
The button allows:
- To access the main menu.
- Return to the main screen (at
any time).
6.3 Climapro2 RF and its wall support
1
Legend
1 Wall support
2 Room thermostat
3 Scroll (up / down) button
4 Selection button
5 Back button
6 Menu button
7 Screen
-6-
0020094580_01 - 08/10 - Glow-worm
HOW TO USE YOUR CLIMAPRO2 RF
6.4 Room thermostat status
6.5 Main screen
Climapro2 RF can be the main or
secondary room thermostat:
6.5.1
Description
Main
The “main” room thermostat of the
installation has all functions available. The
installation comprises only one main room
thermostat. It is in general in the principal
part of the dwelling.
4
3
5
6
2
Secondary
The “secondary” room thermostat located
in another part has a limited number of
functions.
If the installation comprises:
-- A single room thermostat. It
is made up of a main room
thermostat.
-- Many room thermostats.
It is made up of a main
thermostat room thermostat
and secondary room
thermostats. Each room
thermostat is related to
a zone at the time of the
installation and must be only
used in this zone.
• Refer to the table on page 26 for room
thermostat functionality.
0020094580_01 - 08/10 - Glow-worm
7
1
Legend
1 Display area of the current operating
mode
2 Display area for messages
3 Day of the week
4 Current time
5 Current date
6 Room temperature*
7 Outside temperature as measured
by the outdoor sensor (if sensor is
connected)
(*) Please note: the room
temperature displayed on the
Climapro2 RF may vary when
the thermostat is held in your
hand.
Climapro2 RF takes
measurements optimally when
it is held in its wall support.
-7-
HOW TO USE YOUR CLIMAPRO2 RF
6.5.2
Button functions
From the main screen, it is possible to:
Buttons
Description
To change the room temperature
if the heating program is
disabled.
6.6 Override shortcuts
6.6.1
Override menu
This menu appears when multiple
programs are enabled.
• From the main screen, press
.
To access the override of an
active program.
To access the override menu if
multiple programs are active (see
override menu).
To unlock the keypad by pressing
the button for 3 seconds.
To cancel an override.
To access the cancel override
menu if more than one override
is active (see override menu).
To access the main menu.
6.5.3
Screen on standby
The room thermostat screen goes into
standby when the keyboard is not in use
for 1 minute. The screen displays no
information.
• Select the program to which the
temporary modification will be applied
.
and press
6.6.2
Override
This feature allows the temporary
overriding of current programs.
If the lock function is enabled, locking
takes place when the room thermostat is
on standby (see keypad lock).
• Press a key on the keyboard to display
the main screen.
• Settings:
-- heating temperature,
-- enable or disable for hot water and
cooling.
• Press the button to confirm
.
• Set the end time of the temporary
modification with the buttons
press the button to confirm
-8-
and
.
0020094580_01 - 08/10 - Glow-worm
HOW TO USE YOUR CLIMAPRO2 RF
6.8 Heating
Display on main screen:
If enabled
Menu
This menu lets you:
Activate or deactivate the
heating
Program the time intervals
for the heating
Override the program (if
activated)
To cancel:
• From the main screen, press
.
The result of combining the heating and
heating programme functions:
Function
Heating
• Select the override(s) to be cancelled
to confirm.
and press
6.7 Main menu
• Press the button
Menu
:
Browsing
Browse with buttons:
Heating
program
Result
OFF
ON
No heating
OFF
OFF
No heating
ON
OFF
Heating at
a constant
room
temperature
ON
ON
Heating
according to
program
ON: enable, OFF: disable
6.8.1
Activating or deactivating the
heating
> then select > Heating >
• Press
on / off on the screen
Press the button:
to return to the previous screen.
Select with the button:
Press the button:
to return to main screen. (at
any time)
(**) Menus available according
to the configuration of the
system
0020094580_01 - 08/10 - Glow-worm
• Press
to highlight your choice
(activate or deactivate) and press the
to confirm.
button
-9-
HOW TO USE YOUR CLIMAPRO2 RF
6.8.2
Enable or disable the central
heating program
and select >
• Press the button
Heating> program on the screen
• Press
to confirm the activation of
the heating instead of cooling (if the
latter is enabled) and press the button
to confirm.
Display on main screen:
If enabled, it will be possible:
• Press
to highlight your choice
(activate or deactivate) and press the
to confirm.
button
Display on main screen:
If enabled, it will be possible:
Buttons
Description
To set a constant room
temperature.
If disabled
Buttons
Description
To override the heating program
or access the override menu.
If disabled, it will be possible:
Buttons
Description
To set a constant room
temperature.
- 10 -
0020094580_01 - 08/10 - Glow-worm
HOW TO USE YOUR CLIMAPRO2 RF
6.8.3
Programming the heating
To set an operating time slot:
Programming for a day begins at 00:00 with a
maximum of 7 time intervals over 24 hours.
Temperature setting values (° C)
minimum
5
recommended
20
maximum
30 (adjustable during
installation)
Factory setting:
• Define the end of the time interval with
Monday to Friday
Nº of time
slot
1
Start
00:00
End
06:30
Temp.
12°
2
06:30
22:00
22°
3
22:00
00:00
12°
Saturday
Nº of time
slot
1
Start
00:00
End
07:30
• Begin the programming operations
again if you wish to add other time
intervals.
To modify a setting:
• Modify a temperature or a time with
07:30
23:30
22°
23:30
00:00
12°
Sunday
End
buttons and validate with the
button.
12°
2
Start
the
(go back) or
• Use the buttons
(go forward) to highlight the
setting in question.
Temp.
3
Nº of time
slot
• Increase or reduce with the
buttons to display the desired ambient
temperature setting and validate with
.
button
Temp.
the
buttons and validate with the
button.
To delete a time interval:
1
00:00
07:30
12°
Deletion is performed:
2
07:30
23:30
22°
3
23:30
00:00
12°
-- time interval by time interval,
• Press button
> then select on
screen > heating > program > define
> choose a day.
-- from the last time interval to the first.
to highlight the
• Use the button
last time interval that was set.
• Use the button
0020094580_01 - 08/10 - Glow-worm
to display
.
- 11 -
HOW TO USE YOUR CLIMAPRO2 RF
The display automatically goes to
and deletes the programmed temperature.
• Select the function (copy a day) and
press the button
to confirm.
The setting for the previous time interval
then applies up to .
• Select the day to be copied with the
and press
to
buttons
confirm.
• Validate with the button
delete another time interval.
or
To delete another time interval:
to highlight the
• Use the button previous time interval and perform the
action again.
Copy a day
This allows you to copy a program from
one day to other days.
• Copy to the day or group of days of
and
your choice by selecting with
press
to confirm.
This allows the selected day to be copied:
6.8.4
-- to a day of the week
This feature allows the temporary
overriding of current programs.
-- to weekdays (Monday to Friday)
-- to a full week (Monday-Sunday).
Override the heating program
> then select > Heating>
Press
override>set up on the screen .
Once a day has been programmed, you
are automatically returned to the selection
screen of the day to be programmed.
- 12 -
0020094580_01 - 08/10 - Glow-worm
HOW TO USE YOUR CLIMAPRO2 RF
• Set the desired temperature with the
and press the button
buttons
to confirm.
6.9 Hot water**
Menu
This menu lets you:
Activate or deactivate the
domestic hot water heating
program.
• Set the override end with the buttons
and press the button
to
confirm.
Adjust the temperature of
the hot water
To cancel:
Program the time intervals
when hot water heating
functions
> then select > Heating>
• Press
override >off on the screen.
Override the program (if
activated)
It is also possible to cancel the override
from the main screen.
Display on main screen:
(**) Menus available according
to the configuration of the
system
If enabled, it will be possible:
The result of combining the hot water
heating and heating program functions:
Heating
of hot
water
Buttons
Description
To override the heating program.
To access the override menu
if more than one program is
enabled (heating and hot water).
To cancel the override for the
heating.
To access the cancel override
menu if if more than one override
is enabled (heating and hot water)
(see override menu).
0020094580_01 - 08/10 - Glow-worm
Hot water
heating
programme
Result
OFF
ON
OFF
OFF
ON
OFF
Constant hot
water heating
without program
ON
ON
Hot water heating
according to
program
No hot water or
heating
ON: enable, OFF: disable
- 13 -
HOW TO USE YOUR CLIMAPRO2 RF
It is necessary to enable the
hot water heating function in
order to program the ON/OFF
times.
Depending on the appliance,
disabling the program cuts off
the hot water heating as well
as the production of hot water
(see the appliance installation
manual).
6.9.1
Enabling or disabling the hot
water heating
, then, on the
• Press the button
screen, select > hot water > on / off
• Press
to highlight your choice
(activate or deactivate) and press the
to confirm.
button
6.9.2
Setting the water temperature
• Increase or reduce with the
buttons to display the desired water
temperature and validate with button .
6.9.3
Enabling or disabling the hot
water heating program
button and select >
• Press the
Heating > program on the screen.
• Press
to highlight your choice
(activate or deactivate) and press the
to confirm.
button
Temperature setting values (° C)
minimum
38
recommended
55
maximum
60 (adjustable during
installation)
• Press the button
, then, on
the screen, select > hot water >
temperature
- 14 -
0020094580_01 - 08/10 - Glow-worm
HOW TO USE YOUR CLIMAPRO2 RF
6.9.4
Programming hot water heating
Factory setting:
• Use the buttons
(go back) or
(go forward) to highlight the
setting in question.
Monday to Friday
Nº of time
slot
Start
Fin
Activate
1
00:00
06:30
OFF
2
06:30
22:00
ON
3
22:00
00:00
OFF
• Change the water heating setting or
buttons and
button.
a time by pressing
validate with the
To delete a time interval:
Deletion is performed:
Saturday
Nº of time
slot
To modify a setting:
Start
Fin
Activate
1
00:00
07:00
OFF
2
07:00
22:00
ON
3
22:00
00:00
OFF
-- time interval by time interval,
-- from the last time interval to the first.
to highlight the
• Use the button
last time interval that was set.
Sunday
Nº of time
slot
Start
Fin
Activate
1
00:00
07:00
OFF
2
07:00
22:00
ON
3
22:00
00:00
OFF
• Press
> then select > hot water >
program > define> select a day on the
screen
To set an operating time slot:
Programming for a day begins at 00:00 with a
maximum of 7 time intervals over 24 hours.
• Activate or desactivate water heating
with the
button
buttons and validate with
.
• Define the end of the time interval with
the
buttons and validate with the
button.
• Begin the programming operations
again if you wish to add other time
intervals.
0020094580_01 - 08/10 - Glow-worm
• Use the button
to display
.
The display automatically goes to
and deletes the programmed setting.
The setting for the previous time interval
.
then applies up to • Validate with the button
delete another time interval.
or
To delete another time interval:
to highlight the
• Use the button previous time interval and perform the
action again.
Copy a day
This function allows you to copy a
program from one day to other days.
This allows the selected day to be copied:
-- to a day of the week
-- to weekdays (Monday to Friday)
- 15 -
HOW TO USE YOUR CLIMAPRO2 RF
-- to a full week (Monday-Sunday).
6.9.5
To override the hot water
heating program
Once a day has been programmed, you
are automatically returned to the selection
screen of the day to be programmed.
This feature allows the temporary
overriding of current programs.
button, then, on the
• Press the
screen, select > hot water > override
temperature > set up.
• Select the function (copy a day) and
press the button
to confirm.
• Activate or deactivate domestic hot
water heating with the
validate with button
• Select the day to be copied with the
and press
to
buttons
confirm.
buttons and
.
• Set the end time of the temporary
and
modification with the buttons
press the button
to confirm.
To cancel:
button, then, on the
• Press the
screen, select > hot water > override
off.
It is also possible to cancel the override
from the main screen (see override menu).
• Copy to the day or group of days of
and
your choice by selecting with
press
to confirm.
- 16 -
0020094580_01 - 08/10 - Glow-worm
HOW TO USE YOUR CLIMAPRO2 RF
Display on main screen:
If enabled, it will be possible:
Cooling
function
ON
No cooling
OFF
OFF
No cooling
OFF
Cooling with
constant water
temperature (set
by the installer).
Description
To override the hot water heating
program
ON
ON
To access the override menu
if multiple programs are active
(hot water heating and heating /
cooling).
To cancel the override in the
active hot water heating program.
To access the cancel override
menu if more than one override
is active (hot water heating and
heating / cooling).
Result
OFF
ON
Buttons
Cooling
program
Cooling
according to
program (room
temperature set
by the user)
Start of cooling
when the room
temperature
exceeds the set
value.
ON: enable, OFF: disable
6.10.1 Enable or disable cooling
button and select >
• Press the cooling > on/off on the screen .
6.10 Cooling function**
This feature enable the cooling of the
room temperature. (Heat pumps only)
Menu
This menu lets you:
Activate or deactivate
cooling
Program the timed intervals
for the cooling
Override the program (if
activated)
• Highlight your choice by pressing
and press the button
confirm.
to
Adjust cooling to the
desired temperature
(**) Menus available according
to the configuration of the
system
Effect of the combination of the cooling
functions and the cooling program:
0020094580_01 - 08/10 - Glow-worm
- 17 -
HOW TO USE YOUR CLIMAPRO2 RF
• Press
to confirm the activation of
the cooling instead of heating (if the
latter is enabled) and press the button
to confirm.
Display on main screen:
If enabled, it will be possible:
Display on main screen:
If enabled
Buttons
Description
To override the cooling program
or access the override menu.
6.10.2 Enable or disable the cooling
programme
If disabled
button and select >
• Press the cooling> program on the screen
• Press
to highlight your choice
(activate or deactivate) and press the
to confirm.
button
- 18 -
0020094580_01 - 08/10 - Glow-worm
HOW TO USE YOUR CLIMAPRO2 RF
6.10.3 Programming cooling
• Define the end of the time interval with
the
Factory setting:
Monday to Friday
Nº of time
slot
Start
End
Activate
1
00:00
08:30
OFF
2
08:30
22:00
ON
3
22:00
00:00
OFF
Saturday
Nº of time
slot
Start
End
Activate
1
00:00
08:30
OFF
2
08:30
22:00
ON
3
22:00
00:00
OFF
Sunday
Nº of time
slot
Start
End
Activate
1
00:00
08:30
OFF
2
08:30
22:00
ON
3
22:00
00:00
OFF
• Press the
button and select >
cooling> program > define > choose
a day on the screen.
buttons and validate with the
button.
• Begin the programming operations
again if you wish to add other time
intervals.
To modify a setting:
(go back) or
• Use the buttons
(go forward) to highlight the
setting in question.
• Change the cooling setting or a time by
pressing the
buttons and validate with
button.
To delete a time interval:
Deletion is performed:
-- time interval by time interval,
-- from the last time interval to the first.
to highlight the
• Use the button
last time interval that was set.
• Use the button
To set an operating time slot:
to display
.
The display automatically goes to
and deletes the programmed setting.
Programming for a day begins at 00:00 with a
maximum of 7 time intervals over 24 hours.
• Activate or deactivate the cooling with
the
button
buttons and validate with
.
0020094580_01 - 08/10 - Glow-worm
- 19 -
HOW TO USE YOUR CLIMAPRO2 RF
The setting for the previous time interval
then applies up to .
• Validate with the button
delete another time interval.
or
• Select the day to be copied with the
and press
to
buttons
confirm.
To delete another time interval:
to highlight the
• Use the button
previous time interval and perform the
action again.
Copy a day
This function allows you to copy a
program from one day to other days.
• Copy to the day or group of days of
and
your choice by selecting with
to confirm.
press
This allows the selected day to be copied:
6.10.4 Override the cooling program
-- to a day of the week
This feature allows the temporary
overriding of current programs
-- to weekdays (Monday to Friday)
-- to a full week (Monday-Sunday).
, then select > cooling>
Press
override >set up on the screen .
Once a day has been programmed, you
are automatically returned to the selection
screen of the day to be programmed.
• Enable or disable the cooling by
and pressing the button
pressing
to confirm.
• Select the function (copy a day) and
press the button
to confirm.
• Set the end time of the override with
and press the button
the buttons
to confirm.
To cancel:
, then select > cooling >
• Press
override > off on the screen.
It is also possible to cancel the override
from the main screen (see override menu).
Display on main screen:
- 20 -
0020094580_01 - 08/10 - Glow-worm
HOW TO USE YOUR CLIMAPRO2 RF
If enabled, it will be possible:
• Increase or decrease with the buttons
to display the initial cooling
temperature and press the button
.
6.11 Holiday
Menu
Buttons
Description
To override the cooling program.
To access the override menu
if more than one program is
enabled (cooling and hot water).
To cancel the override enabled in
the cooling program.
To access the override cancel
menu if more than one override is
enabled (cooling and hot water)
(see override menu).
This menu lets you:
Configure a period of
absence
Enable or disable the
absence period
6.11.1 Configuring a period of
absence
button and select >
• Press the
holiday> set up on the screen
6.10.5 Setting the temperature
This function allows you to set the desired
temperature. The system automatically
changes the setting in accordance with the
weather conditions if the wireless outdoor
sensor is installed.
Temperature setting values (° C)
minimum
24
recommended
24
maximum
30
• Press the
button and select >
cooling > temperature on the screen .
• Set the start and end your absence
and
(day and time) by pressing
pressing the button
to confirm.
• Remember to adjust the room
and
temperature by pressing
pressing the button
to confirm.
The suggested temperature during an
absence is:
-- 12° C if the heating is turned on,
-- 5° C if the heating is turned off.
0020094580_01 - 08/10 - Glow-worm
- 21 -
HOW TO USE YOUR CLIMAPRO2 RF
Reminder: the room thermostat’s antifreezing system controls the start-up of the
heating when the temperature of the room
in which the thermostat is installed falls
below 5°C, or if an outdoor sensor is fitted,
the outside temperature falls below 3°C.
The hot water is turned off**.
(**) Display only if the hot
water function is activated.
Display on main screen:
If activated
6.12 Parameters
Menu
This menu lets you:
Adjust the date and time
Choose the language
Personalise the name of the
control
Turn the keypad lock on
or off
Adjust the brightness and
contrast of the screen
Return to factory settings
Display information: zone,
type and software version
for the room thermostat
6.12.1 Setting the current date
button and select >
• Press the
parameters > date on the screen
6.11.2 Deactivating a period of
absence
button and select >
• Press the
holiday > off on the screen
• Set the display format of the current
and pressing
date by pressing
. There is a choice between
the factory setting day/month/year and
year/month/day.
• Set the current date by pressing
and pressing the button
to
confirm.
- 22 -
0020094580_01 - 08/10 - Glow-worm
HOW TO USE YOUR CLIMAPRO2 RF
6.12.2 Setting the current time
6.12.4 Control name
button and select >
• Press the
parameters > time on the screen
• Press the
button and select >
parameters > control name on the
screen
• Set the time by pressing
pressing the button
and
to confirm.
6.12.3 Choose the language for the
menus
button and select >
• Press the
parameters > language on the screen
• Select each character of the device’s
and then
name by pressing
pressing the button
to confirm.
The installation may be
composed of several room
thermostats. In such a case, a
number corresponding to the
area is assigned by the control
unit to each thermostat. The
number «1» is assigned to the
main area (example: LOUNGE
1).
Display on main screen:
To display the additional languages:
If enabled
• Select > others on the screen
• Choose the language with the button
and press the button
to
confirm.
0020094580_01 - 08/10 - Glow-worm
- 23 -
HOW TO USE YOUR CLIMAPRO2 RF
6.12.5 Enable or disable automatic
keypad lock
This feature allows you to turn the keypad
lock on or off. Locking occurs when the
room thermostat enters standby.
6.12.6 Screen
button and select >
• Press the
parameters > screen > on the screen
button and select >
• Press the
parameters > lock keypad on the
screen
• Press
to highlight your choice
(brightness or contrast) and press
to confirm.
• Press
to highlight your choice
(activate or deactivate) and press the
to confirm.
button
Display on main screen:
If enabled, it will be possible:
• Adjust your screen by pressing
to
and press the button
confirm.
6.12.7 Return to factory settings
button and select >
• Press the
parameters > reset on the screen
Buttons
Description
To temporarily unlock the keypad
by pressing the button for 3
seconds.
To permanently disable the automatic
keypad lock
• Disable the automatic keypad lock
before the thermostat enters standby
again.
- 24 -
The resetting of factory
settings is irreversible. Any
customised configuration of
the room thermostat will be
lost.
0020094580_01 - 08/10 - Glow-worm
HOW TO USE YOUR CLIMAPRO2 RF
6.12.8 General information on the
Climapro2 RF
This feature allows you to display the
following information: area, software type
and version.
6.13 Summary of available menus and
functions**
(**) Menus available according
to the configuration of the
system
button and select >
• Press the
parameters > about on the screen
6.12.9 System efficiency
Menu
This menu lets you:
View the system efficiency.
• Press the
button and select >
perf. index on the screen
(**) Menus available according
to the configuration of the
system
The energy performance index is obtained
from the generators effectiveness during
the last 4 hours. The cursor moves on a
scale from A to D.
Comment
Excellent
Good
OK
Standard
System efficiency is only
available if the Climapro2 RF
is paired with the Systempro
control unit
0020094580_01 - 08/10 - Glow-worm
- 25 -
HOW TO USE YOUR CLIMAPRO2 RF
Menus and functions
Room thermostat
main
secondary
☻
☻
☻
☻
☻
☻
☻
☻
☻
☻
☻
☻
☻
-
☻
☻
☻
☻
☻
☻
☻
☻
☻
☻
☻
☻
-
☻
☻
☻
☻
☻
☻
☻
☻
☻
☻
☻
☻
☻
☻
Heating
Activate or deactivate the heating
Enable or disable the central heating program
Program the functioning time intervals for the heating
Override the program
Hot water
Activate or deactivate the domestic hot water heating
Setting the domestic hot water temperature
Enabling or disabling the hot water heating program
Program the time intervals for hot water heating
Override the program
Cooling function
Activate or deactivate
Enable or disable the cooling program
Program the time intervals for the cooling
Setting the temperature
Override the program
Holiday
Activate or deactivate the absence period
Configuring a period of absence
Parameters
Setting the current date
Setting the current time
Choose the language for the menus
Room thermostat name
Enable or disable automatic keypad lock
Screen (brightness or contrast)
Return to factory settings
General information Climapro2 RF
- 26 -
0020094580_01 - 08/10 - Glow-worm
ANY ASSISTANCE ?
ANY ASSISTANCE?
Warning
Procedure
7 Trouble-shooting
This chapter contains all the messages
that the thermostat may display, and the
corrective actions that you can carry out to
put the appliance back into service.
Call the telephone number
displayed on the screen.
• If after carrying out this basic advice
and your appliance still does not work,
leave it turned off and contact your
qualified engineer.
Warning
The wireless outdoor
sensor has not yet
provided the outside
temperature.
If the problem persists after
30 minutes, contact your
after-sales service.
Procedure
Check that power is
supplied to the heating
system.
See the manual for the
appliance.
Replace the batteries,
following the instructions
(see "battery
replacement").
No display
• Check that:
- The room thermostat
batteries are properly
installed in their
compartment
- The battery polarity is not
reversed
- The batteries are not
exhausted. If so, replace
with new batteries.
See the appliance manual
to reset.
See the appliance manual
to increase the pressure in
the heating system.
0020094580_01 - 08/10 - Glow-worm
- 27 -
ANY ASSISTANCE ?
8 Replacing the batteries
4
3
When the message «battery low - change
the batteries» appears on the main
screen, the remaining life of the batteries
is about one month.
C
2
Remarks :
-- If the batteries are not changed in time,
the generator functions without the
ambient temperature thermostat.
A
1
-- Programme settings will not be lost.
-- Clean the battery compartment before
inserting new batteries.
-- Do not mix new and used batteries or
batteries of different types.
-- Do not use rechargeable batteries.
-- Never expose the batteries to
excessive heat or a naked flame, never
try to take them apart, and make sure
that they are never short-circuited.
-- If electrolyte leaks and comes into
contact with skin or clothing, rinse them
immediately with water.
B
Legend
1 Battery cover
2 Batteries
3 Battery compartment
4 Room thermostat
• Remove the battery cover (1) for the
room thermostat (4) respecting the
order of operations from (A) to (C).
• Remove the batteries (2).
• Replace the batteries with new
batteries of type «AA LR6», respecting
their polarity (direction «+» and «-»).
The batteries must not be
placed in household waste, but
disposed of in accordance with
the regulations in force.
- 28 -
0020094580_01 - 08/10 - Glow-worm
ANY ASSISTANCE ?
9 Maintenance and care of
Climapro2 RF
9.1 Cleaning
• Clean the cover of the Climapro2 RF
with a dry or slightly wet cloth.
• Ensure that no water enters the room
thermostat.
a
Do not use any form of
abrasive or solvent cleaner
as you may damage the
paintwork.
9.2 Spare Parts
In order to guarantee the safe and
prolonged life of the product, insist that
only the manufacturer’s genuine spare
parts are used.
10Contact your after-sales
• Go to www.glow-worm.co.uk or call our
After Sales Service on 01773 828100
for further information.
0020094580_01 - 08/10 - Glow-worm
- 29 -
0020094580_01 - 08/10
Because of our constant endeavour for improvement, details may vary slightly from those shown in these instructions.
Glow-worm, Nottingham Road, Belper, Derbyshire. DE56 1JT