1
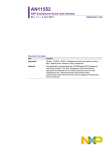
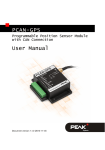
LPCXpresso
Getting started with NXP LPCXpresso
Rev. 12 — 17 April 2013
User guide
Document information
Info
Content
Keywords
LPCXpresso, LPC800, LPC1100, LPC1200, LPC1300, LPC1700,
LPC1800, LPC2000, LPC2900, LPC3000, LPC3100, LPC3200,
LPC4000, LPC4300
Abstract
LPCXpresso is a, low-cost development platform available from NXP.
This document is a brief overview on how to get started with
LPCXpresso.
LPCXpresso
NXP Semiconductors
Getting started with NXP LPCXpresso
Revision history
Rev
Date
12
Description
20130417
• Added LPC800
• Added schematics for LPC800 and LPC1104 LPCXpresso boards.
• Updated screenshots to match LPCXpresso version 5
• Updated supported LPC products list.
11.2
20120711
11.1
20111201
• Updated supported LPC products list.
11
20110614
• Updates for LPCXpresso 4- new screen shots
• Added system requirements for the Mac OS version.
• Updated supported LPC products list.
• Added 1.1 V4 new features section
• Updated comprehensive supported parts list
• Updated create new project process
10
20110407
• Added Fig 45 and Fig 46.
9
20110301
• Updated keywords and supported products throughout
• Updated Section 6.1
• Updated Section 6.2.5
• Updated Section 6.6.2
• Removed Fig 20
• Added Fig 41 and Fig 42
8
20110211
• Updated Section 3.2
• Added Fig 38, Fig 39, Fig 40, Fig 48
7
20100915
• Updated Section 3.1
6
20100712
• Added 7.1 Schematics for LPCXpresso LPC1768 target side
• Added 6.1 Installing Eclipse plugins
5
20100604
• Added new products supported to Introduction section: LPC2929, LPC3250
• Removed 6.1.6 Download performance
• Updated 6.4.2 Optimization section
4
20100419
• Updated Fig 49
3
20100315
• Updated Fig 37
2
20100311
1
20100111
• Added Fig 38
• Updated Section 3.1
• Added Section 6.2.5
• Initial version
Contact information
For additional information, please visit: http://www.nxp.com
For sales office addresses, please send an email to: [email protected]
LPCXpresso_Getting_Started_Guide
User guide
All information provided in this document is subject to legal disclaimers.
Rev. 12 — 17 April 2013
© NXP B.V. 2013. All rights reserved.
2 of 49
LPCXpresso
NXP Semiconductors
Getting started with NXP LPCXpresso
1. Introduction
LPCXpresso is a, low-cost development platform available from NXP. The software
consists of an enhanced, Eclipse-based IDE, a GNU C compiler, linker, libraries, and an
enhanced GDB debugger. The hardware consists of the LPCXpresso development board
which has an LPC-Link debug interface and an NXP LPC ARM-based microcontroller
target. LPCXpresso is an end-to-end solution enabling embedded engineers to develop
their applications from initial evaluation to final production.
The LPCXpresso IDE, powered by Code Red Technologies (http://lpcxpresso.code-redtech.com), is based on the popular Eclipse development platform and includes several
LPC-specific enhancements. It is an industry-standard GNU tool-chain with an optimized
C library that gives engineers all the tools necessary to develop high-quality software
solutions quickly and cost-effectively. The C programming environment includes
professional-level features. There is syntax coloring, source formatting, function folding,
on- and offline help, and extensive project management automation.
The LPCXpresso target board, jointly developed by NXP, Code Red Technologies, and
Embedded Artists (http://www.embeddedartists.com/products/lpcxpresso/), includes an
integrated JTAG debugger (LPC-Link), so there’s no need for a separate JTAG debug
probe. The target portion of the board can connect to expansion boards to provide a
greater variety of interfaces, and I/O devices. The on-board LPC-Link debugger provides
a high-speed USB to JTAG/SWD interface to the IDE and it can be connected to other
debug targets such as a customer prototype. Users can also use the LPCXpresso IDE
with the Red Probe JTAG adapter from Code Red Technologies.
Supported LPC products and board part numbers on the LPCXpresso platform:
• LPC800: All part types supported
− OM13053: LPC812
• LPC1100: All part types supported
− OM13014: LPC11U14
− OM13012: LPC11C24
− OM13035: LPC1115
− OM13047: LPC1104
• LPC1200: All part types supported
− OM13008: LPC1227
• LPC1300: All part types supported
− OM13045: LPC1347
• LPC1700: All part types supported
− OM13000: LPC1769
• LPC1800: All part types supported
• LPC2000: LPC2109, LPC2109/01, LPC2134, LPC2142, LPC2362, LPC2929
• LPC3000: LPC3130, LPC3250
• LPC4000: All part types supported
LPCXpresso_Getting_Started_Guide
User guide
All information provided in this document is subject to legal disclaimers.
Rev. 12 — 17 April 2013
© NXP B.V. 2013. All rights reserved.
3 of 49
LPCXpresso
NXP Semiconductors
Getting started with NXP LPCXpresso
LPCXpresso base board products:
• OM11083: Embedded Artists Base Board for LPCXpresso and mbed
• OM13009: Embedded Artists Motor Control Kit for LPCXpresso
• OM13016: NGX mbed-LPCXpresso baseboard
1.1 LPCXpresso 5 new features
• Support for Instruction Trace for Cortex-M3/M4 based MCUs implementing an
Embedded Trace Buffer (ETB)
• Support for Instruction trace for Cortex-M0+ based systems implementing a Micro
Trace Buffer (MTB)
• Based on Eclipse Juno and gcc 4.6.2
• New part support
For more information on LPCXpresso 5 new features visit:
http://support.code-red-tech.com/CodeRedWiki/NewInVersion5
1.2 LPCXpresso IDE
LPCXpresso’s IDE is a highly integrated software development environment for NXP’s
LPC Microcontrollers, which includes all the tools necessary to develop high quality
software solutions in a timely and cost effective fashion. LPCXpresso is based on Eclipse
with many LPC specific enhancements. It also features the latest version of the industry
standard GNU tool chain with a proprietary optimized C library providing professional
quality tools at low cost. The LPCXpresso IDE can build an executable of any size with
full code optimization and it supports a download limit of 128 kB after registration.
LPCXpresso supports the full embedded product design cycle by moving beyond chip
evaluation boards and supporting development on external target boards.
LPCXpresso_Getting_Started_Guide
User guide
All information provided in this document is subject to legal disclaimers.
Rev. 12 — 17 April 2013
© NXP B.V. 2013. All rights reserved.
4 of 49
LPCXpresso
NXP Semiconductors
Getting started with NXP LPCXpresso
Fig 1.
LPCXpresso IDE
1.3 LPCXpresso development board
Fig 2.
LPCXpresso development board
LPCXpresso_Getting_Started_Guide
User guide
All information provided in this document is subject to legal disclaimers.
Rev. 12 — 17 April 2013
© NXP B.V. 2013. All rights reserved.
5 of 49
LPCXpresso
NXP Semiconductors
Getting started with NXP LPCXpresso
1.4 LPC-LINK JTAG/SWD debugger
The LPCXpresso board contains a JTAG/SWD debugger called the “LPC-Link” and a
target MCU. LPC-Link is equipped with a 10-pin JTAG header (highlighted on the above
image) and it seamlessly connects to the target via USB (the USB interface and other
debug features are provided by NXP’s ARM9 based LPC3154 MCU). Cutting the tracks
between the LPC-link and the target will make the LPC-Link a stand-alone JTAG
debugger. This enables the LPCXpresso platform to be connected to an external target
and used to develop for a wide variety of NXP’s Cortex-M0, Cortex-M3, and ARM7/9
based applications. Currently supported microcontroller products include LPC800,
LPC1100, LPC1200, LPC1300, LPC1700, LPC1800, LPC4000, LPC4300 series and
specific members of the LPC2000 and LPC3000 families.
1.5 Integrated evaluation target
The target includes a small prototyping area and easily accessible connections for
expansion. The LPCXpresso board with target can be used
• On its own for software development and benchmarking
• Connected to an off-the-shelf baseboard for rapid proof-of-concepts
• Connected to customer-designed board for a full prototype
1.6 LPCXpresso partners
NXP has partnered with Code Red Technologies and Embedded Artists for the
LPCXpresso platform. For added flexibility and higher memory configurations, the
LPCXpresso platform can easily be upgraded to include full-blown suites from Code Red
Technologies and more advanced hardware kits from Embedded Artists. Please visit the
LPCXpresso webpage for more information.
LPCXpresso_Getting_Started_Guide
User guide
All information provided in this document is subject to legal disclaimers.
Rev. 12 — 17 April 2013
© NXP B.V. 2013. All rights reserved.
6 of 49
LPCXpresso
NXP Semiconductors
Getting started with NXP LPCXpresso
2. Evaluate, explore and develop
Fig 3.
Product development stages
Users can envisage three stages from evaluation to product development. During
evaluation, features and peripherals of the target MCU can be easily tested with the
prototyping area and easily accessible connections on the target board. Complementing
the target board are also easy-to-use example projects and a handy Getting Started
guide. For rapid proof-of-concepts, users can get an off-the-shelf base board from
Embedded Artists and quickly explore the next level of applications. And finally
LPCXpresso users can seamlessly develop their final application by using the LPC-Link’s
10-pin JTAG connector to attach any JTAG-capable custom board. This way, users can
now enjoy the same user experience right from evaluation to product development.
LPCXpresso_Getting_Started_Guide
User guide
All information provided in this document is subject to legal disclaimers.
Rev. 12 — 17 April 2013
© NXP B.V. 2013. All rights reserved.
7 of 49
LPCXpresso
NXP Semiconductors
Getting started with NXP LPCXpresso
3. Installation
3.1 System requirements
Operating System
Microsoft® Windows - XP 32-bit (SP2 or greater)
Microsoft® Windows - Vista 32-bit or 64-bit
Microsoft® Windows - Windows 7 32-bit or 64-bit
Microsoft® Windows – Windows 8
Mac OS X 10.7.5 (Lion), and 10.8.2 (Mountain Lion)
Linux - Ubuntu 9 trough 12Linux - Fedora 14 and 17
System RAM
2 GB MB minimum (4 GB recommended)
Hard Disk
500+ MB of available space.
Screen/Display Adaptor
1024x768 minimum recommended
Internet Connection
High-speed internet is recommended to download and register
the software
Note: LPCXpresso may install and run on other Linux distributions. However, only the
distributions listed above have been tested. Desktop virtualization tools supporting a
Linux or Windows guest with USB support can be used to run LPCXpresso on other
computing platforms.
3.2 Installation process
LPCXpresso is installed into a single directory, of your choice. Multiple versions can be
installed simultaneously without any issues. The installation process is to double-click the
installer file after downloading. Then click “next” on the setup wizard. To install under
Linux, the downloaded file should be marked as executable first using chmod +x.
Fig 4.
LPCXpresso_Getting_Started_Guide
User guide
Setup wizard
All information provided in this document is subject to legal disclaimers.
Rev. 12 — 17 April 2013
© NXP B.V. 2013. All rights reserved.
8 of 49
LPCXpresso
NXP Semiconductors
Getting started with NXP LPCXpresso
Fig 5.
Setup wizard
Read the license agreement then click next. There are a number of other screens on the
setup wizard, but generally the default options can be accepted. After the install, an
information file will be displayed. Click “Next.” Congratulations! Your LPCXpresso
installation is complete!
Fig 6.
LPCXpresso_Getting_Started_Guide
User guide
Setup wizard
All information provided in this document is subject to legal disclaimers.
Rev. 12 — 17 April 2013
© NXP B.V. 2013. All rights reserved.
9 of 49
LPCXpresso
NXP Semiconductors
Getting started with NXP LPCXpresso
3.3 Activation
To activate your product from LPCXpresso, choose Help->Product activation->Create
serial number and Activate. Once the wizard is open, click “Copy to clipboard” to copy
the LPCXpresso serial number into the clipboard. This serial number is based on your
machine’s hardware and operating system configuration, but contains no personally
identifiable information. Now click the button to open the registration activation page. This
should display a web form. After completing the form, you will receive an activation code
via email within a few minutes. Highlight the activation code in your email program, and
select Copy to place it into the Windows clipboard. Now, choose Help->Product
activation->Enter Activation code from within LPCXpresso. Paste the product
activation code into the Product activation dialog by right clicking in the Activation code
field and choosing “Paste.” Then click the “OK” button. You should receive a dialog
confirming acceptance of the activation code. It is also possible to complete LPCXpresso
activation on a PC that is offline as long as another PC has access to the Internet. Refer
to Fig 7 for the process.
Fig 7.
LPCXpresso activation with offline PC
LPCXpresso_Getting_Started_Guide
User guide
All information provided in this document is subject to legal disclaimers.
Rev. 12 — 17 April 2013
© NXP B.V. 2013. All rights reserved.
10 of 49
LPCXpresso
NXP Semiconductors
Getting started with NXP LPCXpresso
4. Getting familiar with the LPCXpresso IDE
LPCXpresso IDE is based on the Eclipse IDE framework and many of the core features
are described well in generic Eclipse documentation and in the help files found in the
help menu of the product. Further documentation and pointers to useful documents are
also available on the Code Red Technologies Wiki at http://support.code-redtech.com/CodeRedWiki.
4.1 Layout of the LPCXpresso desktop
LPCXpresso’s Desktop contains many windows. Each window is called a View, because
it displays a particular view of data in the LPCXpresso environment. This data could be
source code, hex dumps, disassembly, memory contents, or more. Views can be
opened, moved, docked, and closed, and the layout of the currently displayed Views can
be saved and restored. A specific configuration of Views is called a ‘Perspective.’
Typically, LPCXpresso operates in a single perspective under which both the code
development & debug sessions operate as shown on the next page. The single
perspective greatly simplifies the Eclipse environment and enhances the entire
LPCXpresso experience.
All Views in the Perspective can be moved around by dragging and dropping. If a View is
accidentally closed, it can be restored by selecting it from the Show View dialog. The
Show View dialog can be opened from the Show View Other... option in the Window
menu.
Fig 8.
Show view/other menu
LPCXpresso_Getting_Started_Guide
User guide
All information provided in this document is subject to legal disclaimers.
Rev. 12 — 17 April 2013
© NXP B.V. 2013. All rights reserved.
11 of 49
LPCXpresso
NXP Semiconductors
Getting started with NXP LPCXpresso
4.1.1 Single perspective (code development)
1
2
4
3
Fig 9.
Single perspective (develop)
1. Project Explorer View: The ‘Project Explorer’ gives you a view of all the projects in
your current ‘Workspace’. A ‘Workspace’ is a collection of projects that are stored in
a single Workspace Directory on your computer.
2. Editor: On the upper right is the editor which allows modification and saving of source
code as well as setting breakpoints in debug mode.
3. Console and Problems Views: On the lower right are the Console and Problems
Views. The Console View displays status information on compiling and debugging,
as well as program output. The Problem View (available by changing tabs) shows all
compiler errors and will navigate the Editor View to the error location.
4. Quick Start View: Below, the ‘Quick Start’ view has fast links to commonly used
features. This is the best place to go to find options such as Build, Debug, and
Import.
LPCXpresso_Getting_Started_Guide
User guide
All information provided in this document is subject to legal disclaimers.
Rev. 12 — 17 April 2013
© NXP B.V. 2013. All rights reserved.
12 of 49
LPCXpresso
NXP Semiconductors
Getting started with NXP LPCXpresso
4.1.2 Single perspective (debug)
2
1
3
5
4
Fig 10. Single perspective (debug)
1. Core Register View: This shows all of the registers in the processor core. Registers
that have changed from step to step are highlighted in yellow.
2. Debug View: This shows you the stack trace. In the ‘stopped’ state, you can click on
any particular function and inspect its local variables in the Variables tab (parallel to
the Registers View). Debug controls can be found on the global toolbar (at the top of
the screen).
3. Editor: In here you will see the code you are executing and can step from line to line.
By pressing the ‘i’ icon at the top of the Debug view, you can switch to stepping by
assembly instruction. Clicking in the left margin will set and delete breakpoints.
4. Console View: On the lower right is the Console View. The Console View displays
status information on compiling and debugging, as well as program output.
5. Quick Start View: Below, the ‘Quick Start’ view has fast links to commonly used
features.
LPCXpresso_Getting_Started_Guide
User guide
All information provided in this document is subject to legal disclaimers.
Rev. 12 — 17 April 2013
© NXP B.V. 2013. All rights reserved.
13 of 49
LPCXpresso
NXP Semiconductors
Getting started with NXP LPCXpresso
4.1.2.1 Peripheral views
LPCXpresso includes full, annotated and interactive debug views of all the peripherals.
Access to the views is found on the Peripherals View (click the Peripherals tab) behind
the Project Explorer view. Each peripheral can be selected, and it is displayed in the
‘Memory’ view which is located behind the ‘Console’ view at the bottom of the
LPCXpresso desktop.
Fig 11. Display of peripheral view showing selection of MRT peripheral
Fig 12. Display of memory view showing detail of MRT peripheral registers
LPCXpresso_Getting_Started_Guide
User guide
All information provided in this document is subject to legal disclaimers.
Rev. 12 — 17 April 2013
© NXP B.V. 2013. All rights reserved.
14 of 49
LPCXpresso
NXP Semiconductors
Getting started with NXP LPCXpresso
4.2 Connecting the target
To begin development, the LPCXpresso can be connected to a PC using a USB 2.0
A/Mini-B cable.
Fig 13. USB 2.0 A / Mini-B cable
If you are debugging a prototype board or a target containing a different MCU, see the
Appendix for a pin-out to connect the debugger section of the LPCXpresso to an external
target.
LPCXpresso_Getting_Started_Guide
User guide
All information provided in this document is subject to legal disclaimers.
Rev. 12 — 17 April 2013
© NXP B.V. 2013. All rights reserved.
15 of 49
LPCXpresso
NXP Semiconductors
Getting started with NXP LPCXpresso
5. Working with example projects
5.1 Downloading NXP sample code from the web
Fig 14. Quickstart panel
The LPCXpresso IDE includes several sample code bundles for various development
boards. To work with these projects, select “Import project(s)” from the Quickstart panel
in the lower left corner of the screen.
Fig 15. Import project(s) dialog
LPCXpresso_Getting_Started_Guide
User guide
All information provided in this document is subject to legal disclaimers.
Rev. 12 — 17 April 2013
© NXP B.V. 2013. All rights reserved.
16 of 49
LPCXpresso
NXP Semiconductors
Getting started with NXP LPCXpresso
Next, select “Browse” from the “Project archive (zip)” section of the Import project(s)
dialog.
The sample code bundles are located in the directory where the LPCXpresso IDE was
installed, under .\lpcxpresso\Examples\NXP. Navigate to the sample code bundle that
applies to your Target Device and select it.
Fig 16. Zip file from LPCXpresso-Support web site selected for importing
Now click the Next button and then choose which projects to import from the .zip file.
LPCXpresso_Getting_Started_Guide
User guide
All information provided in this document is subject to legal disclaimers.
Rev. 12 — 17 April 2013
© NXP B.V. 2013. All rights reserved.
17 of 49
LPCXpresso
NXP Semiconductors
Getting started with NXP LPCXpresso
Fig 17. Import projects(s): Selecting which projects to import
Often, there will be references between projects in a .zip file so it is best to import all of
them.
Fig 18. Import projects: Progress indicator
• Updates to the example code bundles can be found at http://LPCWare.com between
releases of the LPCXpresso IDE.
LPCXpresso_Getting_Started_Guide
User guide
All information provided in this document is subject to legal disclaimers.
Rev. 12 — 17 April 2013
© NXP B.V. 2013. All rights reserved.
18 of 49
LPCXpresso
NXP Semiconductors
Getting started with NXP LPCXpresso
5.2 Debugging/running ‘blinky’ or another project on your LPCXpresso
board
In LPCXpresso, when you start to debug, your program will automatically download to
the target and be programmed into flash memory.
To start debugging on your target, simply highlight the project in the Project Explorer and
then in the Quickstart Panel select ‘Debug ‘Projectname’ [Debug].
Fig 19. Debug
You may also enter debug mode by clicking the bug icon on the top LPCXpresso toolbar.
Fig 20. Bug icon
You are then presented with the debug view and toolbar and have run control over the
code running on your target. The debug toolbar will pop up above the code window.
Fig 21. Debug toolbar
LPCXpresso_Getting_Started_Guide
User guide
All information provided in this document is subject to legal disclaimers.
Rev. 12 — 17 April 2013
© NXP B.V. 2013. All rights reserved.
19 of 49
LPCXpresso
NXP Semiconductors
Getting started with NXP LPCXpresso
You can now do the following with the buttons towards the top of the ‘Debug’ view:
Run the program.
Step Over C/C++ line.
Step into a function.
Stop the debugger.
Pause Execution of the running program.
Restart the debug session
Fig 22. Debug buttons
5.3 Working with Instruction Trace
Instruction trace provides the ability to record and review the sequence of instructions
executed on a target. LPCXpresso 5 introduces support for instruction trace via on board
trace buffers. Instruction trace makes use of the Embedded Trace Buffer (ETB) on
Cortex M3 and M4 parts and the Micro Trace Buffer (MTB) on the Cortex-M0+. The
instruction trace which is generated at high speed can be captured in real time and
stored in these on-chip buffers, so that they can be downloaded at lower speeds without
the need for additional debug hardware.
For information on how to configure LPCXpresso 5 to work with Instruction Trace, please
refer to the “Getting Started with Red Trace guide” that is available for download from the
Code Red support website:
http://support.code-red-tech.com/CodeRedWiki/NewInVersion5
Please note that only the Instruction Trace part of the guide is applicable to the
LPCXpresso-IDE.
6. LPCXpresso IDE tips and tricks
6.1 Installing Eclipse plugins
The LPCXpresso IDE contains many of the features of the Eclipse open-source IDE from
http://www.eclipse.org. The browse and install plugin function is present in the help
menu. To access it, choose Help -> Install New Software. This will display the Eclipse
Install Software dialog which will allow browsing and installing of Eclipse plugins.
6.2 Debugging tips
6.2.1 Debug features not enabled
All of the LPCXpresso features are context-sensitive. If features are disabled, doublecheck that you are navigated into a .c file in an open project on the Project Explorer
View, or some menu items and toolbar buttons may be disabled. If your workspace
LPCXpresso_Getting_Started_Guide
User guide
All information provided in this document is subject to legal disclaimers.
Rev. 12 — 17 April 2013
© NXP B.V. 2013. All rights reserved.
20 of 49
LPCXpresso
NXP Semiconductors
Getting started with NXP LPCXpresso
contains projects that create libraries such as CMSIS, please note that debug features
will be disabled if you are currently editing a .c file that is part of a library project.
6.2.2 Error launching debug\filename.axf
Fig 23. Error starting debug
LPCXpresso checks the target chip ID against the currently selected chip ID for the
project and will not start if there is not a match. Make sure that the correct NXP LPC
microcontroller part is selected in LPCXpresso. The current part number is displayed in
the status bar at the bottom of the LPCXpresso window. It can be changed by holding
down the Ctrl key and clicking. A dialog will appear allowing selection of the correct part
number.
Fig 24. Current part number
LPCXpresso_Getting_Started_Guide
User guide
All information provided in this document is subject to legal disclaimers.
Rev. 12 — 17 April 2013
© NXP B.V. 2013. All rights reserved.
21 of 49
LPCXpresso
NXP Semiconductors
Getting started with NXP LPCXpresso
Fig 25. Selecting correct part number
6.2.3 Optimization issues
When optimization is enabled, it will reorder code. What this means is that the code from
multiple C lines will be intermingled. In addition, assignments and initializations might be
pulled out of loops so they are only executed once. Changes like these will make the
code confusing to debug. Some symptoms you might see are breakpoints that only work
the first time through, or seeing the debugger’s current line indicator fail to advance or
even move backwards when you click step. It is best to always use –O0 for debugging.
Since optimization can make such a big difference in code size and performance, it is a
good idea to test your project with optimization and plan for a final build that is optimized.
6.2.4 Exiting debug mode and stopping debugging
To stop debug press the ‘Stop’ button (red square) shown in the toolbar at the top of the
debug view.
6.2.5 Recovery of board
After playing around with the LPCXpresso board, especially when trying out new PLL
settings, reconfiguring the SWDIO/SWDCLK pin functions, disabling AHBCLKCTRL bits,
or trying power down modes, the board may be disabled and no longer enter debug
mode. This is caused by code on the on-board flash that incorrectly disables the system
clocks or the debug port soon after reset before the debugger can connect to the core.
The easiest solution to this is to load a working project into LPCXpresso, ground the ISP
pin (see the chip User’s Manual for details) and then try to enter debug mode.
Grounding the ISP pin during reset will put the target MCU into In-System Programming
(ISP) mode. It will wait for a command through the serial port or the USB port. This
temporarily prevents the troublesome code in flash from starting. Although ISP is
designed to enable serial and USB updates, while ISP is running, the LPCXpresso
toolchain is able to connect to the Cortex core and reprogram the flash. After the flash is
LPCXpresso_Getting_Started_Guide
User guide
All information provided in this document is subject to legal disclaimers.
Rev. 12 — 17 April 2013
© NXP B.V. 2013. All rights reserved.
22 of 49
LPCXpresso
NXP Semiconductors
Getting started with NXP LPCXpresso
reprogrammed, disconnect the ISP pin (pull it high or allow it to float) and stop
debugging. Now you should be able to debug code again.
6.3 Datasheet browser
The LPCXpresso IDE comes with an integrated web browser that will direct viewers to
the datasheet of the device. Just click on the part number in the lower right border of the
LPCXpresso window to see the browser in action.
Fig 26. Integrated web browser
6.4 Code size
6.4.1 printf
When optimizing a project for size, if you are using printf, make sure that Redlib is
selected as the standard library in the Projects Properties dialog. This option can be set
using the Quick Settings dropdown box in the Quick Start panel.
Fig 27. Reconfigure library setting
The printf implementation in Redlib is about half the size of the implementation in Newlib.
A smaller printf library can be used in Redlib if floating point formatting strings are not
used. To select this smaller library, define the symbol CR_INTEGER_PRINTF to the
compiler (i.e. -DCR_INTEGER_PRINTF). To save even more space, avoid using printf or
LPCXpresso_Getting_Started_Guide
User guide
All information provided in this document is subject to legal disclaimers.
Rev. 12 — 17 April 2013
© NXP B.V. 2013. All rights reserved.
23 of 49
LPCXpresso
NXP Semiconductors
Getting started with NXP LPCXpresso
any C standard library functions and select Redlib (none). Depending on your printf
settings and code, this could free up 10K to 20K of flash memory.
6.4.2 Optimization
Optimization can do a lot to save flash memory. It can be configured in the same dialog
as the C standard library. Choose “Optimization” under “MCU C Compiler” in the “Tool
Settings” tab. Higher levels of optimization will typically result in higher performance, but
may result in larger code size. It is best to use –O0 for debugging and higher levels for
Release. For best code size try –Os –mword-relocations. To further reduce code, add
--gc-sections to the project linker flags. This causes the linker to remove unused
functions from the compiled code. --gc-sections is enabled by default in new projects
created by the project wizard. If you are working with an existing project, you may need
to manually add this option to your project. --gc-sections is safe to use in both Release
and Debug builds. There are many optimization options available for GCC. Visit
http://gcc.gnu.org/onlinedocs/gcc/Optimize-Options.html to see all of them.
6.5 Showing hidden views
A view is an on-screen representation of something in the IDE. A view can be source
code, the project tree, or a debug window. If you accidentally close a view, you can open
it again by going to the Window menu and choosing Show View and Other. It is a good
idea to browse through the Show View window to see what is available.
Fig 28. Show view window
This will present a dialog allowing you to pick a view and display it.
6.6 Creating a ‘skeleton’ project in a new Workspace
LPCXpresso includes several project Templates to help get started quickly.
LPCXpresso_Getting_Started_Guide
User guide
All information provided in this document is subject to legal disclaimers.
Rev. 12 — 17 April 2013
© NXP B.V. 2013. All rights reserved.
24 of 49
LPCXpresso
NXP Semiconductors
Getting started with NXP LPCXpresso
6.6.1 Create a new Workspace
From the ‘File’ menu hover over ‘Switch Workspace’ and then select ‘Other…’ from the
bottom of the list. You will then see the ‘Workspace Launcher’ dialog shown below.
Enter or browse to the new path for your workspace. We have called our new workspace
‘NewWorkspace’.
Fig 29. Workspace launcher
Then click on OK to re-open LPCXpresso with this new workspace selected.
6.6.2 Create the ‘Skeleton’ project
• If you are using a Cortex-based part, first, import the CMSIS header files for the chip
family you are planning to work with. To do this, click “Import Project” and navigate to
the CMSIS<version/part>.zip. The CMSIS header files are installed with LPCXpresso
in C:\nxp\lpcxpresso\lpcxpresso\examples\nxp. Once this project is added to your
workspace, click “Build all projects (Debug)” in the Quickstart Panel.
• Click on ‘New project…” and select the NXP C project type for your architecture.
• Click “Next” and enter a project name. In this case we will use ‘MyProject’ then click
‘Next.’
LPCXpresso_Getting_Started_Guide
User guide
All information provided in this document is subject to legal disclaimers.
Rev. 12 — 17 April 2013
© NXP B.V. 2013. All rights reserved.
25 of 49
LPCXpresso
NXP Semiconductors
Getting started with NXP LPCXpresso
Fig 30. Enter project name
• The next section of the dialog will ask you to specify which chip in the family you are
using.
Fig 31. Enter project name
LPCXpresso_Getting_Started_Guide
User guide
All information provided in this document is subject to legal disclaimers.
Rev. 12 — 17 April 2013
© NXP B.V. 2013. All rights reserved.
26 of 49
LPCXpresso
NXP Semiconductors
Getting started with NXP LPCXpresso
• If you are using a Cortex-based part, the next step in the wizard will ask which
CMSIS project to use. CMSIS stands for Cortex Microcontroller Software Interface
Standard. CMSIS defines a common way to access peripheral registers and to define
interrupts. Please select the project that you imported into the workspace earlier and
click Finish.
Fig 32. CMSIS selection
Congratulations! You have created your first project!
LPCXpresso_Getting_Started_Guide
User guide
All information provided in this document is subject to legal disclaimers.
Rev. 12 — 17 April 2013
© NXP B.V. 2013. All rights reserved.
27 of 49
LPCXpresso
NXP Semiconductors
Getting started with NXP LPCXpresso
Fig 33. Project creation complete
LPCXpresso_Getting_Started_Guide
User guide
All information provided in this document is subject to legal disclaimers.
Rev. 12 — 17 April 2013
© NXP B.V. 2013. All rights reserved.
28 of 49
LPCXpresso
NXP Semiconductors
Getting started with NXP LPCXpresso
7. Appendix
7.1 LPCXpresso target side schematics
LPCXpresso_Getting_Started_Guide
User guide
All information provided in this document is subject to legal disclaimers.
Rev. 12 — 17 April 2013
© NXP B.V. 2013. All rights reserved.
29 of 49
NXP Semiconductors
LPCXpresso_Getting_Started_Guide
User guide
Rev. 12 — 17 April 2013
LPCXpresso
Getting started with NXP LPCXpresso
All information provided in this document is subject to legal disclaimers.
30 of 49
© NXP B.V. 2013. All rights reserved.
Fig 34. Schematic for the LPCXpresso LPC1769 target side (1 of 3)
NXP Semiconductors
LPCXpresso_Getting_Started_Guide
User guide
Rev. 12 — 17 April 2013
LPCXpresso
Getting started with NXP LPCXpresso
All information provided in this document is subject to legal disclaimers.
31 of 49
© NXP B.V. 2013. All rights reserved.
Fig 35. Schematic for the LPCXpresso LPC1769 target side (2 of 3)
NXP Semiconductors
LPCXpresso_Getting_Started_Guide
User guide
Rev. 12 — 17 April 2013
LPCXpresso
Getting started with NXP LPCXpresso
All information provided in this document is subject to legal disclaimers.
32 of 49
© NXP B.V. 2013. All rights reserved.
Fig 36. Schematic for the LPCXpresso LPC1769 target side (3 of 3)
NXP Semiconductors
LPCXpresso_Getting_Started_Guide
User guide
Rev. 12 — 17 April 2013
1. Design and layout compatible with LPC1343 version. Therefore, PIO2_4/5 and PIO3_4/5 swap. LPC1114 does not have USB, but LPC1343 does. Therefore R37/38.
LPC1114 does not have SWO, but PIO0_9 is connected (since LPC1343 has SWO there). Recent versions of this board use a LPC1115 in place of the LPC1114.
LPCXpresso
33 of 49
© NXP B.V. 2013. All rights reserved.
1.
Getting started with NXP LPCXpresso
Fig 37. Schematic for the LPCXpresso LPC1114/LPC1115 target side 1
NXP Semiconductors
LPCXpresso_Getting_Started_Guide
User guide
Rev. 12 — 17 April 2013
LPCXpresso
34 of 49
© NXP B.V. 2013. All rights reserved.
2.
This board has been replaced with the LPC1347-LPCXpresso board.
Getting started with NXP LPCXpresso
All information provided in this document is subject to legal disclaimers.
Fig 38. Schematic for the LPCXpresso LPC1343 target side 2
NXP Semiconductors
LPCXpresso_Getting_Started_Guide
User guide
Rev. 12 — 17 April 2013
LPCXpresso
Getting started with NXP LPCXpresso
All information provided in this document is subject to legal disclaimers.
35 of 49
© NXP B.V. 2013. All rights reserved.
Fig 39. Schematic for the LPCXpresso LPC11C24 target side (1 of 2)
NXP Semiconductors
LPCXpresso_Getting_Started_Guide
User guide
Rev. 12 — 17 April 2013
LPCXpresso
36 of 49
© NXP B.V. 2013. All rights reserved.
Getting started with NXP LPCXpresso
All information provided in this document is subject to legal disclaimers.
Fig 40. Schematic for the LPCXpresso LPC11C24 target side (2 of 2)
NXP Semiconductors
LPCXpresso_Getting_Started_Guide
User guide
Rev. 12 — 17 April 2013
LPCXpresso
Getting started with NXP LPCXpresso
All information provided in this document is subject to legal disclaimers.
37 of 49
© NXP B.V. 2013. All rights reserved.
Fig 41. Schematic for the LPCXpresso LPC1200 target side (1 of 2)
NXP Semiconductors
LPCXpresso_Getting_Started_Guide
User guide
Rev. 12 — 17 April 2013
LPCXpresso
Getting started with NXP LPCXpresso
All information provided in this document is subject to legal disclaimers.
38 of 49
© NXP B.V. 2013. All rights reserved.
Fig 42. Schematic for the LPCXpresso LPC1200 target side (2 of 2)
NXP Semiconductors
LPCXpresso_Getting_Started_Guide
User guide
Rev. 12 — 17 April 2013
LPCXpresso
Getting started with NXP LPCXpresso
All information provided in this document is subject to legal disclaimers.
39 of 49
© NXP B.V. 2013. All rights reserved.
Fig 43. Schematic for the LPCXpresso LPC11U14 target side (1 of 2)
NXP Semiconductors
LPCXpresso_Getting_Started_Guide
User guide
Rev. 12 — 17 April 2013
LPCXpresso
Getting started with NXP LPCXpresso
All information provided in this document is subject to legal disclaimers.
40 of 49
© NXP B.V. 2013. All rights reserved.
Fig 44. Schematic for the LPCXpresso LPC11U14 target side (2 of 2)
NXP Semiconductors
LPCXpresso_Getting_Started_Guide
User guide
Rev. 12 — 17 April 2013
LPCXpresso
Getting started with NXP LPCXpresso
All information provided in this document is subject to legal disclaimers.
41 of 49
© NXP B.V. 2013. All rights reserved.
Fig 45. Schematic for the LPCXpresso LPC1104 target side (1 of 2)
NXP Semiconductors
LPCXpresso_Getting_Started_Guide
User guide
Rev. 12 — 17 April 2013
LPCXpresso
Getting started with NXP LPCXpresso
All information provided in this document is subject to legal disclaimers.
42 of 49
© NXP B.V. 2013. All rights reserved.
Fig 46. Schematic for the LPCXpresso LPC1104 target side (2 of 2)
NXP Semiconductors
LPCXpresso_Getting_Started_Guide
User guide
Rev. 12 — 17 April 2013
LPCXpresso
Getting started with NXP LPCXpresso
All information provided in this document is subject to legal disclaimers.
43 of 49
© NXP B.V. 2013. All rights reserved.
Fig 47. Schematic for the LPCXpresso LPC800 target side
NXP Semiconductors
LPCXpresso_Getting_Started_Guide
User guide
Rev. 12 — 17 April 2013
LPCXpresso
44 of 49
© NXP B.V. 2013. All rights reserved.
Getting started with NXP LPCXpresso
All information provided in this document is subject to legal disclaimers.
Fig 48. Dimensioned drawing of LPCXpresso
LPCXpresso
NXP Semiconductors
Getting started with NXP LPCXpresso
7.2 LPCXpresso PCB pinout and dimensions
The schematics of the LPCXpresso Target and the LPC-LINK debug connector appear in
Fig 34 to Fig 47. The LPCXpresso board was designed to be pin compatible with NXP
mbed. LPCXpresso can be powered either through the debug mini-USB port, by 3.3 V
applied to the board, or by 5 V applied to the USB connector. A cable for the 10-pin mini
JTAG connector on the LPC-LINK debugger portion of LPCXpresso can be purchased
from Digi-Key, part number FFSD-05-D-06.00-01-N.
Dimensions: A dimensioned drawing of LPCXpresso can be found in Fig 48. The outer
dimensions of LPCXpresso are 1.35x5.45 inches. It contains two rows of holes 900 mil
apart. Each row has 27 connections and holes are drilled at a 100 mil pitch.
Fig 49. LPCXpresso LPC-LINK JTAG/SWO pinout
LPCXpresso_Getting_Started_Guide
User guide
All information provided in this document is subject to legal disclaimers.
Rev. 12 — 17 April 20133
© NXP B.V. 2013. All rights reserved.
45 of 49
LPCXpresso
NXP Semiconductors
Getting started with NXP LPCXpresso
7.3 Terminology
LPCXpresso
The Code Red Technologies IDE (Integrated Development Environment) based on
Eclipse with our own extensions for embedded development.
SWD
Serial Wire Debugging (Single Wire Debugging). This is a debug connection technology
available on the Cortex-M3 that allows debug through just 2-wires unlike 5 for JTAG.
ELF (Executable and Linking Format)
This is the object code file format used by our development tool chain and most
microprocessor tool chains.
Workspace
LPCXpresso organizes groups of projects into a ‘Workspace’. A workspace is stored as a
directory on your host PC and has subdirectories containing individual projects.
Project
An LPCXpresso project. A project contains all of the .c and .h files to build a single
microcontroller flash image.
Perspective
In LPCXpresso, a perspective is a particular collection of ‘Views’ that are grouped
together to be suitable for a particular use. For example the ‘C/C++ programming’
perspective and the ‘Debug’ perspective.
View
A ‘View’ is a window in LPCXpresso that shows a particular file or activity. A view could
be of a C source code file or something live such as a disassembly window or register
dump. A ‘Perspective’ is the layout of many ‘Views’.
Semi-hosting
The ability to use IO on your debugger host system for your target embedded system.
For example a ‘printf’ will appear in the console window of the debugger.
Debug Target
The system being debugged. LPCXpresso includes a target microcontroller on-board, but
can also be connected to external targets.
Redlib
TM
The optimized Code Red Technologies C runtime library (non-GNU). LPCXpresso
includes both Redlib and Newlib libraries.
LPCXpresso_Getting_Started_Guide
User guide
All information provided in this document is subject to legal disclaimers.
Rev. 12 — 17 April 20133
© NXP B.V. 2013. All rights reserved.
46 of 49
LPCXpresso
NXP Semiconductors
Getting started with NXP LPCXpresso
8. References
[1]
NXP LPCXpresso http://www.nxp.com/lpcxpresso
[2]
NXP LPCZone http://www.nxp.com/lpczone
[3]
NXP Microcontrollers http://www.nxp.com/microcontrollers
[4]
Code Red Technologies Wiki http://lpcxpresso.code-redtech.com/LPCXpresso/softwareknowledgebase
[5]
Code Red Technologies LPCXpresso page http://lpcxpresso.code-red-tech.com
[6]
Embedded Artists AB http://www.embeddedartists.com
[7]
Harbison, S.P. & Steele, G.L. (2002). C: A Reference Manual (5th Edition). Prentice
Hall.
[8]
Yiu, J. (2007). The Definitive Guide to the ARM Cortex-M3. Oxford, UK: Newnes.
[9]
Yiu, J. (2011). The Definitive Guide to the ARM Cortex-M0. Oxford, UK: Newnes.
[10] ARM Cortex-M3 Technical Reference Manual. Revision: r2p0. (ARM DDI 0337G).
http://infocenter.arm.com/help/index.jsp
[11] ARM Cortex-M0 Technical Reference Manual. Revision: r1p0. (ARM DDI 0413D).
http://infocenter.arm.com/help/index.jsp
[12] ARMv7-M Architecture Reference Manual (ARM DDI 0403)
http://infocenter.arm.com/help/index.jsp
[13] ARMv6-M Architecture Reference Manual (Cortex-M0/LPC11)
http://infocenter.arm.com/help/index.jsp
LPCXpresso_Getting_Started_Guide
User guide
All information provided in this document is subject to legal disclaimers.
Rev. 12 — 17 April 20133
© NXP B.V. 2013. All rights reserved.
47 of 49
LPCXpresso
NXP Semiconductors
Getting started with NXP LPCXpresso
9. Legal information
9.1 Definitions
Draft — The document is a draft version only. The content is still under
internal review and subject to formal approval, which may result in
modifications or additions. NXP Semiconductors does not give any
representations or warranties as to the accuracy or completeness of
information included herein and shall have no liability for the consequences
of use of such information.
9.2 Disclaimers
Limited warranty and liability — Information in this document is believed to
be accurate and reliable. However, NXP Semiconductors does not give any
representations or warranties, expressed or implied, as to the accuracy or
completeness of such information and shall have no liability for the
consequences of use of such information. NXP Semiconductors takes no
responsibility for the content in this document if provided by an information
source outside of NXP Semiconductors.
In no event shall NXP Semiconductors be liable for any indirect, incidental,
punitive, special or consequential damages (including - without limitation lost profits, lost savings, business interruption, costs related to the removal
or replacement of any products or rework charges) whether or not such
damages are based on tort (including negligence), warranty, breach of
contract or any other legal theory.
Notwithstanding any damages that customer might incur for any reason
whatsoever, NXP Semiconductors’ aggregate and cumulative liability
towards customer for the products described herein shall be limited in
accordance with the Terms and conditions of commercial sale of NXP
Semiconductors.
Right to make changes — NXP Semiconductors reserves the right to make
changes to information published in this document, including without
limitation specifications and product descriptions, at any time and without
notice. This document supersedes and replaces all information supplied prior
to the publication hereof.
Suitability for use — NXP Semiconductors products are not designed,
authorized or warranted to be suitable for use in life support, life-critical or
safety-critical systems or equipment, nor in applications where failure or
malfunction of an NXP Semiconductors product can reasonably be expected
to result in personal injury, death or severe property or environmental
damage. NXP Semiconductors and its suppliers accept no liability for
inclusion and/or use of NXP Semiconductors products in such equipment or
applications and therefore such inclusion and/or use is at the customer’s
own risk.
Applications — Applications that are described herein for any of these
products are for illustrative purposes only. NXP Semiconductors makes no
representation or warranty that such applications will be suitable for the
specified use without further testing or modification.
LPCXpresso_Getting_Started_Guide
User guide
Customers are responsible for the design and operation of their applications
and products using NXP Semiconductors products, and NXP
Semiconductors accepts no liability for any assistance with applications or
customer product design. It is customer’s sole responsibility to determine
whether the NXP Semiconductors product is suitable and fit for the
customer’s applications and products planned, as well as for the planned
application and use of customer’s third party customer(s). Customers should
provide appropriate design and operating safeguards to minimize the risks
associated with their applications and products.
NXP Semiconductors does not accept any liability related to any default,
damage, costs or problem which is based on any weakness or default in the
customer’s applications or products, or the application or use by customer’s
third party customer(s). Customer is responsible for doing all necessary
testing for the customer’s applications and products using NXP
Semiconductors products in order to avoid a default of the applications and
the products or of the application or use by customer’s third party
customer(s). NXP does not accept any liability in this respect.
Export control — This document as well as the item(s) described herein
may be subject to export control regulations. Export might require a prior
authorization from competent authorities.
Evaluation products — This product is provided on an “as is” and “with all
faults” basis for evaluation purposes only. NXP Semiconductors, its affiliates
and their suppliers expressly disclaim all warranties, whether express,
implied or statutory, including but not limited to the implied warranties of noninfringement, merchantability and fitness for a particular purpose. The entire
risk as to the quality, or arising out of the use or performance, of this product
remains with customer.
In no event shall NXP Semiconductors, its affiliates or their suppliers be
liable to customer for any special, indirect, consequential, punitive or
incidental damages (including without limitation damages for loss of
business, business interruption, loss of use, loss of data or information, and
the like) arising out the use of or inability to use the product, whether or not
based on tort (including negligence), strict liability, breach of contract, breach
of warranty or any other theory, even if advised of the possibility of such
damages.
Notwithstanding any damages that customer might incur for any reason
whatsoever (including without limitation, all damages referenced above and
all direct or general damages), the entire liability of NXP Semiconductors, its
affiliates and their suppliers and customer’s exclusive remedy for all of the
foregoing shall be limited to actual damages incurred by customer based on
reasonable reliance up to the greater of the amount actually paid by
customer for the product or five dollars (US$5.00). The foregoing limitations,
exclusions and disclaimers shall apply to the maximum extent permitted by
applicable law, even if any remedy fails of its essential purpose.
9.3 Trademarks
Notice: All referenced brands, product names, service names and
trademarks are property of their respective owners.
All information provided in this document is subject to legal disclaimers.
Rev. 12 — 17 April 2013
© NXP B.V. 2013. All rights reserved.
48 of 49
LPCXpresso
NXP Semiconductors
Getting started with NXP LPCXpresso
10. Contents
1.
1.1
1.2
1.3
1.4
1.5
1.6
2.
3.
3.1
3.2
3.3
4.
4.1
4.1.1
4.1.2
4.2
5.
5.1
5.2
5.3
6.
6.1
6.2
6.2.1
6.2.2
6.2.3
6.2.4
6.2.5
6.3
6.4
6.4.1
6.4.2
6.5
6.6
6.6.1
6.6.2
7.
7.1
7.2
7.3
8.
Introduction ......................................................... 3
LPCXpresso 5 new features............................... 4
LPCXpresso IDE ................................................ 4
LPCXpresso development board ....................... 5
LPC-LINK JTAG/SWD debugger ....................... 6
Integrated evaluation target................................ 6
LPCXpresso partners ......................................... 6
Evaluate, explore and develop ........................... 7
Installation ........................................................... 8
System requirements ......................................... 8
Installation process ............................................ 8
Activation.......................................................... 10
Getting familiar with the LPCXpresso IDE ...... 11
Layout of the LPCXpresso desktop .................. 11
Single perspective (code development) ........... 12
Single perspective (debug)............................... 13
Connecting the target ....................................... 15
Working with example projects........................ 16
Downloading NXP sample code from the web . 16
Debugging/running ‘blinky’ or another project on
your LPCXpresso board ................................... 19
Working with Instruction Trace ......................... 20
LPCXpresso IDE tips and tricks ....................... 20
Installing Eclipse plugins .................................. 20
Debugging tips ................................................. 20
Debug features not enabled ............................. 20
Error launching debug\filename.axf .................. 21
Optimization issues .......................................... 22
Exiting debug mode and stopping debugging .. 22
Recovery of board ............................................ 22
Datasheet browser ........................................... 23
Code size ......................................................... 23
printf ................................................................. 23
Optimization ..................................................... 24
Showing hidden views ...................................... 24
Creating a ‘skeleton’ project in a new Workspace
......................................................................... 24
Create a new Workspace ................................. 25
Create the ‘Skeleton’ project ............................ 25
Appendix ............................................................ 29
LPCXpresso target side schematics ................ 29
LPCXpresso PCB pinout and dimensions ........ 45
Terminology ..................................................... 46
References ......................................................... 47
9.
9.1
9.2
9.3
10.
Legal information ..............................................48
Definitions.........................................................48
Disclaimers .......................................................48
Trademarks ......................................................48
Contents .............................................................49
Please be aware that important notices concerning this document and the product(s)
described herein have been included in the section 'Legal information'.
© NXP B.V. 2013.
All rights reserved.
For more information, please visit: http://www.nxp.com
For sales office addresses, please send an email to: [email protected]
Date of release: 17 April 2013
Document identifier: LPCXpresso_Getting_Started_Guide