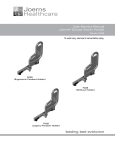
1
Built-in
Wi-Fi
A c t i o n
Ca m e r a
User Manual
kitvision.co.uk
JB. 3593 / Made in China. © Kitvision 2014. Christchurch, Dorset. BH23 4FL.
HD5W
Contents
4
4
5
6
16
22
32
34
34
36
44
46
47
Main features
Box contents
Functions
Using the camera
Changing the camera settings
Using Wi-Fi
Connecting the camera
Using the PC camera function
Waterproof case
Mount accessories
Specification
Care for your action camera
Troubleshooting
Main features
Box contents
Functions
• FHD 1080p video at 30fps
• 12 Megapixel photo mode
• Waterproof up to 60 m
• K
itvision Escape HD5W
Action Camera
• 60 m waterproof case
• Bicycle mount
• Mount connector clip
• Curved adhesive mount
• Flat adhesive mount
• 2 x 3M adhesive pads
• Action camera to ¼" tripod
screw adaptor
• Action camera to ¼" tripod
thread adaptor
• Tripod adaptor
• Mount connector
• 90 degree adaptor
• Vented helmet mount straps
• User manual
• USB cable
1. Shutter/Ok Button
2. Top Operation Indicator
3. Power/Mode Button
4. Built-in Microphone
5. Micro SD Card Slot
6. Micro USB Input
7.Lens
8. Micro HDMI Output
4
9
1
4
2
3
9. Operation Indicator
10.Charging Indicator
11. Built-in LCD
12.Up/Wi-Fi Button
13. Built-in Speaker
14.Down Button
15.Battery Cover
16.Battery Cover Lock
12
5
13
15
6
7
8
11
10
14
16
5
Instructions for use
Turning power on and off
1. Long press the Power/Mode Button (3) to turn on the camera.
2. Long press the Power/Mode Button (3) to turn power off.
Charging the battery
The camera has a built-in rechargeable lithium battery.
Please fully charge the battery before use.
1. Turn off the camera.
2. Connect the micro USB connector of the USB cable to the
camera and the other end to a PC/mains charger USB Port.
3. The Charging Indicator (10) will be solid blue whilst charging.
4. Once fully charged the Charging Indicator (9) will turn off.
Inserting the memory card
The Escape Action Camera HD5W doesn’t have any internal
memory. To be able to record video or capture photos using
the camera, you must have your micro SD card inserted
(32 GB max, not included).
1. Ensure the camera is turned off.
2.Insert your memory card into the Micro SD Card Slot (5).
3. The camera uses the FAT32 file format. If the micro SD card is
incompatible, it will need formatting.
4. To format the card correctly, go to the ‘Changing the Camera
Settings’ section later in this manual and follow the ‘General
Settings’ instructions.
Note: The camera body may be warm after extended use.
This is normal.
6
7
Changing the mode of the camera
The camera has 6 different modes: Video mode, Photo mode,
Burst mode, Time Lapse mode, Playback mode and Settings mode.
1. P
ress the Power/Mode Button (3) to enter the Mode selection
display, use the Up Button (12) and Down Button (14) to select
your chosen mode and press the Shutter/Ok Button (1) to enter
the mode.
Video mode
For recording video clips
Photo mode
For taking still photos
Burst mode
Takes a series of 3 / 5 / 10 photos
Time Lapse mode
Takes a photo at set intervals until deactivated
Playback mode
For viewing captured files
Settings mode
For changing camera settings
Using Video mode
By selecting Video mode you can capture high quality, full HD videos
with your Escape HD5W Action Camera. In the Settings mode you
can change the Resolution and Recording Length, you can also
choose to activate HDR mode, Motion Detection recording, Audio
Recording, Date Stamps, Sports Mode and G-Sensor recording.
1. T urn on the camera and it will start in Video mode
automatically. If in another mode, press the Power/
Mode Button (3) and choose Video mode.
2.Use the LCD (11) to view your shot, then press the Shutter/
Ok Button (1) to start recording.
3.When recording the Operation Indicator (9) and Top Operation
Indicator (2) will flash, the LCD (11) will show a flashing red
circle and will display how long it has been recording for.
4. Press the Shutter/Ok Button (1) again to stop recording.
Note: The camera will stop recording and save automatically when
the memory capacity is full or it has run out of battery power.
8
9
Recording audio within a video
If using the camera with the waterproof case, audio will be
recorded although it will be less audible. For best audio quality,
the camera will need to be used without the case. When using
the camera without a case, please take extra care and make sure
it does not get wet.
Using Photo mode
By selecting Photo mode you can capture a single image with
your camera. You can change the Resolution, Exposure, Quality,
White Balance, ISO and Anti-shake settings in the Settings mode.
Using Burst mode
By selecting Burst mode you can take a series of photos within
one ‘burst’, the Burst settings can be changed in the Settings Mode.
1. T urn on the camera and press the Power/Mode Button (3)
to enter the Mode Menu and select Burst mode.
2.Use the LCD Display (11) to view your shot, and then press
the Shutter/Ok Button (1) to take a series of still images.
The camera will make a series of ‘shutter’ sound effects
depending on the quantity of photos selected; the Operation
Indicator (9) will flash repeatedly during this sequence.
1. T urn on the camera and press the Power/Mode Button (3)
to enter the Mode Menu and select Photo mode.
2.Use the LCD Display (11) to view your shot, and then
press the Shutter/Ok Button (1) to take a still image.
3.After the image has been taken, the camera will make
a ‘shutter’ sound effect and the LCD will blink once.
10
11
Using Time Lapse mode
By selecting Time Lapse mode you can take a series of photos at
set intervals, when stitched together it will create a video effect
of a very slow frame rate to show movement over a long period
of time. Photos captured in Time Lapse mode will be saved as
single files and external software is required to convert the
captured photos into a video file. The Time Lapse settings
can be changed in the Settings mode.
1.Turn on the camera and press the Power/Mode Button (3)
to enter the Mode menu and select Time Lapse mode.
2.Use the LCD Screen (11) to view your shot, and then press
the Shutter/Ok Button (1) to activate the Time Lapse photo
sequence. At every set interval the LCD Screen (11) will flash
and the camera will sound a ‘Beep/Shutter’ sound effect.
3.The camera will continue to take a photo at every interval
until deactivated by pressing the Shutter/Ok Button (1) again.
12
Using Playback mode
1. Turn on the camera and press the Power/Mode Button (3)
to enter the Mode menu and select Playback mode.
2. To navigate through your files use the Up Button (12)
and Down Button (14).
Viewing video files
1. Once a video file is selected press the Shutter/Ok Button (1)
to play.
2.Whilst playing the video file you can fast forward by pressing
the Down Button (14) or rewind by pressing the Up Button (12).
3 Whilst playing the video you can pause by pressing the
Shutter/Ok Button (1).
4. Press the Power/Mode Button (3) to return to the
selection screen.
13
Deleting files from the inserted micro SD card
1. Select the file to be deleted using the Up Button (12) and
Down Button (14).
2.Press the Power/Mode Button (3) and select the Settings menu.
3. Use the Down Button (14) to scroll down to the ‘Delete’ option.
4. Press the Shutter/Ok Button (1) to enter the Delete options.
5.Select ‘Delete this file’ and press the Shutter/Ok Button (1)
to enter, select ‘No’ to cancel the process or select ‘Yes’ to
permanently delete the file.
6. Select ‘Delete all files’ to delete all files from your micro SD
card, press the Shutter/Ok Button (1) to enter, select ‘No’
to cancel the process or select ‘Yes’ to permanently delete
all files.
14
Removing the battery
1. Slide the Battery Cover Lock (16) in the direction of the arrow.
2. Lift the Battery Cover (15).
3. Pull the battery tab to remove the rechargeable battery.
15
Changing the camera settings
General settings
1.To enter the general settings menu, turn on the camera and
press the Power/Mode mutton (3) to enter the Mode menu
and select Settings mode.
2.Use the Up Button (12) and Down Button (14) to navigate
through the Setup menu.
3. Use the Shutter/Ok Button (1) to enter a sub-menu.
Seamless
Set a time for how long you want each video file,
the camera will begin recording the next video
automatically after each interval
[Off] / [1minute] / [3minutes] / [5minutes]
HDR
Activating HDR will optimise your videos and photos
by automatically using the best settings for the
environment’s light levels [Off] / [On]
Record Audio
This function allows you to enable or disable voice
recording over your captured videos
[Off] / [On]
Date Stamp
This function can be used to add a date and time
to your videos as you take them
[Off] / [On]
Sport Mode
Using Sport mode will optimise the camera video
settings to react to moving objects e.g: people
playing sports
[Off] / [Low] / [Mid] / [High]
In the general settings menu, you will find the following options:
MENU
FUNCTION
Movie Size
Change the video resolution for the video recording.
Select a smaller movie size for reduced file size or
a higher movie size for better quality
[FHD 1080P (30fps)] / [HD 720P (30fps)]
Motion Detection
16
Set the camera to record video when movement
is detected [Off] / [On]
17
G Sensor
Set the camera to stop the video recording
automatically when it is not moving. When the camera
moves again, it will start the recording automatically
[Off] / [Low] / [Mid] / [High]
White Balance
Change the white balance of the Photo mode
to suit the environment
[Auto] / [Daylight] / [Cloudy] / [Tungsten] /
[Fluorescent]
Resolution
Change the photo resolution depending on desired
quality. [12MP] / [10MP] / [8MP] / [6MP] / [3MP] /
[2MP] /[VGA]
Anti-Shake
Activate anti-shake to reduce blurring when
photographing moving objects and to digitally
stabilise the camera sensor [Off ] / [On]
Exposure
Change the exposure of the Photo mode
[-2.3] / [-1/3] / [0.0] / [+1/3] / [+2/3] / [+1.0] / [+4/3] /
[+5/3] / [+2.0]
Time Lapse
Quality
Change the quality of the Photo Mode
[Super Fine] / [Fine] / [Normal]
Change the frequency of photos taken in Time Lapse
mode. Choosing ‘short’ will reduce the time between
photos and ‘long’ will increase the time between
each photo
[Short] / [Long]
Sharpness
ISO
Change the ISO levels of the Photo Mode
[Auto] / [100] / [200] / [400]
Change the sharpness of the Photo mode
[Strong] / [Normal] / [Soft]
Power Save
Burst
Change the amount of photos taken in Burst mode.
[Off] / [3 Burst] / [5 Burst] / [10 Burst]
Change the time in which the camera
will enter sleep mode
[Off] / [10 sec] / [30 sec] / [1 min]
18
19
When Date Stamp is activated you should ensure
the date and time are correct. Use the UP and Down
Buttons to select a value and press the Shutter/
Ok Button to proceed
Frequency
Change the Light Frequency of your camera
[50Hz] / [60Hz]
File Type
Choose the file type for your camera
[Event] / [Video] / [JPEG]
Rotate
Activate 180° auto-rotate; when inverted the camera
will automatically rotate the photo or video recording
[Off] / [On]
Format
Wi-Fi Password
Choose a Wi-Fi Password for your camera by using
the Up and Down Buttons to select a value and press
the Shutter/Ok Button to proceed
Select this option to format your storage device, this
will erase all content stored on your micro SD card
and create a FAT32 filing system
[Cancel] / [Enter]
Delete
Beep
Activate or turn of Button ‘Beeps’
[Off] / [On]
Delay Shutdown
[Off] / [On]
Delete one file or all files using this sub-menu, once
you confirm an option you will receive another option
to confirm your choice. Selecting ‘Delete This File’
will give you the option to delete your last viewed file
(in Playback mode), select ‘Yes’ to delete or ‘No’
to skip to the next file
[Delete This File?] / [Delete All Files?]
Language
Change the language of your camera
[English] / [German] / [French] / [Spanish] /
[Italian] / [Portuguese] / [Chinese traditional] /
[Chinese Simplified] / [Japanese] / [Russian]
Factory Reset
Reset the settings to the default/factory standar
[Cancel] / [Enter]
System Info
Select this option to view your model number
and firmware version
Date & Time
20
21
Using Wi-Fi
With the Escape HD5W’s built-in Wi-Fi, you can use your smart
device as a camera remote, viewfinder, and download files to
your phone.
Downloading the Wi-Fi App
• The Wi-Fi app is available to download for free at the
Apple App Store™ and Google Play Store™
• Android users: Enter the Google Play Store™, search for
“iSmart DV”, download and install, following this user manual
to connect the Wi-Fi and operate
• Phone users: Enter the Apple App Store™, search for “iSmart
DV”, download and install, following this user manual to
connect the Wi-Fi and operate
Pairing the camera to your device
1. Turn on the camera and press the Up/Wi-Fi Button (12)
2.The LCD (11) will show the message ‘Waiting for Wi-Fi connection…’
3.Search for a Wi-Fi hotspot on your smart phone/tablet, select
the “Escape HD5W” network and you will be prompted for a
password; enter “1234567890” to proceed.
4.Once connected the camera’s LCD (11) will enter sleep mode.
If a camera button is pressed whilst the camera is in Wip-Fi
mode, the camera will disconnect from your device.
5.Open the ‘iSmart DV’ application and wait for the live feed to
be shown as per Figure 1.
iSmart DV
22
23
Using Wi-Fi for Video mode (Figure 1/2)
1. Upon opening the application, Video mode should be
automatically selected in the capture mode slider
2. Use the live feed to view your shot.
3. Press the record button to start and stop recording
4. Video time remaining (based on remaining storage)
is shown in the top left corner.
Camera battery
indicator
Video resolution
settings
Remaining
video storage
Video resolution settings
Camera
settings
Live
video
feed
• T o change the resolution press and you will receive
a pop-up menu to change the resolution (Figure 2).
White balance and frequency settings can be changed
by pressing Camera settings in Figure 1 and selecting
the relevant headings in Figure 5
File
viewer
Record
Button
Figure 1:
24
App home screen
+ video mode
Figure 2:
Capture mode
(automatically
set to video)
Video resolution
settings
25
Using Wi-Fi for Photo mode (Figure 3/4/5)
1. Select Photo mode in the capture mode slider
2. Use the live feed to view your shot.
3. Press the capture button
to take a photo.
4.Remaining photo space (dependant on storage) is shown
in the top left corner.
Video resolution
settings
Video resolution settings
Camera
settings
• T o change the photo resolution press
in Figure 3 and
you will receive a pop-up menu to change the resolution
(Figure 4). White balance, frequency settings and burst mode
can be changed by pressing Camera settings in Figure 3
and selecting the relevant headings in Figure 5
Capture
Button
Figure 3:
Figure 4:
Photo mode
Capture
mode select
26
Photo resolution
settings
Figure 5:
Camera settings
27
Using Wi-Fi for file playback
1. Press the file viewer icon in either Video or Photo mode
to enter the file album.
2.To view a photo simply select a photo file and it will be
expanded to fill the screen.
• T o view a video file you will first have to download the
file to your device as the application doesn’t support video
streaming, follow the download steps on the next page
28
Using Wi-Fi for file playback
1. To download a selection of files press the file selection icon
2.Tap on each file you wish to download, a blue tick will appear
on selected files (Figure 7).
3.Once you have chosen your files, press the download icon
to download the files to your device storage. A pop-up will
appear to advise you of the download progress (Figure 8).
• T o download all press the download icon and press
‘Download all’
29
Using Wi-Fi to delete files (Figure 6/7/8)
1.Press the file selection icon to select items you
wish to delete.
2.Tap on each file you wish to delete, a blue tick will
appear on selected files (Figure 7).
3.Once you have chosen your files, press the trash icon
to delete the files from your camera’s micro SD card
storage (Figure 7).
Video file
Photo
file
File
selection
Figure 6:
Figure 7
File viewer / album
30
Download
(press to
download all
Figure 8
31
Connecting the camera to an HDTV
Connecting the camera to a PC with the USB cable
1. C
onnect the micro HDMI end of a micro HDMI to HDMI cable
(not included) to the camera’s micro HDMI Port (8), and the
other end to the HDTV’s HDMI port.
2. Turn on the HDTV and select the appropriate HDMI source.
3. Follow the instructions for ‘Playback of files’ mentioned
earlier in this manual.
4. When viewing is finished, turn off the camera and HDTV
before removing the HDMI cable.
1. C
onnect one end of the supplied USB cable to the camera’s
micro USB Port (6), and the other end to the PC’s USB port
and turn the camera on.
2.Turn on the camera, a ‘Connecting’ prompt will appear
on the LCD Screen (7), select ‘MSDC’.
3.Open [My Computer] or [Windows Explorer®] on your PC.
‘Removable Disk’ will be in the drive list. Double-click the
‘Removable Disk’ icon to view its contents. Files stored
on the camera are located in the folder named ‘DCIM’.
4. Copy the files that you want to your PC.
Connecting the camera to a PC
There are two ways to download files from the camera’s
micro SD to a computer:
• By inserting the micro SD into a card reader
• By connecting the camera to a computer using the supplied
micro USB cable
32
33
Using the PC camera function
1.Connect one end of the supplied USB cable to the camera’s
micro USB Port (6), and the other end to the PC’s USB port
and turn the camera on.
2.Turn on the camera and a ‘Connecting’ prompt will appear
on the LCD Display, choose ‘PCCAM’. If using Windows XP®,
Open [My Computer], double click ‘USB video tool’. If using
Window Vista®, 7 or 8, the PC Camera function can only be
used with third-party software (Skype™, etc.).
Using the waterproof case
1. Open the waterproof case by releasing the clip on the top
of the case, follow the arrows on the clip to unlock; slide
the top tab (i) left and pull the vertical arrow (ii) upwards
whilst holding the horizontal tab in the unlocked position.
2.Insert the camera correctly so that the case closes easily
and provides a tight seal.
3. Snap the top clip shut to ensure the case is waterproof.
4.To operate the camera, use the waterproof case’s external
spring buttons.
Waterproof case
The Escape HD5W Action Camera includes a case that is waterproof
up to 60 metres. When using the camera in a wet environment,
always use the waterproof case. It is recommended that the case
be used at all times for protection.
34
(i)
(ii)
35
Mount accessories
In order to use the camera for various outdoor activities, we have
provided three different mounts.
• M
ount Assembly (B) uses an adhesive mount to hold the
camera and the provided straps to fix it to a helmet vented:
• Mount (A) is used to fix the camera to the handlebars on a bike:
B
A
• A
dhesive Mounts (C) are used to mount the camera to flat/
curved, smooth surfaces:
C
36
37
Fixing the camera to a bike
1. Unscrew both screws (i) and place both halves (ii) of the
Bicycle Mount (A) around the desired position of the pole.
2.Replace the screws (i) and tighten them until the mount
is firmly in place.
3.Remove the screw from the top of the Mount (iii) and slot the
camera (inside waterproof case) into position, replace screw
and tighten to lock in position.
4. If you wish to use a forward-facing bar you may wish to use
the 90° adaptor (iv) in between the camera and the bicycle
mount to make the camera forward-facing.
(iii)
(ii)
(iv)
(i)
38
39
Fixing the camera to a vented helmet
1. Fix the camera to the Mount Clip (i).
2.Thread the supplied straps through the slots in a flat or
curved Adhesive Mount (don’t remove the adhesive film) (ii).
3.Attach the camera assembly to the strap mount assembly
by sliding it in until it clicks into position.
4.After fixing the camera to the mount correctly, use the strap
to fix it to the helmet. Adjust the length according to the
helmet’s size, and then push the clips down into position
to lock the straps in place.
(ii)
C
(i)
40
41
Fixing the camera to a board/flat surface
1. Ensure the surface is clean and dry before applying
the adhesive mount.
2.Peel off adhesive paper and stick the mount in the
desired position.
3. Fix the camera to the Mount Clip (i).
4.Attach the camera assembly to the Adhesive Mount (C)
by sliding it in until it “Click” into position.
C
(“Click”)
(i)
42
43
Specification
Frequency
50 Hz / 60 Hz
Display
1.5"
USB Interface
USB 2.0
Lens
170° ultra wide-angle lens
Battery Capacity
700 mAH
Language Options
English / German / French / Spanish /
Italian / Portuguese / Chinese traditional /
Chinese Simplified / Japanese / Russian
Power Consumption
260 mA @ 4.2 V
Recording Time per charge
About 90 minutes (based on highest settings)
Video Resolution
1080p / 30fps
720p / 30fps
Operating System
Windows XP® / Vista or Above / Windows 7® /
Mac OS™
Video Format
MOV
Dimensions (mm)
H59.27 x W41.13 x D29.28
Photo Resolution
[12MP] / [10MP] / [8MP] / [6MP] / [3MP] /
[2MP] / [VGA]
Weight
58 g
Storage
Micro SD (up to 32 GB)
Photo Modes
Single Shot / Timed / Burst / Time Lapse
44
45
Care for your Escape HD5W Action camera
Troubleshooting
Please DON’T:
• Get the camera wet, unless sealed in the included
waterproof case
• Drop the camera as this will invalidate your warranty.
• Open up the camera. There are no user serviceable parts inside
• Expose the camera to extreme temperatures or rapid changes
of hot to cold or vice versa
We hope you’ve now got all the information you need to
get started, but if you’re having problems with anything,
please feel free to contact us at: [email protected]
or visit www.kitvision.co.uk
Please DO:
• Clean the camera with a soft dry cloth and no detergents
We apologise for any inconvenience caused by minor inconsistencies in these instructions,
which may occur as a result of product improvement and development.
46
47