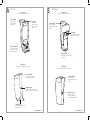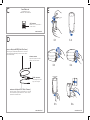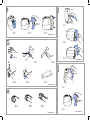
1
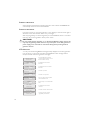
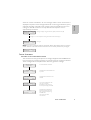
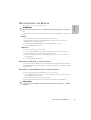
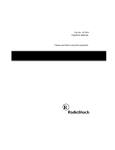
ENGLISH
ResLink™
User’s Manual
English
Reorder number: 308198/5 09 03
A
ResLink
B
Front view
Vue avant / Vista frontal / Vista frontal
cover (open)
top catch
couvercle (ouvert) /
cubierta (abierta) /
tampa (aberta)
patte d’attache
supérieure / traba
superior / lingueta
superior
S8 ResLink
Front view
Vue avant / Vista frontal / Vista frontal
cover (open)
couvercle (ouvert) /
cubierta (abierta) / tampa
(aberta)
top latch
attache supérieure / cerrojo
superior / trinco superior
15-pin connector
connecteur 15 broches /
conector de 15 clavijas /
conector de 15 pinos
bottom latch
attache inférieure / cerrojo inferior /
trinco inferior
Back view
Back view
Vue arrière / Vista posterior / Vista traseira
Vue arrière / Vista posterior / Vista traseira
cover (closed)
cover (closed)
couvercle (fermé) / cubierta
(cerrada) / tampa (fechada)
couvercle (fermé) /
cubierta (cerrada) / tampa
(fechada)
oximeter port
port de connexion de l’oxymètre /
puerto del oxímetro / porta do oxímetro
oximeter port
port de connexion de
l’oxymètre / puerto del
oxímetro / porta do oxímetro
locking lever
verrouillage / palanca de traba /
alavanca de fecho
©2009 ResMed Ltd.
©2009 ResMed Ltd.
C
E
SmartMedia card
carte SmartMedia / tarjeta
SmartMedia / cartão SmartMedia
gold contacts
contacts en or / contactos dorados /
contactos de ouro
©2009 ResMed Ltd.
D
E-1
E-2
sensor cable (model 8000J Adult Flex Sensor)
câble du capteur (modèle 8000J Adult Flex Sensor) / cable sensor
(Sensor Adult Flex Modelo 8000J) / Cabo sensor (Sensor Adulto
Flexível Modelo 8000J)
oximeter sensor
capteur de l’oxymètre / sensor del
oxímetro / Sensor do oxímetro
E-3
E-4
Xpod connector
connecteur Xpod / Conector
Xpod / Conector Xpod
oximeter cable (model 3012 Pulse Oximeter)
câble de l’oxymètre (oxymètre de pouls modèle 3012) / cable del
oxímetro (Oxímetro de pulso Modelo 3012) / cabo do oxímetro
(Oxímetro de Pulso Modelo 3012)
E-5
©2009 ResMed Ltd.
E-6
©2009 ResMed Ltd.
I
F
I-1
F-1
F-2
F-3
©2009 ResMed Ltd.
G
I-2
B
I-3
A
B
G-1
G-2
©2009 ResMed Ltd.
J
A
G-3
G-4
G-5
©2009 ResMed Ltd.
H
H-1
H-2
H-3
J-1
J-2
©2009 ResMed Ltd.
©2009 ResMed Ltd.
CONTENTS
INTRODUCTION . . . . . . . . . . . . . . . . . . . . . . . . . . . . . . . . . . . . . . . . . . . . . . . 3
RESLINK AND S8™ RESLINK
USER/OWNER RESPONSIBILITY
INTENDED USE
3
3
3
THE RESLINK SYSTEM . . . . . . . . . . . . . . . . . . . . . . . . . . . . . . . . . . . . . . . . . . 5
ACCESSORIES
5
SETTING UP THE RESLINK . . . . . . . . . . . . . . . . . . . . . . . . . . . . . . . . . . . . . . . 5
INSERTING THE CARD
ATTACHING THE RESLINK
CONNECTING AN OXIMETER TO THE RESLINK (OPTIONAL)
ATTACHING AN OXIMETER TO YOUR FINGER
5
5
6
6
USING THE RESLINK . . . . . . . . . . . . . . . . . . . . . . . . . . . . . . . . . . . . . . . . . . . 7
STARTING TREATMENT
STOPPING TREATMENT
LCD MESSAGES
TYPICAL SCENARIOS
8
8
8
9
DISCONNECTING THE RESLINK . . . . . . . . . . . . . . . . . . . . . . . . . . . . . . . . . 11
RETURNING THE RESLINK TO YOUR CLINICIAN
RETURNING THE SMARTMEDIA CARD TO YOUR CLINICIAN
11
11
CLEANING AND MAINTENANCE . . . . . . . . . . . . . . . . . . . . . . . . . . . . . . . . . 12
CLEANING THE RESLINK
CLEANING THE OXIMETER
CLEANING THE OXIMETER SENSOR
12
12
12
TROUBLESHOOTING . . . . . . . . . . . . . . . . . . . . . . . . . . . . . . . . . . . . . . . . . . 13
TECHNICAL SPECIFICATIONS . . . . . . . . . . . . . . . . . . . . . . . . . . . . . . . . . . . 17
2
The RESLINK™ is a device designed for use with ResMed flow generators to help your
clinician monitor your sleep and ensure that you are receiving optimal treatment.
When connected to the flow generator, the RESLINK records treatment and pulse
oximetry data during therapy.
The data is stored on a SmartMedia™ card—a memory card capable of storing up to
30 sessions of detailed data. After treatment, the SmartMedia card containing the data
can be removed from the RESLINK device and sent to your clinician for review.
ENGLISH
INTRODUCTION
RESLINK AND S8™ RESLINK
The RESLINK device is available in two different mechanical forms (RESLINK and S8
RESLINK) to fit different families of flow generators.
The RESLINK and the S8 RESLINK function in the same way, but they attach to and
detach from the flow generator in different ways. When the word ‘RESLINK’ is used in
a general sense, it applies to both RESLINK and S8 RESLINK. See “Compatible flow
generators” on page 18 to see which device is used with each flow generator.
Note: The S8 ResLink may not be available in all regions.
!
CAUTION
In the US, Federal law restricts this device to sale by or on the order of a physician.
USER/OWNER RESPONSIBILITY
The user or owner of this system shall have sole responsibility and liability for any injury
to persons or damage to property resulting from:
• operation which is not in accordance with the operating instructions supplied
• maintenance or modifications carried out unless in accordance with authorized
instructions and by authorized persons.
INTENDED USE
The RESLINK is an accessory to ResMed flow generators that are used for the
treatment of Obstructive Sleep Apnea (OSA) in adult patients. RESLINK is for home
and hospital use.
!
WARNINGS AND CAUTIONS
A Warning alerts you to possible injury.
A Caution explains special measures for the safe and effective use of the device.
The following are general warnings and cautions. Specific warnings and cautions appear
next to the relevant instructions in the manual.
• Use the RESLINK only for its intended use as described in this manual.
• The RESLINK is compatible for use with certain ResMed flow generators only. See
“Compatible flow generators” on page 18 for details. Do not use the RESLINK with
any other flow generators.
INTRODUCTION
3
•
•
•
•
•
•
•
•
Make sure that the flow generator is turned off before connecting or disconnecting
the RESLINK.
Do not attempt to dismantle the RESLINK. There are no user serviceable parts
inside. Repairs and internal servicing should only be performed by an authorized
agent.
There is a serial (9-pin) port at the back of some flow generators. Do not connect
the NONIN® Xpod connector into the serial port as it may damage the oximeter.
SmartMedia cards should be obtained only from ResMed as custom upgrade
software may be required for operation of the ResLink.
Avoid touching the gold contacts on the SmartMedia card.
The SmartMedia card should be kept in its plastic sleeve when not in use. This is
because dirt may interfere with the RESLINK operation.
Do not use the RESLINK in the presence of flammable or explosive materials.
From time to time, electronic devices can be affected by irregularities in the
electrical power supply. It is important to periodically check that the RESLINK is
working correctly by checking the flow generator Liquid Crystal Display (LCD) for
any error messages. This includes checking the pulse oximeter probe for correct
operation by inspecting that the Light Emitting Diode (LED) on the finger probe is
illuminated when the flow generator is turned on.
Contact your equipment supplier if you have any concerns about correct operation of
the RESLINK.
4
The RESLINK system (RESLINK and SmartMedia card) is illustrated in sections A, B and
C on the illustration sheet.
ACCESSORIES
See Section D on the illustration sheet (8000J Adult Flex Sensor only illustrated).
The NONIN® Model 3012 Pulse Oximeter is compatible for use with the RESLINK. It
can be used with either the 8000J Adult Flex Sensor or 8000AA Adult Finger Clip. The
same oximeter cable can be used for either sensor. These accessories are available
from ResMed.
ENGLISH
THE RESLINK SYSTEM
SETTING UP THE RESLINK
See sections E and F on the illustration sheet.
Note: Your clinician may have already set up the ResLink for you.
INSERTING THE CARD
CAUTION
!
Avoid touching the gold contacts on the SmartMedia card.
1. Open the RESLINK cover.
2. Insert the SmartMedia card into the card slot on the RESLINK (E-1). Make sure that
the card is aligned as shown in the diagram.
3. Close the cover after inserting the SmartMedia card.
ATTACHING THE RESLINK
Note: The ResLink and S8 ResLink use different attachment mechanisms.
!
WARNING
Before connecting the ResLink or S8 ResLink, make sure that the flow generator is
powered off.
RESLINK
1. Ensure that the flow generator is powered off before attaching the RESLINK. Use
the switch at the back of the flow generator to power off the device.
2. Slide the lever at the back of the RESLINK to the left (E-2).
3. Place the top catch of the RESLINK onto the notch at the back of the flow
generator (E-3).
4. Push the bottom of the RESLINK onto the auxiliary port at the back of the flow
generator (E-4).
5. Slide the lever at the back of the RESLINK to the right, to lock the RESLINK in place
(E-5).
THE RESLINK SYSTEM
5
S8 RESLINK
1. Ensure that the flow generator is powered off before attaching the S8 RESLINK.
You will need to turn the power off at the wall outlet.
2. Take off the module currently attached to the flow generator (F-1) and store it in
the flow generator bag.
3. Push the S8 RESLINK onto the flow generator (F-2), making sure that both the top
and bottom latches engage firmly with the flow generator.
Note: The S8 ResLink does not have a locking lever.
4. When attached, the S8 RESLINK should fit closely onto the back of the flow
generator (F-3).
CONNECTING AN OXIMETER TO THE RESLINK (OPTIONAL)
Your clinician may have supplied an oximeter for use with the RESLINK. Connecting an
oximeter to the RESLINK allows collection and storage of oximetry data (oxygen
saturation and pulse rate).
1. Ensure that the sensor cable is properly connected to the Xpod connector (see
illustration D).
2. Insert the oximeter plug into the RESLINK oximeter port (E-6).
!
WARNING
Only the NONIN Model 3012 Pulse Oximeter and Models 8000J or 8000AA
Sensors are compatible with the ResLink. Connecting other oximeters may
cause personal injury or damage to the flow generator or the ResLink.
• Check the oximeter cables and the oximeter sensor before use. If there is any
sign of damage or wear contact your equipment supplier.
• There is a serial (9-pin) port at the back of some flow generators. Do not
connect the NONIN Xpod connector into the serial port as it may damage the
oximeter.
•
serial port
ATTACHING AN OXIMETER TO YOUR FINGER
CAUTION
!
The oximeter sensor will not function properly if there is nail polish on your
fingernails.
Note: Do not attach the oximeter until you are ready to start therapy.
ATTACHING THE NONIN 8000J ADULT FLEX SENSOR
See section G on the illustration sheet.
Your clinician will have attached the sensor to the adhesive side of the FlexiWrap.
6
ENGLISH
1. Remove the adhesive backing from the FlexiWrap.
2. Carefully position any one of your fingers (not the thumb) on diode A on the
FlexiWrap (G-1). Wrap the two small lower flaps onto the sides of your finger.
3. Carefully fold the FlexiWrap over the tip of your finger (G-2). Diode B must be
positioned on your fingernail. Check that the two diodes are aligned, with B
directly above A (G-3).
4. Wrap the long flap around your finger to secure the sensor (G-4). The FlexiWrap
should feel firm, but not uncomfortably tight.
5. Secure the sensor wire to the base of the finger or wrist using medical tape (G-5).
ATTACHING THE NONIN 8000AA ADULT FINGER CLIP
See section H on the illustration sheet.
1. Open the Finger Clip (H-1) and place your finger inside the device (H-2).
2. Close the Finger Clip (H-3).
3. Secure the sensor wire to the base of the finger or wrist using medical tape.
Note: For more details, please refer to the user guide supplied with the oximeter.
USING THE RESLINK
1. Turn on the flow generator. A series of messages will be displayed on the flow
generator LCD. When the following message is displayed, you know that the
RESLINK is correctly connected.
SX155-0301
ResLink
The number displayed will
reflect the ResLink
software version
2. If necessary, the software in your flow generator will be automatically upgraded.
The upgrade ensures that your flow generator is compatible for use with the
RESLINK.
!
WARNING
The flow generator will not deliver therapy during the upgrade. Do not put the
mask on until the upgrade is completed.
During upgrade, the LCD backlight flashes and the following is displayed:
UPGRADING, WAIT.
ResLink
On some flow generators, this screen may be shown in multiple languages prior to
upgrade.
The upgrade can take up to 20 minutes. Please wait for completion. When
upgrade is successful the WELCOME screen will be displayed on the LCD.
Note: If the upgrade is interrupted for any reason, turn the flow generator off, ensure the
ResLink is properly attached and the SmartMedia card is inserted, then turn the flow
generator back on to restart the upgrade. Note that the LCD message may not be shown
following an interruption; the screen may be blank for up to 20 minutes during the upgrade.
USING THE RESLINK
7
STARTING TREATMENT
Start treatment as described in the flow generator User’s Manual. The RESLINK will
automatically collect and store treatment data.
STOPPING TREATMENT
Press the Front key on your flow generator to stop therapy at the end of the night. If
attached, remove the oximeter sensor from your finger.
After stopping therapy on the last night that you use the RESLINK, wait for 15 minutes
then turn off your flow generator at the power switch.
!
CAUTION
Do not power the flow generator on or off while the ResLink is being used, as this
may stop the gathering of data. If there is any interruption to the flow generator’s
power supply, wait 15 minutes to commence therapy after powering the flow
generator back on.
LCD MESSAGES
You may see the following RESLINK messages briefly displayed on the flow generator
LCD to inform you about the operation of the RESLINK. These messages will be
interspersed with other flow generator messages.
SX155-0301
ResLink
FOUND CARD
ResLink
1/4
SmartMedia Card has been
detected
INSERT CARD!
ResLink
1/4
SmartMedia Card has not been
detected
FOUND OXIMETER
ResLink
2/4
Oximeter is present
NO OXIMETER
ResLink
2/4
Oximeter is not present
COPYING, WAIT...
ResLink
3/4
Summary data is being copied to
the SmartMedia Card
READY.
ResLink
4/4
ResLink ready to record Detailed
Data
NO CARD
ResLink
NO OXIMETER
ResLink
UPGRADING, WAIT.
ResLink
8
Successful ResLink connection
(number displayed will be current
ResLink software version)
SmartMedia Card has been
removed
Oximeter has been disconnected
The flow generator is being
upgraded by the ResLink
SpO2: 98% HR: 65
OXIMETER
1/6
ENGLISH
When an oximeter is attached, a set of six messages similar to those shown below is
displayed in sequence. These messages indicate the current oxygen saturation (SpO2)
and heart rate being measured by the oximeter. They are intended to assist you in
making sure that the oximeter is correctly attached. The sequence runs for
approximately one minute.
Message 1: displays oxygen saturation (SpO2) and heart rate (HR)
Messages 2, 3, 4 and 5: sequence showing information similar to Message 1
SpO2: 99% HR: 59
OXIMETER
6/6
Message 6
Note: If you see a message similar to that shown below, with dashes instead of numeric
values, check to make sure that the oximeter sensor is correctly attached to your finger.
SpO2:---% HR:--OXIMETER
1/6
TYPICAL SCENARIOS
SCENARIO 1: NO OXIMETER ATTACHED
This scenario shows the typical sequence of messages displayed when the RESLINK has
been correctly set up, the flow generator is powered on and no oximeter is attached.
These messages will be interspersed with other flow generator messages.
SX155-0301
ResLink
Successful ResLink connection
FOUND CARD
ResLink
1/4
Indicates that the SmartMedia Card
is present
NO OXIMETER
ResLink
2/4
Indicates that the oximeter is not
attached
COPYING, WAIT...
ResLink
3/4
This screen is displayed on the
LCD for 2-5 minutes
depending on the amount of
Summary Data being transferred.
READY.
ResLink
4/4
Indicates that the ResLink has
finished copying the Summary
Data and is now ready to log
Detailed Data.
This screen clears after
a few seconds.
USING THE RESLINK
9
SCENARIO 2: OXIMETER ATTACHED
This scenario shows the typical sequence of messages displayed when the RESLINK has
been correctly set up, the flow generator is powered on and an oximeter is attached.
These messages will be interspersed with other flow generator messages.
SX155-0301
ResLink
Successful ResLink connection
SpO2: 98% HR: 65
OXIMETER
1/6
First oximetry message.
SpO2: 99% HR: 59
OXIMETER
6/6
Last oximetry message.
FOUND CARD
ResLink
1/4
FOUND OXIMETER
ResLink
2/4
COPYING, WAIT...
ResLink
3/4
READY.
ResLink
4/4
There are 6 messages. Each
message is shown for a 5
second interval and then
removed for 5 seconds.
Indicates that SmartMedia card is
present.
Indicates that the oximeter is
present.
This screen is displayed on
the LCD for 2-5 minutes
depending on the amount of
Summary Data being transferred.
Indicates that the ResLink has
finished copying the Summary
Data and is now ready to log
Detailed Data.
This screen clears after a few
seconds.
10
See sections I and J on the illustration sheet.
!
WARNING
Before disconnecting the RESLINK, make sure that the flow generator is powered
off.
If an oximeter is connected, pull the oximeter plug out of the RESLINK oximeter port
(I-1).
ENGLISH
DISCONNECTING THE RESLINK
RESLINK
1. Turn the flow generator power off using the power switch.
2. Slide the lever at the back of the RESLINK to the left (E-2). This unlocks the
RESLINK from the flow generator.
3. Carefully pull the RESLINK away from the flow generator (I-2, I-3).
4. Store the RESLINK in its pouch.
S8 RESLINK
1.
2.
3.
4.
Turn the power off at the wall outlet.
To remove the S8 RESLINK from the flow generator, grip it from the top (J-1).
Pull the S8 RESLINK away from the flow generator (J-2).
Take the module that you took off the flow generator (F-1) and put it back on in
its original place.
5. Store the S8 RESLINK in its pouch.
RETURNING THE RESLINK TO YOUR CLINICIAN
If you are returning the RESLINK to your clinician, leave the SmartMedia card in place.
Put the RESLINK in its pouch and contact your clinician or equipment supplier for details
regarding return.
RETURNING THE SMARTMEDIA CARD TO YOUR CLINICIAN
If you are returning only the SmartMedia card to your clinician:
1. Open the RESLINK cover and remove the SmartMedia card. Close the cover after
removing the SmartMedia card.
2. Place the SmartMedia card in its plastic sleeve.
3. Place the SmartMedia card in the mailback card supplied with the RESLINK.
!
CAUTION
If returning the SmartMedia card through the postal service, always use a padded
envelope.
DISCONNECTING THE RESLINK
11
CLEANING AND MAINTENANCE
!
CAUTION
Avoid exposing the ResLink to moisture and extreme temperatures.
CLEANING THE RESLINK
If necessary, wipe the outside of the RESLINK with a clean cloth.
CLEANING THE OXIMETER
1. If necessary, wipe the surfaces with a soft cloth dampened with isopropyl alcohol
or a mild detergent.
2. Dry with a soft cloth or allow to air dry.
Note: The oximeter cable and Xpod connector can be wiped with a clean cloth.
!
CAUTION
Do not autoclave or immerse this device in liquid or use caustic or abrasive cleaning
agents or any cleaning products containing ammonium chloride.
CLEANING THE OXIMETER SENSOR
For instructions on cleaning the oximeter sensor, please refer to the user guide
supplied with this device.
!
WARNING
•
•
12
Do not use liquids to clean any part of the RESLINK.
Do not attempt to dismantle the RESLINK. Under no circumstances should you
attempt to service or repair the device yourself. There are no user serviceable
parts inside. Inspection and repair should only be performed by an authorized
agent.
If there is a problem, try the following suggestions. If the problem cannot be solved,
contact your equipment supplier. Do not attempt to open the RESLINK.
Problem
Possible Cause
Solution
Difficulty attaching the
RESLINK to the flow
generator.
Incompatible flow
generator.
The RESLINK AND S8 RESLINK are
compatible for use with certain
ResMed flow generators only. See
“Compatible flow generators” on
page 18.
The RESLINK may be
attached incorrectly.
See “Attaching the ResLink” on
page 5.
Power cord is not plugged
into the flow generator or
power outlet properly.
Check that the power cord is
plugged firmly at the back of the
flow generator and into a working
power outlet.
Flow generator not
powered on.
Check that the flow generator is
turned on.
Faulty power outlet.
Try another power outlet.
Flow generator LCD
continuously displays
black boxes or blank
screen on power up.
Previous failed software
upgrade.
Power off the flow generator.
Attach RESLINK with a
SmartMedia card inserted. Power
on the flow generator. Allow 20
minutes for the software upgrade.
Note: During the upgrade the
‘UPGRADING, WAIT’ screen
may not be displayed.
The following messages
are displayed on the LCD
of an AutoSet CS2 flow
generator that has had a
RESLINK connected:
Upgrade failed due to loss of Power off the flow generator.
power to the AutoSet CS2.
Attach RESLINK with a
SmartMedia card inserted. Power
on the flow generator. Allow 20
minutes for the software upgrade.
Note: During the upgrade the
‘UPGRADING, WAIT’ screen
may not be displayed.
Flow generator and
RESLINK not working (no
display on LCD).
No signature
and bad CRC
ENGLISH
TROUBLESHOOTING
Waiting for
File upload
TROUBLESHOOTING
13
Problem
Possible Cause
Solution
The ‘Successful ResLink
connection’ message (see
page 8) is not displayed
after power up.
The RESLINK is not securely
attached to the flow
generator.
Power the flow generator off.
Ensure that the RESLINK is securely
connected to the flow generator.
Also ensure that the lever at the
back of the RESLINK is in the lock
position. Power the flow
generator back on.
For the S8 RESLINK make sure that
the top and bottom latches are
secured properly.
Incompatible flow
generator.
The RESLINK and S8 RESLINK are
compatible for use with certain
ResMed flow generators only. See
“Compatible flow generators” on
page 18.
Faulty RESLINK.
Contact your equipment supplier.
Difficulty inserting the
SmartMedia card into the
RESLINK.
A SmartMedia card is
inserted but
Incompatible memory card Ensure that a SmartMedia card,
used.
obtained from ResMed only, is
used.
The SmartMedia card is
inserted incorrectly.
See ’“Inserting the Card” on
page 5.
Software upgrade not
required.
This is OK. Continue with setup.
UPGRADING, WAIT.
ResLink
is not displayed.
The following is displayed
on the LCD when a
SmartMedia card is inserted
and the flow generator is
powered on:
CARD ERROR!
ResLink
1/4
SmartMedia card cannot be Power the flow generator off.
accessed—it may be
Remove and then re-insert the
partially inserted.
SmartMedia card.
Alternatively, the gold
contacts could be dirty.
The SmartMedia Card may
be damaged.
Contact your equipment supplier.
During software upgrade, Loss of power supply to the Power the flow generator off. Rea blank screen is displayed flow generator.
insert the SmartMedia card.
on the LCD.
Check the power supply to the
flow generator. Power the flow
generator back on. See “Using the
ResLink” on page 7.
14
Possible Cause
Solution
A SmartMedia card
containing upgrade
software is inserted and
the following is displayed
on the LCD:
Incompatible flow
generator, or alternatively
the flow generator cannot
be upgraded.
Power the flow generator off.
Remove the RESLINK with
SmartMedia card inserted.
Contact your equipment supplier.
Flow generator was
delivering therapy.
Stop therapy. Power the flow
generator off. Check the power
supply to the flow generator.
Power the flow generator back
on. See “Using the ResLink” on
page 7.
UPGRADE FAILED
ResLink
Incompatible oximeter
Difficulty inserting the
oximeter into the RESLINK. used.
ENGLISH
Problem
Ensure that a NONIN (Model
3012) Pulse Oximeter is used. See
“Connecting an Oximeter To the
ResLink (optional)” on page 6.
Oximeter plug not oriented See “Connecting an Oximeter To
correctly.
the ResLink (optional)” on page 6.
The following message is
displayed on the LCD:
OXIMETER FAULT
ResLink
The following message is
displayed on the LCD:
INSERT CARD!
ResLink
1/4
Incompatible oximeter.
Ensure that a NONIN (Model
3012) Pulse Oximeter is used.
The oximeter sensor cable Ensure that the oximeter sensor
and Xpod connector are not cable and Xpod connector are
properly connected.
properly connected.
Faulty oximeter.
Contact your equipment supplier.
The SmartMedia card has
not been inserted or
correctly positioned in the
RESLINK.
Power off the flow generator, reinsert the SmartMedia card and
power the flow generator back
on.
The following message is Software upgrade not yet
displayed on the LCD for completed.
more than 20 minutes and
The SmartMedia card has
never leaves this state.
been removed during
UPGRADING, WAIT. software upgrade.
ResLink
Wait another 10 minutes.
Power the flow generator off. Reinsert the SmartMedia card.
Power the flow generator back
on. See “Using the ResLink” on
page 7
Faulty SmartMedia card.
Power the flow generator off.
Contact your equipment supplier.
Damaged flow generator.
Power the flow generator off.
Contact your equipment supplier.
TROUBLESHOOTING
15
Problem
Possible Cause
Solution
The message on the LCD
alternates between the
RESLINK connected
message,
SmartMedia card may be
damaged.
If the message does not clear,
disconnect the RESLINK and
contact your equipment supplier
to get a new SmartMedia Card.
RESLINK may be faulty.
Contact your equipment supplier.
Oximeter is not present
during the copying of
Summary Data to the
SmartMedia Card.
If you are not intending to use an
oximeter, this message is OK. If
you are intending to use an
oximeter, make sure that the
oximeter is plugged in correctly.
SX155-0301
ResLink
and the message to
indicate that RESLINK has
been removed.
ResLink
Removed
The following message is
displayed on the LCD:
NO OXIMETER
ResLink
2/4
The following message is
displayed on the LCD:
CARD FULL
ResLink
The following message is
displayed on the LCD:
The SmartMedia Card is full Contact your equipment supplier
and cannot store any more to get a new SmartMedia Card.
data.
SmartMedia Card is write
protected.
Contact your equipment supplier
to get a new SmartMedia Card.
The software on the RESLINK
itself is being upgraded,
using data on the
SmartMedia Card.
This is OK. Wait for
approximately three minutes.
RESLINK should then start normal
operation.
The RESLINK has been
removed from the flow
generator or not attached
correctly.
Attach the RESLINK or S8 RESLINK
to the flow generator. Make sure
that it is properly attached.
Difficulty disconnecting
the RESLINK from the flow
generator.
The RESLINK is locked in
place.
Unlock the RESLINK. See
“Disconnecting the ResLink” on
page 11.
Difficulty disconnecting
the S8 RESLINK from the
flow generator.
There is no locking device
on the S8 RESLINK.
See “S8 ResLink” on page 11.
READ-ONLY CARD!
ResLink
1/4
The following message is
displayed on the LCD:
>>>>>>>>>>>>>>>>
ResLink
The following message is
displayed on the LCD:
ResLink
Removed
Note: If you see a message not shown here, contact your equipment supplier.
16
RESLINK
Dimensions (H x W X D):
5” x 2.6” x 2.4” (126 mm x 65 mm x 60 mm)
Weight: 0.24 lb (110 g)
Power Supply:
Maximum power consumption derived from the flow generator: 200mA at 24-30V
ENGLISH
TECHNICAL SPECIFICATIONS
S8 RESLINK
Dimensions (H x W X D):
4.7” x 2.6” x 2.6” (120 mm x 65 mm x 65 mm)
Weight: 0.25 lb (114 g)
Power Supply:
Maximum power consumption derived from the flow generator: 400mA at 12V
RESLINK AND S8 RESLINK
Housing Construction:
Flame retardant engineering thermoplastic.
IEC 60601-1 Classification: Class II (double insulation), Type CF
Electromagnetic Compatibility
Product complies with all applicable electromagnetic compatibility requirements
(EMC) according to IEC60601-1-2, for residential, commercial and light industry
environments.
Environmental Conditions
Operating Temperature: 41°F to 104°F (5°C to 40°C)
Operating Humidity: 10% to 95% non-condensing.
Storage and Transport Temperature: -4°F to 140°F (-20°C to 60°C)
Storage and Transport Humidity: 10% to 95% non-condensing.
NONIN MODEL 3012 PULSE OXIMETER, 8000J ADULT FLEX SENSOR AND
8000AA ADULT FINGER CLIP
SpO2
70–100% ± 3 digits
Pulse rate
18 to 300 pulses per minute ± 3% ± 1 digit
Environmental Conditions
Operating Temperature: 32°F to 122°F (0°C to 50°C)
Operating Humidity: 10%–90% non-condensing.
Storage and Transport Temperature: -4°F to 122°F (-20°C to 50°C)
Storage and Transport Humidity: 10%–95% non-condensing.
TECHNICAL SPECIFICATIONS
17
COMPATIBLE FLOW GENERATORS1
Compatible with ResLink
Compatible with S8 ResLink
AutoSet Spirit™
S8 AutoSet Spirit™
VPAP™ III series
S8 Elite™
S7™ Elite
S8 AutoScore™
AutoSet CS™2
S8 AutoSet Vantage™
VPAP™ Adapt SV
S8 AutoSet Spirit™ II
VPAP™ Malibu
S8 Elite™ II
S8 AutoScore™ II
VPAP™ Auto
S8 AutoSet™ II
GLOSSARY OF SYMBOLS
Attention, consult accompanying
documents
Type CF applied part
Class II equipment
IPX1
1
18
Drip proof
Not all flow generators are available in all regions