1
User’s Manual
Version 2.5
Polaris Microsystems
48 Chestnut Street
Woodbury, NJ 08096
Disclaimer and License
CharterLog is a copyrighted program offered to companies and individuals
“as is” as a tool for managing information associated with FAR Part 135
operations. Polaris Microsystems makes no claims as to the program’s
suitability for a specific use and expressly disavows any responsibility for
real or consequential damages of any sort.
Duplication of Program Files
CharterLog is proprietary commercial software. You may duplicate the
program files for your own personal use. However, you may not distribute
copies to other parties.
Registration Codes
Purchasers of CharterLog are assigned a unique serial number and
registration code. Support and update service is provided only to registered
customers. Registration codes are non-transferrable. The transfer of
registration codes by sale or barter is expressly prohibited and will result
in the voiding of the registration and the cancellation of support and
update services.
Trademarks
“CharterLog” is a trademark of Polaris Microsystem. All other trademarks
in this document are the properties of their respective companies.
Copyright
Program and documentation, Copyright © 1999, Polaris Microsystems. All
Rights Reserved. No part of this publication or program may be
reproduced, photocopied, stored on a retrieval system, or transmitted
except as provided by the terms outlined above.
ii
Table Of Contents
Introduction
Overview . . . . . . . . . . . . . . . . . . . . . . . . . . . . . . . . . . . . . . . . . . . . . . 3
Product Support . . . . . . . . . . . . . . . . . . . . . . . . . . . . . . . . . . . . . . . . . 6
Initial Setup Tasks
Database Installation . . . . . . . . . . . . . . . . . . . . . . . . . . . . . . . . . . . . . 9
Configuration Menu Options . . . . . . . . . . . . . . . . . . . . . . . . . . . . . . . 10
Setting Program Options . . . . . . . . . . . . . . . . . . . . . . . . . . . . . . . . . . 10
Customizing the Flight Log Form . . . . . . . . . . . . . . . . . . . . . . . . . . . 13
Initializing Pilot Information . . . . . . . . . . . . . . . . . . . . . . . . . . . . . . . 14
Initializing Aircraft Information . . . . . . . . . . . . . . . . . . . . . . . . . . . . 16
Setting Up User Access Control . . . . . . . . . . . . . . . . . . . . . . . . . . . . . 19
Establishing a Data Backup Procedure . . . . . . . . . . . . . . . . . . . . . . . . 21
Operations Tasks
Launching a Flight . . . . . . . . . . . . . . . . . . . . . . . . . . . . . . . . . . . . . . . 25
Processing a Completed Flight . . . . . . . . . . . . . . . . . . . . . . . . . . . . . . 26
Recording a Duty Shift . . . . . . . . . . . . . . . . . . . . . . . . . . . . . . . . . . . . 28
Post-flight Fuel Purchase Data Entry . . . . . . . . . . . . . . . . . . . . . . . . . 29
Reporting Tasks
Printing Currency Reports . . . . . . . . . . . . . . . . . . . . . . . . . . . . . . . . . 33
Printing Maintenance Reports . . . . . . . . . . . . . . . . . . . . . . . . . . . . . . 34
Printing Custom Reports . . . . . . . . . . . . . . . . . . . . . . . . . . . . . . . . . . 35
Report Search Filters . . . . . . . . . . . . . . . . . . . . . . . . . . . . . . . . . . . . . 37
Creating and Modifying Custom Reports . . . . . . . . . . . . . . . . . . . . . . 40
Data Maintenance Tasks
Relocating Single-User Data Files . . . . . . . . . . . . . . . . . . . . . . . . . . . 43
Backing Up Data Files . . . . . . . . . . . . . . . . . . . . . . . . . . . . . . . . . . . . 44
Recovering From Data Loss . . . . . . . . . . . . . . . . . . . . . . . . . . . . . . . . 45
Reference
iii
CharterLog Access Utility . . . . . . . . . . . . . . . . . . . . . . . . . . . . . . . . . 49
CharterLog Data Manager . . . . . . . . . . . . . . . . . . . . . . . . . . . . . . . . . 53
Demo Mode Restrictions . . . . . . . . . . . . . . . . . . . . . . . . . . . . . . . . . . 54
Keyboard Shortcuts . . . . . . . . . . . . . . . . . . . . . . . . . . . . . . . . . . . . . . 54
Navigator Buttons . . . . . . . . . . . . . . . . . . . . . . . . . . . . . . . . . . . . . . . 54
Aircraft Tags . . . . . . . . . . . . . . . . . . . . . . . . . . . . . . . . . . . . . . . . . . . 56
Time Zones . . . . . . . . . . . . . . . . . . . . . . . . . . . . . . . . . . . . . . . . . . . . 57
iv
Introduction
In This Section
< Overview — 3
< Product Support — 6
1
2
Overview
What Is CharterLog
CharterLog is a Windows program which aids Part 135 operators in
managing the information necessary to insure compliance with FAA
regulations. It records and tracks "flight log" forms, individual pilot
records, and aircraft records. Printed reports include a monthly Flight Duty
Report for each pilot, which both graphically and numerically depicts the
pilot's duty hours, commercial flight hours, and non-commercial flight
hours for each day of the month. Summary totals are included for the
current quarter, previous quarter, and current calendar year. Pilot records
include tracking of on/off duty times, any number of user-specified
checkrides (e.g. 135.293 and 135.297), and medical certificate. Aircraft
records include tracking of airframe hours/cycles, engine hours/cycles, and
airframe/engine components and inspections.
CharterLog organizes flight operations information into three primary
databases; a Flight Log, a Pilot Log and an Aircraft Log.
The Flight Log
The Flight Log serves as a journal for recording all pertinent information
about a flight. Entries in the Flight Log are called Flight Log Forms and
are analogous to printed multi-leg flight log sheets used to record flight
information in the cockpit.
Each Flight Log Form stores the Aircraft ID, Flight Number, customer
information, passenger list, and remarks for the flight, plus the following
for each leg:
C From & To airports,
C Estimated time of departure (ETD)
C Crew instructions (services, fueling, catering, transportation, lodging,
etc.)
C Type Of Time (Part 135, 121, 91 and Other Commercial),
C Date, Time Zone, Time-Out, Time-Off, Time-On, Time-In. The program
calculates Block Time and Flight Time from the latter four fields,
C Passenger Count, Fuel Burn and Fuel Purchase data,
C Weight & Balance information: (Gross Weight & CG),
C Crew Logbook Entries (Day, Night, Takeoffs & Landings, Approaches,
Instrument and Holds),
3
C Hours & Cycles for Airframe and Engine 1-4,
C "Squawks" and VOR check information.
The Pilot Log
The Pilot Log stores the information necessary to track certificates, ratings,
check rides, flight time and duty time for each pilot flying for the company.
While the Pilot Log does include a "logbook" for recording flight times, it
is not intended to act as the pilot's personal logbook. It records only those
times necessary for part 135 reporting to the FAA.
Each pilot record in the Pilot Log includes the following:
C Pilot Certificate: type, number and date of issue,
C Logbook: includes columns necessary to track flight time, block time,
day/night, takeoffs, landings, instrument time and approaches,
C Time Sheet: records on-duty date/time, off-duty date/time, and remarks
for each shift,
C Ratings: records and tracks an unlimited number of category/type
ratings. Each rating includes date issued, date of last 135.293 checkride,
a valid time for the checkride, and the date the next checkride is due,
C Medical: includes date, class and due dates for private, commercial and
ATP operations,
C Checkrides: An open-ended list of user-specified checkrides including
the date of last check, the valid time period, and the date next check is
due.
The Aircraft Log
The Aircraft Log stores the information to track inspections, squawks, and
airframe & engine time/cycles for each aircraft used in company
operations.
Each aircraft record includes the following:
C Physical and identification information, including tail number, type,
category, class, maximum gross weight, number of engines and required
crew, typical cruise speed, maximum number of passengers and
operating cost per hour,
C Status: "Airworthy", "Minimum Equipment List" or "Grounded",
C VOR Check: includes date, facility, frequency, Nav1/Nav2 errors, and
date next check due,
4
C Aircraft & Engine Log: tracks hours and cycles for airframe and up to
four engines. Individual log entries are identified by date and flight log
number,
C Squawk Log: includes date reported, flight log number & leg, problem
description & corrective action (memo fields), return-to-service date, and
return-to-service status,
C Maintenance Log: tracks an unlimited number of independent
components and/or inspections. Each maintenance item is linked to a
specific aircraft system (airframe, engine no., etc.) in the Aircraft &
Engine log, allowing "next due" calculations to be based on hours,
cycles, date, or any combination of the three.
How CharterLog Works
New flights are "launched" by creating a new Flight Log Form, specifying
the departure date and route (legs), and assigning an aircraft and a crew.
The Flight Launch Wizard guides the user through the selection of aircraft
and crew. The Pilot and Aircraft Logs are integrated with the Flight
Launch Wizard to insure that aircraft inspections and maintenance are
current, selected crew members are rated for and current in the aircraft,
and that crew member's instrument checkrides and medical certificates are
up to date.
Once the crew and aircraft have been assigned, a printout of the Flight Log
Form is made and given to the crew before departure. During the flight, the
crew records detailed information for each leg including departure and
arrival times, passenger count, fuel burned, weight and balance
information, squawks (if any), VOR checks performed, remarks, and crew
logbook entries.
At the termination of the flight, information from the completed form is
entered into the Flight Log. When the Flight Log Form is completed and
verified, it is "closed". The closing process automatically posts logbook
information for each crew member to the Pilot Log, hours and cycle counts
for airframe and engines to the Aircraft Log, and updates VOR check and
Squawk records.
Closed Flight Log Forms retain all of their information, but are sealed
against further modification. If necessary, to correct errors and omissions,
the closing process can be reversed.
5
Product Support
Technical assistance is available to registered customers via Email, FAX or
telephone.
If you experience problems with CharterLog...
1. Complete the Problem Report form. CharterLog includes a built-in
Problem Report facility. To access this window, select Help|File a
Problem Report... from the pull-down menus in the main window.
Complete as much of the form as possible. Note that the form is larger
than the display window. Use the scroll bar on the right side to view the
entire form.
2. Print the completed Problem Report. Use the Print Report button at
the top of the window to print the report. Have the report handy when
you contact us for support.
3. Send the completed Problem Report. If your computer has Email
capabilities, you can transmit the completed Problem Report form by
simply clicking the Send via EMail button. If you are unable to use the
EMail option, you can Fax us the report. (The Fax number is printed at
top of report.)
4. Call for assistance. Contact us via phone or EMail at the numbers
provided below. If you get the answering machine, please leave a
message. We are a small company and are not able to man the phones at
all times. On such occasions, our answering machine will be on. We
return most calls within a few hours, and we do our best to get back to
everyone within a day. We often return calls on weekends and in the
evening, so you can leave both a home and business number if desired.
Technical Assistance Contacts
C EMail: [email protected]
C Voice: 1-856-848-1043
C Fax: 1-856-848-1623
A Word About the 800 Number
Polaris Microsystems has an 800 number which it provides for sales
purposes. Though we will never refuse to accept a tech call on the 800
number, we do ask that you avoid using it for technical assistance. We
understand, however, that in certain situations it may be necessary. If this
6
is the case, please inform us up-front that you are calling on the 800
number and we will be happy to call you right back.
Initial Setup Tasks
In This Section
<
<
<
<
<
<
<
<
Database Installation — 9
Configuration Menu Options — 10
Setting Program Options — 10
Customizing the Flight Log Form — 13
Initializing Pilot Information — 14
Initializing Aircraft Information — 16
Setting up user access control — 19
Establishing a Data Backup Procedure — 21
7
8
Database Installation
CharterLog is available in either a single user version, or a multi-user
version (multiple users on multiple workstations). Refer to the discussion
below for information on installing the database files for your version.
Single-User Version
Single-User CharterLog automatically creates all necessary folders and
files on the local hard drive, and initializes a complete set of empty data
files. Under normal circumstances, there is no need to do any additional
database setup. The CharterLog directory structure is explained below..
In the single-user environment, both the CharterLog program and your
company data files reside on local drives within a single computer. The
diagram below illustrates the default directory structure created by the
installation utility.
The CharterLog program files are stored in the "Chartlog" folder. The
"Session" sub-folder holds temporary files which are present when
CharterLog is running. Company data files are stored in the "Data"
sub-folder. If desired, the company data files can be located elsewhere on
the same drive or on another local drive. See Relocating Data Files for
instructions.
Multi-User Version
In a multi-user environment, your company data files reside on a
centralized network file Server, while the Multi-User CharterLog program
files reside on each network Workstation. All necessary data folders and
files are created during installation. See the Multi-User CharterLog
Installation Guide for detailed instructions. This guide is included as a
separate document along with the user's manual. It is also provided on the
CharterLog installation CD.
9
10
Configuration Menu Options
Road Map - All of the above options are set from the Configuration
pull-down menu. A checkmark next to an option indicates that it is
enabled.
Multi-Record Editing
Normally when editing records in CharterLog, you must manually place
each individual record in edit mode by clicking the Edit Record button in
the navigator bar. This can make for tedious work when you need to make
changes to several records in a file. With Multi-Record Editing enabled, if
you edit a record and then scroll to another record, the screen stays in edit
mode. You only need to click the Edit Record button once.
Display Popup Hints
Enables/disables display of pop-up hints for various fields and buttons
within CharterLog. To display a pop-up hint, position the mouse pointer
over the item and hold it there for a short while.
Verify Required Fields
The Fuel Purchased and Scheduled Block Time fields in the Flight Leg
Dialog are designated as "required", meaning that they cannot be left
blank. This option enables/disables checking of these fields.
Show Clock-In/Clock-Out Buttons
Displays/hides the duty shift Clock-In and Clock-Out buttons in the main
button bar. These buttons are only used to enter non-flight duty shifts only.
Normal flight duty shifts are entered via the Flight Log.
Setting Program Options
Road Map - Open the Program Options window by selecting
[Configuration|Program Options] from the menu.
Company Info
Enter your company name, address and phone number. The name you
enter into the Company Name field is printed at the top of CharterLog's
reports.
11
12
FAR Settings
Medical Certificate Valid Times
Enter the number of calendar months or the number of days a medical
certificate is valid for a Private, Commercial, or ATP pilot. Note: These
fields are normally preset to the match the current FARs and should not
require adjustment.
Aircraft Checkride (.293) Period
Enter the number of calendar months or the number of days the most
common (for your company) 135.293 checkride is valid. The value
entered here is used as a preset or default wherever a new type-specific
293 checkride is entered into the Pilot Log.
Instrument Proficiency Check (297) Valid Time
Enter the number of calendar months or the number of days a 135.297
proficiency check is valid.
Autopilot Check (297G) Valid Time
Enter the number of calendar months or the number of days a 135.297
(g) proficiency check is valid.
Route Check (135.299) Valid Time
Enter the number of calendar months or the number of days a 135.299
route check (line check) is valid.
Takeoffs/Landings
Enter the number of takeoffs and landings required in the first field. In
the second two fields, enter the number of calendar months or the
number of days within which the required takeoffs and landings must be
performed. Note: These fields are normally preset to the match the
current FARs and should not require adjustment.
Block Time Limitation Warnings
Enter maximum the maximum allowed block times for each time
interval. If you desire advance warning, you can set the values lower
than the actual FAR maximums.
Rest Periods per Quarter
Enter the minimum number of 24-hour rest periods required per
calendar quarter.
Min Rest Hrs Between Shifts
Enter the minimum off-duty hours required between duty shifts. If this
rule is not applicable to your operation, enter 0.
13
Other configuration settings
Date Format
Select the desired date format. The date format affects how dates are
entered, displayed and printed by CharterLog.
Distance Units
When flights are entered into either the Flight Log or the Pilot Log,
CharterLog calculates and stores Great Circle Route distances between
airports. This option setting controls the distance units used. Changing
the units selection only affects distance calculations for subsequent
flight entries.
Aircraft Maintenance-Due Warnings
These three settings are used in two ways. When aircraft are displayed
by the Flight Launch Wizard, these settings control how maintenance
information is highlighted. In addition, the settings are used as default
parameters for the Aircraft Maintenance Report.
Default Time Zones
C Computer Clock -- CharterLog uses this time zone setting whenever it
needs to convert the computer clock (date and time) to Zulu. When
Standard Time is in effect, enter your local time zone. During
Daylight Savings Time periods, you should adjust this time zone
accordingly so that the proper Zulu conversion is made.
C Flight/Duty Times -- This value is used as a preset or default whenever
new flight legs or duty shifts are added.
C Duty Record Report -- This value is used as a preset or default for the
Time Zone setting in the Currency Reports Dialog. This setting is the
time zone on which the Flight Duty Report is based.
Inactivity Timeouts
Testing for periods of inactivity and taking the appropriate measures is
critical in the multi-user environment. For example, if user places a
record in edit mode and then leaves his workstation, all other users are
prevented from working with the locked record until he returns and posts
his changes. The inactivity timeout feature prevents this situation from
occurring
CharterLog detects long periods of inactivity (the absence of mouse
motion and/or keystrokes) and automatically posts changes to data
records, closes open windows, and ultimately shut itself down. You can
modify the inactivity timeout periods by adjusting these fields.
14
FAR Limitation Warnings
CharterLog can issue advanced warning (via yellow highlighting) when
block time totals exceed a percentage (entered here) of the FAR limits.
Warn on Close Flight when...
Whenever a Flight Log is closed, CharterLog checks the total block and
duty time for the flight and issues a warning if the specified maximums
(entered here) are exceeded.
Customizing the Flight Log Form
CharterLog versions 2.5 and later support user-customizable flight log
forms. Log forms are stored in template files (RTM extension) in the
CharterLog program folder on each workstation.
Standard Forms
Two pre-designed forms are provided. If necessary, these can be modified,
or completely new templates can be created.
Basic Log Sheet — This is a single page log form which includes areas
for recording detailed leg information, VOR test info, pilot logbook
details (landings, instrument, approaches, etc.) squawks and general
flight remarks.
Manifest & Log Sheet — This is a two page form. The first page is a
manifest form which includes customer information, crew itinerary, and
passenger list. (The information for this sheet comes from entries made
in the Manifest tab of the Flight Log Window.) The second page is the
Basic Log Sheet described above.
Selecting a Form Template
C Open the Flight Log Form Designer dialog by selecting
[Configuration|Flight Log Form...] from the main menu.
C Select the desired template from the Template File combo box.
C Click Close.
Creating a Custom Form Template
(Documentation for this feature is not yet available. Contact Polaris
Microsystems if you need help or would like to have us design a custom
template for you.)
15
Initializing Pilot Information
Road Map -Open the Pilot Log Window by selecting [Logs|Pilot
Log] from the menu, or by clicking the Pilot Log button in the main
window.
Before you can begin using CharterLog, you must first create and initialize
a Pilot Log record for each pilot flying for your company.
Creating a Pilot Record
Insert a blank record by clicking the Insert Record navigator button at the
top of the window. In the New Pilot dialog, enter an ID number for the
pilot. You can use an employee number or social security number, or some
other identifier just as long as it is unique to the individual. Click Ok.
Then enter the pilot’s last and first name in the fields provided.
Initializing Pilot Certificate and Medical Certificate
If necessary, select the General page. On the left side of the window, enter
the Pilot Certificate and Medical Certificate information (class & date).
Initializing Checkride Information
Repeat the steps below for each checkride tracked for the pilot. Note:
CharterLog automatically inserts Instrument (297) and Route (299)
checkrides. All you need do for these is to enter the Last Check dates.
C If adding a new checkride, click the Insert Record navigator button in
the navigator bar just above the Checkrides list. If editing an existing
entry, select it then click the Edit Record navigator button.
C Enter a description for the checkride in the first column and the date the
checkride was last taken in the Last Check column.
C If necessary, modify the Valid For... and Days/Months columns to
indicate how often the checkride must be taken.
Initializing Ratings
The Ratings page accepts two types of entries. The first is a basic
"category/class" rating (e.g. Airplane Multi-Engine Land). The second is a
type-specific rating. In the case of the latter, there must be an entry for
each type-specific 135.293 check taken by the pilot.
Select the Ratings page then repeat the steps below for each category/class
rating held by the pilot, and each type checkride (293 check) taken by the
pilot.
16
Note: CharterLog automatically inserts an Airplane Single-Engine
Land (AIR-SEL) rating and Airplane Multi-Engine Land (AIR-MEL)
rating for the new pilot. These entries are required in order to
"qualify" the pilot for aircraft which do not require a 293 checkride.
Do not delete these entries.
C In the navigator bar just above the Category & Type Rating list, click the
Insert Record navigator button.
C If entering a category/class rating, select the appropriate category and
class designations in the first two columns, leave the Type column
blank, and enter the issuance date.
C If entering a type-specific checkride entry, select the appropriate
category and class designations in the first two columns, then click the
ellipse button (three dots) in the Type column and select the aircraft type
from the pop-up list. Enter the original issuance date in the Date Issued
column.
C Enter the date of the most recent 135.293(b) checkride under Last 293
Chk.
C Enter the date of the most recent 135.293(a) tests under Last 293 Test
(1), Last 293 Test (2-3), and Last 293 Test (4-8).
C If necessary, modify the Valid For... and Days/Months columns to
indicate how often the checkride must be taken.
Initializing Pilot Logbook & Time Sheet
Generally it is not necessary to make any initial entries in the Logbook
and Time Sheet sections. Since CharterLog is not intended to act as the
pilot's official logbook, there is no need to back-enter previous time. As
flights are processed and closed using the Flight Log Window, entries will
automatically be made to the individual pilots' logbooks and time sheets.
The only exception to this is when you wish to be able to produce a
complete Duty Report for the current month (or year). In this case, you
will need to back-enter the necessary flights into each pilot's Logbook, and
the appropriate duty shifts into the Time Sheet.
To back-enter a flight into the Logbook...
C If necessary, select the Logbook page, then click the Insert Record
navigator button. The Logbook Record Dialog will be displayed.
C Enter the flight information into the dialog fields, then click Ok. To
cancel the new entry, click Cancel.
17
To back-enter a duty shift into the Time Sheet...
C If necessary, select the Time Sheet page.
C Click the Insert Record navigator button, or click the Clock-In button to
the right of the bar. The Duty Shift Dialog will be displayed.
C Modify the On-Duty time and date, and then enter the Off-Duty time and
date. Also enter remarks about the shift, if any.
C Verify that the Time Zone in the upper right-hand corner is correct, then
click Ok.
Initializing Aircraft Information
Road Map - Open the Aircraft Log Window by selecting
[Logs|Aircraft Log] from the menu, or by clicking the Aircraft Log
button in the main window.
Before you can begin using CharterLog, you must first create and initialize
an Aircraft Log record for each aircraft in use by your company.
Creating an Aircraft Record
C Insert a blank record by clicking the Insert Record navigator button at
the top of the window. In the New Aircraft dialog, enter an ID number
for the aircraft. You can use the tail number if you wish, keeping in
mind that the ID must be unique. Click Ok.
C Enter the aircraft tail number and select the Type, Category and Class
from the drop down lists.
C Enter the maximum gross weight, number of engines, the required crew,
and the nominal cruise airspeed. Accurate engine, crew and cruise speed
entries are important because these values affect the operation of the
Airframe/Engine Log and the Flight Launch Wizard.
C Select the current aircraft status from the drop down list (Airworthy,
Minimum Equipment List, or Grounded). This field must be manually
updated as necessary, by the maintenance staff. The Status field is
displayed in the aircraft selection list presented in the Flight Launch
Wizard.
C If pilots operating the aircraft must pass a type specific 135.293
checkride, check the 293 Check Req. box. An accurate entry in this field
is important since it affects the operation of the Flight Launch Wizard.
C Record the most recent VOR check in the fields provided.
18
Initializing the Airframe/Engine Log
In order to initialize this log, you need to make a single entry which
contains the current hours and cycles readings for each aircraft system.
Follow the procedure below.
C If necessary, select the Airframe/Engine Log page, then click the Insert
Record navigator button. The Airframe/Engine Log Dialog will be
displayed.
C Enter the current hours and landings (cycles) for the airframe and the
hours/cycles for each engine. Indicate in the Remarks field that this is an
initial entry for the aircraft. You can leave the Distance and Fuel Burn
fields blank since bottom-line totals for these values are not important in
this context.
C Click OK to close the dialog and complete the entry.
Initializing Maintenance Records
In order to initialize this section, you need to add and initialize a
Component record for each component tracked for the aircraft, and an
Inspection record for each inspection performed on the aircraft. Repeat the
following procedure for each new record.
IMPORTANT! Confirm that an initial Airframe/Engine Log entry has been
made for the aircraft (see above). If not, make this entry before
continuing.
NOTE: If your fleet employs several aircraft of the same or similar type,
you can set up one aircraft and then use the Copy Another Aircraft button
to duplicate the settings to the other aircraft.
Inserting a new Component
C If necessary, select the Maintenance page, and click the Components
tab below the table.
C Click the Insert Record navigator button. The Component/Inspection
Dialog will be displayed.
C In the System field, select the aircraft system (Airframe, Engine 1,
Engine-2, etc.) to which the component is most closely linked. For
example, if the component is a landing gear , the hours on the gear are
directly related to the hours logged for the airframe, so choose
"Airframe" in the System field. For a prop on engine #1, the number
of hours on the prop is directly related to the hours logged for that
engine, so choose "Engine 1" in the System field.
19
C Make entries in the ATA/GAMA Index, Component Name, and
Component ID fields as appropriate to describe the component. The
ATA/GAMA Index is used to establish a sort order the maintenance
records, so accurate entries are important for this field.
C Specify the maintenance action (REP, OVH, F/T, or NDT) to be
performed on the component, and the maintenance schedule by
completing the Action block.
C Enter the current hours and cycles logged on the component in the
Component Totals column. Typically the entries will be 0 for new or
overhauled components. These fields will be unlocked for a new
record. If you are modifying an existing component, you will first
need to unlock each field by double-clicking on it.
C Enter either the date the component was placed in service, or the date
of the most recent F/T or NDT action in the Last Action column. Also
record the hours and cycles logged on the component at that time.
These fields will be unlocked for a new record. If you are modifying an
existing component, you will first need to unlock each field by doubleclicking on it.
C Click OK to close the dialog and complete the entry.
Inserting a new Inspection
C If necessary, select the Maintenance page, and click the Inspections
tab below the table.
C Click the Insert Record navigator button. The Component/Inspection
Dialog will be displayed.
C In the System field, select the aircraft system (Airframe, Engine 1,
Engine-2, etc.) which will be the basis for the inspection. For
example, if a 100 hour inspection is to be based on the number of
hours and/or cycles logged for the airframe, then choose "Airframe" in
the System field.
C Make entries in the ATA/GAMA Index and /Inspection Name fields
as appropriate to describe the inspection. The ATA/GAMA Index is
used to establish a sort order the maintenance records, so accurate
entries are important for this field.
C Specify the inspection interval by completing the Action block.
C Enter the total hours and cycles logged to date for the system (selected
in the System field, above), in the System Totals column. These
fields will be unlocked for a new record. If you are modifying an
existing component, you will first need to unlock each field by double-
20
clicking on it.
C Enter the date of the most recent inspection, and the hours and cycles
logged at the time of that inspection in the Last Inspection column.
These fields will be unlocked for a new record. If you are modifying an
existing component, you will first need to unlock each field by doubleclicking on it.
C Click OK to close the dialog and complete the entry.
Initializing Squawk Records
C In order to initialize this section, you need to enter all unresolved
squawks issued against the aircraft (if any). You can optionally enter
resolved squawks, though this is not necessary in order for CharterLog to
operate properly. Repeat the following procedure for each squawk.
C If necessary, select the Squawks page, then click the Insert Record
navigator button. The Aircraft Squawk Dialog will be displayed.
C Enter the date the squawk was reported and a verbal description of the
problem. Leave the Leg field blank. If this is a resolved squawk enter
the Returned to Service date and complete the Corrective Action field,
otherwise leave these fields blank.
C Click OK to close the dialog and complete the entry.
C
Setting Up User Access Control
Access control is managed by the CharterLog Access program
which is separate from the main program.
In order to set up access control for CharterLog, you need to establish a list
of "users" and assign specific permissions to each. The permission settings
control what functions and areas within CharterLog a user is allowed
access to. For example, you can set up permissions such that a pilot can
view all Pilot Log records, but only modify his or her own.
Designating a System Administrator
In order for access control to work (and make sense) you need to assign
one trusted individual as system administrator. His or her responsibilities
will include establishing a list of CharterLog users and assigning
permissions to them.
Starting CharterLog Access the first time
C Locate and double-click the CharterLog Access icon located in the
21
CharterLog folder. You will be asked if you want to create the user
database. Click Yes.
C When asked to enter the password, respond by entering "masterkey"
(excluding the quotes). The program window will be displayed.
C Click the Change System Administration Password button. Enter
"masterkey" in the first box (old password), then enter a new password
in the second box (new password). Repeat the new password in the third
box to verify and check for typos, then click Ok.
The system administrator should be the ONLY person who knows the
System Administration Password. If you forget your password contact
Polaris Microsystems for assistance.
Creating the User List
If you haven't already done so, enter your pilots into CharterLog before
proceeding.
The following will guide you through creating a users list containing all of
your pilots. First you'll be adding a "default" user with permission settings
typical for most pilots. Then you'll use Add Pilots function to automatically
add pilots to the users list.
C Click the Insert Record button in the navigator bar. When prompted for
the Username, enter "DEFAULT" (exclude quotes) then click Ok.
C Click the Edit button in the navigator bar, then assign the permissions
which most closely match the settings you want for the majority of pilots.
C Click the Save as Default button. This will save the settings so they can
be automatically assigned to new users when they are added to the list.
C Click the Add Pilots to Users List button. Confirm your choice by
clicking Ok. All pilots currently entered into CharterLog will be added
to the list and assigned the default permission settings.
C If necessary, use the navigator bar buttons to edit the users list and "fine
tune" permissions and passwords.
Setting Initial User Permissions
Passwords are masked from view until the user record is placed in edit
mode by clicking the Edit button in the navigator bar.
When a new user is added, the program presets the password to a code
based on the first two characters of the Username. As system
administrator, you can either ask the user to choose a password and alter it
yourself, or you can just inform the user of the preset password and allow
them to change it from within CharterLog ([File|Change User
22
Password...]). The choice is yours.
23
Establishing a Data Backup
Procedure
See Backing up data files for instructions on how to run a backup
operation.
Both CharterLog and its companion utility, CharterLog Data Manager
include a built-in backup facility which will copy all of your company data
files into a single compressed library file. The backup library file is a
standard PKZip format file, however a file extension of "CLM" is used so
that the program can easily identify its own backup files.
Safeguard Your Data with Proper Backup Procedures
Running a backup to the same floppy disk every so often, while better than
no backup at all, offers only minimal protection against data loss. The
problem with this scheme is that, often times, a damaged data file is not
discovered until well after the damage has occurred. If you run a backup
before you discover the damage, you will overwrite the potentially good
backup with a corrupt one.
The best way to safeguard against this scenario is to maintain multiple
levels of backup, each one progressively older. If a damaged file is not
discovered until a few days later, there will be a much better chance of
having a good backup on hand. The easiest way to establish and maintain
a multiple-level backup is to use a rotating daily backup scheme whereby a
different set of disks is used for each day of the week. See Preparing
Backup Disks below for details on how to implement this scheme.
Preparing Backup Disks
Preparing for a rotating daily backup is simple. Just format seven (7) new
floppy disks and label them as follows.
1 "CharterLog Backup: Sunday-1"
2 "CharterLog Backup: Monday-1"
3 "CharterLog Backup: Tuesday-1"
4 "CharterLog Backup: Wednesday-1"
5 "CharterLog Backup: Thursday-1"
6 "CharterLog Backup: Friday-1"
7 "CharterLog Backup: Saturday-1"
This will give you a starting set of disks, one for each day of the week. The
"-1" after each day name indicates that this is disk number 1 for that day.
Daily backup will eventually require multiple disks. You can format and
24
label additional disks as needed.
25
Operations Tasks
In This Section
<
<
<
<
Launching a Flight — 25
Processing a Completed Flight — 26
Recording a Duty Shift — 28
Post-fight entry of Fuel Purchase Data — 28
26
27
Launching a Flight
Create a new Flight Log Form
The launch process can be aborted at any time by clicking the Cancel
button in the Flight Launch Wizard dialog box.
C Click the Launch button in the main window, or select
[Activities|Launch a Flight] from the main menu. The Flight Launch
Wizard will be displayed.
C Select the departure date from the calendar. If necessary, use the scroll
buttons below the calendar to select the desired month and/or year.
When the date is set, click the Next button or press [Ctrl-PgDn].
C Review the aircraft status information and then choose the aircraft to be
used for the flight by clicking once on it. When an aircraft has been
selected, click the Next button or press [Ctrl-PgDn].
C Select the departure airport, the intermediate stops (if any) and the
termination airport from the list. When all airports have been selected,
click the Next button or press [Ctrl-PgDn].
If you are using Aerotran's "Quote" for quoting trip costs to customers,
you can import route information (airport stops) directly into
CharterLog by clicking the Load From Quote button.
C Select the required crew members for the first leg of the flight. Choose
each crew member by clicking on a pilot in the Pilot List, and dragging
to the desired crew position. Once a crew is selected for the first leg, you
can easily copy the assignments to the remaining legs by clicking
Duplicate Selected Leg. When all crew member positions have been
filled, click the Next button or press [Ctrl-PgDn].
C Enter the Flight Number for the flight. Flight Numbers can be any
combination of letters, numbers or other characters. The only
requirement is that it be absolutely unique. If you are using a simple
sequence number, you can click the << Next Number button to
automatically assign a number. When finished, click the Ok button or
press [Ctrl-PgDn] to close the wizard and create the new Flight Log
Form.
Enter Manifest Information (optional)
The information in the Manifest tab will be printed on a Charter Flight
Manifest sheet, along with the standard flight log form when the
28
"Manifest & Log Sheet" log form is selected.
C Select the Manifest tab in the Flight Log window. Enter customer
contact information in the fields provided.
C Enter the ETD and Remarks information for each leg in the Crew
Itinerary block. (Use the navigator buttons below to select and edit each
leg.)
C Enter the passenger list (if any) in the Passengers block. (Use the
navigator buttons below to insert new passenger entries into the list.)
Print the Log Form and Dispatch the Flight
C Verify the pre-flight log form information, paying particular attention to
the From and To airports and crew member assignments for each leg.
The Flight Launch Wizard sets the departure dates for all legs to the
same. Departure date information can be corrected when the leg
information is updated after the termination of the flight. (See
Processing a Completed Flight)
C Print the form by clicking on the Print button in the navigator bar at the
top of the window. Give the printed form to the Captain for completion
during the flight.
Processing a Completed Flight
The processing of a completed flight requires the recording all pertinent
flight information in the Flight Log Form created during the "launch"
phase. Typically the flight information will have been recorded on the
printed Flight Log form by the flight crew, and the completed form turned
into the staff member responsible for recording and closing flights.
The following assumes that a Flight Log Form for the flight was
previously created using the Flight Launch Wizard.
Locate the Flight Log Form
Click the Flight Log button (main window) to open the Flight Log
Window. Use the Locate navigator button to find the appropriate Flight
Log form.
Record Leg and Duty Information
Click the Legs tab, then double-click on the first leg to open the Flight Leg
Dialog. Do the following for each leg of the flight.
29
See Keyboard Shortcuts for ways to speed entry of flight information.
C Click the Edit Record button in the navigator bar, or press [Ctrl-Enter]
to put the record in edit mode.
C Verify the Departure Date and correct if necessary.
C Select the appropriate Type Of Time for the flight. The choices are:
Part-135, Part-121, Part-91 or Other Commercial.
C Make appropriate entries in the Ops (operations code) and Release fields.
These are optional, and can be left blank, if desired.
C Verify the TZ (time zone) number and correct if necessary. The time
zone must be consistent with the times entered in the On Duty, Out, Off,
On, In and Off Duty fields.
C If departure was delayed, select the appropriate reason from the
Departure Delay drop down list. The choices are: ATC, Passenger,
Weather, Other or None.
C Enter the number of passengers in the Pax field.
C If the leg is the first leg of the flight or the first leg flown for the duty
shift, record the time and date the crew's duty shift started next to OnDuty. If the crew remained on duty from a previous leg of the same
flight, leave the On-Duty Time field blank.
C Enter departure, takeoff, landing and arrival times for the leg next to the
Time-Out, Time-Off, Time-On and Time-In fields, respectively.
C If the leg is the last leg of the flight or the last leg flown for the duty
shift, record the time and date the crew's duty shift ended next to OffDuty. If the crew remained on duty for the next leg of the same flight,
leave the Off-Duty Time field blank.
C If the aircraft has a Hobbs meter and you base maintenance hours on the
Hobbs reading, enter the beginning and ending meter readings in the
Hobbs Out and Hobbs In fields, respectively.
C Record the appropriate Day, Night and Instrument experience for each
crew member. When entering the Day Hrs, Nit Hrs and IFR Hrs values,
pressing [Ctrl_+] (hold down Ctrl and press the + key) automatically
inserts Block Time. Alternately, pressing [Ctrl_-] clears these fields.
C Make appropriate entries in the Fuel Burned, Fuel Bought, Fuel Cost,
and Scheduled Times fields. Most of these are optional, and can be left
blank, if desired. However, the fuel and scheduled times fields are
required if you are utilizing CharterLog's fuel tracking and trip reports
(see Custom Reports Explorer).
30
C Entered the CG and Gross Weight information if desired. These fields
are optional and can be left blank.
C Verify the calculated Block Time, Flight Time, Airframe, Engine and
Distance fields. If necessary, you can override any of the values by
double-clicking on the field (to unlock it) then entering a new value.
C Click the Next Record navigator button (lower left-hand corner) to move
to the next leg, or OK to close the Flight Leg Dialog.
Record Squawks
C Click the Squawks tab, then do the following for each squawk.
C Click the Insert Record navigator button to add a blank squawk and open
the Aircraft Squawk Dialog.
C Enter the Date, the Leg, and a Description of the problem being
reported. The remaining fields are locked and are left blank.
C Click OK to complete the entry and close the dialog.
Enter remarks and VOR check
Click the Remarks/VOR Check tab. Enter any flight remarks. If a
VOR check was performed, enter it, overwriting the previous VOR
check.
Close the Log Form
Click the Close Flight button.
Recording a Duty Shift
IMPORTANT! Duty Shifts associated with flights are automatically
recorded via the Flight Log Form. The Clock-In and Clock-Out
functions are normally used only for duty shifts not associated with
a flight (e.g. training), or for back-entry of previous duty shifts.
Each time sheet entry (duty shift) includes a single time zone
setting. Both the on and off duty dates and times must be "local" to
this time zone.
Clocking In
C Click the Clock-In button in the main window, or select
[Activities|Clock-In] from the main menu.
C Select the pilot from the Find Pilot list by double-clicking on the name,
or by clicking once on the pilot name then clicking the OK button.
31
C If necessary, modify the On-Duty time and date.
C Verify that the Time Zone in the upper right-hand corner is correct.
C Click Ok to complete the entry.
Clocking Out
C Click the Clock-Out button in the main window, or select
[Activities|Clock-Out] from the main menu.
C Select the pilot from the Find Pilot list by double-clicking on the name,
or by clicking once on the pilot name then clicking the OK button.
C If necessary, modify the Off-Duty time and date.
C Enter remarks about the shift, if any.
C Verify that the Time Zone in the upper right-hand corner is correct.
C Click Ok to complete the entry.
Post-flight Fuel Purchase Data
Entry
Road Map — Open the Fuel Purchase Information Window by
selecting [Activities|Update Fuel Purchase Info...] from the menu,
or by clicking the Fuel button in the main window.
The Fuel Purchase Information window provides a fast and convenient
way for the fuel purchase information (quantity purchased and total cost) to
be verified and updated for flights in the Flight Log. Any flight can be
updated, even "closed" flights.
The body of the window contains a tabular list of all flight legs currently in
CharterLog. Flight number, leg number, date, release number and airport
(departure point) fields are shown to help locate and identify flight legs.
The Fuel Purchased and Fuel Cost columns can be edited directly.
32
33
Reporting Tasks
In This Section
<
<
<
<
<
Printing Currency Reports — 33
Printing Maintenance Reports — 34
Printing Custom Reports — 35
Report Search Filters — 37
Creating and Modifying Custom Reports — 40
34
35
Printing Currency Reports
Road Map - Open the Currency Reports dialog by selecting
[Reports|Currency Reports...] from the menu, or by clicking the
Currency Reports button in the main window.
This dialog is used to select, prepare and print currency and FAR
limitations. Available reports include...
C Currency Summary Report
C Flight Duty Report (graphic)
C 135 Limitations Report
Selecting and Running a Report
C Choose the report you want to run from the drop down list. A brief
description of the selected report is displayed in the box to the right of
the selection combo box.
C Select the pilots you want included in the report. Use Ctrl-Click to select
multiple pilots or click Select All to select all of the pilots in the list.
C If required, specify the parameters for the report. Note that not all
reports require parameters to be set. The report parameters for various
pilot reports are discussed below.
C Click the Run button.
Flight Duty Report Parameters
Report for...
Select the month and year for which you want reports.
Zone
Enter the numeric time zone in which the reports are to be based. All
flight and duty times in the reports will be adjusted to local time for the
specified time zone. To base the reports in zulu time, enter a time zone
of 0.
Graph Colors
These five fields allow you to specify the colors used to plot flight time
(Part-91, Other Commercial, and Part-135) and duty time (flight and
training). If you have a color printer, you can experiment with various
color settings. For black & white printers, the default settings shown
below work best:
C Part 91 - White
36
C
C
C
C
Other Commercial - Silver
Part 135 - Black
Flight Duty - Black
Training Duty - Silver
Currency Summary & 135 Limitations Report Parameters
The Date, Time and Zone entries (below) are combined internally to
produce the zulu date upon which the currency report is based.
Calculate for...
Enter the date, time and time zone for which you want a currency
summary. For the Zone field, enter the time zone in which the reports
are to be based. To base the report in zulu time, enter zero (0). This
fields are preset to the current date and time. To show pilot currency
status on some prior date, adjust the fields accordingly.
Underline Expired Items
When checked, all expired items (past-due dates or takeoff/landing
counts below minimum) are underlined. Use this option to emphasize
expired items when printing to a black&white printer.
Show Expired Items in Red
When checked, all expired items (past-due dates or takeoff/landing
counts below minimum) are printed in red. Use this option to emphasize
expired items when previewing on the screen or printing to a color
printer.
Printing Maintenance Reports
Road Map - Open the Maintenance Reports dialog by selecting
[Reports|Maintenance Reports...] from the menu, or by clicking the
Maintenance Reports button in the main window.
This dialog is used to select, prepare and print maintenance related reports
based on the information stored in the Aircraft Log. Available reports
include...
C Aircraft Maintenance Report
Selecting and Running a Report
37
C Choose the report you want to run from the drop down list. A brief
description of the selected report is displayed in the box to the right of
the selection combo box.
C Select the aircraft you want included in the report. Use Ctrl-Click to
select multiple aircraft or click Select All to select all of the aircraft in
the list.
C If required, specify the parameters for the report. Note that not all
reports require parameters to be set. The report parameters for various
pilot reports are discussed below.
C Click the Run button.
Aircraft Maintenance Report Parameters
The Days Remaining, Hours Remaining, Cycles Remaining and
Maintenance Action items select records in an either-or fashion. For
example if Days Remaining <= 30 is checked and Cycles Remaining <=
200 is checked, maintenance records which match either of these
conditions will be shown.
Days Remaining <=
To show items where the days remaining is less than or equal to some
value, check the box to the left and enter the number of days in the field
to the right.
Hours Remaining <=
To show items where the hours remaining is less than or equal to some
value, check the box to the left and enter the number of hours in the field
to the right.
Cycles Remaining <=
To show items where the cycles remaining is less than or equal to some
value, check the box to the left and enter the number of cycles in the
field to the right.
Maintenance Action is
To show items where a specific maintenance action is called for, check
the box to the left and select the action from the drop down list to the
right.
Printing Custom Reports
See also...Creating and Modifying Custom Reports
38
Road Map - Open the Custom Reports Explorer by selecting
[Reports|Custom Reports...] from the menu, or by clicking the
Custom Reports button in the main window.
The Custom Reports Explorer works much like Windows Explorer.
Reports can be categorized and stored in folders. You can add, rename and
delete folders. Reports can be manipulated much like files are in Windows
Explorer. You can add new reports, rename existing reports, delete reports
and moved reports from folder to folder.
Previewing a Report
C Locate the report by opening folders as necessary.
C Select the report then click the Preview button, or just double-click on
the report.
Printing a Report
C Locate the report by opening folders as necessary.
C Select the report then click the Print button.
Adding and Editing Reports
(See Creating and Modifying Custom Reports)
Buttons
Close - Closes the window.
Help - Displays help information for the window.
Up 1 Level - Move up one level in the folder structure.
New Folder - Create a new folder.
New Report - Creates a new empty report template.
Edit - Modify the selected report template.
Print - Runs the selected report and prints it .
Preview - Runs the selected report and displays it on the screen.
Delete - Erases the selected report. The report is gone forever!
39
40
Report Search Filters
Road Map - The Report Search Filter dialog is displayed whenever a report is
selected from the Custom Report Explorer for previewing or printing.
CharterLog's report search filters allow you to limit the contents of a report
by specifying search criteria for various data fields. The search options
available vary depending on the type of information stored in the field.
The four types of fields are:
C Date - Fields which hold a calendar data or a combination date-time
value.
C Character - Fields which hold letters, numerals and other keyboard
symbols.
C Numeric - Fields which hold numeric values.
C Multiple Choice - Fields which allow selection of a fixed range of
choices.
Date Fields
When the search field is a date-type field, a search option combo box is
shown along with three additional entry fields. The various search
options are listed below. Some of the options require entry of additional
information in the entry fields to the right.
Fixed Range — Use this option to filter for records dated within a
specific date range. Enter the specific starting and ending dates in the
date range fields on the far right.
This Month/Quarter/Year — Use these options to filter for records
dated within the current calendar month, quarter or year (respectively)
based on the computer's clock.
Last Month/Quarter/Year — Use these options to filter for records
dated within the previous calendar month, quarter or year (respectively)
based on the computer's clock.
First/Second/Third/Fourth Quarter — Use these options to filter for
records dated within the selected calendar quarter of the current year,
based on the computer's clock.
First/Second/Third/Fourth Quarter... — Use these options to filter for
records dated within the selected calendar quarter of a specific year.
Enter the desired 4-digit year into the entry field to the right.
41
Past ... Days/Months/Years — Use these options to filter for records
dated within the past [n] days, months, or years (respectively) from the
computer clock date. Enter the number [n] into the entry field to the
right.
Next ... Days/Months/Years — Use these options to filter for records
dated within the next [n] days, months, or years (respectively) from the
computer clock date. Enter the number [n] into the entry field to the
right.
Calendar Year ... — Use this option to filter for records dated within a
specific calendar year. Enter the desired 4-digit year into the entery field
to the right.
January .../February .../ -- December ... — Use these options to filter
for records dated within the selected calendar month of a specific year.
Enter the desired 4-digit year into the entry field to the right.
Character Fields
When the search field is a character-type field, a search option combo box
is shown along with an entry field. Most of the search options require you
to type a complete or partial search value in the entry field. Where
appropriate, an ellipsis (...) button is available to allow search value(s) to
be selected from a list of choices.
begins with (does not begin with) — Use these options to filter for
records where there is (is not) a partial match between the search value
and the beginning of the field value. See the examples below.
Search Value
ABC123
AB
ABCD
BC
Field Value
ABC123
ABC123
ABC
ABC
Match?
Yes
Yes
No
No
contains (does not contain) — Use these options to filter for records where
the search string matches (does not match) all or any portion of the field
value. See the examples below.
Search Value
ABC123
AB
ABCD
BC1
TBN
42
Field Value
ABC123
ABC123
ABC
ABC123
HP,CG,TBN
Match?
Yes
Yes
No
Yes
Yes
is in list (is not in list) — Use these options to filter for records where the
field value matches (does not match) any one of a list of search values.
Search values are entered into the entry field, separated by commas (,). See
the examples below.
Search Value(s)
N9594L,N94294
SEL,MEL
LR35
Field Value
N94294
SES
LR35
Match?
Yes
No
Yes
is blank (is not blank) — Use these options to filter for records where an
entry has not (has) been made into the field.
Numeric Fields
When the search field is a numeric-type field, a search option combo box is
shown along with an entry field. Most of the search options require you to type
a numeric search value in the entry field.
is equal to (is not equal to) — Use these options to filter for records where
the search value is (is not) exactly equal to the field value.
is greater than/is less than — Use these options to filter for records where
the search value is numerically larger than (greater than), or smaller than
(less than) the field value.
is greater than or equal to/is less than or equal to — Use these options to
filter for records where the search value is numerically equal to or larger than
(greater than), or equal to or smaller than (less than) the field value.
is blank (is not blank) — Use these options to filter for records where an
entry has not (has) been made into the field. Note that a field value of 0
(zero) is not considered blank since an entry has been made.
Multiple Choice Fields
When the field presents only a few possible choices (e.g. a True/False field), a
series of radio buttons is shown. Simply click on the appropriate radio button
to set the filter for that field.
43
Creating and Modifying Custom
Reports
(Documentation for this feature is not yet available. Please call for assistance if
you need help or would like to have us design a custom report for you.)
44
Data Maintenance Tasks
In This Section
< Relocating Single-User Data Files — 43
< Backing Up Data Files — 44
< Recovering from Data Loss — 45
45
46
Relocating Single-User Data Files
Data file relocation is an option only with the single-user version of
CharterLog. In Multi-User CharterLog the data files must be located on the
Server. Contact your system administrator if you need to relocate Multi-User
CharterLog data to a different folder on the Server.
You can change where CharterLog stores your company data. Follow the
appropriate procedures below.
Creating empty files in a new or existing directory.
C If data files are to be stored in an existing folder, first insure that the folder is
empty. If not, erase any files using Windows Explorer or File Manager.
C Start CharterLog then choose [File|Set Data Path...] from the main menu to
open the Data File Location Dialog.
C To create a new folder, type the full data path into the Data Path field then
press the Tab key. CharterLog will confirm that you want to create the new
directory. Click Yes.
C To select an existing folder, click the ellipse (...) button to the right of the
Data Path field then select the desired folder from the Browse For Folder
dialog.
C Once the path to the desired folder is shown in the Data Path field, Click OK
to close the Data File Location dialog. CharterLog will automatically create
and initialize empty data files.
Moving data files to a new or existing directory.
C If data files are to be moved to an existing folder, first insure that the
destination directory is empty. If not, erase any files using Windows
Explorer or File Manager.
C IMPORTANT! Shut down CharterLog.
C Start the CharterLog Data Manager by selecting
Start|Programs|CharterLog|CharterLog Data Manager.
C Click Backup Files and make a backup copy of your data either to a blank
floppy disk or a temporary folder on your hard drive.
C If moving files to a new folder, type the full data path into the Data Path
field.
C If moving files to an existing folder, click the ellipse (...) button to the right
of the Data Path field then select the desired folder from the Browse For
Folder dialog.
47
C Once the path to the desired destination folder is shown in the Data Path
field, click Restore From Backup. If you have selected a new folder, the
program will confirm that you want to create the new directory. Click Yes.
C If the Restore From Backup warning is displayed, click OK to proceed. In
the Open dialog, locate and select the backup (CLM file) created in step 4
above. Data files will be restored from the backup.
C The program will ask you if you want to run the Check Files function on the
restored files. Click Yes. When the check is completed, close CharterLog
Data Manager, then start CharterLog. Confirm that the Data Path shown in
the status bar of the main window indicates your new folder.
Backing Up Data Files
NOTE: If you are running Multi-User CharterLog on a network, the data
files are stored on the network server and may be backed up on a regular
basis as part of the server backup. (Check with your system administrator
regarding server backups.) However, you are free to do your own backup
using the procedure below.
NOTE: The following assumes that you have prepared backup disks as
specified in Establishing a Backup Procedure.
To run a backup, all you need to do is to specify a name and location (drive
and/or directory) for the backup file. The rest is automatic.
C Locate the backup disks for the proper day of the week and insert the "-1"
disk in the floppy drive. Always use the proper disks, regardless of when the
last backup was done. For example, if it is Wednesday and for some reason a
backup was not done on Tuesday, use the "Wednesday" disks anyway.
C Select Activities|Backup Data... from the menu, or click the Backup button in
the main window. In the dialog box, select the floppy disk drive in the Drives
field and set the desired name for the backup file in the File name field. A
good suggestion for a file name is your company name abbreviated to 8
characters or less. CharterLog will remember the drive and file name you
choose and will preset the fields accordingly the next time you run a backup.
C Click OK to begin the backup. Before proceeding, CharterLog will check to
see if a backup file by the same name exists on the disk. If so, it will warn
you of the overwrite and give you two chances to cancel. If you are using the
suggested rotating daily backup scheme, you should proceed and allow the
48
file to be overwritten. You will only be overwriting the backup made a week
ago, and not the other six.
Recovering From Data Loss
WARNING! The Restore From Backup function will wipe out ALL of the
CharterLog data on your system, and replace it with the data on the
Backup. Any changes or additions since the backup was created will
be lost!
WARNING! Do NOT use the Restore From Backup function to Merge
or Synchronize data between two machines!
If you data files become damaged or are erased, follow the recovery steps below.
If you have any questions or doubts about the recovery process, call for
assistance before proceeding.
Step 1: Rebuild damaged data files
This should be first recovery step taken when one or more of the CharterLog
data files is damaged.
C Single-User CharterLog: Shut down CharterLog. Start the CharterLog Data
Manager by selecting Start|Programs|CharterLog|CharterLog Data
Manager.
C Multi-User CharterLog: Shut down Multi-User CharterLog on all
workstations. On the Server, start the CharterLog Data Manager by locating
and double clicking the CharterLog Data Manager icon on the desktop.
C Click Check Files to begin the recovery operation. If Check Files is able to
successfully rebuild all damaged files, close the CharterLog Data Manager
and take steps to visually verify that all data is present. If data is missing,
you can attempt to manually re-enter it, or opt to restore from the most recent
backup (see step 2).
C If the rebuild fails, the only recourse is to restore from the most recent backup
(see step 2).
Step 2: Restore data from most recent backup
Use this procedure when one or more of the CharterLog data files is damaged
and the rebuild operation failed, or if one or more data files are inadvertently
deleted.
Warning! Do NOT restore data to the same directory where your damaged
data resides. Always restore to a new directory.
49
Warning! Due to the complicated links between the individual data files
which make up a CharterLog database, restoration of individual files is not
allowed. You must restore all files, if you are going to restore any of them.
C Single-User CharterLog: Shut down CharterLog. Start the CharterLog Data
Manager by selecting Start|Programs|CharterLog|CharterLog Data
Manager.
C Multi-User CharterLog: Shut down Multi-User CharterLog on all
workstations. On the Server, start the CharterLog Data Manager by locating
and double clicking the CharterLog Data Manager icon on the desktop.
C Create a new data folder by typing the full destination data path into the Data
Path field then click Check Files. The data manager will confirm that you
want to create the new directory. Click Yes..
C Locate the backup disk(s) from which you want to restore, and insert the "-1"
disk in the floppy drive.
C Click Restore From Backup. Proceed past the "warning" dialog by clicking
OK. The "Restore files from..." dialog will be displayed.
C In the dialog box, select the floppy disk drive in the Drives field and locate
the backup file in the File list on the left. Double-click on the name in the
list, or click once on the name then click the OK button. Either action will
begin the restore process. If your backup spans more than one disk, follow
the instructions on the screen, inserting the last disk then reinserting the first
disk as requested.
50
Reference
In This Section
<
<
<
<
<
<
<
CharterLog Access Utility — 49
CharterLog Data Manager — 53
Demo Mode Restrictions — 54
Keyboard Shortcuts — 54
Navigator Buttons — 54
Aircraft Tags — 56
Time Zones — 57
51
52
CharterLog Access Utility
Road Map — CharterLog Access is a separate program. To start, select
the CharterLog Access icon, located in the CharterLog folder in the
Programs menu.
Overview
CharterLog Access allows you to establish a list of "users" and assign specific
permissions to each. Users are added to the list and permissions are set using
the CharterLog Access application window.
At the top of the window is the main navigator bar with buttons for moving
through the users list, adding new users, etc. Just below the navigator bar on
the left is a tabular display of users. The "selected" user is indicated by the
triangular pointer. The selected user's password and permissions are shown in
the fields to the right of the list.
Permission Settings
Permissions are set by manipulating the following fields.
Aircraft Log Permissions
< Open Aircraft Log — Allows user to open and view the contents of the
Aircraft Log. Note that this permission must be granted in order for the
remaining Aircraft Log Permissions to be effective.
< Add Aircraft — Allows the user to add a new aircraft to the Aircraft Log.
< Modify Aircraft — Allows the user to modify an existing aircraft in the
Aircraft Log.
< Delete Aircraft — Allows the user to delete an existing aircraft and all of
its associated aircraft log and maintinance information from the Aircraft
Log.
< Add Log Entries — Allows the user to add airframe/engine log records for
an aircraft.
< Modify Log Entries — Allows the user to modify aircraft airframe/engine
log records.
< Delete Log Entries — Allows the user to delete aircraft airframe/engine
log records.
< Add Maintenance Records — Allows the user to add maintenance
inspections or components for an aircraft.
53
< Modify Maintenance Records — Allows the user to modify existing
aircraft maintenance inspections or components.
< Delete Maintenance Records — Allows the user to delete aircraft
maintenance inspections or components.
< Add Squawks — Allows the user to add squawks for an aircraft.
< Modify Squawks — Allows the modify aircraft squawks.
< Delete Squawks — Allows the delete aircraft squawks.
Pilot Log Permissions
< Open Pilot Log — Allows user to open and view the contents of the Pilot
Log. Note that this permission must be granted in order for the remaining
Pilot Log Permissions to be effective.
< Add Pilots — Allows the user to add a new pilot to the Pilot Log.
< Delete Pilots — Allows the user to delete an existing pilot and all
associated logbook and time sheet records from the Pilot Log.
< Modify Self — Allows the user to modify only his or her own records in
the Pilot Log. Modification of other pilot's records is prohibited.
< Modify Others — Allows the user to modify any of the existing pilot
records in the Pilot Log.
Flight Log Permissions
< Open Flight Log — Allows user to open and view the contents of the
Flight Log. Note that this permission must be granted in order for the
remaining Flight Log Permissions to be effective.
< Add Flights — Allows the user to add a new flight to the Flight Log.
< Modify Flights — Allows the user to modify an existing flight in the Flight
Log.
< Delete Flights — Allows the user to delete an existing flight and all of its
associated leg and squawk records from the Flight Log.
< Close Flights — Allows the user to Close an existing flight in the Flight
Log.
< Reopen Flights — Allows the user to reopen a closed flight in the Flight
Log.
Reporting Permissions
< Currency Reports — Allows user to open the Currency Reports dialog and
view or print reports contained therein.
< Maintenance Reports — Allows user to open the Maintenance Reports
dialog and view or print reports contained therein.
54
< Open Custom Reports — Allows user to open the Custom Reports Explorer
and view or print reports contained therein.
< Add Custom Reports — Allows user to create new reports and add them to
the Custom Reports Explorer.
< Modify Custom Reports — Allows user to modify any of the existing
reports in the Custom Reports Explorer.
< Delete Custom Reports — Allows user to delete existing reports from the
Custom Reports Explorer.
Other Permissions
< Restore from Backup — Allows user restore data files from a backup disk
set. WARNING -- A user granted this permission will be able to
completely replace all existing data on your hard drive, potentially
destroying it. It is strongly suggested that only the system administrator be
granted this permission.
< Append from Backup — Allows the user to append new information into
the database from a backup disk set created on another machine running
CharterLog.
< Modify Data Path — Allows the user to alter the directory path to the
CharterLog data files. This permission is typically granted only to the
system administrator.
< Modify Lists — Allows the user to modify the Airports, Types, Categories
and Classes lists from the List Editor Window. Note that users without
this permission can still make additions to these lists during entry of new
flight and pilot log records.
< Modify Configuration — Allows the user to open the Program Options
dialog and modify the settings contained therein.
Fields
Username
This field displays the unique username assigned to the individual. This is
the name the person will use when logging in to CharterLog. Usually the
person's last name is used, though in cases where there are two users with
the same last name, a modified last name will need to be used to avoid
duplication. The Username field is set when the user is added to the list.
Once added, the username can only be changed by deleting then re-adding
the user.
Emp. No./SSN
This field is used within CharterLog to determine if a user is attempting to
modifying his or her own Pilot Log records. Therefore, if the user is a
55
pilot, this field should be set to match the Employee Number assigned to
the pilot in the Pilot Log. It should be left blank for non-pilot users. This
field is read only. To modify it, first double-click on the field box. Note:
The Emp. No/SSN field is set automatically when users are added using
the Add Pilots to Users List button (see below).
Password
This is the log-on password for the user. Passwords are masked from view
until the user record is placed in edit mode by clicking the Edit button in
the navigator bar. Initial passwords should be assigned by the system
administrator and given to each user. Note: Users can change their
password from with CharterLog by selecting [File|Change User
Password...].
Permission Check Boxes
Placing a checkmark next to an activity gives the user "permission" to
perform that activity. Refer to the notes which follow and see Permission
Settings (below) for further explanation.
C In the Pilot Log Permissions section, only use the Modify Self
permission for pilots. Modify Self requires that there be a valid
employee number in the Emp. No/SSN field. Non-pilot users must be
granted Modify Others permission if they are to be able to alter pilot
records.
C Use caution when assigning a user Restore from Backup permission.
Restoring from a backup overwrites ALL of the existing data files. This
function should be reserved for the system administrator only.
Buttons
Save as Default
Click this button to make the displayed permissions the "default" setting.
The default permissions are automatically assigned when a new user is
added to the list or when the Set Default Permissions button is clicked.
Set Default Permissions
Click this button to assign the default permissions to the currently selected
user. The user record must be in edit mode in order for this button to be
active.
Add Pilots to Users List
This function scans the Pilot Log and adds new pilots to the user list. The
program uses the employee number to determine if a pilot is already in the
list. Use this button to update the user list whenever a new pilot is added
to CharterLog.
56
Change System Administration Password
Use this function to change the password which allows entry into
CharterLog Access.
CharterLog Data Manager
Road Map — The CharterLog Data Manager is a separate program. To
start the data manager, select the CharterLog Data Manager icon,
located in the CharterLog folder in the Programs menu.
Fields
Data Path
This field displays the path (directory location) of the CharterLog data and
report files. The data path can be modified directly (by typing in the field),
or you can click the ellipsis (...) button to select an existing folder.
Buttons
Check Files
This function verifies the structure of the CharterLog data files including all
associated index files. .
Reindex & Pack Files
This function rebuilds all index files, and recovers any wasted space resulting
from record deletions.
Install Report Templates
The reports available from CharterLog's Custom Reports Explorer window
are stored as templates in special database files. From time to time, Polaris
Microsystems will add new templates or update existing templates. These
updates can be installed into your database by clicking this button.
Backup Files
Creates a backup of your data files. See Backing Up Data Files for detailed
instructions.
Restore from Backup
Begins a restore operation. Read Recovering From Data Loss before using
this function!
57
Import Single-User Files
This function provides a way to import data from single-user CharterLog
versions 2.1 and earlier. See the Multi-User CharterLog Installation Guide
for instructions.
Demo Mode Restrictions
To allow pre-purchase evaluation, CharterLog will operate in Demo Mode for
15 usage days without a valid serial number and registration code. While in this
mode, the following functional restrictions are imposed.
C The Flight Log is restricted to 20 entries. Once this limitation is reached,
further creation of new Flight Logs is disabled.
C Reports can only be previewed on the screen. The printing of reports, or the
directing of reports to another device, such as a fax driver, is disabled.
Keyboard Shortcuts
Most of CharterLog's windows and dialog boxes respond to keyboard
commands or "shortcuts" which allow for more rapid data entry under certain
circumstances. Below is a summary.
< Date, time and numeric fields support increment and decrement via the + and
- keys.
< When entering Day Hrs, Nit Hrs and IFR Hrs values in either the Flight Leg
Dialog or the Logbook Record Dialog, [Ctrl_+] (hold down Ctrl and press
the + key) automatically inserts Block Time. Alternately, pressing [Ctrl_-]
clears these fields.
< Many Navigator bar functions can be invoked using key sequences. See
Navigator Buttons (below) for details.
Navigator Buttons
Navigator buttons are grouped into a "navigator bar" located at the top of
database editing windows (Flight Log, Pilot Log, etc.). In cases where the
database includes sub-lists of associated detail records, there will be secondary
58
navigator bars for those lists. In many cases, some of the buttons described
below will either be omitted from the navigator bar or disabled, indicating that
their respective functions are not applicable.
Close - Close the window.
First - Moves to and displays the first record in the database. Keyboard
Shortcut: [Ctrl-Home]
Prior - Moves to and displays the prior record in the database.
Keyboard Shortcut: [Ctrl-PgUp]
Next - Moves to and displays the next record in the database. Keyboard
Shortcut: [Ctrl-PgDn]
Last - Moves to and displays the last record in the database. Keyboard
Shortcut: [Ctrl-End]
Insert Record - Adds a new record to the database. Keyboard Shortcut:
[Ctrl-Insert]
Delete Record - Permanently erases the displayed record. A
confirmation dialog is always displayed first, giving the user an
opportunity to cancel the delete. Keyboard Shortcut: [Ctrl-Delete]
Edit Record - Places the displayed record in Edit mode, allowing fields
to be entered and/or modified. Keyboard Shortcut: [Ctrl-Enter]
Post Edit - Saves any changes made to the displayed record during
editing. CharterLog will do an automatic "Post" before moving to
another record or closing the window. Keyboard Shortcut: [Ctrl-Enter]
Cancel Edit - Cancels any changes made to the displayed record during
editing. When an edit is canceled, all fields are restored to their pre-edit
state. A confirmation dialog is always displayed first, giving the user an
opportunity to retain the changes.
Refresh Data - Reads the displayed record from disk and updates the
display. This button is useful in a shared-data installation where
multiple users may be modifying data concurrently.
Set Bookmark - This button works in conjunction with the Return To
Bookmark button to provide a convenient way to mark and quickly
return to a record in the database. To mark the displayed record, click
the button. To later return to the marked record, click the Return To
59
Bookmark button (below). Note that bookmarks are lost when the
CharterLog session is terminated.
Return to Bookmark - Displays a previously book marked record. See
Set Bookmark (above) for details.
Locate -Displays a search dialog to aid in locating records in a large
database. The search dialog allows the user to locate a record using all
indexes available for the database in question.
Print - If a record-print option is available for the database, clicking this
button initiates the print operation.
Aircraft Tags
Aircraft tags are user-defined codes which serve to identify certain physical
characteristics of an aircraft, including but not limited to the power plant type,
gear type, equipment, etc. You assign tags to an aircraft by entering them into
the Tags field in the Aircraft Log Window. When entering multiple tags for an
aircraft, separate them with commas.
Defining Tags
How you define your tags is totally up to you, however, you should consider the
following guidelines.
The Tags field is limited in length to 40-characters. You can enter multiple
tags into these fields, however, the number that will fit depends on how long
the tags are. Therefore, you should try to define tags which are as short and
concise as possible.
Tags should be consistent in length. In other words, if you want to use a threeletter tag, all tags should be three letters long. If you mix two and three letter
tags, it is possible that a search will work incorrectly. For example, if you use
"TB" for turbine and "TBP" for turboprop, a filter which tests for "TB" will
incorrectly select "TBP" as well (since "TBP" contains "TB").
Before you define your own tags, first look at the type of aircraft your company
operates. Decide how you may need to classify them, beyond the usual
classifications of type, category and class, when printing reports.
60
Time Zones
CharterLog makes use of time zone numbers instead of named zones (Eastern,
Pacific, etc). If you are unfamiliar with time zone numbers, the following
discussion and conversion table will be of assistance.
What is a numeric time zone?
A numeric time zone is simply the number of hours added to (or subtracted
from if negative) local time to get GMT or zulu time. For example, in the
Eastern time zone, when standard time is in effect, 5 hours is added to local
time to convert to zulu, so the equivalent numeric time zone is 5. During
daylight savings time, local time is advanced by 1 hour, so the numeric time
zone changes accordingly. Using the Eastern time zone as an example once
again, during daylight savings time the equivalent numeric time zone changes
to 4.
Time Zone Conversion Table
The table below lists some of the common named time zones and their
standard time numeric equivalent. Subtract 1 from the listed numeric zone if
daylight savings time is in effect.
61
Named Time Zone Numeric Zone
Alaska/Hawaii
Atlantic
Azores
Baghdad
Bering
Brazil Zone 2
Central Europe
Central
China Coast
Int'l Date Line
Eastern Europe
Eastern
Greenwich
Guam
Japan
Middle Europe
Mountain
New Zealand
Pacific
South Sumatra
USSR Zone 3
USSR Zone 4
USSR Zone 5
West Africa
Yukon
62
10
4
2
-3
11
3
-1
6
-8
12
-2
5
0
-10
-9
-1
7
-12
8
-7
-4
-5
-6
1
9


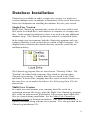


![DRYPOINT XCp Series [PDF 2 MB]](http://vs1.manualzilla.com/store/data/005879775_1-bb6418dd423c7cadd49d7e9d677e0af9-150x150.png)