1
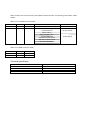
ECO LED PAR39 Model #555-11407 WARNING FOR YOUR OWN SAFETY, PLEASE READ THIS USER MANUAL CAREFULLY BEFORE YOUR INITIAL START-UP! SAFETY INSTRUCTIONS Every person involved with the installation, operation & maintenance of this equipment should: -Be competent -Follow the instructions of this manual Before your initial start-up, please make sure that there is no damage caused during transportation. Should there be any, consult your dealer and do not use the equipment. To maintain the equipment in good working condition and to ensure safe operation, it is necessary for the user to follow the safety instructions and warning notes written in this manual. Please note that damages caused by user modifications to this equipment are not subject to warranty. IMPORTANT: The manufacturer will not accept liability for any resulting damages caused by the nonobservance of this manual or any unauthorized modification to the equipment. Never let the power-cable come into contact with other cables. Handle the power-cable and all mains voltage connections with particular caution! Never remove warning or informative labels from the equipment. Do not open the equipment and do not modify the equipment. Do not connect this equipment to a dimmer-pack. Do not switch the equipment on and off in short intervals, as this will reduce the system’s life. Only use the equipment indoors. Do not expose to flammable sources, liquids or gases. Always disconnect the power from the mains when equipment is not in use or before cleaning. Only handle the power-cable by the plug. Never pull out the plug by pulling the powercable. Make sure that the available voltage is between 110~120VAC. Make sure that the power-cable is never crimped or damaged. Check the equipment and the power-cable periodically. If the equipment is dropped or damaged, disconnect the mains power supply immediately. Have a qualified engineer inspect the equipment before operating again. If the equipment has been exposed to drastic temperature fluctuation (e.g. after transportation), do not switch it on immediately. The arising condensation might damage the equipment. Leave the equipment switched off until it has reached room temperature. If your product fails to function correctly, discontinue use immediately. Pack the unit securely (preferably in the original packing material), and return it to your dealer for service. Only use fuses of same type and rating. Repairs, servicing and power connection must only be carried out by a qualified technician. THIS UNIT CONTAINS NO USER SERVICEABLE PARTS. WARRANTY; One year from date of purchase. OPERATING DETERMINATIONS If this equipment is operated in any other way, than those described in this manual, the product may suffer damage and the warranty becomes void. Incorrect operation may lead to danger e.g.: short-circuit, burns, electric shocks, lamp failure etc. Do not endanger your own safety and the safety of others! Incorrect installation or use can cause serious damage to people and property. Introduction: There are multiple modes in which this light may operate depending upon the specific needs of the user. These include Stand-alone, DMX master and DMX slave. In stand-alone mode, the lamp may be set to automatically scroll through various color change patterns, at user selected speeds, with user selected fade, or to strobe a user specified color and rate. An internal microphone also allows sound-activated mode, allowing the color change to be synchronized to music. If multiple lamps are used, they may all be set to stand-alone mode above, and each will operate completely independently, with independent rates and color changes. However, in multi lamp setups, it is often desirable to have all lamps operating together; scrolling, strobing or fading between colors in unison. In this case, the lamps may be connected together, using specified 3-pin DMX cables, with the first lamp set in automatic mode, and as the DMX master, with all subsequent lamps set as the DMX slave. For even more complex setups, a separate DMX controller may be used, enabling complex combinations of fades, strobes, chases and other effects. In this case, all lamps would be set in DMX slave mode, with the DMX controller set as the DMX master. All Stellar Labs LED PAR lamps utilize industry standard DMX-512 protocols, and are compatible with any such DMX controllers and lighting devices. Installation: Lighting fixtures may be mounted in any angle or desired arrangement. Thankfully, LED lighting not only uses considerably less power (less than 20W), but give off virtually no heat, greatly increasing flexibility and use. Lamps are equipped with a 3-prong grounded cord, and should be connected only to appropriate grounded AC outlets. If using multiple lamps in a DMX controlled setup, only appropriate 3pin DMX cables should be used. Using microphone or other similar cable may cause erratic and unpredictable results. Also, when connecting multiple DMX lamps in a chain, a DMX terminator should be placed at the end of that chain to ensure reliable operation. All DMX cables, terminators, light stands and specially designed AC outlet strips are available at MCM Electronics, as well as a variety of other music and lighting suppliers. Menu: The following flow chart shows the menu arrangement for programming the lamp for a desired operation mode. The terminology and layout of this menu is typical of most DMX controlled lighting products, and experienced users will merely need to refer to this for any information needed. However, if you are new to DMX control, some simple setup instructions following the menu will prove helpful. Note: viewing this manual electronically from www.mcmelectronics.com will allow zooming in on the following chart, making some symbols more readable. UP Enter DMX Address DMX地址设置 Down Select Address 选择地址 Select Address 选择地址 Menu Down UP Enter Set DMX MODE DMX模式 参数设置 Down UP Enter 5 Channel 5通道模式 Down 3 Channel 3通道模式 Menu Menu UP Down Display Enter ON Down 常开 显示设置 OFF 2 分钟内没有按键操作关闭显示 Menu UP Auto Change 7彩变色 Down Enter Speed Down 速度设定 Speed 速度设定 Menu UP Mix Enter Speed 混色 Down Down 速度设定 Speed 速度设定 Menu Sound Enter Sound 声控 Down 开启声控 Menu UP Test Enter Red 测试模式 Enter 红色 Down UP Red Value Down Red Value 红色亮度值 红色亮度值 Menu UP Green Enter 绿色 Down UP Green Value Down 绿色亮度值 Gr een Value 绿色亮度值 Menu UP Blue Enter 蓝色 Down Down UP Blue Value Down 蓝色亮度值 Blue Value 蓝色亮度值 Menu UP Strob Enter Menu Slave DMX接收模式 Enter Slave 开启DMX接收模式 Menu Strob Speed 频闪速度( 为0时不闪) 频闪 Down Strob Speed 频闪速度 Basic Setup: For new users, the following should prove helpful. It will take you through the steps of setting the lamp for automatic or sound activated mode, with information on setting one unit as the master controller, with multiple units connected, operating in unison with that control. Steps for use: Connect the LED PAR lamp to a suitable AC power source. The LED display will read: AddR Press the ↓button one time, the LED will read: SET Press the OK button, the LED will read: DMX Press the OK button again, the LED will read: 3CH Press the OK button, the LED will still read: 3CH Press the M button twice, the LED will read: SET The unit is now set as a three channel DMX master controller Press the ↓button one time, the LED will read: CHAN Press the ↓button one time, the LED will read: MIX Press the ↓button one time, the LED will read: SOUd Press the OK button, the LED will read: SOUd There will be a small blinking dot on the lower right side of the LED display. The unit is now in sound activated mode. Tapping the unit with your finger will cause it to randomly change color. The microphone will now pick up sounds within the room, such as music, causing the unit to change colors to the beat of the music. This unit is set as the DMX master, and is in sound activated mode. You may connect additional lamps to slave from this, by utilizing the female 3-pin DMX output connection. Using a suitable DMX cable, connect this 3-pin output to the 3-pin input of a second lamp and set that lamp to slave mode, it will follow exactly the color changes of the first lamp. Steps for setting lamp to slave mode: Connect the LED PAR lamp to a suitable AC power source. The LED display will read: AddR Press the ↓button one time, the LED will read: SET Press the ↓button again, the LED will read: CHAN Press the ↓button again, the LED will read: MIX Press the ↓button again, the LED will read: SOUd Press the ↓button again, the LED will read: TEST Press the ↓button again, the LED will read: SLAV Press the OK button, the LED will read: SLAV This unit is now in slave mode, and will copy the action of the first unit in the chain. You are now at the end of the address list, pressing the ↓button again will revert back to the AddR position on the menu. The ↓and ↑ buttons may be used to scroll up and down on the menu. If this second lamp is the only other to be used, a DMX terminator should be connected to the 3-pin female DMX output connector. If additional lamps are to be used, they should be set to slave mode, and connected exactly as shown above, with the terminator placed at the end of the chain. Other self-contained modes: Besides the above sound activated mode, the master unit may also be set to automatically scroll through its available colors. This may be done with hard changes from color to color, or gradual fades, both with varying speeds. To see this in action, use the following steps: Use the ↓and ↑ buttons to scroll the menu display to the AddR position. Press the ↓button one time, the LED will read: SET Press the ↓button again, the LED will read: CHAN Press the OK button, the display will still read: CHAN The display should now show a number between C000 and C255 The lamp should now be automatically scrolling through multiple colors. There will be a small dot illuminated on the lower right side of the LED display. The displayed number represents the rate in which the lamp automatically changes color, 000 the slowest and 255 the fastest. Use the ↓and ↑ buttons to adjust this setting. Once the desired setting is obtained, press the OK button. In this mode, you will see the lamp is making “hard” changes from one color to the next. It may be desirable for the lamp to make gradual blend changes between colors. This is easily accomplished as follows. Press the M button to revert back to the master menu. The menu should read CHAN. If not, Use the ↓and ↑ buttons to scroll the menu until CHAN appears. Press the ↓button one time, the LED will read: MIX The display should now show a number between M000 and M255 Use the ↓and ↑ buttons to select a setting between 000 and 255, this will control how fast the lamp blends from one color to the next, 255 being the highest rate. Once the desired setting is obtained, press the OK button. Much like the sound activated mode, the lamp will now act as a self contained device, or as a DMX master, controlling others connected after it in a DMX chain. General Menu Explanation: It will be necessary to set this lamp to specific DMX address locations for use with complex DMX controllers. Additionally other information will be needed to identify the operation of this lamp with used in a chain with non-similar DMX devices. The following is intended to provide detail on these items, as well as a general explanation of each of the menu settings. Menu Display AddR SET CHAN MIX SOUd TEST SLAV This allows setting of the first DMX channel of the lamp. This may be set to any DMX address from 001 to 512. DMX This allows the unit to be set in either 3-channel or 5-channel DMX mode. Available settings are 5CH and 3CH dISP This allows the LED display to be turned off after setup is complete. This is ideal in situations where visibility of the display in a dark setting may be undesirable. Available settings are ON and OFF This allows setting of the rate change for hard color changes Available settings are C000 ~ C255 This allows setting of the rate change for color blends Available setting are M000 ~M255 This setting turns the sound activation on Sole available setting is SOUd This allows testing of all brightness levels of each available LED color. This is useful for periodic testing of the lamp for burned out LED’s. This may also be used if a lamp is to be used as a simple fixed color of virtually any color REd This allows any brightness setting of the red LED’s. Available settings are R000 ~ R255 GREE This allows any brightness setting of the green LED’s. Available settings are G000 ~ G255 bLUE This allows any brightness setting of the blue LED’s. Available settings are B000 ~ B255 Note that any of the colors above may be blended to provide virtually any desired output color STRO This will put the lamp in strobe mode, flashing the color that was selected in the steps immediately above. Available settings are S000 ~ S255 This places the lamp in slave mode. Sole available setting is SLAV When all lamps are to be externally controlled by a DMX controller, the following information will be helpful When set as to DMX 5-channel mode: CH1 RED 0~255 CH2 GREEN 0~255 CH3 BLUE 0~255 CH4 MODE 0-31=color Setting 32-63=Fade Out 64-95=Fade In 96-127=Fade In Out 128-159=Auto Mix 160-191=3 Colour Chase 192-223= 7 Colour Chase 224-255=Sound Action CH5 Speed/Strobe 0-15=OFF 16-255=Strobe 0-255=Speed When set to DMX 3-channel mode: CH1 RED 0~255 CH2 GREEN 0~255 CH3 BLUE 0~255 Technical Specification Number of LED’s Power supply Power consumption Dimensions Weight 60 tri-color each red/green/blue 120VAC, 60Hz 14W 5-1/2" x 5-1/2" x 5" 2 lbs, Warranty MCM Custom Audio and Stellar Labs products are warranted, by MCM Electronics, against manufacturer defects for a period of two years from the original date of purchase. This warranty is limited to manufacturer defects, in either materials or workmanship. MCM Electronics, or any other worldwide divisions of Premier Farnell PLC, are not responsible for any consequential or inconsequential damage to any other component, structure or the cost of installation or removal of said items. For questions or specific information regarding warranty replacement or repair, contact: MCM Electronics www.mcmelectronics.com 800-543-4330