1
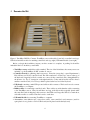
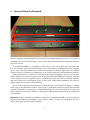
TouchKeys: DIY Kit Installation Guide
Andrew McPherson
Centre for Digital Music
Queen Mary University of London
http://touchkeys.org
March 9, 2014
Contents
1
Introduction
1.1 Terminology . . . . . . . . . . . . . . . . . . . . . . . . . . . . . . . . . . . . . . . . . . .
3
3
2
Prepare the Tools
3
3
Examine the Kit
4
4
Open and Clean the Keyboard
5
5
Identify Features Inside the Keyboard
6
6
Check Sensor Size and Alignment
7
7
(Optional) Cut Sensors Down to Size
9
8
(Optional) How to Attach Cables to Sensors
9
9
Attach Cables to Controller Boards
11
10 Connect Controller Boards to Each Other
12
11 Connect USB Board and Test System
13
12 Place Adhesive Pieces on Keys
14
13 (Optional) Cut Adhesive Backing on Sensors
15
14 Attach Sensors to Keys
16
15 Fold Cables Behind Black Keys
17
16 Attach Cables to Controller Boards
18
1
17 Connect Controller Boards and Place Behind Keyboard
19
18 Bring USB Port out of Keyboard
20
18.1 Option A: Drill Hole for USB Port . . . . . . . . . . . . . . . . . . . . . . . . . . . . . . . 20
18.2 Option B: Place USB Board Outside of Keyboard . . . . . . . . . . . . . . . . . . . . . . . 21
18.3 Option C: Attach USB Cable Inside of Keyboard . . . . . . . . . . . . . . . . . . . . . . . 21
19 Reassemble Keyboard
22
20 Connect TouchKeys to Computer and Launch Software
22
21 Troubleshooting
23
2
1
Introduction
The TouchKeys are multi-touch sensors which attach to the surface of any piano-style keyboard. Each sensor
measures the location and contact area of up to three fingers on the key surface. Touch data can be used with
any MIDI synthesizer to add vibrato, pitch bends, timbre changes, and other expressive techniques.
The TouchKeys are provided as a do-it-yourself (DIY) kit which installs on any keyboard. Kits are
available in a variety of sizes, including 25, 49, 61 and 88 keys. This guide explains the process of installing
a DIY kit on a MIDI keyboard.
This guide is accompanied by a video which also explains the process. It can be found here:
http://vimeo.com/82399344
1.1
Terminology
The following terms will be used throughout the guide:
• Sensor refers to a TouchKeys sensor: the thin white or black circuit boards which install on the keys.
• Key refers to a key on the MIDI keyboard.
• Naturals are the white keys on the traditional keyboard (C, D, E, F, G, A, B). Sharps are the black
keys (C#, D#, F#, G#, A#). Because the TouchKeys DIY Kit is available in “Classic” and “Inverted”
configurations, these terms are used instead of “white keys” and “black keys” for clarity.
• Controller board refers to the long circuit boards in the DIY Kit which attach to the sensors. A single
controller board spans up to two octaves of sensors.
2
Prepare the Tools
To install the TouchKeys, you will need a DIY Kit and a MIDI keyboard. You will also need the following
tools:
• Screwdriver(s) to open the keyboard
• Optional: Sharp knife to cut the adhesive backing on sensors (needed only for installations which are
intended to be removed later)
• Optional: Strong scissors to cut the sensors for the sharps down to length (needed only for certain
keyboards)
In Step 18, one option for accessing the TouchKeys USB port is to drill a hole in the back of the keyboard
(Step 18.1). In this case, you will need a drill and a small file to widen the hole after it is drilled. However,
other options are available for the USB port which do not involve drilling.
Notes:
• The MIDI keyboard can have more keys than the DIY kit; for example, a 25-key DIY kit can be
installed on an 88-key keyboard. In this case, the TouchKeys can be installed on any octave of the
keyboard as long as it begins and ends on C.
3
3
Examine the Kit
Figure 1: TouchKeys DIY Kit. Contents: TouchKeys sensors with cables (lower left); controller board (top);
USB board and ribbon cable for attaching controller boards (top right); USB mini-B cable (lower right).
Before you begin the installation, inspect your kit to ensure it is complete. A packing list should be
included in the box. In the kit, you will find:
• TouchKeys sensors with ribbon cables attached. The size of the kit indicates how many sensors are
included; e.g. the TouchKeys 61 DIY contains 61 sensors.
• Controller boards for gathering data from sensors. Every kit (except the 1-octave Experimenter’s
Kit) will have one 25-key controller board. The 25th connection is for the Top C sensor at the top of
the keyboard. Larger kits will also contain one or more 24-key controller boards, distinguishable by
the absence of a “Top C” inscription on the right-hand side. 61-key and 88-key kits will also have a
smaller controller board (12 or 15 keys) which is placed at the bass end of the keyboard.
• USB board containing a mini-USB port and a ribbon cable connector. This board is used to connect
the TouchKeys to a computer.
• Ribbon cables for connecting controller boards. These cables are wider than the cables connecting
to the TouchKeys sensors. Every kit will have one long, wide ribbon cable (typically placed under
the controller boards in shipping); this connects to the USB board. Larger kits will also contain short,
wide ribbon cables to connect controller boards to each other.
• USB mini-B cable for connecting TouchKeys to computer.
• Accessories: extra adhesive tape; extra sensor cables; extra controller board connectors (used for
spare plastic doors); plastic cover for USB board (used if placed outside the keyboard).
4
4
Open and Clean the Keyboard
remove all screws
marked with arrows
do not remove
Figure 2: Opening a Novation Impulse 61 keyboard. Screws marked with green arrows are to be removed
(including a few not seen in this picture). Screws in the red box hold the keyboard mechanism and do not
need to be removed.
To install the TouchKeys, you will need to remove the top case of your keyboard so the back of the
keys are accessible. Most keyboards with plastic cases (especially those smaller than 88 keys) separate
into two pieces once screws in the bottom are removed. On larger wooden-case digital pianos (e.g. Yamaha
Clavinova), there is sometimes a top lid that slides off once screws in the back of the instrument are removed.
Most keyboards have a collection of screws that secure the key mechanism to the bottom of the case.
These typically do not need to be removed. An exception is the Dopefer LMK-series keyboards, where the
solid wooden case does not separate into pieces. On the Doepfer keyboards, the key mechanism should be
removed from the case by removing the screws on the bottom. Gently lift the mechanism out of the case
using a firm grip on both sides of the mechanism.
Be sure to disconnect any cables that may be holding the pieces of the keyboard together, for example
cables going to the pitch and mod wheels. Don’t forget to re-attach these when you put the keyboard back
together! In general it is not necessary to completely detach the top section of the keyboard, as long as the
back of the keys are accessible. Therefore, only the cables which prevent the keyboard from opening need
to be detached.
Important: the keys on the keyboard should be clean before you install the TouchKeys. Grease on the keys
may prevent the adhesive from making a solid connection. Before or after you open the keyboard, use a
cloth to gently wipe down the surface of the keys.
5
Figure 3: Removing the top of the Novation Impulse 61 keyboard. Notice the two red/orange cables on the
left side of the keyboard which need to be detached before the top can be fully opened.
5
Identify Features Inside the Keyboard
Figure 4: Left: Inside of the Novation Impulse 61 keyboard. Look for space behind the keys and notice any
cables, circuit boards or controllers which may get in the way of the TouchKeys sensors and cables. Right:
The TouchKeys controller boards will fit vertically behind the keys on most keyboards.
Once the keyboard is open, take a moment to look for several features inside. On most keyboards, the
TouchKeys controller boards will eventually be installed vertically behind the keys. It is useful to check
now whether the boards will fit in this location once the keyboard is shut. If the space immediately behind
the keys is not accessible, the controller boards can also be placed further back in the keyboard, as long as
the cables will reach to the sensors.
Also look for any cables, wheels, buttons or circuit boards on the keyboard which might get in the way
of the TouchKeys installation. For example, some 25-key keyboards place the pitch and mod wheels behind
the keys. Check whether these wheels will turn freely with the controller board placed inside the keyboard.
6
6
Check Sensor Size and Alignment
Figure 5: Natural (top) and sharp (bottom) sensors placed on top of the keys, to check alignment.
Eventually, you will affix the sensors to the surface of the keys with adhesive tape. But first, it is important to check the size and alignment between sensors and keys. Without removing the adhesive backing, lay
a few sensors on the surface of the keys to check that they fit. Checking one sensor of each shape (the seven
naturals and one sharp) is recommended. You are looking for the following:
• Check that the natural keys are wide enough that the sensors don’t touch each other.
• Check if the sharp sensors are longer than the keys.
• Check if the sharp keys on the keyboard slope downward in the back.
To align the natural sensors, check that they are centred from side to side, both on the front and back
part of the key. Align the sensor such that the inside corner (where the naturals and sharps meet; top-right
7
Figure 5) is lined up between key and sensor. In other words, do not allow the natural sensors to rub against
the sharp keys. On some keyboards, the sensor will extend 1-2mm beyond the front of the key; this is fine.
On some larger keyboards (typically 88-key weighted keyboards), the front parts of the natural keys are
slightly longer than the sensors. In this case, the natural sensors can be aligned with the front of the keys.
extra length behind key
will need to be cut
(but don’t cut the cable)
no overhang
at front
Figure 6: The black sensor is longer than the key on this Novation Impulse 61. The back part of the sensor
will need to be cut for the keyboard to close.
To align the sharps, check that they are centred from side to side. The sensor should not extend beyond
the front of the key. The sharp sensors are longer than the keys on some keyboards. In this case, use a pen to
mark the extra length (Figure 6). In the next step, you will cut off this part of the sensor so it fits the key.
8
7
(Optional) Cut Sensors Down to Size
Note: This step is only needed on keyboards whose keys are shorter than the sensors. On some keyboards, the sharp sensors are longer than the keys. In the previous step, the extra length at the back of the
sensor was marked with a pen. This extra length with need to be cut off so the sensors don’t hit the case
when it’s closed.
You will need to remove the cables from the sensors before you cut them. See the next step for instructions on removing and attaching the cables. Once the cables are removed, use a strong pair of scissors to cut
the sensor where you marked it. (Be sure not to cut the connector which holds the ribbon cable.)
8
(Optional) How to Attach Cables to Sensors
Figure 7: Removing and attaching cables from sensors. Top left: lifting the connector door with thumbnail
to remove cable. Top right and bottom left: inserting cable into the connector. Bottom right: lock the
connector by pushing down the plastic door.
For various reasons, including cutting the sharp sensors down to size, you may find you need to remove
or attach the ribbon cables from the sensors. To remove the cable from the sensor, first gently lift the black
plastic door on the connector (Figure 7). The cable can then be pulled straight out without resistance.
To reattach the cable, be sure the plastic door on the connector is open (lifted up vertically). The metal
contacts on the cable should face you (i.e. the blue plastic side of the cable should face the circuit board).
Gently push the cable into the end of the connector. It should go in about 1mm when fully inserted. Once the
cable is inserted, close the plastic door by rotating it downward, securing the cable in place. Important: the
cable can be pulled out of the connector on the sensor even when the door is closed. Later in the installation,
9
it will be important to support the cable with adhesive so there is no mechanical strain on this connector.
Figure 8 shows several incorrect ways of inserting the cable. Check that the cable is fully seated in the
connector with the metal contacts facing up.
RIGHT
WRONG
WRONG
WRONG
not fully
inserted
upside down
at an angle
Figure 8: Right and wrong ways of attaching cables to sensors. Be sure the metal contacts face up and that
the cable fully inserts into the connector before closing the plastic door.
10
9
Attach Cables to Controller Boards
push gently and evenly
Figure 9: Attaching cable to controller board. Top left: suggested way of opening connector door using two
thumbs. Top right: inserting cable underneath plastic door. Bottom left: pressing door closed. Bottom right:
final result; cable should be firmly held in connector and difficult to pull out.
Each controller board has up to 25 connectors for sensors. Ech connector has a plastic door that opens
by sliding outward. First, open all the plastic doors on the board. Be careful not to use too much force
or twist the door at an angle, as they can easily break. The suggested method for opening the doors is to
push slowly and steadily with both thumbs (Figure 9). Alternatively, the doors can be pulled open using
fingernails. Note: spare doors are shipped in each DIY kit in case any break. However, even a broken door
will usually securely hold the cable in place when pressed shut.
Once all the doors are open, the cables can be inserted blue side up. The cable slides into the connector
just beneath the door. It should go in around 3-4mm (deeper than the connector on the sensor side). Once
the cable is inserted, close the door by pressing on it with two fingers. The final result should be very
mechanically robust; if the cable pulls out with a modest tug, then it hasn’t been properly inserted. In this
case, open the door and repeat the process.
11
10
Connect Controller Boards to Each Other
Figure 10: Connecting controller boards to each other using short, wide ribbon cables. Top left: only one
board will have the designation “Top C”; this board belongs at the right side of the chain. Top right: the
door rotates downward to close. Bottom: boards connected end-to-end.
(49 key kits and larger only.) For kits with two or more controller boards, the short, wide ribbon cables
are used to connect the controller boards end-to-end. One of the controller boards will be longer than the
others and have a connector labelled “Top C” at the rightmost side. This board belongs at the upper register
of the keyboard (right side of the chain). Specifically, the order is as follows:
• 49 keys: 24-connector board at left; 25-connector board at right
• 61 keys: 12-connector board at left; 24-connector board in middle; 25-connector board at right
• 88 keys: 15-connector board at left; two 24-connector boards in middle; 25-connector board at right
To attach the ribbon cable, first locate the connector on the end of the controller board. Lift up the
brown plastic door and insert the cable through the plastic guide tabs on the connector (Figure 10). The
cable should be inserted with blue side up. Rotate the door downward to close it.
After this step, all the controller boards should be connected to one another by the short ribbon cables.
There should be no ribbon cable yet at either end of the chain. In the next step, the USB board will be
attached to the rightmost side.
12
11
Connect USB Board and Test System
Figure 11: Controller boards with sensors and USB board attached.
Attach the long, wide ribbon cable to the USB board (Figure 11). The other end of this cable should go
in the connector on the rightmost side of the chain of controller boards, near the connector labelled “Top C”.
Once the USB board is attached, use the included USB mini-B cable to connect the TouchKeys to
the computer. You should see a small green light on each controller board. Run the TouchKeys software
program (see Step 20 for details) and check that the device appears in the box labelled “TouchKeys”. Click
“Start” to begin gathering data from the TouchKeys. Verify that each sensor works before proceeding to the
next step. See Section 21 for troubleshooting tips if everything is not working correctly at this stage.
After you test that all the sensors work, disconnect the sensor cables from the controller boards.
That is, remove the narrow ribbon cables from the controller board connectors, but leave the cables attached
to the sensors.
13
12
Place Adhesive Pieces on Keys
adhesive pieces on black keys
white key adhesive
(weighted keys only)
Figure 12: Attach pieces of double-sided adhesive to the backs of the black keys before installing the
TouchKeys. For weighted-key keyboards, a single piece of adhesive on each white key is also useful.
In the following steps, the TouchKeys sensors will be installed on the keys. But before installing the
sensors, small pieces of adhesive should be placed on the back of the black keys. These adhesive pieces will
be used to secure the ribbon cables to the keys so there is no strain on the connectors when the keys move.
On non-weighted and semi-weighted keyboards (e.g. Novation Impulse and most other keyboards less
than 88 keys), it is recommended to use two pieces of adhesive for each black key. One piece should go
on the vertical back of the key (Figure 12). The other piece should be placed close to the hinge on which
the key rotates. Adhesive is only needed on the white keys if the natural sensors have been trimmed to be
shorter. Otherwise, the adhesive backing on the sensor itself will be sufficient to hold the cable in place.
On weighted keyboards (most 88-key keyboards), the key levers are typically longer. It is useful on
these keyboards to use one piece of adhesive on each white key, near the hinge at the back of the key, as well
as two pieces on each black key. This keeps the cables secure when the keys are played.
Before proceeding to the next step, remove both sides of the adhesive backing, so the adhesive pieces
are sticky and ready to attach to the cables.
14
13
(Optional) Cut Adhesive Backing on Sensors
Figure 13: If the TouchKeys sensors are to be removed and reused later, expose only small pads of adhesive
rather than the entire adhesive surface.
This step is only needed if you intend to later remove the TouchKeys sensors from the keyboard and
reuse them.
The adhesive holding the TouchKeys to the keyboard is very strong. Removing the sensors later will not
leave a residue on the keyboard, but given the strength of the adhesive, removal may damage the sensors. To
make the TouchKeys removable, it is useful to expose only small parts of the adhesive (Figure 13). Please
note that removal is not officially supported, and this step is a suggestion only. Using a sharp knife, score
the plastic backing on the adhesive so that several small patches can be removed:
Naturals: Expose four sections, each about 1cm wide: a strip near the wide front of the key; a strip on
the narrow part of the white key where the note name is marked on the back; a strip farther back on the
narrow part, roughly 2cm in front of the connector; and the back part of the adhesive, behind the connector
(which secures the cable).
Sharps: Expose two sections, each around 1.5cm wide: one on the front part of the key, one on the back
part (at least 1cm in front of the conector).
15
14
Attach Sensors to Keys
Figure 14: Top left: remove adhesive backing. Top right: position the natural sensor as directed in Step 6
and press down. Bottom left: position the sharp sensor and press down.
In this step, you will attach the TouchKeys sensors to the keyboard. The cable should be attached to
each sensor, but the sensors should not be connected to the controller boards. Install the sensors one at a
time, moving from bottom to top of keyboard, using the following procedure:
1. Sharps only: if the sensor has been cut down in length, it is useful to fold the cable down 90 degrees
at the back before attaching it to the key, while the cable is easier to grip. It is fine to bend the stiff
blue part of the cable.
2. Peel the adhesive backing off the sensor (Figure 14, top left)
3. While holding the sensor above the key, position the sensor as directed in Step 6
4. Press down on the sensor to attach it to the key
Important: once the sensor is attached, it is difficult to reposition. It is important to check the alignment
before you press the sensor down onto the key. If you accidentally brush the adhesive into contact with the
key, it can typically be removed by carefully pulling upward, but once it is firmly pressed into place, it will
be difficult to remove (unless the backing has been cut as described in Step 13).
16
15
Fold Cables Behind Black Keys
Figure 15: Fold the ribbon cables down behind the back of the black keys.
Important: do not skip this step. The ribbon cables on the black keys needed to be folded down to sit
flush with the back of the key. Otherwise, pressing the key will put strain on the cable and can cause it to
disconnect from the sensor.
Fold the ribbon cables on the sharp sensors down around the back of the keys as shown in Figure 15.
Use the adhesive you installed in Step 12 to secure the cables in place. Be sure the cables do not stick out
too far beyond the back of the black keys, or they may hit the case when the keyboard is closed.
17
16
Attach Cables to Controller Boards
Figure 16: Ribbon cables attached to controller boards (blue side should face up).
Following the same procedure you used in Step 9, attach each cable to the controller board, making sure
to keep the controller boards in the same order you used in Step 9. Push the connector doors securely closed
and make sure the cables are securely attached.
18
17
Connect Controller Boards and Place Behind Keyboard
Figure 17: Turn the controller boards vertically and tuck them behind the keyboard.
First make sure that all sensors have been connected to the controller boards. At each end of the controller boards, just past the wide ribbon cable connector, is a piece of adhesive. Note: add this adhesive if
it is not already present. Remove the backing on this adhesive. Then use the short, wide ribbon cables to
connect the controller boards to each other, following the same procedure as Step 10. Push the cables down
to secure them to the adhesive. This ensures the cables will not work loose when the boards are placed
inside the keyboard.
Also attach the USB board to the rightmost controller board as described in Step 11. Then turn all the
controller boards vertically and tuck them down behind the keyboard (Figure 17). The extra ribbon cable
will form a small loop behind each key. This extra length is useful and helps keep the cables from pulling on
the connectors when the keys are pressed. But be sure that the extra cable does not fall in any place where
it will get crushed when the keyboard is reassembled. For example, the cables should not block any screw
holes in the case.
19
18
Bring USB Port out of Keyboard
In the previous step, the USB board was attached to the controller boards. The last part of the installation
involves finding a place for the USB cable to emerge from within the keyboard. There are three possible
options, described below.
18.1
Option A: Drill Hole for USB Port
Figure 18: Installing the USB board inside the keyboard, with a hole drilled in the back of the keyboard to
allow the USB cable to attach. This hole may need to be widened with a file for the cable to fit.
This step requires the most tools and expertise, but provides the most mechanically robust solution.
Required tools: drill and file
In this step, the USB board is attached inside the keyboard (Figure 18, left). Depending on the layout
of the case, the board might be oriented vertically or horizontally. The port will usually face the back of the
keyboard, but it might also face the right side of the keyboard. Look for a place inside the keyboard with
two perpendicular surfaces: one to which the board can be adhered, the other which can be drilled to expose
the port.
Use a drill to cut a hole centred on the USB port. The drilling may have to be done before the USB
board is stuck in place. The initial hole may not be large enough to insert the USB cable (Figure 18, right).
Use a file to widen the hole until the cable fits through the case into the USB board.
A piece of adhesive can be used to help secure the long ribbon cable to the case.
20
18.2
Option B: Place USB Board Outside of Keyboard
Figure 19: Installing the USB board outside the keyboard by bringing the ribbon cable through an opening
in the case.
This option is most suitable if you do not have access to a drill or prefer not to make a hole in the
keyboard.
Here, the USB board will be installed on the outside of the keyboard. Bring the long ribbon cable out
of the case using an existing hole or gap between pieces of the case (Figure 19). The board can then be
secured anywhere on the outside of the case. The kit comes with a 2-piece plastic container into which the
USB board can be placed for protection. Use extra pieces of adhesive tape as needed to hold this container
together and secure it to the case.
18.3
Option C: Attach USB Cable Inside of Keyboard
This is an alternative to Option B if the USB board does not fit outside the keyboard, or if there is any
concern about the USB board getting damaged during transport. Attach the USB mini-B cable to the USB
board and place both cable and board inside the case. Find or create an opening anywhere in the case to
extract the USB cable. Rather than having a USB port, the keyboard will have a cable emerging from it. A
USB extension cable can be used if the cable needs to be lengthened.
21
19
Reassemble Keyboard
When you have finished the installation, reassemble the keyboard following the reverse of Step 4. Don’t
forget to reattach any cables you removed when you opened the keyboard (for example, cables for control
wheels). Important: be careful not to trap any TouchKeys cables in the case. Check every screw hole
to make sure you do not drive a screw through one of the ribbon cables.
20
Connect TouchKeys to Computer and Launch Software
Figure 20: Screenshot of TouchKeys software. Device should appear in the box in the upper-left of the
window.
Finally, verify that everything works by connecting the TouchKeys and the MIDI keyboard to the computer by USB. You will need two USB ports: one for the TouchKeys and one for the keyboard. Download
the latest software from the TouchKeys download page1 and launch the program. Verify that everything is
still functional, as it was in Step 11.
At this point, you’re ready to play! To begin exploring the features of the software, please consult the
software user manual on the download page.
1
http://code.soundsoftware.ac.uk/projects/touchkeys/files
22
21
Troubleshooting
See below for a list of common problems and solutions. Most issues during installation are caused by cables
that are not fully connected, so always be sure to double-check the cables. If the solutions below do not
address your issue, please visit the TouchKeys forum2 for further advice.
• Device not seen by computer, or does not open: Check the wide ribbon cables from the USB board to
the controller board and between the controller boards. Make sure all cables are secure and straight in
their sockets. Also check that the USB mini-B cable is securely attached.
• Device shows fewer octaves than it has: Check the wide ribbon cables between controller boards, as
above.
• Some keys do not show touch data: Check the ribbon cables between the keys and the controller
boards, on both sides.
• The ribbon cable came out of the sensor: Even with the sensor attached it is usually possible to guide
the cable back into the socket. The back of the sensor can be gently lifted up. The cable can be pushed
into the socket even with the latch closed, though this is difficult. If the sensor is lifted far enough, the
tip of a knife can be used to re-open the door without removing the sensor.
• I still couldn’t get the ribbon cable back in the sensor: If it is impossible to get the cable back into the
connector, the sensor should be removed. This is challenging, especially on the naturals, but it can be
done with consistent pressure, taking care not to bend the sensor too much in any particular place. On
the sharps, the sensors can most easily be removed with a twisting motion rather than pulling straight
up.
• One of the plastic doors broke off the controller board: Each kit ships with replacement connectors
in case the doors break. Gently remove the door from the replacement connector (a knife can help
release the latch) and put it on the controller board. In most cases, a door with a broken latch will still
hold the cable securely. This is also true for the wider connectors on the ends of the boards.
• The sharp sensors are still too long, even after I cut them down: A small number of keyboards have
very short black keys. It is possible to shorten the sharp sensors further by cutting some off of the
front of the sensor as well as the back. You will want to file down the corners after doing this so they
are still rounded to the touch. Please contact me if you think you are in this situation; I may have a
few ideas.
2
https://groups.google.com/forum/#!forum/touchkeys
23