1
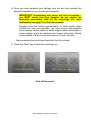
Standard Operating Procedure Equipment / Procedure: Biofuge Centrifuges Filename: 2013.1028SOP_biofuge_centrifuge Assessor’s name & date: Reviewer’s name & date: Review Date: Richard Metcalfe, September 2012 Rebecca Toone 28/10/13 28/10/15 2013.1028SOP_biofuge_centrifuges BIOFUGE Centrifuges This Standard Operating Procedure contains important safety and operating information concerning the BIOFUGE primo R centrifuge. For more detailed information please refer to the user manual. Safety Information: Ensure that you have had appropriate training and have read the relevant operator’s manual/s and any specific documentation prior to using the equipment or undertaking the following task. Location: The location of the centrifuge must meet the following criteria: 1. A safety zone of at least 30cm around the centrifuge must be maintained where hazardous materials may not be kept during centrifugation. 2. The substructure where the centrifuge is placed must be stable. 3. To ensure sufficient air circulation, a minimum distance from the wall of 10cm at the back and of 15cm on each side must be kept. 4. The centrifuge must be protected from heat and direct sunshine. 5. The location must be well ventilated at all times. Operation: 1. Turn on the mains switch on the back (bottom right hand corner) of the centrifuge to switch it on. The instrument will carry out an internal check of its software for the first 10 seconds; when ready to use the run time and speed will read 0 and the temperature of the unit will be displayed. 2. Open up the lid and check that the correct rotor is fitted and secured properly (see user manual for compatible types of rotor and how to fit them). 3. Close the lid by pressing down slightly on the front until you hear a small “click”. IMPORTANT: Try not to slam the lid shut! 4. Select the settings you want to use (gradient, speed, run time and temperature) by using the arrow keys located beside the display of each unit. Be sure that the correct unit of speed is selected (i.e., RPM or g). Please note that if you want to spin your samples at low or high temperatures the unit will take a while to cool down/warm up. 2013.1028SOP_biofuge_centrifuges 5. Once you have selected your settings and the unit has reached the desired temperature you can load your samples. IMPORTANT: Overloading may cause the rotor to explode – you MUST check that your samples do not exceed the maximum permissible load for the centrifuge. For more information see page 30 of the user manual. Samples must be loaded symmetrically. In other words, when loading the rotor only partially, you must ensure that opposite bores always receive tubes of equal weight (when centrifuging a single sample, place an identical tube loaded with water). Below are examples of how to load, and how not to load, the rotor. - Before starting the centrifuge check that the lid is closed. 6. Press the “Start” key to start the centrifuge run. Correct Loading Incorrect Loading End of Document 2013.1028SOP_biofuge_centrifuges