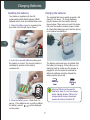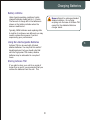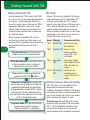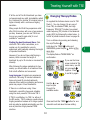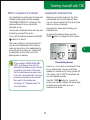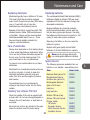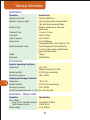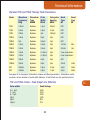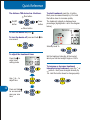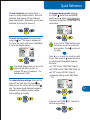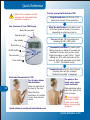
1
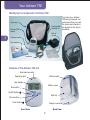
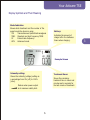
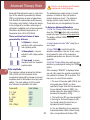
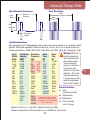
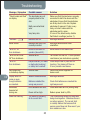
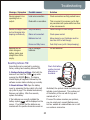
PO
TSE
WE
R
MO
DE
HR
MIN
Need Help?
If you need advice about any aspect of your
Acticare device please email us at:
UK and Europe
[email protected]
Australia and NZ
[email protected]
or consult our website www.acticare.com for
support telephone numbers.
Calls may be recorded
for quality control
purposes.
Key to Symbols used in this Manual
Contra-indications. These notes
describe situations where you should
not use Acticare TSE.
Warnings and Cautions. Make sure
you understand these before using
Acticare TSE.
Important Note. This symbol
appears next to key points of note.
Common problems are
listed in the
troubleshooting guide in
section 10.
R
O
0120
Acticare TSE is manufactured by:
Warranty information
Bioinduction Limited
178-180 Hotwell Road
Bristol BS8 4RP
United Kingdom
Bioinduction Ltd warrants Acticare TSE and its
fast charge cradle free from defects in
workmanship and materials for one year from
the date of invoice.
Tel:
Website:
Email:
Electrodes, batteries, carry cases, lead wires
and other accessories are warranted to be
free from defects in workmanship or materials
at the time of delivery.
+44 870 241 9071
www.acticare.com
[email protected]
Document REF: TU-00000 TSE Manual (5.0)
Part code: C00201
Year of manufacture: 2009
Acticare TSE and the Acticare logo are
registered trademarks of Bioinduction Ltd
The Acticare TSE device is protected by
patents and patents pending. This manual is
copyright © Bioinduction Limited 2004-2007.
Bioinduction Ltd will repair or replace, at its
discretion, any product found to be defective
within the warranty period.
This warranty does not apply to any product
which has been damaged due to misuse, or
that was repaired or altered other than by the
manufacturer.
Introduction
1
Important Information
2
Your Acticare TSE
3
Charging Batteries
4
Treating Yourself with TSE
5
Treating Yourself with TENS
6
Settings Menu
7
Maintenance and Care
8
Advanced Therapy Modes
9
Troubleshooting 10
Technical Information 11
Quick Reference 12
Introduction
About “TSE”, “TENS” and “RF”
Welcome to Acticare TSE!
1
Acticare TSE can deliver two different types of
electrotherapy called “TSE”, “TENS” and “RF”.
Congratulations, you have invested in an
Acticare TSE device to help manage your pain
without increasing your intake of drugs. If
you are eager to get started, you only need
follow the instructions on the enclosed “Quick
Start Guide”.
“TSE” stands for:
Transcutaneous (through the skin) Spinal
Electroanalgesia (electrical pain relief). TSE is
a unique and powerful form of electrotherapy
available only on Acticare devices.
Acticare TSE provides effective relief from
persistent pains anywhere on the body. In a
January 2005 study of 150 patients who used
Acticare TSE for a period of two months,
more than 3 out of 4 said that they had 50%
or more pain relief, despite an average
duration pain of 9 ½ years. In addition to
providing pain relief, TSE improves mood,
relieves stress and can aid natural sleep.
“TENS” stands for:
Transcutaneous (through the skin) Electrical
Nerve Stimulation. TENS is a commonly
available form of electrotherapy used widely
by physiotherapists and doctors. TENS
treatments normally produce a tingling
sensation and work by stimulating the
peripheral nerves.
TSE is an accumulative therapy and therefore
it is important that you treat yourself regularly
for at least a week, preferably two, before you
assess your level of relief. Although TSE may
reduce pain, in many cases it does not
completely eliminate pain.
"RF" stands for:
Radio-Frequency. This is a form of TSE where
the pulses are delivered in short bursts rather
than individually and is similar in concept to
pulsed radio frequency treatment used widely
in pain clinics.
Acticare TSE should only be used to treat
diagnosed pains. If you have any new
symptoms always consult your doctor. Also,
do not vary your intake of any prescribed
medication without consulting your doctor.
TSE is safe to use in the home, but should not
be used if you are epileptic, pregnant or have
a cardiac pacemaker.
Many people find that by using TSE they have
good relief from pain for the first time in
many years, which leads to a recovery of
mobility. If this is your experience, please
take care not to “overdo it” but instead ease
yourself gradually back into a more active
lifestyle.
1
1
Introduction
The History of TSE and Acticare
How Does TSE differ from TENS?
Electrical stimulation of the spinal cord for
pain relief dates back to 1967, when
electrodes were implanted in the spinal cord
to block the sensation of pain. This technique
is called Spinal Cord Stimulation (SCS). Spinal
Cord Stimulation is often effective against
longstanding pain, but has the disadvantage
that surgery is required to implant the
electrodes.
Transcutaneous Electrical Nerve Stimulation
(TENS) is a popular and successful treatment
for the relief of common aches and pains.
There are however a few limitations to its use.
Effectiveness may reduce over a period of
time and the period of post-stimulation relief
tends to be brief. Also, TENS electrodes must
be placed over the painful region and correct
placement often requires experimentation.
In 1991, inspired by the success of SCS, Drs
Alex Macdonald and Tim Coates discovered
Transcutaneous Spinal Electroanalgesia (TSE).
They were granted patents on the technology
in 1995 and 1997.
One benefit of TSE is that the electrode
locations are standardised. Two surface
electrodes are always placed over the spinal
cord wherever the painful regions are.
Because the spinal cord is the body's conduit
for pain signals, TSE can relieve multiple pains
in different parts of the body at once.
Furthermore, the effect of TSE tends to be
cumulative over time in about 50% of
patients.
TSE uses very short electrical pulses applied
to the spinal cord via the skin. These pulses
are only a few millionths of a second in
duration, but of relatively high voltage. The
pulses pass through the skin and tissues to
the spinal cord. They are too short to cause
any more than a very mild tingling sensation
in nerves under the skin, so the therapy is
well tolerated by most people.
In order to penetrate deep tissues, TSE pulses
are of higher voltage and higher power than
TENS. But because of their very short
duration, TSE pulses produce less stimulation
of the peripheral nerves and therefore little or
no tingling sensation which some patients find
uncomfortable.
TSE has been used as a form of electrical pain
relief since its discovery in 1991. No serious
side effect or interaction with medication has
been reported despite being used in over 100
NHS hospitals and by thousands of patients in
their homes.
The Acticare TSE device looks very similar in
size and shape to a regular TENS device, but
its size is deceptive: under typical treatment
conditions it delivers ten times the power.
TSE will work alongside drug therapy without
harmful interactions or side effects and is
complimentary to physiotherapy, osteopathy
and acupuncture. TSE has also been clinically
proven to improve mood and aid relaxation.
2
1
Important Information
Indications
Warnings
Acticare TSE is intended to be used for the
symptomatic relief of chronic pains of all
types, to help improve mood and aid natural
sleep.
Pregnancy The safety of using
electrotherapy at anytime during pregnancy
or birth has not been established.
Drowsiness This device can cause
drowsiness or light-headedness. During use,
or after use if feeling drowsy, never operate
potentially dangerous machinery such as
power tools, automobiles, etc.
Contraindications
2
Cardiac pacemakers Not to be used by
persons fitted with a cardiac pacemaker.
Epilepsy Not to be used by persons who
suffer from an epileptic condition.
Symptomatic treatment This device may
suppress sensations of pain that would
otherwise serve as a protection mechanism.
Transthoracic Stimulation (Chest) Do
not apply the electrodes across the chest. This
can cause electrical current to enter the chest
and may lead to irregularities in heart beat.
Keep out of reach of children This device
is not recommended for use on children
except under clinical guidance.
Cranial Stimulation (Head) Do not apply
the electrodes across the head.
Metallic Implants Consult a clinician before
using TSE if you have a metallic implant in
your spine or neck. Not recommended for
use by persons with metallic rods in the
spine, where these rods lie between electrode
locations.
Skin and vascular problems Do not apply
the electrodes over infected areas of skin, skin
eruptions, dermatological conditions, open
wounds or damaged or broken skin or on
areas of the body where there is a loss of
normal skin sensation.
Tumours Use only under the guidance of a
clinician.
Unknown Cause Do not use to relieve
undiagnosed pains, until cause has been
established by a clinician.
Neurological damage Use only under the
guidance of a clinician for persons with
neurological conditions such as MS, stroke
and cognitive defects.
Carotid Sinus (Neck Stimulation) Avoid
using any electrode placement that stimulates
the carotid sinus region at the front of the
neck. In rare cases, spasm of the laryngeal
and pharyngeal muscles may occur when the
electrodes are placed across the neck or
mouth. This may be strong enough to cut off
the airway causing breathing difficulty.
Electronic equipment Electronic
monitoring equipment such as cardiac alarms
may not function properly if used
simultaneously with this device.
External use Only for external use. Not for
internal use.
3
Important Information
Warnings
Adverse reactions
Spinal Cord Stimulators This device is not
recommended for use in persons with an
implanted spinal cord stimulator.
Skin irritation under electrodes This
usually resolves itself within a few days. A
hypo-allergenic electrode material is available
for sensitive skin.
High frequency Surgical Equipment
Simultaneous connection of a patient to high
frequency surgical equipment may cause
burns at the site of electrodes and possible
damage to the device.
Electrode reactions can arise from high
intensity stimulation or mono-phasic currents
that are available in advanced modes. Use
the default biphasic modes and/or reduce
stimulation level.
Microwave or Radio frequency sources
Operation close (less than 1m) to sources of
short-wave radio or microwave equipment is
not recommended.
Adverse reactions to electrotherapy are
rare but reported cases include the following:
general malaise, nausea, vomiting, dizziness,
fainting, migraine or headache, epileptic
seizure, eczema, tinnitus, numbness, loss of
muscle tone and balance, swelling or redness.
If affected, discontinue use and seek medical
advice.
Damage from liquids Do not allow Acticare
to come into contact with water or other
liquids. Do not use in the bathroom.
Flammable atmospheres Do not use this
device in the presence of flammable gases or
liquids, such as when refueling an automobile.
Limitation of Liability
To the maximum extent permitted by law, Bioinduction
Ltd, its subsidiaries, suppliers or resellers (collectively
"Bioinduction") accepts no liability for any damages
arising from the use of or inability to use the product
including but not limited to indirect, incidental or
consequential damages.
Connections Do not connect Acticare TSE to
anything other than the approved charger
cradle and electrode lead wires.
Uncomfortable stimulation Do not
operate at a level at which the stimulation is
uncomfortable; reduce the intensity to a
comfortable level.
In any event, Bioinduction's entire liability shall not
exceed the purchase price of the product, with the sole
exception of death or personal injury caused by the
negligence of Bioinduction but only to the extent that
applicable law prohibits the limitation of damages in such
cases. The purchaser indemnifies Bioinduction from all
claims arising from third parties.
No curative value This device is effective
for the treatment of chronic pain but has no
curative value.
Bioinduction will not be held liable for any loss resulting
from incorrect information provided by its personnel,
errors or omissions in this manual and other
documentation.
Long-term effects The long-term effects of
of electrical stimulation have not been
established.
By using the product the purchaser agrees to be bound
by these terms, otherwise purchasers should return the
product unused within 14 days of receipt requesting a
refund.
4
2
Your Acticare TSE
Identifying the components of Acticare TSE
Carry bag
Rechargeable
batteries x4
Acticare TSE
Device
3
To protect your Acticare
TSE during transport, we
recommend that you pack
the device and charger in
the pockets in the bag as
illustrated.
Pack of
4 pads
Charging cradle
User manual
Lead wire
Features of the Acticare TSE unit
Electrode connector
Battery catch
Operating light
User display
TSE MODE
POWER
Plus button
HR
Battery cover
MIN
On/Off button
Belt clip
Minus button
Timer button
Charger connector
Front View
Back View
5
Your Acticare TSE
Display Symbols and Their Meaning
Mode Indication
Shows which treatment and the number of the
preset mode the device is using:
TSE
Transcutaneous Spinal Electroanalgesia
TENS
Standard and high frequency TENS
RF
Pulsed radio-frequency
ADV
Advanced mode
IFRFTENSTSE MODE
ADV
0
POWER
HR
Battery:
Indicates the amount of
charge left in the batteries.
Scans when charging.
10
MIN
Example Screen
Intensity setting:
Treatment timer:
Shows the intensity (voltage) setting as
a percentage from 0% (off) to 100%
(max).
Shows the remaining
treatment time in hours and
minutes and in seconds for
the last minute of treatment.
Flashes when power output
is at maximum safety limit.
6
3
Charging Batteries
Charging the batteries
Installing the batteries
Your device is supplied with four AA
rechargeable Nickel Metal Hydride (NiMH)
batteries which must be installed before use.
The supplied fast charge cradle provides a full
charge in 2½ hours. To charge batteries,
plug the device into the charger stand as
shown below. Make sure you push the device
fully into the cradle to ensure proper contact.
An intermittent beeping means that the device
is not pushed completely in.
1. Open the battery cover by squeezing the
blue catch into the belt clip as shown.
4
2. Insert four new AA batteries making sure
the polarity is correct. The correct polarity is
indicated by symbols in the battery
compartment.
The battery symbol will scan to indicate that
the battery is charging. If the battery is not
charging check to make sure the charger is
plugged in and the socket is switched on.
When the batteries are fully charged the
battery symbol shows full.
Battery
Low
Battery
Full
Acticare TSE cannot be used for
treatment when it is on the charger
stand. Placing Acticare TSE on the
charger stand during a treatment
causes the device to switch off.
3. Close the battery cover. Check that it is
secure. If the batteries are correctly installed
the battery symbol
will be displayed
on the screen.
7
Charging Batteries
Battery Lifetime
Under typical operating conditions freshly
charged batteries should last for 1-2 hours.
The amount of charge left in the batteries is
shown on the battery indicator when the
device is switched on.
Never attempt to recharge standard
alkaline batteries. Do not plug
anything into the base of Acticare TSE
except for the dedicated Acticare
charger stand.
Typically, NiMH batteries need replacing after
6 months of continuous use although you may
need to replace them sooner if you are
experiencing poor performance.
Using Non-Rechargeable Batteries
4
Acticare TSE can be used with AA sized
alkaline batteries. You may find this useful if
travelling abroad, but you should note that
with the high power TSE modes, alkaline
batteries may be exhausted in a couple of
hours.
Storing Acticare TSE
If you plan to store your unit for a period of
longer than a month, we recommend that you
remove the batteries from the unit. This
8
Treating Yourself with TSE
Getting started with TSE
TSE modes
Getting started with TSE is easier than TENS
since there are only two electrode placements
to consider. Correct electrode placement is
one of the major reasons that users of TENS
experience difficulties in early use. To get
started, follow the steps summarised in the
flowchart below and described in detail over
the next few pages.
5
Acticare TSE has three standard TSE therapy
modes and two burst TSE modes called “RF”.
First time users should use TSE 1 therapy
mode for pain relief. Acticare TSE comes set in
TSE 1 mode as standard so you should not
need to change these settings on first use.
When the device is switched on the set mode
is displayed on the screen for one second (to
change TSE mode, see opposite).
While treating yourself with TSE, you can
continue to go about your daily routine, but
because TSE can sometimes cause drowsiness
we recommend that you do not drive if
affected.
Name Therapy
Recommended For
TSE 1
Normal TSE
All first time users,
all conditions.
TSE 2
Powerful TSE
Severe or longlasting conditions
where TSE 1 has
not helped.
TSE 3
Long pulse
TSE
Low mood, fatigue
and conditions where
TSE 1 & 2 have not
helped.
Plug the lead wire into the top of the
device and connect to two electrodes.
Stick the electrodes on your skin in one
of the two positions shown on page 12
depending on where your pain is.
RF 1/2 Burst mode
TSE
Turn on Acticare TSE by pressing and
releasing the ON / OFF
button.
Acute pain and
conditions where
regular TSE has not
helped.
Selecting treatment time and intensity
Commence treatment by pressing and
holding down the + button to increase the
treatment intensity until you feel a light
tingling sensation or reach 100%. Typical
settings are 50% with electrodes on the
neck and 100% with electrodes on the back
in TSE 1 (the default mode).
With TSE, there is no one treatment time
appropriate for everybody and every
condition. Because the effects of TSE tend to
accumulate over time, we recommended that
you use the therapy every day for two weeks
before assessing the degree of relief.
First time use: Start off with a 30 minute
treatment using the default TSE mode called
TSE 1. Set the treatment intensity so that
you feel a mild tingling at first, which will
usually dissipate as the treatment progresses.
Treatment ends when the timer finishes
counting down and the message
“Treatment Complete” is displayed.
9
Treating Yourself with TSE
If at the end of this first treatment you have
not experienced any relief, immediately restart
the treatment for another 30 minutes using a
higher intensity with a continuous tingling
sensation.
Changing Therapy Modes.
As supplied the Acticare device is set in TSE
Mode 1. You can change it to any one of
three TSE, six standard TENS, two High
Frequency TENS (HFT) modes, two pulsed
radio-frequency (RF) modes or the advanced
mode (ADV) by following the steps below. A
full list of preset modes is shown on page 26.
Many people find that they experience relief
after 30-60 minutes, with one or two sessions
per day. However, you can use TSE for as
long as you need to gain relief, it is not
possible to “overdose”.
Turn on Acticare by pressing and releasing
the on/off button
.
Hold down the TIMER
button and
momentarily press the plus
button at the
same time.
Finding the best treatment time: Pain
relief with TSE is often cumulative, so in
regular use it is possible for users to
experiment with gradually reducing the length
of repeated treatments.
The display flashes “MODE MENU” as
confirmation.
However, if you do not have relief during a
session, either increase the length of
treatment by up to 30 minutes or increase the
intensity.
IFRFTENSTSE MODE
ADV
0
POWER
HR
After following the above guidelines for two
weeks, you should settle on a treatment time
that is both effective and convenient.
Long term use: A typical user experiences
relief with TSE using 30 minute treatments.
Some only need 20 minute treatments,
whereas others with long-standing and severe
pains may require 3 hour treatments.
Use the
or
keys to cycle
through the
available modes.
If there is no relief even using 3 hour
treatments, repeat the two week schedule
using the more powerful TSE mode TSE 2.
If TSE 2 is ineffective, try TSE 3 or either of
the RF modes. TSE 3 produces a quite strong
tingling sensation because of its longer pulses
and may also be applied peripherally over the
area of pain like a high-powered TENS
machine.
10
MIN
If you see the timer
screen instead of the
mode menu, you did
not press
&
together. Press
to exit & try again.
IFRFTENSTSE MODE
ADV
0
POWER
HR
10
MIN
Press and hold the TIMER
button for one
second to exit and save the new setting.
10
5
Treating Yourself with TSE
STEP 1. Connect the electrodes and lead wire
Connect a pair of self-adhesive electrodes to
the device using the lead wire as described
below.
3. Connect the lead wire to the Acticare TSE
device. Note that the connector can only be
inserted into the device in one orientation. For
the right orientation, match up the key shape
of the connector with the key shaped hole in
the device.
1. Before connecting the lead wire for the first
time, pull the wires apart so that the
electrodes can be positioned someway apart
from one another. To do this, slide down the
clear plastic sheath on the lead wire and pull
apart the pins as shown in the picture.
5
3
4. When you are ready to begin treatment
peel the electrodes off the backing sheet
using the electrode material, not the lead
wire. Pulling on the lead wire can reduce the
lifetime of your electrodes.
1
2. Connect the metal pins to the electrodes
while they are still on the backing sheet.
4
2
Electrode life is considerably shortened by use on dirty or oily skin; it is best to clean
the electrode application area with soap and water, then rinse and thoroughly dry
before each session.
Do not use worn-out self-adhesive electrodes as this can cause weak stimulation and
skin irritation. With normal use (one treatment per day) electrodes begin to lose their
stickiness after one month. Replace with new electrodes when this occurs.
11
Treating Yourself with TSE
STEP 2. Place the electrodes on your skin
Place the electrodes in the locations described below depending on the site of your pain. For pains
in both areas of the body, alternate the electrode placements between treatments.
For all pains below the shoulders:
Spinal Placement. Place one electrode at the
base of the neck. Place the other electrode in
the middle of the lower back as shown. Make
sure that the electrodes are directly over the
spine. If you are using TSE 3 for low mood,
always use the spinal placement.
For pains in the head, neck, upper chest
and arms:
Neck Placement. For TSE 1 and 2 and RF modes
only, place electrodes either side of the neck as
shown. There should be a hands-width gap
between the electrodes. Remove any metallic
necklaces when using the neck placement.
Spinal
Placement
Neck
Placement
Alternate Neck
Placement
If you find the basic neck
placement uncomfortable,
try this alternate neck
placement with the pads
on the top of the
shoulders as shown.
Do not use neck placement at
intensity settings that cause
intense tingling sensations.
Peripheral electrode placement:
If you have a recent or acute injury, particularly if it is localized, you may find that you get best
results with the electrodes placed so that they span the painful area, rather than using the
standardized neck or back placements described above. For instance, if the pain is in your arm or
leg, place one electrode directly over the point of pain and the second electrode further up the limb
and on the other side, so that current flows through the tissues. Use the high power TSE2 or RF
modes, as they cause little or no sensation while blocking pain signals. If you are unsure about
where to place the pads you can also use TSE and RF modes with the pad placements indicated in
the TENS section on pages 16-18.
Never apply the electrodes across the head or chest, or to the front of the neck since
this can cause breathing difficulty if the stimulation is strong enough to cause muscle
contraction. Never use the Neck Placement with any TENS mode. Only use with TSE at
a level at which a tingling sensation is very mild or just perceptible.
12
5
Treating Yourself with TSE
STEP 3. Turn Acticare TSE on
If the POWER bar flashes, this indicates the
device is providing full current, which may
happen at less than 100% intensity if your
skin resistance is low. This is not a problem,
but there is no need to increase the intensity
level beyond this setting.
Once you have placed the electrodes in the
correct place you are now ready to turn
Acticare TSE on and begin treatment
6
Press and release the ON/OFF
button to
turn on the device. If using TSE for the first
time, we recommend TSE 1.
Most people do not feel any sensation with
TSE 2, so it is fine to increase the output level
to 100%. You are likely to feel a light tingling
sensation using TSE 1 and TSE 3.
Always check that the correct mode is
set when you switch on, this is
displayed at the top of the screen.
5
IFRFTENSTSE MODE
ADV
0
POWER
HR
If the sensation becomes uncomfortable, press
the – key until it is comfortable again.
10
MIN
Treatment mode
IFRFTENSTSE MODE
ADV
0
POWER
HR
STEP 4. Commence treatment
When prompted by the message “PRESS + TO
BEGIN TREATMENT”, press the plus + key to
increase the treatment intensity until you feel
a light tingling sensation or reach 100%.
Each press of the + key increases the
intensity by just 1%, holding the key down
causes the intensity to increase gradually
without the need for repeated presses.
Intensity Level %
10
MIN
Treatment Timer
Typical Running Screen
With TSE treatments, we recommend
that you set the intensity level to a
light tingling sensation or 100% if
there is no sensation.
Typical intensity settings are 50% with
electrodes on the neck and 100% with
electrodes on the back in the default mode,
TSE 1.
Caution. With TSE 1 and TSE 2
especially, the electrodes may get
warm and/or there may be some
reddening of the skin during
treatment. If this happens, check
that they are properly stuck to your
skin and reduce the intensity by
about 25%.
The orange light on the top of the unit will
turn on to show that the treatment has
begun. The last used treatment time (or
factory default of 30 mins) is also shown.
The intensity is displayed as a percentage
from 0-100% at the bottom left of the screen.
13
Treating Yourself with TSE
STEP 5. Completion of treatment
Adjusting the treatment timer
Whenever you start a treatment, the Timer
automatically uses the last treatment time.
You can however adjust the Timer at any time
before or during a treatment.
Your treatment has ended when the timer has
finished counting down and the message
“TREATMENT COMPLETE” is displayed. The
device will bleep to let you know when
treatment is over.
See page 9 for advice about deciding your
treatment time.
You can end a treatment before the timer has
finished by turning off the device.
To change the treatment timer, press the
TIMER
button to display the Timer screen.
To turn off the device hold down the ON/OFF
button for 1 second.
After every treatment, we recommend that
you return the electrodes to their backing
sheet and store them in the sealable bag to
prevent them from drying out. Always stick
the electrodes to the correct side of the
backing sheet as marked.
IFRFTENSTSE MODE
ADV
0
POWER
HR
10
MIN
Timer Setting Screen
If the message “CHECK LEADS AND
PADS” is displayed, check that the
electrodes and lead wires are correctly
connected to the device. Check also
that the electrodes are properly stuck
to the skin. Once electrodes have been
properly connected you can increase
the power to the desired level.
Press + or – to increase or decrease the timer
to your desired time. You can select times
between 10 minutes and 3 hours, or timer off.
If the timer is set to “OFF” the treatment will
run until stopped manually.
Press the TIMER
button for 1 second to
confirm your setting. Acticare TSE will go back
to the Running screen with your new
treatment time shown.
See section 10 “Troubleshooting” for
more information.
14
5
Treating Yourself with TENS
STEP 1. Select the TENS mode to use
To change between therapy modes:
Acticare TSE has eight different TENS therapy
modes as summarised in the table below. If
you are using TENS for the first time it is
recommended that you start with TENS1.
6
Follow the instructions on page 10.
Name
Type and Sensation Technical Description
Recommended For
TENS1
Constant tingling
100Hz, 50µS pulse width
Most types of chronic and
acute pain
TENS2
Constant pulsing
5Hz, 200µS pulse width
For chronic pains such as
back pain and arthritis.
Don't use on damaged muscles
TENS3
Burst mode “tapping”
100Hz, 100µS pulse width,
0.1 sec bursts five times
per second
For chronic pains such as
back pain and arthritis.
Don't use on damaged muscles
TENS4
Burst mode “gripping” 100Hz, 100µS pulse width,
0.5 sec bursts once per
second
For chronic pains such as
back pain and arthritis.
Don't use on damaged muscles
TENS5
Modulated fast wave
100Hz, 50µS pulse width,
3 sec modulation period
Most types of chronic and
acute pain
TENS6
Modulated slow wave
100Hz, 50µS pulse width,
6 sec modulation period
Most types of chronic and
acute pain
TENS7
High frequency
tingling
500Hz, 20µS pulse width
Severe acute and chronic
pains
TENS8
High frequency
tingling and pulsing
500Hz, 20µS pulse width
0.05 sec bursts ten times
per second
Severe acute and chronic
pains
The current therapy mode is
displayed at the top of the screen.
You should always check you are in
the desired mode prior to treatment.
15
IFRFTENSTSE MODE
ADV
0
POWER
HR
10
MIN
Treating Yourself with TENS
STEP 2. Setup your treatment
Follow the instructions for “Treating Yourself
with TSE” in section 5 with the following
exceptions:
4. Electrode Positioning
With TENS treatments it is important to place
the electrodes in the correct position
depending on where you are experiencing
pain. Choosing the correct electrode
positioning for TENS often requires
experimentation to get a good result and you
may require professional advice from your
doctor, physiotherapist or TENS nurse.
Otherwise refer to the maps on the following
pages as a starting point.
1. Treatment Time
There is no one TENS treatment time suitable
for everybody so it is recommended that your
first treatment time is kept short,
approximately 20 minutes. Once you become
familiar with your response to TENS try
increasing treatment periods up to 1 hour in
length.
Never apply the electrodes across
your head or chest when using TENS
stimulation.
2. Treatment Intensity
Unlike TSE treatments, TENS treatments can
produce a strong tingling sensation. When
setting up your TENS treatment, increase the
intensity until you feel a strong but
comfortable level of sensation. You may need
to increase the intensity during treatment to
maintain the same level of sensation as your
body becomes tolerant to the TENS
stimulation.
Electrode Placements for TENS
Lower Back Pain
Place electrodes either side of the spine
slightly above the position of the pain.
After TENS treatments you may feel a
tingling sensation or numbness around
the area of the electrodes. This is
normal.
3. Care of electrodes
Electrode life is considerably shortened by use
on dirty or oily skin; it is best to clean the
electrode application area with soap and
water, then rinse and thoroughly dry before
each session.
16
6
Treating Yourself with TENS
Electrode Placements for TENS (cont)
Hip Pain
Place electrodes so that the painful area is
between them.
Shoulder Pain
Apply electrodes to the front and back of the
painful shoulder.
Knee Pain
Place electrodes either side of the knee. For
best results avoid placing the electrodes on
the knee cap.
Neck Pain
Place electrodes on the back of the neck no
higher up than the nape of the neck.
6
Never place TENS electrodes on the
side or front of the neck.
17
Treating Yourself with TENS
Electrode Placements for TENS (cont)
Arthritis of fingers and hands
Place one electrode on the top of the hand
and the second close to your elbow on the
inside of the forearm.
Elbow Pain
Place electrodes either side of the elbow, one
slightly above and one slightly below the joint.
6
Menstrual Pain
Place the electrodes over the tummy area or
across the lower back.
Nausea and Travel Sickness
Place electrodes on the front and back of one
forearm just above the wrist.
18
Settings Menu
To enter the Settings menu:
Press + or – to set the value of the parameter
to your desired setting.
Hold down the TIMER
button and
momentarily press the minus – button at the
same time. The display flashes “SETT
MENU” for one second.
To exit Settings and save your changes:
Press and hold the TIMER
button for 1
second.
To make changes: Press the TIMER button
to advance through the options until the
parameter you want to change is displayed.
To exit Settings without saving: Press the
– and TIMER
buttons together.
The following parameters can be changed in the Settings Menu:
Parameter
Screen
Name
Valid
Options
Description
Language
L
English, French,
German
Allows selection of language for help messages.
Pad Detect
PAD
ON, OFF
Disables detection of disconnection of leads and
pads. This is useful for patients with hairy skin
who experience false disconnect messages.
Clock
CLK
ON, OFF
Controls time and date display when the
device is switched off.
7
Year
YEAR
2004 - 2034
Sets year.
Month
MONTH
Jan - Dec
Sets month.
Date
DATE
1 - 31
Sets day of month.
Hour
HOUR
0 - 23
Sets current time (hours).
Minute
MIN
0 - 59
Sets current time (minutes).
Pain diary
DIARY
ON, OFF
For clinician use. Allows level of relief to be
recorded using Visual Analogue Scale (VAS)
scoring which can be uploaded for analysis.
Consult www.acticare.com for details.
Serial port
COM
ON, OFF
For clinician use. Controls serial
communications port.
Buzzer
BUZ
ON, OFF
Controls buzzer, disables end of treatment
alarm.
19
Maintenance and Care
Replacing electrodes
Replacing batteries
Electrodes typically have a lifetime of 30 uses.
This means that they should be replaced
every month if used once per day. With heavy
use, or if used with oily or hairy skin,
electrodes may need replacing sooner.
The rechargeable Nickel Metal Hydride (NiMH)
batteries installed in Acticare TSE may need
replacement if the time between charges has
decreased considerably.
Because batteries are chemical products,
performance deteriorates not only with use
but also during prolonged storage. Normally,
the batteries will last around 6 months (or 250
cycles) if used under proper conditions.
Because of the higher current level with TSE,
standard carbon rubber TENS electrodes are
not suitable. Always use the recommended
electrodes available direct from us. These
have an integral metallic conductor for
superior current distribution.
Disposing of a battery in fire can cause the
battery to rupture.
Care of electrodes
Always store electrodes on their backing sheet
in their sealed bag between treatments. When
not in use do not leave electrodes exposed to
the air, even if on their backing sheet. This
may cause them to dry out prematurely.
To prevent cross contamination do not share
electrodes.
Replace with good quality AA size NiMH
batteries of at least 1600mA/hour capacity.
Never use the charger stand with
non-rechargeable batteries installed.
Spares Service
The following spares are available from our
helpline or our website: www.acticare.com.
Electrode life is considerably shortened by use
on dirty or oily skin; it is best to clean the
electrode application area with soap and
water, then rinse and thoroughly dry before
each session.
Dry electrodes may be re-moistened by
rubbing a few drops of water into the sticky
surface.
Cleaning Your Acticare TSE Unit
Clean the outside of the unit as required with
a damp cloth. Do not use strong detergents or
immerse the unit, lead wires, or electrodes in
any liquid.
Be careful not to force any liquid into the gaps
where the buttons meet the outer casing.
20
Item
Order Code
Electrode Pads (pack of 4)
C00207
Blue Electrode Pads for
sensitive skin (pack of 4)
C00220
Rechargeable batteries
(pack of 4 AA size)
C00200
Lead wire
C00206
Long lead wire
C00251
Acticare TSE carry bag
C00208
Acticare TSE user manual
C00201
Charger cradle:
UK Version
European Version
North American Version
Australian Version
A00007
A00008
A00009
A00010
8
Advanced
Warranty
Therapy
Information
Mode
Advanced Mode allows the user to control the
type of the waveform generated by Acticare
TSE by programming a series of parameters
that describe the wave shape and frequency.
This mode is very flexible, it allows the device
to be configured to provide a wide range of
stimulation modalities such as Neuromuscular
Stimulation and Electro-Acupuncture, at
frequencies from 1Hz to 500,000Hz.
There are three basic forms of wave
generated by Acticare:
Only for use by doctors and therapists
experienced in electrotherapy.
The instantaneous output charge in normal
operation is limited to 25µC per pulse to
prevent dangerous shock. The maximum
average current is also limited to 20mA.
These limits are not changeable by the user.
To Setup an Advanced Waveform
1. Enter the Therapy Mode menu by holding
down the TIMER
button and momentarily
pressing the plus + button at the same time.
The display will flash MODE MENU as
confirmation.
1. Biphasic a square
waveform with equal positive
and negative pulses
2. Select advanced mode “ADV” using the +
and – keys.
to scroll through the
3. Press TIMER
waveform parameters. Use the + and – keys
to set values for each of the parameters
(available parameters are shown in the table
opposite).
2. Monophasic a square
waveform with single positive
pulses
3. Twin peak a square
waveform with two repeated
positive peaks
9
4. Exit the Therapy Mode menu and save your
selection by pressing and holding the TIMER
button.
Pulse amplitude.
The maximum voltage produced by Acticare
TSE is 250V, but this is reduced as the
programmed pulse width increases to prevent
excessive levels of stimulation at longer pulse
widths. The peak voltage at 100% output
into 500ohms is indicated in the table.
Pulse width
Peak Voltage
0.5 - 2µS
3 - 5µS
6 - 10µS
20µS
50µS
100 - 200µS
250V
200V
160V
130V
90V
70V
If the message “INVALID” is displayed when
you exit, this means the waveform specified is
not possible for Acticare TSE to produce. This
may occur for one of three reasons:
i. The sum of the pulse width (PULS) and
inter-pulse space (SPAC) you have
specified is longer than the time available
at your desired frequency (FRQ). You
should reduce the pulse width (PULS) or
decrease the frequency (FRQ).
ii. The burst time (BT) you have specified
is too long for the burst frequency (BF).
You should reduce the burst time or
decrease the burst frequency.
21
iii. You are attempting to use waveform
frequencies below 100Hz in Burst mode,
this is not possible with Acticare TSE.
Advanced
Warranty
Therapy
Information
Mode
Basic Waveform Parameters
Pulse
Width
Burst Parameters
Waveform
Frequency
Burst
Time
Burst
Frequency
Pulse
Amplitude
Inter-pulse
Spacing
Available Parameters
Each parameter may be independently set to produce any desired waveform. For example a 50µS
Biphasic TENS pulse repeated at 250Hz with bursts of 1 sec on, and 1 sec off would require the
following parameters: MODE: BIPH, PULS: 50µS, SPAC: 0µS, FRQ: 250Hz, BT: 1000mS, BF: 0.5Hz.
Interpulse
Spacing
SPAC
0.0µS
0.5µS
1.0µS
1.5µS
2µS
3µS
4µS
5µS
6µS
8µS
10µS
20µS
50µS
100µS
200µS
1mS
2mS
Waveform
Burst
Burst
Frequency
Time
Freq
FRQ
BT
BF
1Hz
Off
0.25Hz
5Hz
10µS
0.5Hz
10Hz
20µS
1Hz
25Hz
1mS
2Hz
50Hz
2mS
5Hz
100Hz
5mS
10Hz
250Hz
10mS
20Hz
500Hz
20mS
50Hz
750Hz
50mS
100Hz
1kHz
100mS
250Hz
2.5kHz
250mS
500Hz
5kHz
500mS
1kHz
10kHz
1000mS
2kHz
20kHz
2000mS
50kHz
Device safety limit prevents
100kHz
continuous output at these
200kHz frequencies - use burst modes
with short bursts.
500kHz
Not valid in
burst modes
Pulse
Width
PULS
0.5µS
1.0µS
1.5µS
2µS
3µS
4µS
5µS
6µS
8µS
10µS
20µS
50µS
100µS
200µS
Warning. Only use
the Monophasic and
Twin Peak waveforms
with medical advice.
These waveforms
result in a net flow of
current from one
electrode to the other
electrode. The result
may be reddening or,
in severe cases, burns
under the electrodes
due to ionic transport.
Scientific Notation
Hz Hertz
(cycles per second)
µS Microseconds
mS Milliseconds
µC Micro coulombs
(unit of charge)
Waveform time in µS = 1,000,000 ÷ Waveform frequency (FRQ)
Waveform frequencies of 50Hz and below are not available for burst modes.
22
9
Troubleshooting
Message / Symptom
Possible causes
Solution
“Check Leads and Pads”
on display.
The electrodes are not
properly stuck to the
skin.
Make sure that the lead wire is properly
connected to both the device and the
electrodes. Ensure that the electrodes
are firmly stuck to the skin. Replace
electrodes if required. If skin is very
hairy, cut short underneath the
electrodes and try again.
If none of the above works, disable
Pad Detect in settings (section 7).
Badly connected lead
wire.
Very hairy skin.
10
“Low Batt”.
Batteries are flat.
Recharge batteries.
Blank screen.
Batteries are flat or not
correctly inserted.
Recharge batteries and check
orientation.
“Error 01- 02”
then shutdown.
Device is too warm to
operate (above 60C).
Allow device to cool before use.
“Error 03-04-05-0608” then shutdown.
Internal error.
Turn device off then on. If error persists
reset device (see instructions opposite).
“Error 07”
then shutdown.
Output shorted (i.e. leads
or electrodes touching)
or safety limit reached.
Check output lead or pads are not
touching. Turn device off then on.
If error persists reset device.
Non-responsive
or locked up display.
Internal fault.
Follow instructions opposite for
device reset.
Display does not
come on even
though batteries
are inserted.
Weak or dead batteries.
Recharge batteries.
Batteries installed the
wrong way around.
Check that batteries are inserted the
right way around.
Poor adhesion with skin.
Check electrodes are not peeling away.
Power set too high.
Reduce power level by 25%.
The device is operating
at its current limit.
This is sometimes caused by electrodes
being close together. Otherwise there is
no action required. The current limit
is a safety feature that ensures that
excess current does not flow even if your
skin resistance is low.
Electrodes
become hot
during use.
Power bar flashing.
23
Troubleshooting
Message / Symptom
Possible causes
Solution
Device appears to be
operating but no
output.
Lead wire connection.
Check connectors are fully pushed home.
Mode with no sensation.
This is normal, it is common not to feel
any sensation with pulse widths less than
a few microseconds.
Device in charger cradle
but not charging &/or
beeping continuously
Very low battery.
Leave overnight to slow charge.
Batteries do not
retain charge or
battery meter goes
straight from full to
empty.
Mains not connected.
Check power socket.
Batteries too hot.
Allow device to cool (batteries must be
less than 40C to fast charge).
Device not fully home.
Push fully home (until it stops beeping).
Old or damaged
batteries.
Fit new batteries.
Resetting Acticare TSE
Some faults may be resolved by restoring
factory settings and resetting Acticare TSE.
Check that battery
positive terminal
alternates as
illustrated
1. Restore factory settings. Start with the
device off and hold the TIMER
key while
pressing the ON/OFF
key. The device
should display all segments followed by the
software revision before starting up normally.
10
2. Reset Acticare TSE. Open the battery
cover by squeezing the blue catch in the belt
clip (refer to page 7 for detailed instructions).
Remove one battery. After five seconds,
replace the battery.
illustrated; the symbols inside the battery case
indicate correct placement. The positive end
of the battery is the one with the pip and
marked with a “+”.
If the batteries are correctly installed the
battery symbol
will be displayed on the
screen. If not check that the batteries are
inserted with the positive terminals correct as
If none of the above resolves your problem,
you can email us at: [email protected],
visit our website at: www.acticare.com or call
our customer service line.
24
Technical Information
Specifications
Parameter
Average current limit
Maximum charge per pulse
Waveform type
Treatment Timer
Pulse width
Output frequency
Power source
Electrical protection rating
Weight
Dimensions
Specification
20mA @ 250VDC bus
25µC per pulse under normal operation
75µC with single component failure
Biphasic, monophasic or twin peak
square wave
10 mins to 3 hours
0.5µS to 100µS
1Hz to 500kHz
Four AA batteries
(rechargeable NiMH 1.2V or alkaline 1.5V)
Type BF equipment. Do not attempt to
connect to mains power except through
approved charger stand.
235gms
100x72x38mm
Environmental
Ambient Operating Conditions:
Temperature
11
Relative humidity
Atmospheric pressure
Shipping and Storage Conditions:
Temperature
Relative humidity
Atmospheric pressure
All electrical specifications are +/- 10%
10C to 50C
(battery charging 10C to 40C)
30-75% (non-condensing)
0.86-1.06 hPa
-40C to 70C
10-100% (non-condensing)
0.50-1.06 hPa
into a 500 ohm load
Specification - Charger Cradle
Parameter
Input voltage
Europe / UK / Australian Versions
North American Version
Output voltage
Specification
230-240VAC 50-60Hz
115VAC 60Hz
6V @ 1000mA
25
Technical Information
Standard TSE and TENS Therapy Mode Parameters
Mode
Waveform
Frequency
FRQ
Waveform
Type
WAVE
Pulse
Width
PULS
Interpulse
Spacing
SPAC
Burst
Time
BT
TSE1
2.5kHz
Biphasic
1.5µS
200µS
OFF
TSE2
10kHz
Biphasic
0.5µS
0.5µS
OFF
TSE3
250Hz
Biphasic
4µS
2000µS
OFF
TENS1
100Hz
Biphasic
50µS
0µS
OFF
Burst
Freq
BF
TENS2
5Hz
Biphasic
200µS
0µS
OFF
TENS3
100Hz
Biphasic
100µS
0µS
100mS
5Hz
TENS4
100Hz
Biphasic
100µS
0µS
500mS
1Hz
TENS5
100Hz
Biphasic
10-50µS
0µS
3 sec modulation
TENS6
100Hz
Biphasic
10-50µS
0µS
6 sec modulation
TENS7
500Hz
Biphasic
20µS
0µS
OFF
TENS8
500Hz
Biphasic
20µS
0µS
50mS
10Hz
RF1
500kHz
Biphasic
0.5µS
0.5µS
20µS
1kHz
RF2
250kHz
Biphasic
0.5µS
1.5µS
20µS
2kHz
See page 22 for diagrams of Waveform shapes and Burst parameters. Modulation modes
produce a linear variation of pulse width between 10 and 50µS over the specified period.
TSE and TENS modes - Peak Output into 500ohms
Pulse width
Peak Voltage
0.5 - 2µS
3 - 5µS
6 - 10µS
20µS
50µS
100µS
250V
200V
160V
130V
90V
70V
26
11
Quick Reference
The Acticare TSE device has 4 buttons.
Plus button
Timer
button
On/Off
button
To start treatment press the
button.
Each press increases intensity by 1%. Hold
the button down to increase quickly.
The treatment intensity is displayed as a
percentage (highlighted in red in the diagram
below).
Minus button
To turn the device on press
.
To turn the device off press and hold
one second.
for
IFRFTENSTSE MODE
ADV
0
POWER
HR
10
MIN
Intensity Level %
To adjust the treatment timer
Press the
to
enter timer
setting mode
IFRFTENSTSE MODE
ADV
0
POWER
HR
10
MIN
Set the treatment intensity at the level at
which you first feel a slight tingle or 100%.
To increase or decrease treatment
intensity during treatment, press the
or
buttons. Each press changes intensity by
1%. Hold the button down to change quickly.
Use
&
to
adjust time
12
Press and hold
for one second to
save your new
time.
Quick Reference
To stop treatment press and hold the
button to quickly reduce intensity. When the
treatment level reaches 0% the treatment
stops automatically. Alternately, you can stop
treatment by turning the device off.
To change therapy mode hold down
the TIMER
button and momentarily
press the plus
button at the same time.
The display should flash “MODE MENU” as
confirmation.
IFRFTENSTSE MODE
ADV
0
POWER
HR
To check therapy mode turn the device on
using the
key. The mode is displayed at
the top of the screen at all times (highlighted
in red in the diagram below).
IFRFTENSTSE MODE
ADV
0
POWER
HR
10
MIN
You should always check you are in the
desired mode when you turn on
Acticare TSE prior to treatment. The
default mode is TSE1.
To restore factory settings. Start with the
device off and hold down the timer
key
while you turn the unit on with the on/off
key. The device should display all segments
followed by the software revision number
before starting up normally.
10
MIN
If you see the TIMER setting screen
this means you did not press both
keys together. Press
to exit and
try again.
Press
or
to select the mode you wish
to use. Each press of
causes the menu
to cycle through the available modes in
this order:
3 “TSE” modes: TSE1-TSE3 (Page 9)
8 “TENS” modes: TEN1-TEN8 (Page 15)
2 “RF” modes: RF1-RF2 (Page 9)
Advanced settings mode: ADV (Page
21).
IFRFTENSTSE MODE
ADV
0
POWER
HR
10
MIN
12
Press and hold TIMER
exit and save settings.
for 1 second to
Quick Reference
Before first use please read the
warnings and contraindications
contained in section 2.
Key Features of Your TSE Device
To treat yourself with Acticare TSE:
Plug the lead wire into the top of the
device and connect to two electrodes.
Stick the electrodes on your skin in one
of the two positions shown in the photos
depending on where your pain is.
Electrode connector
Operating light
Turn on Acticare TSE by pressing and
releasing the ON / OFF button.
User display
TSE MODE
Plus button
POWER
HR
MIN
Commence treatment by pressing and
holding down the + button to increase the
treatment intensity until you feel a light
tingling sensation or reach 100%. Typical
settings are 50% with electrodes on the
neck and 100% with electrodes on the back
in TSE 1 (the default mode).
On/Off button
Minus button
Timer button
Treatment ends when the timer finishes
counting down and the message
“Treatment Complete” is displayed.
Electrode Placements for TSE
For all pains below
the shoulders:
12
Place one electrode at
the base of the neck.
Place the other
electrode in the middle
of your lower back as
shown.
For pains in the
head, neck, upper
chest and arms:
Place electrodes either
side of the back of the
neck as shown.
Do not use this
placement in TENS
mode or any mode
with a strong tingling
sensation.
Quick reference continued inside back cover
www.acticare.com