1
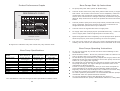
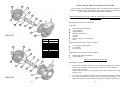
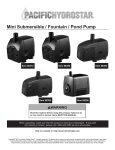
Operations Manual
and
Seal Kit Replacement Guide
MANUFACTURED BY COLUSSI ENGINEERING PTY. LTD.
TELEPHONE: (02) 9817 5433 FAX: (02) 9879 6753
53 College street, Gladesville, NSW 2111, Australia
www.novapumps.com.au
Warranty Details
Safety Information
Record the details of your Nova Pump and the supplying Dealer for future
reference when discussing service, ordering parts or making a warranty
claim.
Before operating the unit read the following safety instructions.
Failure to comply with these warnings may result in serious injury or death.
For specific Safety Information relating to the attached engine or motor
ensure you read and understand the manual and instructions supplied by the
engine or motor manufacturer.
DANGER:
DO NOT pump flammable or explosive fluids such as gasoline, fuel,
oil, kerosene etc.
DO NOT use in explosive atmospheres.
The pump should be used only with liquids compatible with the pump
component materials.
Pump Model
NPP
SPP
Never allow an inadequately trained person to operate the unit.
SPE
Ensure the unit is not operated in a confined space. It must be used
in an area with adequate ventilation.
Pump Serial No.
Engine Model No.
(if fitted)
Engine Serial No.
(if fitted)
Before the use of any chemicals refer to the chemical manufacturers
label and safety instructions for safe handling procedures and correct
method of use. Always use the recommended personal protective
clothing and safety equipment.
Check hoses for weak or worn condition before each use and ensure
all connections are tight and secure.
Supplying Dealer
Before servicing, drain all liquids from the system and flush.
Address
Telephone No.
Date of Purchase
When using the electric model the following fundamental rules apply:
QUALITY
CHECK
- Regularly check the switch and hosing for any cracks that may allow
the entry of water.
- Any extension lead used must be rated at 15 amp or greater and not
coiled during use.
- Never use the machine with wet hands or feet
- Switch the machine off and disconnect the plug prior to undertaking
any maintenance operations.
01
Warranty Terms
Product Information
All our pumps are covered against manufacturing defects by a 24 month,
non-transferable warranty.
The Nova Pump is an Australian made, high pressure, spray pump. Built to
withstand harsh and aggressive chemicals it is extremely reliable in a
demanding environment.
The warranty of engines on all engine-driven equipment and electric motors
on electric pumps remains the responsibility of the engine/motor
manufacturer respectively. This is subject to the particular terms and
conditions set by each manufacturer.
The warranty period commences on the date the equipment is purchased. To
validate warranty claims, evidence of this date of purchase will be required.
Nova Pumps undertakes to repair free of charge those parts showing
manufacturing defects within the warranty period. Defects not clearly
attributable to materials or manufacture will be examined by Nova Pumps
and charges may be applicable depending on the results of the
examination.
It is the user’s responsibility to verify that the chemicals used are
compatible with the pump. Users should contact Nova Pumps if in doubt.
With decades of experience the Nova Pump is a hard working, durable pump
that provides consistent performance day after day, spray after spray.
Manufactured from high quality bronze, the Nova Pumps compact and
simple design ensures a safe delivery of a wide range of chemicals through
its impeller pump system.
The robust and hardwearing construction means your Nova Pump’s total
lifetime cost of ownership is very low and delivers you excellent value for
money.
Nova Pumps are widely used in the pest control, weed control, horticultural
and agricultural industries for the purposes of spot spraying, continuous
spraying and flooding.
This warranty is subject to compliance with the directions and guidelines of
use and installation as set out in the User Manual. This warranty does not
cover:
- Freight damage
- Normal wear and tear (including seals)
- Damage caused by misapplication, negligence or alterations
- Damage caused by misuse, neglect or inadequate maintenance
- Damage caused when the unit has been allowed to run dry
- Damage caused by freezing liquids
- Damage caused by abrasives in pumped liquids
- Repairs which affect the performance or reliability of the pump
Nova Pumps are used for small and medium applications whenever there is
a need to spray harsh or aggressive chemicals in a controlled manner.
All service under this warranty takes place at the Nova Pumps
manufacturing facility. The fee involved in transporting the unit to and from
the manufacturer will be done at the customer's expense.
The Nova SP Electric (Self Prime) is powered by a Teco 240V electric motor
and delivers industrial strength performance with low maintenance and
“whisper” quiet operation.
The Nova NP Petrol (Non Prime) coupled to the Honda GX160 5.5hp engine
delivers a premium spraying performance and has the highest volume in the
Nova range.
The Nova SP Petrol (Self Prime) coupled to the Honda GX120 4.0 hp engine
provides a heavy duty output and has the benefit of easy on-going
operation.
THIS WARRANTY IS THE ONLY WARRANTY APPLICABLE TO COLUSSI
ENGINEERNG PTY LTD NEW PRODUCTS AND, TO THE MAXIMUM EXTENT
PERMITTED BY LAW, IS EXPRESSLY IN LIEU OF ANY OTHER WARRANTIES
EXPRESSED OR IMPLIED, INCLUDING ANY IMPLIED WARRANTY OF
MERCHANTABILITY OR FITNESS FOR A PARTICULAR PURPOSE.
COLUSSI ENGINEERING PTY LTD DOES NOT AUTHORISE ANY PERSON TO
CREATE FOR IT ANY OTHER OBLIGATION OR LIABILITY IN CONNECTION WITH
THESE PRODUCTS.
COLUSSI ENGINEERING PTY LTD SHALL NOT BE LIABLE FOR INCIDENTAL OR
CONSEQUENTIAL DAMAGES RESULTING FROM A PRODUCT PERFORMING IN
BREACH OF THIS WRITTEN WARRANTY.
02
03
Product Performance Graphs
Nova Pumps Start Up Instructions
1.
Fill pump body with water (Nova SP Models Only).
2.
Connect suction hose from pump inlet (marked with arrow) to supply
tank outlet. The suction hose must be of non-collapsible, reinforced
construction with a minimum inside diameter of 19mm. Ensure all
suction hose connections are airtight otherwise performance may be
affected. Keep suction hose as short as possible and avoid unnecessary
bends.
NP Petrol
3.
Connect pressure spray hose from pump outlet (marked with arrow) to
spray equipment. Ensure all pressure spray hose connections are
airtight otherwise performance may be affected.
SP Petrol
4.
Connect hose from bypass ball valve to supply tank.
5.
Fill supply tank with spraying liquid. (Nova NP Model only - ensure fluid
level in supply tank is above highest point of suction hose).
6.
Open the bypass ball valve completely, run the pump at slow speed and
allow the pump to prime itself (removing air from the system).
7.
The unit is now ready for on-going use. Set the bypass ball valve open
halfway, this will ensure the mechanical seal is lubricated at all times.
PERFORMANCE CURVE
Kilopascales
1500
1000
SP Electric
500
0
20
10
30
40
50
Litres per minute
Performance at pump
All figures are indicative only and results may vary between units.
Nova Pumps Operating Instructions
Nova Pump Specifications
Model
Nova NP Petrol
Nova SP Petrol
Nova SP Electric
Engine Type
Honda GX 160
5.5hp Petrol
20mm (3/4”)
12.5mm (1/2”)
46 lpm
1350 kPA
20.5 kgs
340 mm
340 mm
385 mm
Honda GX 120
4.0hp Petrol
20mm (3/4”)
12.5mm (1/2”)
35 lpm
1150 kPA
18.5 kgs
320 mm
330 mm
340 mm
Teco 240V
750 Watts Electric
20mm (3/4”)
12.5mm (1/2”)
30 lpm
750 kPA
20 kgs
285 mm
360 mm
245 mm
Inlet Hose
Outlet Hose
Max Flow Rate
Max Pressure
Dry Weight
Height
Length
Width
lpm - litres per minute, kPA - kilopascals, kgs - kilograms, mm - millimetres
The manufacturer reserves the right to alter specifications without notice.
04
Do not run the pump dry as this will cause serious damage to the
mechanical seals.
Nova SP Electric Model - Ensure any extension leads are rated at 15
amp or greater and are not coiled during use.
Do not allow foreign materials to be pumped such as grit, sand or other
abrasives as this will cause premature wear of the pump. Check the
bottom of your supply tank regularly.
For infrequent use and before long periods of storage, flush and drain
the pump thoroughly. For engine storage instructions refer to the
manufacturers Owners Manual.
If frost or freezing conditions are likely to occur drain all liquids to
prevent damage from freezing liquid expanding within the pump.
Regularly check the pump drainage hole, located on the motor flange,
for leaks and replace the mechanical seals if necessary.
To ensure optimum performance it is recommended that the pump's
mechanical seals are replaced between seasons.
To prevent deposits forming and damaging the pump it is
recommended that the pump is flushed and cleaned on a daily basis.
05
Nova Pumps Seal Kit Replacement Guide
12
14
11
It is strongly recommended that the tank is emptied and the pump is
flushed with water before dismantling. For safety reasons gloves must be
worn during the seal kit replacement procedure.
9
7
Before dismantling the pump, mark all components in their fitted positions
for reassembly.
5
13
3
Recommended tools and equipment
10
8
6
All models
4
Adjustable wrench spanner
7/16” spanner
10mm spanner
Flathead screwdriver
Hammer
Grease
Wet and dry fine emery paper
Cloth
2
NOVA SP
1
14
POSITION
NUMBER
1
2
3
4
5
6
7
8
9
10
11
12
13
14
12
11
9
7
5
13
DESCRIPTION
Pump Body - Bronze
Impeller - Bronze
Shim - Brass
Spring - S/Steel
O-ring - Viton
Seal - Carbon
Washer - Ceramic/SiC
Boot - Viton
Shaft Sleeve - S/Steel
O-ring - Nitrile
Motor Flange - Bronze
Screws - Steel
Screws - Steel
Washer - Teflon
Additional tools for petrol engine models
13/16” spark plug spanner
spanner
Pipe wrench
1/2”
Additional tools for electric motor models
Phillips/star head screwdriver
13mm spanner
Steps for replacement of seal kit
3
Dismantling of pump
10
8
1.
Petrol engine models - using the 13/16” spark plug spanner, remove the
spark plug. Using the 10mm spanner, remove the recoil starter to
expose the recoil hub.
Electric motor models - use the Phillips/star head screwdriver to remove
the fan cover.
2.
Using the 7/16” spanner, remove the four pump body screws (position
12). Using the hammer from behind the pump body (position 1), tap
loose and remove the pump body exposing the impeller (position 2).
6
4
2
NOVA NP
1
06
07
3.
Petrol engine models - use the pipe wrench to secure the recoil hub,
taking care not to damage the recoil hub.
Electric motor models - use the 10mm spanner to secure the rear of the
shaft.
4.
Using the adjustable wrench spanner on the hex nut of the impeller,
turn the impeller anti-clockwise then remove it from the shaft. Remove
any shim or shims (position 3) fitted between the shaft and the impeller
and retain for reassembly.
5.
Petrol engine models - use the 1/2” spanner. Electric motor models - use
the 13mm spanner. Remove the four motor flange screws (position 13).
Using the Flathead Screwdriver gently remove the motor flange
(position 11) from the motor. For Nova NP models remove any shim or
shims fitted between the motor flange and the motor and retain for
reassembly.
6.
7.
Place the motor flange, impeller side down, on a bench. Place the spark
plug spanner or a screwdriver in the central hole against the rear of the
Viton boot (position 8) and tap gently with a hammer to remove both
the Viton boot and the Ceramic/SiC washer (position 7). Remove and
discard all seal components.
Use a cloth to thoroughly clean all pump components. Use wet and dry
emery paper to polish the motor flange bore and then lubricate with
grease.
Reassembly of pump and new seal components
8.
Place the motor flange, impeller side up, on a bench. Place the
Ceramic/SiC washer with the Viton boot, polished side facing up, in the
motor flange bore and push firmly into position against the shoulder.
Use a cloth to remove any excess grease from the bore and Ceramic/SiC
washer.
9.
Use a cloth and wet and dry emery paper to clean and polish the motor
shaft.
12. Place the Viton O-ring (position 5) on the motor shaft behind the
Carbon seal and push the O-ring into the recess of the Carbon seal
taking care not to damage the O-ring.
13. Replace the shim or shims removed during step 4 on the motor shaft.
14. Ensure the spring (position 4) is fitted to the impeller with the spring
locater in position in the impeller locating hole.
15. Petrol engine models - use the pipe wrench to secure the recoil hub,
taking care not to damage the recoil hub.
Electric motor models - use the 10mm spanner to secure the rear of the
shaft.
16. Place the impeller on the shaft. Using the adjustable wrench spanner on
the hex nut of the impeller, turn the impeller clockwise and tighten
firmly. The impeller should just touch the motor flange and rotate freely
when turned.
17. Place the Nitrile O-ring (position 10) around the motor flange.
18. Replace the pump body in its original position on the motor flange and
replace and tighten the pump body screws. For Nova NP models the
motor flange bridge must align with the pump body bridge.
19. Petrol engine models - replace the spark plug and recoil starter.
Electric motor models - replace the fan cover.
20. The Nova Pump is now ready for use. Refer to the Nova Pumps Start Up
Instructions before operation.
10. Place motor flange against the motor in its original position with the
drain hole pointing in a downward direction, do not dislodge the
Ceramic/SiC washer and Viton boot from their positions. Replace any
shim or shims between the motor and the motor flange. Replace the
screws connecting the motor flange to the motor and tighten evenly.
11. Ensure surfaces of the Carbon seal (position 6) and the Ceramic/SiC
washer are clean and free of foreign materials. With the polished surf
ace facing inwards, place the Carbon seal on the motor shaft and push
into position against the Ceramic/SiC washer.
08
09
Trouble Shooting Guide
Problem
Cause
Pump
Leaking
Mechanical seal failure
Fittings
Leaking
Solution
Pump body cracked
Replace mechanical seal - see Seal
Kit Instructions
Refer to dealer
Loose or broken fittings
Remove and reseal or replace fittings
No or Low Suction hose clogged
Output
or improper size
Suction hose collapsed
Air leak from inlet
plumbing
Pump not primed
Clear obstruction from suction hose
or replace with correct hose size
Replace suction hose
Check hoses and connections are
airtight, replace if necessary
Prime pump - see Start up
Instructions
Pump ports blocked
Clear obstruction from pump ports
Output hose or fittings
Clear obstruction from output hose
blocked
or fittings
Output hose collapsed
Replace output hose
Output hose or fittings
Check and reseal or replace output
leaking
hose or fittings
Worn pump components Replace pump - refer to dealer
Impellor not rotating
Refer to dealer
Low engine performance Refer to Engine Manufacturers
Owners Manual.
www.novapumps.com.au