1
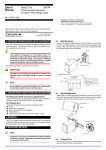
1. MOUNTING METHOD
2. INSTALLATION LOCATIONS
● Avoid the following environments for installation locations:
Areas with vibration, corrosive gases, dust, water, oil, solvents, direct sunlight, radiation, a strong electric field, and/or a strong
magnetic field
Installation altitude: 2000 m or less above sea level.
● If there is any risk of a surge being induced into the power line
and/or signal lines due to lightning or other factors, a dedicated
lightning arrester should be used as protection for both this converter and a field-installed device.
● Operating temperature/humidity range: 0 to 50C/5 to 90%RH (no
condensation)
NOTE
Plug/disconnect the main unit into/from the socket
vertically to the socket face. Otherwise the terminals may
bend and it may cause bad contact.
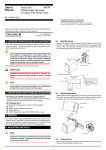
1.1
Wall Mounting
Unfasten the upper and lower stoppers of the converter to disconnect
the main unit from the socket. Next, anchor the socket onto the wall
with two M4 screws. Then, plug the main unit into the socket and secure the main unit with the upper and lower stoppers.
3. EXTERNAL WIRING
Stopper
WARNING
To avoid the risk of an electric shock, turn off the power
supply and use a tester or similar device to ensure that no
power is supplied to a cable to be connected, before carring
out wiring work.
Main unit
Socket
Mounting
screws
[Mounting Dimensions]
Pitch: 56 or more
Unit: mm
Input
Note:
• When mounting the units
close together, leave a space
of at least 5 mm between
them.
• Use the supplied spacer to
keep a space of 5 mm for
DIN rail mounting.
5 or more
Socket
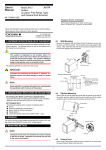
Wires are connected to the terminals of the converter’s socket. M3.5
screw terminals are provided for the connection of external signals. Attach a crimp-on lug to each wire for connection to the terminals.
● Recommended cables: A nominal cross-sectional area of 0.5 mm2
or thicker for signal cables, and that of 1.25 mm2 or thicker for
power cables.
(85)
2-4.5 or 2-M4
100%
GND
L+
400.2
(51)
1.2
N−
0%
6
7
3
4
5
Output
8
1 +
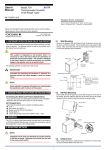
DIN Rail Mounting
2
Locate the converter so that the DIN rail fits into the upper part of the
DIN-rail groove at the rear of the socket, and fasten the socket using
the slide lock at the lower part of the socket.
−
IMPORTANT
● The power line and input/output signal lines should be
installed away from noise-generating sources. Other
wise accuracy cannot be guaranteed.
● The grounding resistance must be 100 Ω (JIS Class D
grounding). The length and thickness of the grounding
cable should be as short and thick as possible. Directly
connect the lead from the ground terminal (terminal no.
6) of the product to the ground. Do not carry out daisychained inter-ground terminal wiring.
● Use of the product ignoring the specifications may
cause overheating or damage. Before turning on the
power, ensure the following:
(a) Power supply voltage and input signal value applied
to the product should meet the required
specifications.
(b) The external wiring to the terminals and wiring to
ground are as specifications.
● Do not operate the product in the presence of
flammable or explosive gases or vapors. To do so is
highly dangerous.
● The product is sensitive to static electricity; exercise
care in operating it. Before you operate the product,
touch a nearby metal part to discharge static electricity.
Fit into here
DIN rail
Push
DIN rail
Spacer
(Rear of the socket)
Slide lock
1.3
CENTER
Power Supply
Using Ducts
Wiring ducts should be installed at leaset 30 mm away from the top or
bottom of the main unit.
NOTE
Be sure to set the input range before using the product (see
Chapters 4 and 5 in this manual).
2
IM 77J04S05-01E
1st Edition
Jul 29, 2005-00