1
R-50 Installation Instructions
❸
R-50 Instrucciones para la Instalación
❸
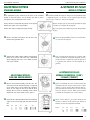
When returning the internal assembly to the case,
ensure that you align the double ribs on the outside
of the case with the larger opening on the top of the
drive housing.
Para reinstalar el ensamblaje interno al casco,
asegúrese de alinear la doble marca en el interior
del casco del aspersor con la ranura ancha en la
parte superior del casco blanco.
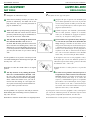
In some low pressure applications, you may be able to
increase rotation speed by setting the bypass position
one less than the nozzle size.
En algunas instalaciones con situaciones de baja presión, es posible aumentar la velocidad con que rota el
aspersor fijando el ajustador de flujo en un número
menos que el tamaño de la boquilla.
Ex: For a 3.0 nozzle at 25 PSI set the bypass to 2.0 setting if you are experiencing slow rotation.
Ej: Para una boquilla de 3 galones con una presión de
25 libras, fije el ajustador de flujo en 2.0 si la rotación
del aspersor es lenta.
12
CAMBIO DE LA BOQUILLA
“QUICK CHANGE” NOZZLES
Para cambiar la boquilla del R-50, siga estos pasos:
To change the nozzle follow these steps:
❶
❷
❸
❹
❺
❻
❼
❶
The first step on nozzle changing is to reset the
adjustable bypass setting as previously discussed
to the size of the nozzle you are inserting.
❷
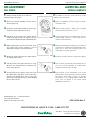
To lift the riser stem place a small, flathead screwdriver in the slot on either side of the top and pull
up on the screwdriver, as indicated in illustrations
#13 & 14.
13
❸
Once you have lifted the riser up, grasp at the
base to hold it up.
❹
Use a regular flathead screwdriver to pop the
nozzle retainer out as pictured in illustrations
#15, 16, & 17
14
El primer paso para cambiar la boquilla es alinear
el ajustador de flujo con el tamaño de la nueva
boquilla, como se decribió anteriormente.
Para levantar el elevador inserte un pequeño
destornillador plano en la tapa y levántela como se
indica en las ilustraciones #13 y 14.
Una vez levantada, sosténgalo en la base para
evitar que se retracte.
Use un destornillador pequeño para quitar el
retenedor de la boquilla como se indica en las ilustraciones #15, 16 & 17.
❺
Insert the screwdriver into
the cavity where the retainer was, position the screw
driver in the slot on the top
of the nozzle and push it out.
Align the new nozzle with
the open cavity making sure
it is properly positioned.
The lip of the nozzle goes
on the top.
15
16
❻
Inserte la nueva boquilla en
el hueco con la ranura hacia
arriba.
❼
Instale un retenedor nuevo
que coincide en color y
tamaño con la nueva boquilla. No reuse el viejo.
17
Snap a new color coded
retainer in place to secure
the nozzle. Do not reuse the
old retainer.
18
19
4
Inserte el destornillador en la
cavidad donde estaba el
retenedor, coloque el destornillador sobre la ranura
de la boquilla y empújela
hacia afuera.