1
NEW
recumbenttechnology
Operating Manual and
Service Instructions
January 2008
2008
HP
Velotechnik
Table of Contents
General safety instructions
Maintenance and care
Intended use – 3
The first miles – 3
Legal requirements – 3
Load capacity – 4
Carrying luggage – 4
Transport in the car – 5
Do not take kids with you – 5
Trailers – 5
Added parts and accessories – 5
Fairings – 5
Replacement of parts – 6
No alteration of parts – 6
Final assembly – 6
Screws and bolts – 6
Quick Releases – 7
Wear and Tear – 33
Brakes – 33
Gear system – 35
Chain – 36
Chain tubes – 38
Chain roller – 40
Headset – 43
Rear suspension element – 45
Swing arm pivot – 47
Seat – 48
Water bottle cage – 49
Mudguards – 50
Wheels – 51
Cleaning and conservation – 52
Storing the bicycle – 54
Screws and bolts – 54
Tightening torques for screws – 55
Warranty – 56
Adjusting your new bike
Adjusting
Adjusting
Adjusting
Adjusting
the
the
the
the
leg length – 9
seat angle – 10
handlebars – 13
suspension – 16
Handling instructions
Learning the new riding technique – 24
Wear protective clothing – 25
Use clipless pedals – 25
Slowly increase the strain – 26
Do not ride freehand – 26
Do not pull on the handlebars – 27
How to ride correctly and safely – 26
Brakes – 28
Gear system – 30
Light system – 31
Prop stand – 32
-
HP
Velotechnik
Warranty Pass
Warranty Pass – 57
Service Plan – 58
Proofs of service – 62
Revision January 2008. For latest product information, please check out our website at
www.hpvelotechnik.com. All trademarks belong to their respective owners.
HP VELOTECHNIK
Elisabethenstrasse 1
65830 Kriftel / Germany
Tel. ++49 (0) 61 92 - 97 99 2-0
Fax ++49 (0) 61 92 - 91 02 18
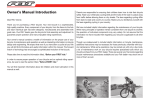
Introduction
Dear customer,
thank you for buying a recumbent by HP VELOTECHNIK and congratulations on the purchase of your new Spirit! With the Spirit,
a high-quality luxury bike, you will enjoy many years of exhilarating riding pleasure.
Your security and your satisfaction are our main concern. On
the following pages, this manual will inform you about important
safety issues as well as maintenance and care instructions.
Even if you have many years of experience with bicycles please
do take your time to read this manual carefully.Your recumbent
is designed with the latest bicycle technology by HP VELOTECHNIK
that partly needs special treatment and care.
In this manual you will find detailed instructions on how to optimize your Sprit to meet your demands and riding style as well
as your size and weight.
In addition to this, we have put together a collection of information on care and maintenance as well as special technical advice from our engineers.
This guide helps you to keep your Spirit in perfect condition so
that you will always have maximum fun, comfort and safety.
Enjoy yourselves and have a great ride!
Paul J.W. Hollants, Dipl.-Ing. Daniel Pulvermüller
and the HP VELOTECHNIK team
HP
Velotechnik
1
Introduction
To this user manual also belong the original
manuals of component manufacturers such as
the brake manufacturer, the gear system manufacturer and the pedal manufacturer.These manuals tell you in detail how to operate and
maintain those specific parts. Please do read
the manuals of the part manufacturers as carefully as the manual on hand. Please have other
users of your recumbent also read the manuals before using the bike.
The maintenance and adjustment of this recumbent partly require special tools and skills.
Do only work within your limits and, in the
interests of your own safety, do not go beyond. Should you be uncertain at any point, get
in contact with your local dealer.
The instructions in this manual apply only to a
completely assembled Spirit with standard
parts from the series production of HP
VELOTECHNIK.
On special demand HP VELOTECHNIK delivers
frame kits with which a specialist dealer can
assemble a bicycle individually. In this case the
manuals on the operation and maintenance of
the parts only represent a guideline, please do
read every manual of every part manufacturer.
The specialist dealer is responsible for the expert assembly, please contact him for detailed
advice! A bicycle that has been assembled from
a frame kit must always be tested and approved by a bicycle mechanic before your first ride.
Caution! The texts in the grey boxes are
particularly important for your safety.Texts
that begin with „Danger!“ mark an immediate danger for your life and your health.
Please do read them carefully.
2
HP
Velotechnik
Intended Use
Legal Requirements
Your Spirit is a bicycle for the use on streets
and surfaced roads.
When you ride your bike on the public road it
must comply with national legislation and guidelines.These will vary from country to country. In general, there are minimum standards
for brakes, reflectors and lighting systems, as
well as usually a general duty to ensure that
your vehicle is in roadworthy safe condition.
There will also be a duty to ride in a safe and
responsible manner. If you ride your HP
VELOTECHNIK bike in traffic you should be sure
to observe all the applicable laws and regulations.
This bicycle is not designed for the use in racing and off-road riding, for jumping or acrobatics, and you must not ride across curbs, stairs,
etc.
Damage through inappropriate use, assembly
errors, accidents or similar activities and wilful
damage results in the loss of any warranty.
The intended use also includes the precise observation of the prescribed usage and maintenance regulations and instructions.
The First Miles
The first 300 km (186 miles) are an important
phase in which you break in the bicycle.
During the first use of a new bicycle the
screws may bed in and come loose. Cables and
spokes may stretch. Bearings may show play.
Please be very attentive during that period.
After 300 km or after two months at the latest you will have to take your bicycle to a bicycle mechanic for the first service. Please record this first service and the tasks performed
in the warranty pass on page 57.The first service is the prerequisite for further use of the
bicycle and for your warranty claims.
In most countries, including Germany and the
UK, two independent braking systems are required. Do not ride with only one brake working!
Please contact your local dealer to find out about your legal obligations.
As an addition, we recommend to mount a flag
on a pole for better visibility in traffic.
The safety equipment on your bike must be
checked before every ride and maintained in
proper condition.
HP
Velotechnik
3
General safety instructions
General Safety Instructions
General Safety Instructions
Load Capacity
The maximum load (rider + luggage) is 130 kgs
(286 lbs.).The maximum total weight (bicycle
+ rider + luggage) is 150 kgs (330 lbs.).The lower limit is valid. It is important to adjust the
spring stiffness of the suspension according to
the load, see the chapter about adjusting the
suspension in this manual, 16.
With an attached trailer, the maximum total
weight must not be higher than 150 kg
(330 lbs)
Carrying Luggage
Luggage transport is only allowed with the integrated seat rack, with a bicycle bag at the
upper seat stay and with bags at the optional
lowrider rack.You can put smaller items like a
repair kit, your mobile phone or your wallet in
the integrated bags at the lower end of the
back rest.
Maximum load:
●
●
●
●
rear rack 25 kgs (57 lbs.)
bicycle bag at the back rest 15 kgs (34 lbs.)
zipped bag in back rest 1 kgs (2.3 lbs)
lowrider rack under the seat 25 kgs (57 lbs.)
Additional loading can influence the road performance of your bike considerably. If you plan
on riding with heavy luggage we advise you to
make a test ride on a street with no traffic to
adjust to the new situation.
The load should be packed as close to the body of the rider as possible, since this leads to a
more stable performance.You can also improve the handling of the bike by positioning the
center of gravity of the luggage as low as possible, so pack heavy items in the bottom of
your panniers.
Be careful that your luggage on the rack is safely stored. Bags must be tightly fastened to
the rack or to the lowrider carrier that is avai-
4
HP
Velotechnik
lable as accessory. In no case may loose parts
like straps and belts touch the wheels, the derailleur or the suspension.
We recommend bicycle bags by ORTLIEB.You
can buy them with extra large hooks matching
the oversized tubes of the rack.You can also
refit those large hooks later.
Take care that your luggage does not cover
the lighting system and the reflectors of your
bicycle and that they stay fully functional.
In case you want to park your bicycle take care to lean it on a wall or any other solid object.With the kickstand alone it is not possible
to safely park a bicycle loaded with luggage, it
could fall down and be damaged.
Added parts and accessories
The best way of transporting your bicycle is
inside the car. See that it does not lie on the
derailleur.
Additional accessories may impair the function
of your Spirit.We advise you to generally ask
your dealer before you mount any special
parts or accessories to your bicycle.
If you want to transport it outside the car we
recommend a roof-rack or a rear carrier.Take
care to fasten your bicycle at the frame only.
Caution! Do not fasten your bicycle at the
handlebar or, with disassembled wheels, at
the dropouts.The wind causes violent forces
that can stress the parts and therefore may
cause damage. Such damage may not be noticed immediately.
Please remove any part that could come loose
during transport (water bottles, luggage bags,
pumps, pennants, etc.).
Do not take kids with you
The Spirit is not designed for the transport of
children.You are not allowed to mount a child's seat. It is only allowed to transport children
in a trailer that has been specially designed for
that purpose.
Caution! Mounting additional parts or accessories is at your own risk. It is important
that you carefully read the installation guide
of the manufacturer. Additions to the handlebar like fairings, handlebar fittings, bottle holders, etc. may impair your safety due to additional loading or clips with sharp edges.
Take care that the handlebar and the suspension always stay mobile.You may not add any
parts to the handlebar or the seat that might
endanger the rider through sharp edged or
pointed shapes while steering, getting on and
off the bike or bumping against something.
Before you purchase a bell or a lighting system
make sure that these accessories conform to
your national laws and regulations.
Fairings
Trailers
You are allowed to use trailers up to 40 kg
(88 lbs.) with the Spirit.We recommend to assemble it with the Weber-coupling Type E.
Always check that the suspension and the trailer still work properly after you have mounted
the trailer.Take care that the trailer does not
damage the frame in case the bicycle falls over.
When you mount a fairing to your Spirit please take care to assure a good vision over the
fairing and sufficient freedom of movement below.
Please take into account that any fairing makes
the bicycle more prone to crosswind influences. In strong wind or gusts of wind unsafe situations may occur, please take off the fairing
in such weather conditions before the ride.
HP
Velotechnik
5
General safety instructions
Transport in the car
General Safety Instructions
Replacement of Parts
Final Assembly
The replacement of parts relevant for safety
(especially brakes, lighting, handlebar, fork, drive
train, suspension elements) should only be done with original parts by a bicycle mechanic,
since it requires a certain degree of skill, suitable tools and mechanical aptitude.
Your bike has been delivered to your specialist
dealer only partly assembled.
Any technical change you perform on your
own is at your own risk!
Danger! If any part is deformed (e.g. due to
an accident or overload), especially frame,
fork, handlebar, seat mounts, pedal, cranks
and brakes, it is not allowed to use it any
further or repair it. Do not try to straighten
bent parts.You must replace them for your
own safety. If you do not replace a damaged
part it can result in a total failure of the part
and you may be seriously injured!
Your dealer has carefully finished the assembly,
perhaps altered the specification of your bike
to meet your special requirements and performed a test ride. Please take care that this predelivery service is recorded in the warranty
document at the end of this manual.
All screws must be checked and tightened,
especially at handlebar, stem, fork, swing arm
pivot and wheels. Please follow the tightening
settings in the table on page 55.
Rear derailleur and brakes must be checked
and adjusted. Please follow the instructions in
the manuals of the parts manufacturers that
come with this manual.
Screws and Bolts
No alteration of parts
Caution! You are not allowed to perform
any work on the parts of the bicycle, especially frame, fork, handlebar and seat, which
might endanger their solidity.
These works include drilling holes, welding,
brazing, painting methods that add heat or
any other chemical treatment. If any of these
works is done improperly it may result in a
loss of strength through direct damage or
increased susceptibility to corrosion.
6
HP
Velotechnik
Caution! Screws must be tightened with
prescribed tightening torque. In this handbook tightening torques are given in Nm
(Newtonmeter). Always use a torque
wrench wherever a torque setting is given in
this manual. Never rely on "feel". Screws
tightened too much or not enough can
break, which can lead to dangerous accidents. In case you don't own a torque
wrench have your bicycle mechanic do the
respective work.You will find a table with
the prescribed torque settings on page 55 in
this manual.
Quick release levers
The wheels come with screws and nuts at the
axle as standard equipment. In case you have
chosen wheels with quick release the following
instructions are also valid for the wheels.
Please read the instructions of the quick
release manufacturer.
Danger! An incompletely or improperly
closed quick release can result in parts coming loose, and hence in a crash, possibly resulting in serious injury.
A quick release lever consists of two basic
parts: the lever on one side provides the clamping force.With the adjusting nut on the other
side you adjust the clamping tension on the
screw thread.
To open the quick release move the lever away
from the frame. In doing so the inscription
"open" should be visible on the lever.
To close the quick release move the lever with
power in the other direction so that the word
"close" is visible on the outward side of the lever. At the start of the lever's motion, for, say,
half of its movement, the lever should move
very easily, without any clamping action. In the
second half of the lever's movement the force
on the leer should increase considerably, corresponding in the end to 15–20 kg (46 lbs.).
In its final position the lever should lie parallel
with the bicycle and should not stick out to
one side.
The quick release levers must be closed firmly. Hold the seat frame with your fingers to enhance your thumb’s power.
Check the security of the lever by attempting
to twist the lever. If the lever can be made to
pivot around in a circle the clamping is too
loose.You must re-open the quick release,
hold the lever and increase the clamping tension. Do this by screwing the adjustment nut
on the other side by half a turn. Close the lever and check the clamping anew.
Finally, check the that the part being secured is
firmly fixed: Lift each wheel several inch off the
ground and give it a slap onto the tire from
above. A properly fixed wheel will remain secure in the frame's dropouts.
The dropouts of the fork of your Spirit are designed as safety dropouts.Therefore you always have to loosen the clamping nut of the
quick release when you take off the front
wheel.When you reassemble it do not forget
to tighten the nut again!
Parts that are fastened with a quick release
open easily.Thus, they are more susceptible to
theft.Therefore, always secure the wheels with
a lock when you park your bicycle. It is also
possible to exchange the quick releases with
special security screws (e.g. from PITLOCK) that
can only be opened with a special tool. For
this please consult your local specialist dealer.
HP
Velotechnik
7
General safety instructions
Quick release levers hold the seat of your
Spirit in position.
Adjusting the seat
Before the first ride: adjusting your
new Spirit
Adjusting the leg length: moving the
seat
The seating position is essential for your riding
comfort, well-being and efficient cycling on the
Spirit.Therefore adjust seat, handlebar and suspension to your individual requirements.
The Spirit is designed for people from
150–200 cm (5'–6'7") height. In order to adjust
the distance between the pedals and the back
of the seat move the seat on the rails.
In order to adapt the Spirit as closely as possible to your body dimensions you can adjust
the distance from seat to pedals, the seat angle, the angle and the position of the seat cushion individually.
Open the two quick release levers under the
seat by turning away the silver levers from the
frame.
The stem of the handlebar is vertically adjustable like a telescope.The handlebars are adjustable in their angle.
All adjustments together affect the distance
between your knees and the handlebars as
well as your minimum turning circle.
Danger! All procedures described here require a certain degree of skill, suitable tools
and mechanical aptitude. After any assembly
operation perform a static check and take a
short test-ride on a quiet street, away from
traffic. If you have any doubts please contact
your local dealer.
Remove your luggage prior to all adjustments.
That way you have easy access to all operating
elements and you don't make the adjustment
more difficult through additional weight.
Hold the frame with one hand.With the other
hand you take hold of the seat unit at the integrated rear rack. Now move the seat to the
correct position.
Close the two quick release levers by moving
the levers towards the frame.The front lever
in particular has to be closed tightly so that
the angle of the back of the seat does not
change during a ride.
In order to check the adjustments have another person hold the bicycle while you are sitting on the recumbent.
Adjust the front boom in such a way that your
leg is fully extended when your heel (wearing
flat shoes) is in the foremost position on the
pedal. Experience shows that the pedal-to-seat
distance on a recumbent can be slightly longer
than on a conventional bike.While you are pedaling the ball of your foot should be positioned over the center of the pedal axle. It is important that your leg is not fully straightened
when the crank is in the foremost position.
If the distance is too great it is difficult to
overcome this dead point, pedaling becomes
uncomfortable and there is too much strain on
the sinews of your feet.
8
HP
Velotechnik
Adjust the seat so that your knee will not be fully straightened
when pedaling.
A wrong adjustment may lead to pain in your
knees and inefficient pedaling. In addition we
recommend to ride with a high pedaling cadence, which means to pedal fast and with little pressure. Pedalling with too much pressure
may also lead to pain in the knees.You will find
more information about this on page 26.
Caution! The two quick releases have to be
closed firmly (tightening force 15–20 kgs /
45 lbs.) to safely hold the seat.You are not
allowed to open them while riding. After
they have been closed the imprint "close"
must be visible. If the quick releases are not
tightened appropriately the seat can move
while riding and you may no more be able
to handle your bicycle.
The area wherein you move the seat is limited
to the front by a screw at the and of the rail.
The screw head keeps the seat from gliding
down off the rail and thus damages the surface
of the frame tube. Always take care that this
screw is placed in its drilling hole at the right
front of the rail.
Caution! The seat rail does not have a limitation at the rear end. If you move the seat
too far back the rear sliders glide off the rail
so that you can't position the seat properly
anymore.When you move the seat always
take care not to move the seat too far to
the back.
The seat rail has marks for easy length adjustment.The maximum rear position is clearly
marked with a „max“ mark. Do not move the
seat further back once the front edge of the
front slider is aligned with the „,max“ mark.
Since the rail is open at the rear end you can
take off the seat for transportation.
To reconnect the seat onto the rail adjust the
two sliders on the quick lever axle parallel to
each other and to the rail and move the seat
slowly onto the rail.
The easiest way to do it is when you park
your bicycle with the kickstand. Kneel down
behind the bicycle so that you have a good
view on the rail and the sliders.
Take care that your fingers do not get caught
between the rear rack and the frame and thus
get hurt while you move the seat.
HP
Velotechnik
9
Adjusting your new bike
If the distance is too short you may suffer
from knee pain or your legs bump on the
handlebar.
Adjusting the seat
Adjusting the seat angle
You can adjust the back rest in a range from
55° - 65°.
The angle you feel comfortable with depends
on the form and the length of your back.
The back rest has an ergonomic shape according to the s-form of the spine.The upper
bend automatically puts the neck in an upright
position so that you don't feel any strain in
neck and shoulders even on a long ride.
In addition to this you can influence the shape
of the back rest by adjusting the tension of the
inlaying belts.
For the beginning we recommend a medium
seat angle. After you have gained some riding
experience you can start trying different angles.
Recumbent beginners often start with a very
upright seat position.That way the biggest part
of your weight lies on the seat cushion and
you mainly sit on your muscles which can lead
to problems on a long ride.
The lower the angle the better you distribute
your weight between seat cushion and back
rest - this is one of the main advantages of the
recumbent.
Another advantage of a low back angle is better aerodynamics. In a recumbent position you
don't offer much surface for head wind which
can result in a big plus in velocity.
10 HP
Velotechnik
Adjusting the back rest
To adjust the angle of the back rest only open
the front quick release lever.That way the seat
stays fixed on the rail and you keep the adjustment made for the leg length. Only when the
back quick release lever is closed very tightly
it is better to open it a little bit, too.
The rear rack moves together with the back
rest.Take care to keep your fingers, bags,
straps, etc. away from the area between integrated rear rack and frame while adjusting the
back rest.
Hold the seat at the upper end of the back
rest and move it to the correct angle.
Close the quick release levers.
Caution! The two quick releases have to be
tightened firmly (tightening force 15–20 kgs.
/ 45 lbs.) after adjusting the seat.You are not
allowed to open them while riding. After
they have been closed the imprint "close"
must be visible. If the quick releases are not
tightened appropriately the seat can move
while riding and you may no more be able
to handle your bicycle.
The angle of the seat cushion has an immediate effect on your riding comfort.
The steeper you adjust the cushion, i.e. the
higher the position of the front part, the more
contact the cushion has with your thighs.That
way you distribute your weight onto a bigger
surface.The feeling of being "in the seat instead of on the seat" is something which most
people find very comfortable.
However, if the angle of the cushion is too
steep it may pinch a little bit while pedaling.
When you lower the front part a little bit it is
also more comfortable for smaller riders to
rest their feet on the ground during a stop.
In case the angle of the cushion is too flat you
may have sometimes the impression that you
glide off the seat to the front.
You will find the most comfortable seating position when you try different combinations of
the angle of the cushion with its horizontal position, as described in the following.
To adjust the angle of the back rest only open
the front quick release lever.That way the seat
stays fix on the rail and you keep the adjustment made for the leg length. Only when the
back quick release lever is closed very tightly
is it better to open it a little bit, too.
Hold the seat at the upper end of the back
rest with one hand.That way you keep the
correct seat back angle.
With the other hand you hold the front part
of the seat cushion and move it up or down to
the correct angle.
Take care not to get caught in the moving
parts with your fingers or your clothing.
Close the quick release levers.
Caution! The two quick releases have to be
tightened firmly (tightening force 15–20 kgs.
/ 45 lbs.) after adjusting the seat.You are not
allowed to open them while riding. After
they have been closed the imprint "close"
must be visible. If the quick releases are not
tightened appropriately the seat can move
while riding and you may no more be able
to handle your bicycle.
The angle of both seat cushion and back rest
is fixed by friction between quick release lever
and seat fitting.
Always take care that the two grooved washers at the front quick release lever are located between quick release and seat fitting.
Schwenken des Sitzlkissens
HP
Velotechnik
11
Adjusting your new bike
Adjusting the seat cushion
Adjusting the seat
Adjusting the horizontal seat cushion position
The seat is bolted to the fittings in long holes.
That way you can adjust the horizontal seat
position individually.
The more you move the cushion to the front
the bigger the seating area, which distributes
your weight evenly.
However, if the cushion is too far towards the
front you may feel a gap between seat and
back rest.
Also, the further the cushion is at the front
the bigger is the feeling of being pinched at the
front part of the cushion, also see page 11 for
reference.
We recommend to start with a middle position and to change it only when necessary.
At the bottom of the seat there are four hexheaded screws. Undo the screws with an Allen
key SW 4 by several turns.
Tighten the screws with 4-6 Nm.
12 HP
Velotechnik
You can move the seat cushion back or forth after you have undone the four allen key screws.
Adjusting the handlebars
Adjusting the height
The height of the handlebars determines the
distance to your knees and the maximum possible cramping of the front wheel.
Before you adjust the height and the angle of
the handlebars please make sure that the seat
of your Spirit is well adjusted to your leg
length, see page 8.
When you have little experience with recumbents, we recommend you to choose a high
position for the handlebars, so that you have
the biggest possible moving range for your
legs.
After you have gained some riding experience
you can lower the handlebars.The lower the
handlebars the sooner your knees touch them
while riding in a curve.
A low position of the handlebars permits a relaxed position for your arms and a good view
to the front.
The handlebar stem consists of two parts.The
upper part is connected with the handlebars
and you slide it telescopically into the lower
part.
The lower part has two clamping connections
where the tube is slotted, and they are connected with a clamping screw.Those connections are in particular the connection to the
upper part of the stem and the connection
stem/fork at the lower end of the tube.
You can adjust the height of the handlebars by undoing the
clamping screw.
Danger! Every time you undo one of the
clamping connections you have to check the
clamping screw.You also have to check the
welded-on thread nut.The thread must not
be damaged and the screw must turn easily.
Once a year you have to dismount the
screw completely and check it. In case of damage or deformation you have to change
the clamping screw immediately.When you
refit the screw, it has to be lubricated carefully and tightened with the required tightening torque (see table on page 55).
In case you tighten the screws too much the
clamping may deform and break.When you
bend the screws while tightening they may
break and the clamping can loosen.When
you tighten the screws with an insufficient
tightening torque, the clamping does not reach the necessary strength and this can result in a twisting of the handlebars or the
stem while riding. All these assembly errors
can lead to dangerous falls!
You adjust the height of the handlebars at the
clamping at the upper end of the lower part of
the stem.
HP
Velotechnik
13
Adjusting your new bike
The handlebars of the Spirit are held by a telescopic stem that is vertically adjustable.
Adjusting the handlebars
Loosen the hex-headed screw with an Allen
key SW6 by several turns. Now you can slide
the upper part of the stem up or down.
Secure the front wheel with your legs and turn
the handlebars right-angled to the front wheel.
Tighten the clamping screw with 17-19 Nm.
Check the safe clamping by trying to twist the
handlebars against the front wheel.
Danger! Only pull the stem out so far as
not to fall below the minimum insertion
depth of 7 cm (2 3/4"). In no case may the
lower end of the inserted tube be visible in
the clamping slot or the mark on the upper
stem half be visible above the lower half!
When the stem sticks out too far the clamping may be damaged or the stem may come
loose while riding, which can result in a dangerous fall.
The cables are secured in their guides with
plastic clips. Alternatively, you can fasten the
cables with cable ties that you put through the
cut in the guide.
Adjusting the angle of the foldable
stem
As an option, the Spirit can be equipped with
the foldable Glideflex stem from Terracycle.
Angle adjustment of the folding stem
The Glideflex unit is equipped with a backstop
adjustment screw close to the pivot axle.To
adjust the backstop, fold the stem forward and
turn the backstop screw in or out with a 4
mm allen wrench.Turning the bolt in (clockwise) allows the handlebars to fold further
back; turning the bolt out stops the handlebars
from going as far back.
Caution! Do not turn the screw so far out
that it contacts the top of the stem when it
is folded back.The bolt must contact the
sloping surface.
Caution! After you have adjusted the handlebar position you also have to adjust the
length of the brake cables and shifter cables.
The cables have to run smoothly without
any sharp turns and they may not be bent or
stretched beyond their elastic limit when the
handlebar is at maximum cramping. Also avoid large arches that could be caught up in
other parts.
Adjusting the folding friction
To adjust the folding friction, tighten or loosen
the pivot bolt with a 5 mm allen wrench.
Tightening the bolt will increase friction; loosening will decrease friction.
Take special care that the cable of the front
disc brakes is not bent or stretched when you
cramp the handlebars strongly.
Danger! Do not loosen the bolt past the
minimum friction point. If you do, retighten
the bolt until you can feel the friction increase.The bolt must be secured with Loctite.
You can make smaller adjustments by moving
the cables in their guides at the frame and the
handlebar, so that there is enough room at all
mobile parts.
If this proves not to be sufficient you will have
to have your specialist dealer shorten the cables or replace them by longer cables.
The friction adjustment should not need frequent readjustment in normal use. Sometimes,
rain will cause the friction to drop slightly, but
things should go back to normal when dried
out.
14 HP
Velotechnik
By changing the angle of the handlebars you
can adjust the position of the grips to the
length of your upper body and arms.
Most riders are comfortable with a 45° angle,
so that the grips are in a lower/inner position.
The more you turn the grips down the less
you can cramp the front wheel, since the
handlebars touch your knees earlier.
In order to change the angle loosen the clamping screw of the handlebars at the upper part
of the stem a little bit.Turn the handlebars into
your favorite position. Check that the stem
clamps the handlebars precisely in their middle.
Tighten the clamping screw with approx. 10-12
Nm. Check the correct clamping of the handlebars by pulling and turning them. In doing so,
they must not move.
Please take care that the clamping area at the
stem is free from burrs, so that it does not have any sharp edges. A sharp edge can cause the
handlebars to break.
After you have undone the clamping screw you can adjust the
handlebars.
While riding you should allow your arms to
rest in a relaxed position on the handlebars.
Do not pull on the handlebars. If the handlebars turn in the stem clamping during the ride,
stop immediately and tighten the clamping
screw of the handlebars again.
If the handlebars turn in a stem that is not sufficiently clamped, the handlebars or the stem
might be damaged or deformed. In that case a
secure clamping can no longer be guaranteed,
even with the correct tightening torque, and
handlebars and stem have to be exchanged.
Handlebar grips
Danger! Every time you undo the clamping
connection you have to check the clamping
screw. It must not show any sign of damage,
deformation or corrosion.The thread must
not be damaged and the screw must turn
easily. In case of damage or deformation you
have to replace the clamping screw immediately.
The grips on the handlebar are susceptible to
wear and tear. Have your grips replaced by
your bike shop once they don't feel comfortable anymore.The grips always need to be attached firmly to the handlebar.
HP
Velotechnik
15
Adjusting your new bike
Adjusting the angle of the handlebars
Adjusting the suspension
Purpose of the adjustment of the suspension
Your Spirit is fitted with a suspension fork for
the front wheel and a rear swing arm for the
suspension of the rear wheel.This system
compensates slight bumps on the road so that
riding is comfortable and the strain on your bicycle is reduced.
Suspension and damping
The suspension systems of the suspension fork
and the rear swing arm are fitted with the actual springs and dampers which are mounted
separately. Often, the terms suspension and
damping are used inappropriately in everyday
language.
A well-adjusted suspension improves the traction of your bicycle on uneven roads.
Especially when riding in a bend this allows a
higher speed and also improves the safety.
The spring is the elastic element that compresses and decompresses through the load
which occurs on bumpy roads.While decompressing the spring releases the same energy it
has saved during compression.
In order to achieve maximum riding comfort,
the suspension settings have to match your
weight as well as the road condition.
The Spirit is fitted with coil springs of steel at
the suspension fork and the rear fork swinging
arm.
The goals of the adjustment are:
The damper slows down the process of compression and decompression.That means that
the bicycle after having passed a bump does
not immediately "spring" back to the initial position or even further than that.The damper
converts spring energy into friction and finally
into heat, and thus takes away energy from the
suspension system.That way the damper prevents that the spring swings uncontrolled after
an initial stimulation. In addition, the damper
helps to avoid self inforcing oscillations of the
suspension that may be caused by reoccurring
stimulations like pedaling forces within a crank
revolution or the rhythmic up and down movement of the legs.
●
●
●
maximum use of the available suspension
travel without the suspension frequently bot
toming out
quick reaction of the suspension without
obvious oscillation after having passed a
bump
avoiding self enforcing oscillations, that means
increasing oscillations of the suspension
system due to pedaling influence, rhythmic
body movements or permanent wavy underground
The suspension fork of the Spirit works with a
mechanical friction damping.The rear suspension element has a hydraulic damping cartridge
with a specific damping rate.
16 HP
Velotechnik
In addition to this, varying pedaling forces have
very little influence on the suspension of the
bicycle due to the No Squat design of the suspension system of the Spirit.
It is necessary to choose the correct spring
stiffness to have a well operating suspension
system.The spring stiffness is a measure for
the compression of a spring at a certain load.
It is either given in "N/mm" (Newton per
Millimeters) or "lbs/inch" (Pounds per Inch).
Sometimes you only find "lbs." printed on the
springs.
The suspension is designed in a way that the
spring compresses considerably when you
mount your bicycle.This is called negative suspension travel and it enables the bicycle to
decompress on bumpy roads.You should choose a spring stiffness with which this negative
suspension travel takes up around 20-30% of
the overall suspension travel.This value usually
provides a very comfortable ride on your fully
suspended recumbent bike designed by HP
VELOTECHNIK.
Adjusting to load
The luggage carriers of the Spirit are mounted
to the suspended part of the frame.That way
your luggage is also fully suspended and it spares the material. Most notably, even under heavy load the suspension will compensate an uneven road much better and quicker compared
to a design where the luggage carrier would
be mounted to the unsuspended parts, e.g. the
rear swing arm.
Additional luggage changes the load of the
wheels and their suspension.The suspensions
are more compressed through the load.That
way, there is less suspension travel for bumps
while riding.Your suspension could seize up
more often.
The suspension of the front wheel is less affected since luggage at the rear rack almost only
puts weight on the rear wheel.
The distribution of the load also differs with a
change of the seat position.The more you move the seat to tha back the more you have to
increase the spring stiffness.
In order to compensate the variations in the
load you can change the pre-load.
This can compensate for a load of approx. 10
kg (23 lbs.) at the rear wheel. In case of higher
variations in the load you would have to exchange the spring for another spring with another spring stiffness.
HP
Velotechnik
17
Adjusting your new bike
You can ride the Spirit with a considerably lower damping than for example a MTB: due to
the relaxed and steady position of the body,
the recumbent does not experience extreme
variations in the load as it is known from the
dancing on the pedals while riding uphill on a
mountain bike.
Adjusting the suspension
Front wheel suspension with suspension fork
The front wheel is suspended by a suspension
fork.The suspension fork of the Spirit comes
with a steering head system. In contrast to
conventional telescopic suspension forks the
suspension is here in the steerer tube of the
fork.
During compression the lower part of the fork
moves into the steerer tube that is placed at
the main frame. A dust boot protects the moving parts against soiling. Inside the steerer tube there is a torsion guide that secures the
parts of the fork against turning, thus enabling
precise steering movements.
Before you adjust the pre-load of the suspension fork or the spring stiffness, make sure that
the torsion guides of the fork are in the correct position and the fork moves easily. See also the instructions in the chapter Maintenance
and care on page 40.
A new suspension fork has to be broken in for
at least 300 km (190 miles), so that the guides
adjust and rough edges become smooth. At the
beginning, the fork only compresses through
hard shocks.Therefore, you should wait for
the end of the break in phase to judge the
pre-load and the spring stiffness correctly.
To get a feeling for the fork when it compresses, pull the front brakes with one hand.With
the other hand, push the front end of the frame at the bottom bracket. Do not try to compress the fork by pushing the handlebars.
The suspension travel is about 30 mm (1,17
inch).The suspension fork should compress by
20-30% while mounting your bike (negative
travel), this corresponds about 6-9 mm (0,2 0,4 inch).
18 HP
Velotechnik
The suspension of the front wheel is integrated in the steerer tube.
You will get this value by adjusting the pre-load, provided you have roughly chosen the correct spring stiffness (see page 19).
It is not important to exactly follow the recommended values for the negative travel, rather follow your feeling how the bicycle behaves during a ride, depending on the road situation and your speed.While riding you should
only seldom feel the suspension bottoming
out. However, in case this never occurs, the
spring might be too hard, which means you
don't use the total suspension travel.
In order to adjust the pre-load you have to take off the handlebar stem. For that purpose,
undo with an Allen key SW6 the lower clamping screw of the handlebar stem which
clamps the slotted tube of the stem onto the
steerer tube.
In the inner fork steerer tube there is the adjustment screw for
the pre-load.
You reduce the pre-load by loosening the
screw anti-clockwise.
Caution! Do not undo the smaller clamping
clip below the stem tube.This clip secures
the headset and adjusts the steering play. If
you have undone this screw you will possibly
have to readjust the headset, see page 43.
The spring must always have a low pre-load.
The adjustment screw must at least be tightened by 12 turns in the steerer tube.
Accordingly, there has to be a minimum distance of 7 mm (inch?) between the end of the
steerer tube and the upper side of the adjustment screw.
When you suddenly feel a strong resistance
while turning the screw into the tube, you have reached the maximum depth. In that case,
undo the screw by one turn.
Take off the handlebar stem and carefully put it
aside. In doing so, take care not to bend or
stretch the cables.
If the screw does not turn easily undo it entirely. Clean the threads, grease the screw lightly and turn it again into the tube as described
above.
After you have undone the clamping screw of the stem you can
take off the stem.
Now that the inner fork steerer tube is open
you can see the adjustment screw.You can
turn this screw with an Allen key SW6.
You increase the pre-load by turning the screw
clockwise further in the tube.
Remount the handlebar stem on the steerer
tube. Secure the front wheel with your legs
and adjust the handlebar right-angled to the
front wheel. Check the safe clamping by trying
to twist the handlebars against the front
wheel.
HP
Velotechnik
19
Adjusting your new bike
Adjusting the pre-load of the suspension fork
Adjusting the suspension
Exchanging springs of the suspension
fork
Your suspension fork comes by default with
two standard (green) springs that cover a wide
range of load and riding styles.
If the spring stiffness should not meet your requirements by adjusting the pre-load or if the
suspension bottoms out too much, you can order one or two springs with another spring
stiffness through your dealer and have them
mounted there.
There are two spring stiffnesses for the Spirit
suspension fork:
green = standard
yellow = hard
In order to exchange the springs, remove the
handlebar stem as described above under
"Adjusting the pre-load of the suspension fork"
on page 19.
Undo the adjustment screw completely with
an Allen key SW6.
Push the front end of the frame down to push
the fork completely together.
Below the adjustment screw there is a black
spacer, the first spring, the spring busher and
the second spring.
Remove these parts totally from the inner fork
steerer tube.You can remove the springs that
are deeper in the tube with the angled head of
a spoke.
The length is approx. 46 +/- 2 mm (1,8 +/- 0,1
inch) per spring.
You can also mount a combination of different
springs. If, for example, the standard middle
springs are too hard for you, exchange at first
only one middle spring for a soft spring.
Adjust the pre-load as described above and so
find step by step the spring tuning of your fork
that you are the most comfortable with.
After you have undone the adjustment screw you can remove the
springs.
Now exchange the springs. Lubricate the
springs and the bushes. Remount the springs.
Tighten the adjustment screw by at least 12
turns in the steerer tube.
Adjust the pre-load of the spring and mount
the stem as described above under "Adjusting
the pre-load of the suspension fork" on page
19.
20 HP
Velotechnik
For the rear suspension of the Spirit a steel
spring is combined with a hydraulic damping
unit in a spring element.
The damping results from fluid friction of an
oil flow through thin holes of a throttle valve
in between two chambers inside the damper. A
slightly noticeable sound that may occur from
this oil flow is normal.
Due to the fluid friction the spring element
may heat up, therefore touch the spring element after a ride only when it has cooled off.
Danger! The suspension elements are filled
with gas under high pressure. Never try to
open the damper or to remove the screw at
the gas tank. Inside the damper there are no
user serviceable parts. In case of damage
you will have to take the complete suspension element to your dealer.
Danger! While adjusting the rear suspension element never load the bicycle, e.g.
through resting on the seat or loading the
rear rack, when your hands or tools are close to the suspension element. Otherwise
your hands may get caught and squeezed
when the suspension compresses.
Your Spirit comes standard with a steel spring
rear shock. As an Option, the air shock DTSWISS XM-180 can be installed. Please read the
manual of the rear shock manufacturer for detals.
Rear suspension element of the Spirit
For the rear wheel the same guidelines as for
the suspension fork are valid: for maximum riding comfort the suspension should compress
by about 30% of the total suspension travel
(100 mm) while you mount the bicycle in driving position.This corresponds to about 30
mm (1 1/5 inch).
For that purpose measure for example the distance between the end of the main frame and
the rear wheel while the bike is unloaded as
well as while sitting on the bicycle in riding position. Also take into account possible luggage.
You can affect this negative suspension travel
depending on how much you weigh and how
much you load your bike either by adjusting
the suspension pre-load for fine tuning or by
replacing the spring with a spring with a different stiffness in the rough tuning.
Danger! Take care that the rear wheel or
the mudguard or the suspension element
never hit the frame or the rear rack while
the suspension is fully compressed.
Therefore, relax the spring completely by
turning the spring retention disc on the
thread of the spring element as far as it will
go. Have a second person mount the bicycle
and make the suspension bottom out by leaning on the seat or the rear rack.
HP
Velotechnik
21
Adjusting your new bike
Adjusting the rear suspension element
Adjusting the suspension
Adjusting the pre-load of the rear
suspension element (steel spring)
The pre-load determines how far the suspension compresses when you are sitting on the
bicycle while standing still.
In order to adjust the suspension pre-load
turn the knobby adjustment ring on the threaded part of the suspension element by hand.
Turning the adjustment ring clockwise (looking
at it from behind) reduces the pre-load, turning it anti-clockwise, you screw the adjustment ring towards the spring and increase the
suspension pre-load. It is helpful to turn the
spring together with the adjustment ring.
The adjustment ring should be turned no more than five turns (measured from the relaxed
position) towards the spring. If the suspension
compresses still too far even after six turns,
the spring is too soft and has to be replaced
by a harder spring. A too big pre-load of a too
soft spring does not take advantage of the full
comfort potential. For instructions on changing
the spring see page 45.
22 HP
Velotechnik
Turning the adjustment ring for the pre-load..
Danger! The adjustment ring has always to
be screwed so far towards the spring that
the spring has no play when unloaded.
Otherwise the adjustment ring could come
loose through shocks while riding, so that
the slotted rear spring retention disc comes
off. In that case the suspension element may
be damaged or the rear wheel could hit the
frame or rear rack, which may lead to serious falls.
Always have an initial pre-load by at least
half a turn on the spring.
This rear shock contains pressurized air in a
main („positive“) air chamber as suspension
medium. Air shocks are lighter than steel
spring rear shocks. Another advantage is that
the spring stiffness can be easily adjusted with
an air pump: By increasing the pressure the
spring becomes harder.
The valve for the air chamber is located at the
back end of the air shock.The valve is protected by a metal valve cap.
To pump up the air shock you need a special
air pump designed for bicycle air shocks. It
must have a fitting schrader valve adaptor and
a pressure indicator.
When attaching or removing the pump
to/from the valve, you will loose some air
(about 0,5-1 bar).Take off the pump quickly.
Recommended pressure settings
load
– 80 kg (183 lbs)
–100 kg (230 lbs)
–130 kg (286 lbs)
pressure
10,5 bar
11,5 bar
13,0 bar
Maximum allowed pressure is 18 bar.
Danger! Take care that the rear wheel or
mudguard or suspension element never hit
the frame, seat or rear rack box while the
suspension is fully compressed.
Therefore fully deflate the air shock. Have a
second person mount the bicycle and make
the suspension bottom out by pushing on
the seat or the rear rack.
Adjusting the damping
By adjusting the damping you can adjust the
performance of the suspension precisely to
your individual riding situation. A rough street
with many harsh bumps that occur in a row or
even cobblestones needs a low damping rate
while a road with long stretched bumps that
occur more regularly needs a stronger damping to achieve a smooth road holding.
Please note that you can seriously spoil the
riding comfort through a bad damper setting,
especially through unsystematic playing with
the knobs that may result in much to high
damper values. In the worst case the suspension element will neither compress nor decompress. If you are in doubt please consult
your local dealer.
A good setting for maximum comfort is
achieved when the rear wheel decompresses
completely after a shock and then oscillates
only once. In order to check the adjustment
you will need a second person that compresses the suspension by pushing the bicycle down
while you are sitting on the bicycle in the riding position.The other person can then observe the suspension movements.
In order to adjust the damping during decompression, turn the adjustment knob on top of
the rear end of the suspension element.
If you turn the knob in direction of the „-“ you
will get less damping and thus faster decompression.Turning the knob in direction of the
„+“ will give you more damping and thus slower decompression.
HP
Velotechnik
23
Adjusting your new bike
Air shock DT.SWISS XM-180
Learning the new riding technique
Learning the new riding technique
Your new bicycle has been assembled by your
specialist dealer and adjusted together with
you as described on the previous pages under
"Adjusting your new bicycle". Before you
mount your bike and take your first ride please make yourself familiar with the instructions
on the riding technique and the handling.
To ride this recumbent you will have to make
yourself acquainted with the different riding
position. Make sure that you and all other future users of this bicycle will have read this
manual carefully prior to the first ride. If you
are in doubt please consult your local dealer.
Before the first ride, the users of this recumbent have to practice and make themselves familiar with the different handling.We recommend to practice riding your Spirit on a quiet
road away from traffic. Before you ride the bicycle in traffic you must master the handling
completely.
Go to a road where you can ride straight ahead without being hindered. Hold your bike at
the handlebar and pull a break.Then mount
your bicycle and lean back. Leave one foot on
the ground and put one on the pedal.
Therefore, rotate the crank in the top position
so that you can later pedal with power.
Try to keep your balance in that position.
Assure yourself that you can stop whenever
you want to and hold the bicycle with one
foot on the ground.When you feel safe put
pressure on the pedal, loosen the brake, pedal
with a lot of force and immediately put your
second foot on the other pedal.
24 HP
Velotechnik
Do not care on which side of pedal you are
currently pedaling in the beginning. Hold the
handlebar loose but steady. Do not pull at it.
Accelerate with a few pedal strokes.Your bicycle needs speed to stabilize.
Look ahead in the direction where you want
to ride, not at the handlebar, at your feet or
the front wheel.
In order to stop, brake carefully with both brakes until the bicycle has come to a complete
stop. Only then do you put a foot on the
ground and keep the balance.
Danger! Never touch the ground with your
feet while the bicycle is still moving.The feet
could be caught on the ground and be pulled
backwards which could lead to a serious injury.
Danger! With a compact recumbent like
the Spirit it is possible that a foot of the rider contacts the front wheel when riding
sharp corners with a pedal in the front position.You will have to avoid this situation at
all times since in extreme situations it may
lead to a fall and injuries.
To control the bicycle you will therefore have to apply the following cornering technique: when you ride a curve stretch the leg
on the outside of the curve, stop pedaling,
only then start steering into the curve. Only
when you ride straight ahead again may you
resume pedaling.
Protective clothing, cleatless pedals
Wear protective clothing
Riding a bicycle is a potentially dangerous
sport where accidents can happen even when
you take care of every safety instruction prescribed.
We recommend you to wear an approved bicycle helmet. Protect yourself by wearing special sports clothing that fits tight and is reflective.
When you fall with a recumbent you usually
land on the side of your hips and your hands.
Wearing reinforced cycling shorts and gloves
reduces the danger of skin injuries considerably.
Use cleatless pedals
On request, your Spirit comes with pedals that
have a binding system on one side.
As soon as you are comfortable with riding
your Spirit you should use those cleatless pedals. Due to the rigid connection between
shoe and pedal you don't have to keep your
foot on the pedals with pressure anymore.This
enables a more relaxed and round pedaling
movement where you may even pull a little on
the pedals.Without this connection to the pedals your feet may come off suddenly, which
may result in a fall. Modern system pedals with
binding therefore contribute to safe riding.
A first you will have to practice with these pedals to make sure that you can get off quickly
in a dangerous situation. Please note the manual of the pedal manufacturer that comes with
the binding system and have your dealer explain the use of the pedals to you. In the beginning set the release force of the binding on a
low value to make sure you can get off safely.
Please use exclusively the enclosed shoe plates
of the binding system manufacturer, do not use
pedals from other manufacturers. If you use
non-authorized shoe plates the binding system
can not operate safely.
HP
Velotechnik
25
Handling instructions
Danger! Please note that you may be not
be very late or not at all by other road
users due to the low seat height and ride
anticipatory according to this.This is especially important while riding in darkness.You
yourself have a much better view than
others perceive you. Ride defensively.We recommend you to mount a well visible and
reflecting flag to the bicycle while using it in
traffic. Please ask your dealer for more information.
Strain, Do not ride freehand
Slowly increase the strain
We recommend you to perform only short rides without much power during the first
weeks.
Always use a low gear and ride with a high pedaling frequency. Only after having acquired some training do increase the strain slowly.
When you ride on a recumbent you use other
muscles than on a conventional bicycle, and
they have to be trained first.
In case of an overload, the blood circulation in
your legs may be affected, which shows in loss
of power, a prickling in the toes, falling asleep
of the legs or cramps.When you have a sporty
way of riding, it can take up to 6 months until
you have become accustomed to your recumbent.
Should you have pain in your knees while riding this is usually the result of too much power put into pedaling.The good support of the
back sometimes misleads to putting the full
power of the legs in the pedal, similar to the
leg training machines in the fitness center.
When you repeat it regularly it is harmful for
the knees. Pain in the knees often results from
an overuse of the muscles in the knee that can
also be strengthened through exercise.
Also, a wrong adjustment to the leg length (in
most cases too short) can lead to pain in the
knees.You will find many tips on proper training for cyclists in miscellaneous books and
magazines for cyclists.
26 HP
Velotechnik
Your pedaling cadence should stay between
80-100 revolutions per minute and not fall below 60 revolutions when going uphill. If necessary have your specialist dealer adjust the gear
range to your riding style and the terrain you
usually ride.
When you have the impression that riding
your Spirit stresses your stomach muscles
considerably, please lean consciously back and
take care not to pull on the handlebars.
In case of persistent problems please consult
your doctor.
Do not ride freehand
Danger! In order to ride safely you have to
keep both hands at the handlebar. Even
when signaling keep at least one hand at the
handlebar. Otherwise, unforeseen bumps in
the road or oscillations of the steering may
lead to a serious fall.
Handlebars, Ride correctly and safely
Caution! Do not pull at the handlebars
with power.They have to be held in a relaxed position.The handlebars do not have
the task to absorb the pedaling forces, this
happens at the seat. Because of the long
stem you exert a big leverage on the stem
clamping of the fork when you pull at the
handlebars, and you might damage the fork.
A failure of the stem clamping can lead to
serious falls.
Prior to each ride, check the stem clamping
for any deformation or damage. In case of
damage you must not use your bicycle any
longer. Have your dealer exchange the damaged stem.
How to ride correctly and safely
Always adjust your speed to the traffic, the road and the weather conditions. Ride slowly in
curves and on unknown roads. Always ride at a
safe distance from other road users, and when
you ride in a group never ride side by side.
When you approach a traffic light never ride
past the line of waiting cars, since even the
most attentive car driver may not see you due
to your low seating position.
Caution! Always carry your bicycle over
stairs and curbstones. Do not ride through
big road holes. Especially when road holes
are filled with water it is very difficult to
guess how deep they really are. In case you
hit such an obstacle, frame and fork may be
damaged which can result in a serious fall. At
first, the damage may be unnoticed. Please
check your bicycle immediately for deformations and cracks. If you are in doubt please
consult your local dealer.
HP
Velotechnik
27
Handling instructions
Do not pull at the handlebars
Brakes
Brakes
The Spirit is equipped with a powerful highquality brake system. Please do read the separate manual from the brake manufacturer that
comes with your bike for details.
Make yourself familiar with the braking system.
Remember which lever pulls the front brake
and which the rear brake.
If the arrangement of the levers does not correspond to what you are used to, please have a
bicycle mechanic change it. Please contact your
bike dealer to find out if there exists any legal
requirement for the arrangement of the brake
levers in your country.
For optimum handling you can adjust the distance between the brake grip and the handlebar with a small hex-headed screw at the grip,
please see the respective manual for details.
Note that the rear brake is the most effective
brake on the Spirit.With the rear brake, you
achieve a much higher braking effect than with
the front brake.The front wheel has a tendency to lock up and slip on the pavement even
under low braking forces.
The braking effect of modern brake systems
can be more powerful than what you have
been used to until now. Do brake carefully.
28 HP
Velotechnik
Danger! Please note that the braking distance is much longer when it is wet or
when the bike is heavily loaded.When riding
on wet, sandy, icy or slippery roads you have
to use the front brake very carefully to avoid
that your front wheel slips. If it does so, you
will no longer be able to handle your bike,
which might lead to a serious fall.
Do not brake in a bend, always brake before a
bend. Braking increases the risk of slipping.
Danger! In case you get into a situation like
that during an emergency stop you have to
let go of the brakes immediately, balance
your bicycle and brake again. If you are not
familiar with the brakes, we recommend you
to train at first at low speed and with little
braking effect until you find the correct dose
for an emergency stop.
If you should hear any unusual sounds while
braking or the braking effect is reduced, the
braking pads might be worn. Do not use your
bike any further until you have checked the
braking pads according to the manual of the
brake manufacturer or ask your local dealer.
Caution! Disc brakes can overheat on long
downhill rides, fade and fail! Do not pull the
brake levers constantly but brake powerfully
from time to time. If you notice that the
braking power starts to fade, do stop immediately and let your brakes cool off!
Check before every ride:
●
that the brake system does not have any da
mages or leaks by activating the lever, holding
it and checking the hose connections for
possible leaks.
●
that the brake lever pressure is ok by pulling
the lever and ensuring that full braking per
formance is achieved before the lever tou
ches the handlebar. If this is not the case, ad
just the cable or change the brake pads, for
hydraulic disc brakes pull the lever several ti
mes (pump) until it feels firm.
●
check the hydraulic brake system for the
correct pressure by pulling the lever, holding
the pressure and checking the hose connec
tions, bleeding screw and compensating tank
for possible leaks.
Danger! Never touch neither the brake
disc nor the brake caliper after long braking
as this may cause serious injury (risk of
burns).
New brake systems, new brake pads and new
brake discs need a break-in period to achieve
maximum brake power.This period lasts for
about 30-40 stops from about 30 km/h
(20mph), which should be done in a safe area
without traffic.
HP
Velotechnik
29
Handling instructions
Danger! Always make sure that the disc and
brake pads are free of oil and grease. If these
parts are dirty please do not use your bicycle any more.You can clean oily brake discs
with alcohol or a special spray. Oily brake
pads have to be replaced. If you are in
doubt, please have your specialist dealer
maintain your brake system.
Gear System
Gear System
With the gear system you can adjust the pedaling frequency, that means the number of revolutions of the crank per minute, to the terrain
and the desired speed.
Your pedaling frequency should stay between
80-100 revolutions per minute and not fall below 60 while going uphill. If necessary consult
your local dealer and have him retrofit the gear range to your style of riding.
Your Spirit comes with DualDrive gear system
by SRAM that combines a 3-gear internal hub
gear system with an 8-gear derailleur gear to
24 gears in total, which are easy to handle. As
an option, you can order the Spirit with a 14gear internal hub gear system made by
ROHLOFF or only a derailleur gear system..The
following section refers to the DualDrive gear
system only. Please refer to the manual of the
gear manufacturer.
With the left-hand twist grip you operate the
hub gear system.You can turn the grip in a
standing position, and while riding during pedaling or without.The most comfortable and easiest way to shift gears is to shift while pedaling with reduced power.
According to the terrain choose between the
uphill mode "I", standard mode "2" and racing
mode "3".We recommend you to ride mostly
in the standard mode since the transmission
operates then with the least loss.
30 HP
Velotechnik
With the right-hand twist grip you operate the
derailleur gear.You may only change the gears
while you keep pedaling, smoothly and without
applying great force, all the time that the chain
is moving between the sprockets.
Choose between the easiest gear "I" and the
heaviest gear "8".
Due to the long cables that expand under
pressure and the housing that compresses under pressure, it may be helpful for changing gears quickly to turn the twist grip a little bit
farther than necessary to select a gear and
turn it back to the indexed position once the
chain has properly shifted ("overshift").
Riding a recumbent requires foresighted gear
shifting. Before stopping you should timely
change in a low gear to make it easy to start
off again, without having to pedal heavily struggling with your balance. Also while standing
you can still operate the left-hand twist grip to
the uphill mode "I".
Danger! Do practice shifting gears on a
traffic-free street. In the course of this, make
yourself familiar with the functioning of the
twist grip shifters. Doing this in traffic could
distract your attention from possible dangers.
In case your gear system does not operate
smoothly anymore or causes noise while pedaling, please have your gear system adjusted once more according to the instructions on page
35.
Light system
If you want to ride your bike on public streets,
it must be equipped with a legal light system.
Do not only use your lights in the dark but also in the twilight of dusk and dawn. Due to
laws and regulations the brightness of bicycle
lights may be considerably lower than that of
other vehicles.Therefore always keep in mind
that other road-users may only see you very
late or not at all.
For the Spirit, HP VELOTECHNIK offers two different dynamo light systems: one with a tire
dynamo and the other with a hub generator.
Both light systems come with strong LEDs for
headlamp and rear light.The LEDs last considerably longer (approx. 100.000 working
hours) than a light bulb. For your safety the
light system has a standlight system at the
front and at the rear light, which makes the
LEDs shine a few minutes after you have stopped riding.The electronic system is maintenance free. Because of the capacitors used you
don't have to worry about batteries.
The cables and the contacts can be affected by
corrosion or mechanical damage.Therefore,
check the light system before every ride.
red knob:
Push for ON
Turn knob to
adjust friction
force
You switch on the tire dynamo by pressing the red button.To
switch off the dynamo move it away from the wheel.
Tire dynamo
You turn on the light system with the tire dynamo at the rear wheel by unlocking the swiveling dynamo. For this purpose, you press the
red button at the dynamo until it moves towards the rear wheel.To turn the light off, you
turn the dynamo by hand back to its initial position.
Danger! Do not try to operate the dynamo
lever while riding, your hands could be
caught in the wheel and be injured! To turn
the light system on or off stop riding, dismount your bicycle and only then do turn
the dynamo lever.Turn the lever carefully without applying force else you might bend the
lever and damage the plastic parts of the dynamo.
Danger! The dynamo must always be safely
fastened to the bracket at the frame, so that
it can not turn. If the screws comes loose
the dynamo can get caught in the spokes
and block the rear wheel - danger of a serious fall! Always check the position and secure attachment of the dynamo before a ride.
HP
Velotechnik
31
Handling instructions
Light system
Light system, Prop stand
You can adjust the pressure of the dynamo
against the wheel with the turning knob at the
side.The pressure is right when the dynamo
wheel just does not slip at the wheel, if the
light flickers, the pressure is too low and you
have to increase it.The position of the dynamo
should be so that the extension of the dynamo
axle points through the center of the wheel.
Take care that the dynamo is mounted safely
and does not turn.Worn dynamo wheels can
be exchanged. Please ask your specialist dealer.
Hub generator
The light system with a hub generator is switched on electrically. For this purpose you will
find a switch on the back of the rear light with
three labeled switch positions.With the switch
you can turn the lighting system ON, OFF or
set it on SENSOR. In the SENSOR position a
twilight sensor in the lamp turns the lighting
system on and off automatically, depending on
the brightness of the environment.
The SON hub generator is highly efficient and
works silently.When the dynamo is turned off
it has a very low turning resistance. Although
you can feel the single poles of the used permanent magnets very distinctly when turning it
by hand, the real rolling resistance is minute.
(The loss is at 15 km/h under 1 Watt).
For details on the hub generator please visit
www.nabendynamo.de.
Prop stand
Only operate the prop stand when you stand
beside your bicycle. In case you have a lowrider mounted to your bicycle, the prop stand
would touch it under load.
Danger! Before every ride check whether
the prop stand is lifted up to its riding position.With a recumbent prop stands are often forgotten. In the first left turn the prop
stand can touch the ground and cause a fall!
After a fall you will have to check the prop
stand and the area where it is mounted for
damage and deformation.
Before riding check that the propstand in any
position does not affect the function of other
parts.
The propstand is only suitable for parking the
bike on even, solid ground. In case of unsuitable ground, luggage load or mounted fairings
we recommed to lean the bike securely against
a solid wall or pole.
You switch on the hub generator light system with the integrated
switch at the front light.
Maintenance and care
Brakes
Your Spirit is fitted with the latest bicycle
technology that does not require much maintenance.
The brake pads suffer from wear due to friction and have to be exchanged then. Depending
on riding conditions, they can last bewteen a
few hundred up to several thousand kilometers. Please read the manual of the brake manufacturer carefully.
However, you will have to maintain your bicycle regularly, as it is with other vehicles too. At
least once a year the bicycle has to be taken
to a bicycle mechanic for an overall service.
Only this way a long lasting and safe function
of all parts of your bicycle can be guaranteed.
It maintains the value of your bicycle as well as
the fun and the safety while riding for many
years.
Read in this chapter how you can carry out
smaller maintenance and care works between
the services.
For a quick overview of the works to be done
take a look at the warranty pass on page 58.
Wearing parts
Caution! The maintenance works of this recumbent partly require special tools and
skills. Do only work within your limits and,
in the interests of your own safety, do not
go beyond. Should you be uncertain at any
point, get in contact with your local dealer.
Like every other vehicle the bicycle has parts
that suffer from wear and tear.The life span of
these parts depends on how often and how
they are used, as well as how they are cared
for. Please note that the wear and tear of certain parts of the bicycle is perfectly normal
and not a reason for complaint.This manual
contains information about the most frequent
wearing parts.
With rim brakes the rim walls suffer from
wear.When the rims are too worn the tire
pressure can tear up the rim and damage the
wheel. Please have your bicycle mechanic check
your rims at the latest after the second brake
pad change and exchange them if necessary.
cable operated (mechanical) brakes
The brake pads of your brakes are worn when
you can pull the lever further and further to
the handlebar before the pads touch the rim.
Rim brakes:When the pads are so worn that
you can't see the cross grooves of the pad
anymore you will have your bicycle mechanic
exchange the brake pads.
To balance the wear of the brake pads you can
tighten the cable with the adjuster barrel
where the cable goes into the brake lever. First
loosen the locknut, then undo the screw so far
that the wheel turns, barely not touching the
pads, hold the screw and tighten the locknut
again towards the brake lever.Take care that
the slot of the adjuster points down so that
no moisture enters from above or the front.
Caution! Damaged cables where single
wires stick out have to be exchanged immediately. Otherwise your brake system may
fail - danger! Please take care that the cable
ends are always protected with a cap.
Always keep the cables shortly trimmed.
Leaving too much cable extending past the
cable anchor can result in the cable catching
in the rotor or wheel, which could then be
pulled in the calliper, causing the wheel to
lock up.
HP
Velotechnik
33
Maintenance and care
Maintenance and care, Brakes
Brakes
mechanical disc brakes
If the brake pads are worn so far that tightening the cable tension is not sufficient, you can
re-align the brake calliper in the slotted holes
and adjust the inner brake pad with the hex
bolt at the hub side of the brake calliper. Have
this adjustment work done by a qualified bike
mechanic.
Danger! All maintenance work on the hydraulic system of your brakes may only be
carried out by a qualified technician. In case
these works are carried out without the required knowledge and skills the brake system might fail which can lead to a serious
crash.
CHeck your brake pads frequently as explained in the manual supplied by the brake
manufacturer.Worn brake pads, oily od damaged pads must be exchanged immediately by
a qualified bike mechanic.
hydraulic rim brakes
To balance the wear of the brake pads there is
a turning knob at the brake lever.Turn this
knob anti clockwise to move the pads closer
to the rim. As soon as the knob doesn't turn
anymore the brake pads have to be exchanged.
Before you change the pads turn the knob
clockwise as far as it will go, back to the initial
position.
Hydraulic brakes
MAGURA hydraulic brakes use low viscosity
mineral oil that, contrary to DOT brake liquid
used in cars, does not absorb water.Thus, you
don't have to change the oil. Please read the
MAGURA manual that comes with the bike.You
will find more detailed maintenance instructions in the manual "Workshop" that is available for download from MAGURA at
www.magura.com. In case of a damaged hose
or any leakage of oil always consult a qualified
technician in a bike shop.
hydraulic disc brakes
MAGURA disc brakes feature a fully automatic
pad wear adjustment. Brake pads are subject
to wear, therefore regularly check the thickness of your brake pads and replace them, if
necessary. The minimum thickness of the
brake pad incl. metal backing is 2.5 mm.
Caution! Never activate the lever blade
without the brake pads in place and with the
wheel dismounted.When you transport the
bicycle without wheels always use the transport clips delivered with your bike or put a
piece of cardboard in the brake calliper to
replace the disc. Carefully separate brake
pads that have moved together with a
screwdriver.
34 HP
Velotechnik
Gear system
Please read the manual of the gear system manufacturer carefully when you want to work
on it.
Your dealer will have carefully adjusted your
derailleur gearing system before handing over
the bike. But during the first 300 kilometers
(186 miles) of riding, the gear cables can
stretch, making the gear indexing imprecise.
The chain then climbs only hesitantly onto the
next sprocket.
Adjusting the gear indexing for the derailleur gear
Adjust the barrel adjuster where the gear cable goes into right twist grip or the derailleur.
Do it in small steps of half a turn.
Check after each adjustment whether the
chain moves smoothly up to the next larger
sprocket.To do this, either turn the cranks by
hand or ride the bike.
When the chain climbs up easily, you need to
check that it still goes down easily onto the
smallest sprocket. If necessary turn the barrel
adjuster a little more and then try shifting gears again.
Danger! If the chain shifts over the smallest
or the biggest sprocket you have to readjust
the end-limit adjusters of the rear or the
front derailleur. Incorrect adjustment can lead to the chain coming off, getting stuck or
damaging the spokes, which may result in serious falls.The adjustment of the end-limit
adjusters is a job for the professional cycle
mechanic.
Danger! If the bike falls over, the derailleur
or its mounting can be bent so that the movement of the derailleur changes. Check the
movement and have it readjusted by your bicycle mechanic, if necessary.
Adjusting the gear indexing for the
DualDrive hub gear
Turn the left twist grip for the hub gear to the
standard mode "2".
At the right side at the rear axle there is the
click box for the hub gear. In the transparent
window you see a yellow indicator. Adjust this
indicator in line with the mark at the click box
by turning the adjustment screw where the cable goes into the box.
All moving parts of the gear system are affected by wear. Cleaning and lubricating these
parts frequently can prolong the life of these
parts, however they will have to be replaced
once worn out.
The cables have to be checked, cleaned and
serviced regularly. Expect more wear and corrosion when the bike is often parked outside
in bad weather conditions.
Caution! Damaged cables that show for
example single wires have to be changed
immediately. Otherwise they may damage
your gear system.Take care that the ends
of the cables are protected with fitting
caps.
HP
Velotechnik
35
Maintenance and care
Gear system
Chain
Chain
The chain is a wearing part that has to be lubricated regularly and to be changed at signs
of excessive wear and tear.
Lubricating the chain
Diligent lubrication is important.The chain of
your Spirit is approximately 2.5 times longer
than a standard bicycle chain (approx. 2.9 m,
119 inch). But it also lasts longer since a chain
only wears while bending at the sprockets and
the chain rings.
Use a good chain oil that won't leave a sticky
film on the chain.The chain oil must not contain any aggressive chemical substances that
might affect the surface of the chain tube.
Specialist stores sell biodegradable lubricants.
HP VELOTECHNIK solely recommends
ProfiDryLube.This lubricant is purely based on
PTFE (Teflon) that keeps the chain clean and
dry.This way dirt simply falls off and the tubes
always stay clean.Your dealer can obtain it
from HP VELOTECHNIK.
It is important that you clean the chain with an
oily cloth before lubricating. Otherwise the
fresh oil washes the dirt that clings to the
chain into the gaps and the bushings where the
dirt causes heavy wear.
Do not use any solvents to clean the chain!
The solvent washes the oil off the bearing
parts, stays there and dilutes the fresh oil so
that a sufficient lubrication is not guaranteed. If
you have treated the chain with a solvent you
will have to heat it up with a hot air torch or
boil it in chain grease.
36 HP
Velotechnik
An effective protection against corrosion is
critical for a long chain life. Some minutes after
you have oiled the chain rub it with a cloth to
remove superfluous oil from the outer surface.
Wax the chain thoroughly with a wax spray.
The wax keeps off water, protects from corrosion and makes dirt fall off easily.
Danger! Take care not to pour any oil on
the brake discs or the tires.The brake system could fail or the tires could slip away
suddenly.The oil affects the rubber of your
tires and could damage them.While lubricating cover the surrounding area with an old
newspaper.
If the chain has become wet after riding in the
rain you should put your bicycle in a dry and
heated room, and every day you should turn
the crank and so move the chain until it is dry
again. Otherwise it is difficult for the moisture
in the tubes to evaporate which may lead to
corrosion at the chain.
Check the chain regularly for lengthening. For
this purpose try to remove the chain from the
chain ring.The chain may come off to a maximum of 5 mm (0,2 inch). For a more precise
reading you can buy a chain measurement gauge in your bike shop that you simply put into
the chain.
Only use chains that are suitable for the gear
system of your bike. Otherwise a precise gear
shifting is not guaranteed any more. Please
consult your dealer on this topic. He will also
assist you in checking your sprockets and chain
rings. A new chain does not fit a worn sprokket or chain ring.We recommend chains from
SRAM (former
SACHS/SEDIS) with rounded edges.They also
shift gears very well.
The chain length has to be fitted so that the
arm of the derailleur is not fully stretched
when you shift onto the the big rear sprocket.
The derailleur must be able to compensate a
tightening of the chain by 4 cm. Please see also
the manual of the derailleur manufacturer on
the choice of the correct chain length.
Caution! The chain has to be closed with a
special joining link or a chain riveting tool
that expands the ends of the rivet while riveting (ROHLOFF revolver).A poorly joined
chain may break, you can come off the pedals and fall. If you are in doubt please have
adjustments of the chain length or the changing of the chain be done by your bicycle
mechanic.
See that the joining link is not bigger in size
than the other chain links to avoid irregular
chain sounds.We recommend the joining links
by SRAM (power links). Every time you change
the chain you also have to mount a new power link.
Caution! When you change the chain take
care that the new chain does not show any
sharp edges or burrs.Very thin racing chains
are also not suitable since they wear the
chain tubes and the chain roller much faster.
HP VELOTECHNIK delivers spare chains by the
meter via your dealer. For this purpose please
indicate the exact length of your chain or order it a little bit longer if you want to be sure
it fits.You will need approx. 1,9 m (119 inch) of
chain.
HP
Velotechnik
37
Maintenance and care
Changing the chain
The chain is one of the parts of the bike that
will wear out.This shows in a stretching of the
chain.Worn out chains do not fit the sprockets
and the chain ring anymore and wear them
away very quickly.
Chain tubes
Chain tubes
The chain protection tubes are made of a long
lasting plastic that features very low friction,
slow wear and good noise damping.The tubes
protect your clothes against the chain oil as
well as the chain against dirt from the road.
The tubes are attached to the frame with a
flexible belt an zip-ties.
The tubes are worn by the chain and have to
be cut at the ends and expanded again (or exchanged) after 3.000-5.000 km (1600-2700 miles) approximately, depending on how many kilometers have been ridden, on the chain type
and the overall riding condition.You can extend this maintenance interval by turning the
tubes by a quarter turn from time to time so
that they do not keep wearing out in the same
place.
The intensity of the wear depends mainly on
the chain type. Please see also the instructions
on "Chain" on page 36.
In order to perform any work at the chain tube you'll have to open the chain and finally close it again. Please see the instructions on
"Chain" on page 36.
Caution! Take care that the chain tubes
keep at least a 5 cm (2 inch) distance to the
rear and front derailleur when the chain is
stretched to the maximum, and that the tubes are well fastened. If necessary you will
have to shorten the tubes. If the end of a
chain tube gets into the rotating drive train
it can be blocked and the chain tubes may
be destroyed.
38 HP
Velotechnik
Expanding the tube ends
The ends of the tubes are expanded like a
trumpet so that the chain can enter smoothly
without friction and without making noises.
When the ends are worn out you can renew
them through expansion. Remove the chain by
opening the power link or open it with a special chain riveting tool. Cut the worn part of
the tube exactly perpendicular with a sharp
knife.
Heat the last 5-10 mm (0,2-0,4 inch) at the
end of the tube with a gas burner or a candle
and turn it permanently until the color of the
utmost edge turns from a dull black to a shiny
black. Now you expand the end with a proper
tool, e.g. the grip of a screwdriver. Quench the
expanded end immediately with cold water.
Take care that the tubes don't catch fire.
At any rate, work in a place with sufficient
ventilation.
If the tube is too short after you have cut it so
that there is not enough protection anymore it
has to be replaced.You can buy spare tubes
either as uncut tubes or already cut into the
correct length, complete with retention spring
from your specialist dealer.
Changing single tubes
Open the chain as described above and remove it entirely from the tube you want to change.
Maintenance and care
Use a side cutter or sharp knife to cut the cable tie that holds the tube in the belt. Remove
the old tube from the belt loop.
Put the new tube through the belt loop. Put a
cable tie through the ring in the belt and
around the tube so that the lock of the cable
tie lies hidden in the belt. Move the cable tie
so that there are at least 5 cm to both the biggest rear sprocket and the chain blade cover
at the front.Tighten the cable tie firmly and
cut off the spare end.
Thread the chain again through the tube.Take
care not to twist the chain. Close the chain
again as described above.
HP
Velotechnik
39
Suspension Fork
Suspension Fork
Please clean the dust boot and the tube below
every four weeks. Lubricate the free part of
the slider tube after cleaning.Take care that
the dust boot fits well. Otherwise, dirt and water can lead to corrosion.
lubricating the suspension fork Federgabel
Dismount the stem, remove the adjustment
screw and the springs as described under
"Exchanging the spring of the suspension fork"
on page 20.You don't have to dismount the
headset.
Always check the correct position of brakes
and wheels after you have worked on the suspension fork as described in the respective
chapters.
The inner fork steerer tube is tightly fitted and
glued in the fork crown, never try to tear this
connection apart or to change the tube.
Never add threads to the steerer tube - danger of breaking! You can only use the fork with
A-Head type headsets.
A new suspension fork needs a break-in phase
of at least 300 km (160 miles) for thesliding
surfaces to smoothen. At the beginning, the
suspension compresses only under heavy
shocks. In order to judge the response or the
play properly you should first wait for the end
of the break-in phase.
Undoing the screw in the steerer tube.
Compress the fork entirely.
Now undo the screw with a long Allen key
SW4.
Pull the lower part of the fork out of the frame. Remove the screw with the two washers
and the O-ring below upwards.
After 1000 km (550 miles), at the latest after a
year, depending on what occurs first, you have
to lubricate the suspension fork.
In case the fork shows play, it can be adjusted.
Please ask your local dealer for assistance.
Remove the lower part of the fork downwards.
40 HP
Velotechnik
Lubricate the slide tube, the safety bolt against
twisting and the inner part of the steerer tube
with a good, acid-free grease.We recommend
a lubricant with added solid particles like
Teflon.
Carefully reinsert the lower part of the fork in
the steerer tube.Take care not to cant the
fork and to insert the safety bolt against twisting carefully in its guide.
Put the O-ring from above on the upper
round part of the safety bolt.Then insert the
screw with the two washers in the steerer tube and tighten it with 5.5 Nm.
Clean the springs, the spring bush and the spacer. Slightly grease the springs and the bushes.
Mount the adjustment screw with at least 12
turns. Adjust the pre-load and mount the stem
as described under "Adjusting the pre-load of
the suspension fork" on page 19.
Adjusting the steering play
At the suspension fork of the Spirit the steering movement is transmitted via the safety
bolt against twisting at the steerer tube to the
lower part of the fork and so to the front
wheel.
The transmission should happen without noticeable play, at the same time the fork should
compress slightly under shocks.
You can check this steering play by holding the
front wheel. If the handlebars move without resistance the play has to be reduced by adjusting
the torsion guides.
In order to adjust the play you have to dismount the fork from the frame.
For that purpose, you have to dismount the
stem. Remove the clamping clip above the headset and then remove the headset.That way,
you can pull the entire fork together with the
steerer tube out of the frame.Take care not to
bend any cables.
In the middle of the steerer tube there is a bigger safety screw
and a smaller adjustment screw, facing each other.
Undo the two safety screws and the adjustment screw by 1.5 turns.
HP
Velotechnik
41
Maintenance and care
Clean the slide tube, the safety bolt against
twisting and the inner part of the steerer tube
with a soft cloth.
Suspension Fork
Press the fork together and try whether it
compresses easily. If this is not the case, you
have to clean the fork and lubricate as described on page 40.
Play in direction of travel
If you notice at your bicycle that the handlebar-fork-unity has play in the direction of travel, this may have several causes.
Tighten both adjustment screws with 1 Nm. It
is important that you tighten both screws
evenly.
First please check if the headset is mounted
correctly and adjusted without play. Please also
see the instructions on page 43 for that.
Tighten the two safety screws with 2 Nm.We
recommend to fasten the screws in addition
with LOCTITE.
When you pull the front brake and rock the
bicycle a little bit back and forth while sitting
on it you may notice a play in the disc brake
system.
Check whether the fork compresses easily. If
not the adjustment screws have been fastened
too tight or unevenly.
Wrap a cloth around the steerer tube and carefully clamp it in a workbench. Check the play
by turning the lower part of the fork back and
forth.
If the fork has still play adjust the screws again
and tighten them evenly a little more.
If the fork shows no play you can remount it
to the frame. Clean, lubricate and mount the
headset. Put the clamping clip on the steerer
tube above the headset. Adjust the headset as
described on page 43.
Remount the stem to the steerer tube. Keep
the front wheel with your legs in place and adjust the handlebars right-angled to the front
wheel. Adjust the clamping screw with 18-20
Nm. Check the clamping by trying to twist the
handlebars against the front wheel.
42 HP
Velotechnik
The brake pads have a small play in their guides that gives a jolt while rocking. In any case
check whether the caliper is tightly and correctly screwed to the frame and whether the
brake disk is tightly connected to the hub.
The suspension fork itself also has a slight normal play in the direction of travel that you'll
notice while rocking back and forth with the
front brake pulled. Similar to conventional telescopic forks this is immanent in the construction and does not cause problems while riding.
The bushing (as well as the springs) suffers
from wear which depends on the frequency of
use, dirt and lubrication.
If the bushing is so worn that the play makes
the steering movements unprecise or produces unusual noise, the fork or maybe only the
plain bushing has to be exchanged. Please contact your dealer for this service.
Headset
Headset
The headset can become loose through heavy
shocks on the road.
Adjusting the play
The steering head bearing has to be adjusted
Caution! Do not ride with a loose headset.
This increases the strain on the fork and the
headset bearing.The headset may be damaged or the fork may break.
so that the fork turns easily with the front
wheel without having play.
To check the bearing play pull the front brake
and grasp with the other hand the upper steering head bearing.Then rock your bicycle hard
back and forth. If the steering head bearing has
play the upper housing distinctly shifts with respect to the lower.
To adjust the bearing you need the adjustment
bushing and the end cap that have come with
your bicycle. (With the optional folding stem,
there are no adjustment bushing clamping clip.)
Put the adjustment bushing on the steerer
fork tube over the clamping clip. Screw the
end cap tightly into the steerer tube. For that
purpose, the adjustment screw for the pre-load has to be turned into the steerer tube by
at least 12 mm (5 inch).
Adjusting the headset with mounted adjustment bushing.
Undo the screw of the clamping clip by one or
two turns.
Carefully turn the end cap with an Allen key
SW8 a little bit.
Caution! Do not tighten the end cap very
hard. It is only used to adjust the play. If the
headset is adjusted too tight the surface of
the bearings can be damaged.The consequence is a turning with jolts and rest positions.Then, the headset has to be exchanged.
In order to check whether everything works
smoothly lift the bicycle at the frame so that
the front wheel moves freely above the
ground. Lean the frame a little sideways. Now
the handlebar should immediately cramp
smoothly.When you hold the frame steady and
touch the handlebar lightly it should turn
smoothly, without jolts, from its middle position.
If the bearing is adjusted too tightly undo the
end cap a little bit. If necessary, you can loosen
it with a light blow of a rubber hammer.
Repeat the adjustment.
HP
Velotechnik
43
Maintenance and care
The front fork is pivoted in the frame through
the steering head bearing, also called headset.
Headset
After the headset has been adjusted without
play tighten the screw of the clamping clip
with 4-6 Nm.
Remove the end cap and take the adjustment
bushing off the steerer tube. Safely deposit
these two adjustment tools, best together with
this manual.
Remount the stem to the steerer tube. Keep
the front wheel with your legs in place and adjust the handlebars right-angled to the front
wheel. Adjust the clamping screw with 18-20
Nm. Check the clamping by trying to twist the
handlebars against the front wheel.
Lubricating the steering head bearing
Once a year the steering head bearing has to
be dismounted, cleaned and lubricated.
Take care of the exact order and position of
the different parts of the bearing. After you have undone the clamping clip you have to readjust the headset as described above. If you are
in doubt have your bicycle mechanic lubricate
the steering head bearing.
44 HP
Velotechnik
Headset adjustemnt with folding stem
With the optionally available folding stem, the
stem is clamped directly to the fork’s steerer
tube; no clamping clip or adjustement bushing
are installed.There is a cap above the folding
stem in the end of the steerer tube.
After you have adjusted the bearing play as described above check if the stem is adjusted in
a parallel position to the front wheel and tighten the two clamping screws alternately with
8–10 Nm. Check the clamping by trying to
turn the stem against the front wheel.
Danger! The hex-headed screw in the cap
adjusts the play of the steering head bearing.
This screw does not help to clamp the stem
tightly to the steerer tube. It does not secure it against turning.Take care that both
clamping screws on the side are tightened as
prescribed after you have finished your
works at the stem. Otherwise the stem may
turn while riding and cause an accident.
Changing the springs of the rear suspension element
You can buy the spring for the rear suspension
element in different spring stiffnesses from
your dealer.
We recommend the following spring stiffnesses, depending on the overall weight:
up to 80 kg (183 lbs): 650 lbs./inch
up to 100 kg (230 lbs): 850 lbs./inch
up to 130 kg (286 lbs): 1100 lbs./inch
Spring lengths:
DV22: 70–90 mm (2 3/4 – 3,5 inch)
(Length of the spring element: 150 mm)
In order to change the spring you will have to
remove the upper screw and swing away the
rear frame.
Hold the main frame of your bicycle in a work
stand.
Push the safety ring at the thread of the suspension element to the front, so that you can
undo the adjustment ring completely and then
turn it to the utmost position at the front.
Remove the slotted spring retention disc at
the rear end.
Danger! If the bicycle does not stand on
the ground while undoing the screws of the
suspension element, the rear swing arm may
come down uncontrolled afterwards and
hurt you seriously. In addition to this, the cables of the gear system and the brakes may
overstretch or bend and you would have to
replace them. Ensure that the rear swing
arm comes down in a controlled and gentle
fashion by putting up a solid string or cable
tie between the main frame and the rear
swing arm.
Danger! When the bicycle is standing on
the ground, the frame and the swing arm come up against each other. Please make sure
that this happens in a controlled and gentle
fashion. Put a cloth between the contact points.Take care not to squash your fingers.
Undo the screws of the rear suspension element with two Allen keys and push the screw
out of the suspension element eye.
Remove the spring from the suspension element and put in the exchange spring. Make sure that the new spring has the same diameter
and length as the old spring and that it lies safely on the adjustment ring.
Put back the slotted upper spring retention
disc on the piston rod. If necessary, compress
the spring a little bit with a screw driver.The
spring retention disc has to match its seating
at the rear end of the suspension element.
Secure the spring by tightening the adjustment
ring until the spring doesn't have any play anymore. Push the safety ring back into the slot
on the thread.
Move the rear swing arm back up and connect
the rear end of the suspension element with
the rear swing arm with the bolt. Lubricate the
bolt thoroughly. Secure the screws of the suspension element with LOCTITE and tighten the
screw with 6-8 Nm.
Readjust the spring pre-load as described on
page 19.
HP
Velotechnik
45
Maintenance and care
Rear suspension element
Rear suspension element
Cleaning the suspension element
Do clean the suspension element, especially
the polished piston rod, if it is dirty. Remaining
dirt can damage the seals of the hydraulic system and so shorten its life considerably.When
you often use dirty roads you can protect the
suspension element from dirt with an elastic
cover that you can buy at your local dealer.
From time to time grease the thread for the
spring pre-load with a drop of acid-free oil.
Thus, you can always turn the adjustment ring
easily by hand. Once a year you have to grease
the pivots of the suspension element. For that
purpose dismount the suspension element as
described under on page 23.
Remove the plastic spacer and pull the metal
tube off the bushing. Lubricate the bushing and
the tubes with grease. Finally remount the suspension element.
Hydraulic dampers are effected by wear and
tear through normal use. It depends on the
usage of the bike, the amount of dirt on it and
the maintenance and lubrication how long it
lasts. After 3000 km the damper must receive
an inspection by a trained mechanic, worn out
parts or the hydraulic cartridge can be replaced then. Due to wear of the seals oil can leak
drom the damper or the internal oil can become foamy.This may lead to some noise when
the damper is working.This noise does not effect the function of the damper. Only if there
is no obvious damping after the first 5 mm of
travel, the damper should be replaced.
Please also note the maintenance instructions
of the damper manufacturer provided with
your bike.
46 HP
Velotechnik
The bushings of the rear spring element need to be lubricated
once a year.
Swing arm pivot
The rear swing arm pivot comes with maintenance-free bushings.They have a self lubricating system with Teflon particles.The bushings
sustain a very high load and they show almost
no wear.
In case you notice play or a creaking noise at
the rear swing arm please check the two
screws that keep the axle in the frame.They
will have to be secured with Loctite.
Tightening torques:
Mushroom head screw M8x25: 14-16 Nm
The bushings are exchangeable. For that purpose you will have to dismount the rear swing
arm and send it together with the axle via
your specialist dealer to HP VELOTECHNIK. After
having been mounted the bushings are machined to adjust them.
Undoing the axle screws
In order to mount the rear rack or the lowrider the axle screws have to be undone.We recommend you to leave one screw in place to
prevent the axle from turning.
In case the rear swing arm is to be dismounted completely you can prevent the axle from
turning by inserting a thin metal rod in the
drilling of the axle through the drilling of the
rear swing arm under the axle.
Danger! If the screws of the axle are not
tight enough this leads to play and noises
when the spring compresses. In extreme
cases the swing arm may come loose which
leads to a serious fall. If the screws are too
tight the thread of the axle may tear out or
the screw may be damaged.
Caution! There has to be a big washer
between the main frame and the end of the
bushing, else the busing is not able to function without play and the frame will be damaged.
You can prevent the axle from turning by inserting a thin metal
rod in the hole of the axle.
HP
Velotechnik
47
Maintenance and care
Swing arm pivot
The seat
The seat
The seat cover of the back rest stretches under load. On the back, there are four belts to
tighten the back rest again.Try different tensions; often, a somewhat lower tension appears
to be more comfortable.
Clean the back rest with lukewarm water and
a sponge. Do not put it in the washing machine, since the net material with the reflective
strip will be damaged.
Clean the back rest and the zipper with lukewarm water.
The seat cushion suffers from wear and tear. It
can be damaged by sharp items or by chemical
cleansing agents.When the surface is worn or
damaged you will have to exchange the cushion. Otherwise, dampness could get into the
seat and affect the wooden underside, which
would endanger its solidity.
If you dismount the quick releases of the seat
fastening, take care to remount the black plastic bushings between the sliders when you
put them back.These bushings work as compression springs that push the sliders away
from the clamping rail after you have opened
the quick releases. Only that way can the seat
be smoothly moved on the rail.
At the front quick release there are on both
sides knurled washers between the quick
release and the aluminum fittings.These washers provide the clamping force necessary for
the adjustment of the angle of the back rest.
The knurling might affect the coating in the
clamping area slightly but it does not interfere
with the functionality.
48 HP
Velotechnik
Water bottle cage
Water bottle cage
You can mount a water bottle cage at the
main frame. For that purpose, there are threading inserts M5 at the top of the frame.
Maintenance and care
You can mount another water bottle cage at
the stem, using the respective clips.Take care
that the clips don't have sharp edges in order
not to damage the surface of the stem.
Before buying a water bottle cage please try
whether it fits your Spirit and accesses easily.
Another useful alternative to water bottles are
systems with a "water bag" and a drinking hose, e.g. from Source or Camelbag.You can simply strap them behind the seat, onto the rear
rack or to your pannier.
HP
Velotechnik
49
Mudguards
Mudguards
At bicycles with suspension, mudguards are
exposed to very strong vibrations and may
break through wear. Please check the stays of
the mudguard regularly for their position and
check the mudguards for cracks or deformations. Immediately replace damaged mudguards.
Caution! You must not mount additional
parts like rear lights or reflectors to the
mudguards since those may break then.
Danger! If branches or other obstacles get
caught in the wheels while riding and are
moved around they may drag the mudguards
along.The mudguard can possibly fold up
between frame and tire and hence block the
wheel, which may lead to a serious fall. If you
hear any unfamiliar noises while riding stop
immediately and remove anything that might
cling to the mudguards or the wheels.
In order to prevent falls you have to fasten the
stays of the front mudguard with a security
clip that opens under pressure.When the clip
has opened once please replace it with a new
one.
After you have performed service work or replaced mudguards check if the wheels turn
freely. Between mudguard and wheel there has
to be a distance of at least 7 mm (0,2 inch).
50 HP
Velotechnik
Check whether the wheels still fully compress
with the mounted mudguards.The mudguards,
stays and screws must not touch other parts
under maximum compression.
Wheels
The correct air pressure is decisive for
smooth running and a good protection against
punctures.The maximum pressure is printed
on the side of your tire. Since your Spirit is fully suspended you can always go for the maximum pressure.You might find an indication of
the minimum required pressure on the side of
the tire as well.
Since the tubes in the tires gradually loose air
you should check the air pressure before every ride.
Before pumping up the tire, you have to undo the little knurled
nut on the valve.
The tubes come with Presta valves (also called
french valves).They are very airtight and easy
to pump up. For that purpose first undo the
valve cap.
Danger! Never pump up your tires beyond
the maximum pressure.The tire may burst
while riding or come off the rim, which may
result in a serious fall.
Now you see a small threaded rod with a
knurled nut that comes out of the valve. Undo
the knurled nut by loosening it as far as it
goes.
To pump up the tire and check the pressure
you need a pump with a gauge, preferably a solid standing air pump. Put the knob of the
pump on the valve, push it completely on the
valve and then retract it a little bit. Now you
can pump up your tire easily.
After you have pumped up the tire to the maximum pressure pull off the pump knob.
Secure the valve through turning the knurled
nut on the threaded rod as far as it will go towards the valve. Finally put on the valve cap
again.
Danger! Check your tires for damage on a
regular basis.You should exchange tires with
worn threads or damaged sidewalls.
Damaged rim tapes have to be exchanged
immediately. Damages at the tires may lead
to a sudden burst of the tire and thus result
in a serious fall.
When you exchange tires please note the maximum width limit of 54 mm (approx. 2").We
recommend tires that are 40-54 mm (1,6 - 2
inch) wide. At the front wheel you have to use
tires of ISO size 305 (16"), at the rear wheel
ISO size 406 (20").The tire width possible at
your bicycle depends on the size of your rims.
Please ask your local dealer.
HP
Velotechnik
51
Maintenance and care
Wheels
Wheels, Cleaning
After you have exchanged the tires please
check if the wheels turn freely and check the
minimum distance between mudguards and
frame.
Due to the small wheel diameter even small
tolerances in rim or tire diameter can cause
visible misalignement of the tire on the rim.
Pump up the tire to only 1 bar first, then align
the tire by twisting it with your hands. Do not
orientate yourself at the attached reflex strip,
this strip can be slightly misaligned due to the
priduction process.
To remove the rear wheel shift the rear derailleur to the fastest gear "8".Turn the twist grip
of the hub gear to the uphill mode "1". Press
the locking mechanism of the click box.
Remove the click box. Now you can undo the
axle nuts and dismount the rear wheel (see
the DualDrive manual).
Danger! Take care that your spokes are always in perfect condition and the spoke tension is balanced. Do not ride with wheels
that run untrue or wheels with loose or
missing spokes.These faults may lead to a
total failure of the wheel while braking and
result in a serious fall!
Caution! To true up the wheels you need
special skills, please have this work done by
an experienced bicycle mechanic.
52 HP
Velotechnik
Cleaning and conservation
The frame of the Spirit has a high quality and
environmentally friendly powder coating.The
surfaces of the aluminum parts are either polished or anodized.
To keep the surfaces brilliant over many years
and to protect them effectively against corrosion the bicycle has to be cleaned from dirt
and then conserved.
Dried sweat but also environmental influences
such as air pollution, dirt on the roads and
especially grit affect the parts, and not only
may this cause flaws but also serious structural
damage of the parts through corrosion.
In contrast to a widespread belief particularly
the "non-rusting" aluminum is dramatically affected by grit! This kind of damage may not be
visible in the beginning but it leads to a serious
danger when the part breaks.
Do clean and conserve your bicycle diligently!
The best things to clean your bicycle with are
warm water and a soft cloth. If your bicycle is
very dirty first take a wet sponge to soften the
dirt and then remove it. In case of bad grease
or oil stains you should use a special cleansing
agent for bicycles in addition.
Caution! Do not use any cleansing agents
that scrub or are chemically aggressive since
they affect the paintwork. Before using any
cleansing agent please test it at a part of
your bicycle that is not immediately visible.
While cleaning your bicycle check it for any
cracks, scratches, deformations, damaged parts,
loose spokes etc. If you are in doubt please
consult your local bike shop.
Caution! Schadhafte Lackstellen müssen
umgehend von Rostansatz befreit und ausgebessert werden.Wird durch Lackschäden eine Stelle Ihres Rahmens freigelegt, kann die
umgebende Lackschicht unterwandert und
der Rahmen durch Korrosion zerstört werden.
Do not only wax the frame but also the spokes, hubs, screws and nuts etc.You can also
conserve the chain with a wax spray after lubricating it, see also the chapter on "Chain",
page 36.
The frame has small holes for ventilation that
prevent condensation in the frame.These drilling holes must not be sealed. However, moisture may enter the frame through the drilling
holes.Therefore protect the inside of your frame by applying wax spray through the holes.
Protect the parts where cables or chain tubes
may scratch the frame with a layer of tape.You
can buy extra strong transparent tape at your
do-it-yourself-store.That way you avoid scratches in the powder coating and coating coming off.
In case of small scratches at the surface of the
powder coating of the frame or the surface of
the seat you can simply polish them away.You
can buy a special polishing agent for epoxy resins at a specialist dealer for boat building. Do
not use a polish for metal!
After you have cleaned the bicycle, dry it and
treat the paintwork and the metal surfaces
with wax.You can purchase this wax from your
local bike dealer as a convenient spray.
The wax passes moisture and flows into tiny
gaps and pores. After some minutes the solvent evaporates and leaves a dull and glutinous
film. Now polish the waxed parts of your bicycle with a soft cloth to make it real shiny.
HP
Velotechnik
53
Maintenance and care
Caution! Do not use any high-pressure cleaner.The strong jet of water goes through
the seals of the bearings, blows away the lube and causes corrosion of the bearing parts
and the chain. In addition to this it may damage stickers.
Storing the bike, Screws and bolts
Storing the bicycle
Screws and Bolts
Before storing your bicycle over a longer period of time, e.g. over winter, please take care of
the following steps:
Screws gradually settle in and through this
they can come loose.Therefore check the
screws and bolts regularly if they are tightened
appropriately.
●
●
●
●
●
Clean your bicycle and protect it from
corrosion as described in the chapter on
"Cleaning".
Store your bicycle in a dry and warm place.
Avoid direct sun and storage close to the
heating since it affects the rubber of your
tires.
Choose the uphill mode "1" at the hub gear
and the smallest sprocket at the rear
derailleur.That way the cables are in the
most relaxed position.
The tubes of your tires loose air when
standing over a longer period of time. If the
bicycle then rests on flat tires the tires may
be damaged.Therefore hang up your bicycle
or check the air pressure regularly.
The winter months are a convenient period of
time for the annual service since then you won't have to wait long for an appointment. Many
dealers offer special prices for the winter
check.
In the following table you will find the prescribed tightening torques, they refer to greased
screws!
The grease also prevents your screws from
seizing in their threads so that they won't unscrew anymore. In particular, screws made of
stainless steel are susceptible to this and therefore have always to be put in with grease.
Do use high quality acid free grease, if possible
a lubricant based on PTFE like Teflon or MoS2.
Their ingredients still work properly after the
thinner grease has been removed from the
contact points. Alternatively you can use
Loctite that you apply to the screw before you
put it into the thread.
Always check the screws very diligently for
signs of corrosion. Rust at the screw heads
may also lead to the screw seizing in the thread.When the metallic and shiny coating of galvanized screws comes off and discloses dull,
gray-brown steel you have to exchange the
screw.
When you exchange screws please do only
use screws of the same type. Screws come in
different strength classes. Please do only use
galvanized screws of the same type and
strength, corresponding to the German
strength classes 8.8 or stainless steel screws
grade A2-70, when not given any other recommendation. If you are in doubt please ask your
specialist dealer.
54 HP
Velotechnik
Tightening torques for screws
Part
brakes: mechanical
- brake lever
- brake caliper
- brake disc
brakes: hydraulic
- brake lever
- brake caliper
- brake disc
gear click box
dynamo
suspension element
rear swing arm
b.b. set
crank
wheel
lowrider rack
hub
pedal
shifter lever
derailleur
mudguard
seat
stem
pull rod DualDrive
connection
screw
handlebar/lever clamping
- caliper/frame
- cable clamping
- disc/hub
M6 SW5
M6
handlebar/lever clamping
- caliper/frame
- disc/hub
cable clamping
dynamo/frame
element/frame
axle
cartridge/frame
crank/axle
chain ring screws
axle nut
lowrider/main frame
axle
cassette/ lock ring
pedal/crank
lever/handlebar
derailleur/frame
cable clamping
stay/frame
seat cushion/seat mounts
quick release
fork/stem
telescopic stem
stem/handlebar
pull rod/hube
M6 SW5
M6 SW5
M4 Torx T25
T20
M6 SW5
M6
Linsenk. M8x25
14’er Nuß
M5 SW4
Linsenk. M8x25
SW15
SW6
M5 SW4
M5 SW4
M8 SW6
M8 SW6
M7 SW5
Maintenance and care
The values indicated are meant for a friction value μ=0,125 (greased threads and screw heads).They only refer to the indicated parts. Please do always follow the values given in the manuals of the parts manufacturers, since the following values may not be the latest due to changes in the product line!
tightening torque
4
8–9
8–9
4,5–6
Nm
Nm
Nm
Nm
4
6
4
4–5
6–8
6–8
14–16
50–60
35
8–11
30–40
4–6
14–16
38–42
35–40
2
8–10
4–6
4–6
4–6
9–12
17–19
17–19
10–12
0,3
Nm
Nm
Nm
Nm
Nm
Nm
Nm
Nm
Nm
Nm
Nm
Nm
Nm
Nm
Nm
Nm
Nm
Nm
Nm
Nm
Nm
Nm
Nm
Nm
Nm
HP
Velotechnik
55
Warranty
Warranty
Your dealer has to fully set up and adjust your
Spirit, so that safe function is guaranteed.The
dealer has to make a final safety check and
carry out a test ride.
Your cycle dealer is obliged by law to ensure,
among other things, that your bicycle is not affected by defects which materially diminish its
value of suitability for the described purpose.
The exact details will vary according to your
country. In Germany, this liability ends two
years after purchase.
In addition to this, HP VELOTECHNIK offers a 10
year warranty on the frame and the swing arm
pivot of the Spirit against damage through original material or manufacturing defects.This
warranty applies only to the original purchaser.
Damage trough wear and tear, corrosion or
damage at the surface coating is excluded.
Damage through inappropriate use, inadequate
care and maintenance, falls, crashes, overloading through excess weight, incorrect assembly
or modifications to the bike is also not covered.The onus rests with the purchaser.The
warranty is void if any of the instructions in
this manual are neglected.
The warranty starts with the date of purchase
(receipt of the bike dealer) of a new bicycle.
The warranty is processed via the bike dealer
who ordered the bicycle from us.
We process our services preferably through
your nearest HP VELOTECHNIK dealer but also
through your local bike dealer.
56 HP
Velotechnik
In case of damage the specialist dealer has to
send the damaged frame to us so that we can
check it, if asked to do so by us.We do not take over any secondary costs.
In case of warranty we will cover the costs for
the transportation within the usual limits
(postal service). In case of warranty we will replace the damaged part with a part of our
choice or a new part equal to the old one
(warranty obligation).
In the event of any work that falls under warranty the usual warranty period will not be
prolonged and no new warranty will be given.
If HP VELOTECHNIK refuses to count a repair as
warranty case we will only carry out a repair
with costs after having talked to the customer
or his representative, the respective dealer.
It is necessary for the purchaser to fill in the
enclosed warranty registration form to benefit
from the extended warranty.This filled in form
has to be sent to HP VELOTECHNIK within 4
weeks after the purchase.
The warranty is only valid when the warranty
pass at the end of this manual has been filled
in when you received your bike, and when every inspection listed has been done and recorded by your bicycle mechanic within the described time schedule.
In the event of any warranty the warranty pass
together with a copy of the proof of purchase
has to be sent to HP VELOTECHNIK through
your dealer.
This warranty does not have any influence on
the rights of the purchaser according to his
statutory rights.
Warranty Pass
Warranty Pass
Warranty Pass
With the HP VELOTECHNIK Warranty Pass you
can assure the safety and proper function of
your Spirit for many years.
Like any other vehicle your bicycle has to be
checked for safe operation before riding.Your
bicycle has to be maintained at regular intervals, at least once a year you will have to take
your bicyle to a qualified bicycle mechanic for
a thorough check.
The service plan on the next page shows you
our mandatory maintenance and service
works.
If you wish you can set an upper price limit for
the service with your bicycle mechanic. If the
necessary works exceed this limit you will be
informed in advance.
Our tip:
You can avoid seasonal waiting periods in
spring and summer when you have your annual
inspection done in the quiet months from
October to January. Many bike shops then have special winter check offers. At any rate do
make an appointment. Clean your bicycle prior
to the inspection since then many of the
checks by sight can be done quickly and at low
cost.
Please have your specialist dealer record every
inspection work in the Warranty Pass.This is a
requirement for the validity of our expanded
warranty that exceeds the legal warranty.
HP
Velotechnik
57
Warranty Pass
Service Plan
part
work
light system
check functionality
adjust headlamp and rear light, check cable contacts
clean reflectors, replace missing reflectors
tires
check air pressure
check tread and sidewalls
brakes
check for damages / brake test whilst standing still
check cables / hydraulic system for leaking oil
check rigid feel brake lever blades when pads reach rotor
check brake pads for wear
suspension element
clean and oil thread
lubricate bushes
replace worn out parts / hydraulic cartridge
suspension fork
check dust boot and correct position
lubricate
check fork play, adjust if necessary
rear swing arm
check function and bearing play, tighten axle screws
bottom bracket bearings
check bearing play
rims
check allignment, check for cracks, dents, wear
chain
grease and check for wear
chain tube
check for wear
expand ends or exchange tubes
crank
check, tighten
paintwork
conserve and repair
wheels
check alignement and spoke tension
handlebar
check for damage / bends
headset
check bearings, grease
58 HP
Velotechnik
31
before every ride monthly
annually
note
Warranty Pass
see page
●
●
●
51
●
28 / 33
●
●
●
●
●
45
●
●
▲
40
●
▲
every 1000 km
●
▲
47
▲
▲
51
36
●
38
●
●
▲
52
●
51
●
13
▲
44
▲
HP
Velotechnik
59
Warranty Pass
Service plan (continued)
parts
work
hubs
check bearing play and brake discs mount
pedal
check bearing play, check binding mechanism
frame
check clamping of the front boom
clean and conserve
check for damage, damage to paintwork
quick release
check correct closing
derailleur
check for movement and function
clean and lubricate
screws and nuts
check and tighten
mudguards
check for damage and correct position
valves
check for correct position and air tightness
stem
check clamping
check clamping screws
cables
dismount, lubricate, replace if necessary
This service plan is intended to give you a
rough overview over the required maintenance and service works. In no case it can replace the detailed instructions in this manual!
You can perform service works marked with a
“●” when you have the required skills and
tools as for example a torque wrench.
When you discover any defects while checking
your bicycle they have to be repaired immediately. If you are in doubt please consult your
local bike shop.
60 HP
Velotechnik
Works marked with a "▲" should only be carried out by a trained bicycle mechanic.
At the annual service the bicycle mechanic has
to carry out all works listed as well as all services and maintenance works necessary according to the momentary technical standard and
professional knowledge.
Please follow at any rate the manuals of the
parts manufacturers.
before every ride monthly
annually
note
Warranty Pass
see page
▲
▲
52
●
●
7
●
35
●
●
54
●
50
●
51
●
13
●
▲
35
The service intervals given in this Warranty
Pass refer to an average use and a riding performance of 3.000 km per year.
When you ride more kilometers per year or
often ride under bad conditions like rain, grit
or other dirty factors it is necessary to have
shorter maintenance intervals.
▲
The regular service maintains the safe operation and the value of your bicycle. Not only
does the completed Warranty Pass record the
maintenance works for the validation of your
warranty but also does it proove the care and
the value of your bicycle - a good thing to
have when you are going to sell your Spirit
one day.
In order to measure your riding performance
we recommend you to use a bicycle computer.
HP
Velotechnik
61
Warranty Pass
Your personal Warranty Pass
service at delivery
name:
At the delivery of a new Spirit
Order No.:
adress:
milage approx. km:
Date:
Dealer's Stamp and Signature:
telephone:
frame no:
(close to the bottom bracket)
I have received the bicycle in good condition. adjusted to my size and performed a test ride.
I have been informed about the correct use of
the recumbent, the components like derailleur
and especially steering and brakes as well as the
necessity of regular service and maintenance. I
will read the manuals prior to the first ride and
have all future users read them too.
Exchanged or additionally mounted parts:
Date:
Customer’s Signature:
Dealer’s Signature an Stamp::
(When you assemble a frame kit please list
the components on an extra sheet and attach it to this Warranty Pass.)
62 HP
Velotechnik
2nd service
No later than 300 kilometers or 2 months after
the purchase.
No later than 3000 kilometers or one year after the purchase.
Order No.:
Order No.:
milage approx. km:
milage approx. km:
Date:
Date:
Dealer's Stamp and Signature:
Dealer's Stamp and Signature:
Exchanged or additionally mounted parts:
Exchanged or additionally mounted parts:
HP
Velotechnik
63
Warranty Pass
1st service
Warranty Pass
3rd service
4th service
No later than 6000 kilometers or two years after the purchase.
No later than 9000 kilometers or three years
after the purchase.
Order No.:
Order No.:
milage approx. km:
milage approx. km:
Date:
Date:
Dealer's Stamp and Signature:
Dealer's Stamp and Signature:
Exchanged or additionally mounted parts:
Exchanged or additionally mounted parts:
64 HP
Velotechnik
6th service
No later than 12000 kilometers or four years
after the purchase.
No later than 15000 kilometers or five years
after the purchase.
Order No.:
Order No.:
milage approx. km:
milage approx. km:
Date:
Date:
Dealer's Stamp and Signature:
Dealer's Stamp and Signature:
Exchanged or additionally mounted parts:
Exchanged or additionally mounted parts:
HP
Velotechnik
Warranty Pass
5th service
65
Warranty Pass
7th service
8th service
No later than 18000 kilometers or six years after the purchase.
No later than 21000 kilometers or seven years
after the purchase.
Order No.:
Order No.:
milage approx. km:
milage approx. km:
Date:
Date:
Dealer's Stamp and Signature:
Dealer's Stamp and Signature:
Exchanged or additionally mounted parts:
Exchanged or additionally mounted parts:
66 HP
Velotechnik
10th service
No later than 24000 kilometers or eight years
after the purchase.
No later than 27000 kilometers or nine years
after the purchase.
Order No.:
Order No.:
milage approx. km:
milage approx. km:
Date:
Date:
Dealer's Stamp and Signature:
Dealer's Stamp and Signature:
Exchanged or additionally mounted parts:
Exchanged or additionally mounted parts:
HP
Velotechnik
Warranty Pass
9th service
67
Warranty Pass
11th service
12th service
No later than 30000 kilometers or ten years
after the purchase.
No later than 33000 kilometers or eleven years
after the purchase.
Order No.:
Order No.:
milage approx. km:
milage approx. km:
Date:
Date:
Dealer's Stamp and Signature:
Dealer's Stamp and Signature:
Exchanged or additionally mounted parts:
Exchanged or additionally mounted parts:
68 HP
Velotechnik
14th service
No later than 36000 kilometers or twelve years
after the purchase.
No later than 39000 kilometers or thirteen
years after the purchase.
Order No.:
Order No.:
milage approx. km:
milage approx. km:
Date:
Date:
Dealer's Stamp and Signature:
Dealer's Stamp and Signature:
Exchanged or additionally mounted parts:
Exchanged or additionally mounted parts:
HP
Velotechnik
Warranty Pass
13th service
69
NEW
recumbenttechnology
2008
HP
Velotechnik
HP Velotechnik ● Paul J. W. Hollants und Dipl.-Ing. Daniel Pulvermüller GbR
Elisabethenstr. 1 ● D-65830 Kriftel ● Tel. ++49 - 61 92 - 97 99 2-0 ● Fax 91 02 18 ● www.hpvelotechnik.com