1
Version G3 1.00 3-2010
StarLam 1600R Liquid Laminator
Operation & Instruction Manual
StarLam 1600R User Manual
Important:
Please read and understand the operation manual completely. Follow all safety information described.
1
StarLam 1600R User Manual
Introduction
Thank you for choosing the StarLam 1600R Liquid Laminator. The StarLam 1600R is a new generation
liquid laminator designed for post fabrication liquid lamination of posters, banners, vehicle graphics and
paper substrates. The StarLam 1600R used in combination with ClearShield liquid laminates will give
you the ability to quickly and easily protect your digital output. In addition, the StarLam is CE
approved to further ensure quality and durability
The StarLam 1600R utilizes air assisted oven drying to allow the application of liquid laminates in a
quick and efficient process. The other main advantage of the StarLam 1600R is consistency. The liquid
laminator allows a controlled wet film thickness to be applied so that square footage coverage and dried
film thickness can be controlled precisely. This ensures accurate lamination with lower production cost.
The StarLam is designed for production environments where ease of use and reliability are paramount.
Attention!
To ensure the safety of the operator and avoid damaging any electrical
components, please be sure to check the reliability of the earth protective ground of
the power receptacle.
■ Please keep this instruction manual for reference in the future!
■ Please follow the safety precautions and operational guide lines when operating
this machine!
2
StarLam 1600R User Manual
Table of Contents
Operation Requirements ................................................................................. 4 Safety Precautions........................................................................................... 4 Machine Diagram ........................................................................................... 7 Technical Specifications ................................................................................. 9 Precautions Before Operating ....................................................................... 10 Preparation Before Operation ....................................................................... 10 Operation Instructions................................................................................... 11 Troubleshooting ............................................................................................ 24 Warranty ....................................................................................................... 26 Maintenance .................................................................................................. 28 After Sale Service ......................................................................................... 28 Appendixes ................................................................................................... 29 3
StarLam 1600R User Manual
Operation Requirements
■ The machine should be used in temperature range of 15˚ C (50˚ F) - 40˚ C (104˚ F).
■ Environmental relative humidity should be 30% - 70%. Avoid using the machine in places with high
temperature, humidity and dust.
■ Don’t place the equipment in direct sunlight.
■ Place the machine on a flat floor and properly level it. Never set it on an irregular floor to avoid
tipping over the machine, leading to personal damage or property loss..
Safety Precautions
Ensure that the machine is properly connected to an electrical ground.
The power cord should be connected in conformity with IEC 60245 regulations and in
compliance with local electrical code requirements. The phase line should be connected to live wire with
mark L. The neutral line shall be connected to zero line with mark N, and the protection conductor shall
be connected to protective earth with mark PE.
If an abnormal situation occurs and you need to urgently stop the machine in process press the
emergency stop switch!
This machine is equipped with a heating and drying system. When operating the heating and
drying system do not place your hands or any other body part into the heating area. The heat generated
can scald and burn the skin. Use caution when operating the heating and drying system of the machine.
When operating and using the machine be careful not to block either of the three fans on top of
the heater panel. This can damage the heating unit and potentially damage the heater box.
4
StarLam 1600R User Manual
Be careful when wearing a necktie, necklace, wristband or long hair when operating the
machine. Care should be taking to bind loose clothing, secure jewelry and manage hair so as not to get
rolled up and bound in the machine. Serious injuries can occur if proper precautions are not taken. Do
not insert any material that is not intended for use with the machine. This can lead to unnecessary
damage of the equipment.
Raise the heating box lightly when lifting the heating box. Do not place hands onto the guide
roll, racks, or side of machine to avoid hand injury.
The left and right box doors can be removed after opening. If the doors need opening take care
to lift and remove them to avoid dropping them.
Use only water based liquid laminate. Using certain solvent based flammable liquids may
increase the chance of a fire or explosion. Please use caution to select and use a liquid laminate
compatible with this equipment.
The machines power source shall be connected to a sufficient proper safety breaker with
nominal current rating. Breaker operating current shall be no less than 40 Amps.
If the laminator needs service, only authorized personnel should open the electrical boxes. A
qualified professional or the manufacturer shall be asked to take responsibility for the maintenance and
repair.
Switch off the main power supply when performing maintenance to the equipment. When it is
necessary to open the electrical apparatus box the main power supply to the machine should be shut off.
This includes the main power supply line. Maintenance to the machine while in a live electrical working
environment should not be allowed. Do not touch the circuit controlling part in the electrical control
box.
5
StarLam 1600R User Manual
Only authorized personnel should open the machine’s electric control box. This electric control
box is equipped with a key lock and key. A designated person in charge should keep the key.
Switch off the power to the external power line when not using the machine for long periods of
time.
6
StarLam 1600R User Manual
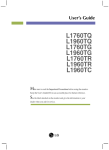
Machine Diagram
1. Left Side Main Frame Box
8. Positioning Axles for
14. Front Guide Roll
2. Heater Box
Heating Box.
15. Laminate Drain Trough
21. Connector For Cleaning
Hose.
24. Door Hinge
3. Liquid Reservoir Bottle Support
9. Emergency Stop Switch
16. Feed Roller Bar
25. Cooling Fan Bank 1
4. Liquid Reservoir Bottle
10. Operating Switch Panel 17. Roll Clutch Assembly
26. Forward Reverse Que
5. Fan Shield
11. Upper Protection Plate
18. Cleaning Trough
6. Liquid Nozzle Fixture
12. Cross Girder
19. Caster
27. Power Supply Switch
28. Hi-Amp Switch
29. Power Cord
30. Take up Roller Bar
31. Cooling Fan Bank 2
7. Right Side Main Frame Box
13. Liquid Metering Rod
20. Leveling Foot
7
StarLam 1600R User Manual
1. Power Light ( White )
2. Working Indicator Light ( Green)
3. Fault Indicator Light (Red)
4. Temperature Display Screen
5. Speed Adjustment Knob
6. Motor Switch
7. Fan Switch
8. Temperature Adjusting Knob
9. Temperature Control Knob
10. Cleaning Pump Switch
11. Cleaning Pump Indicator Light
8
StarLam 1600R User Manual
Technical Specifications
Maximum Laminating width
Maximum laminating length
Temperature adjusting range
Speed adjusting range
Input power
Nominal input power
Nominal input current
Rated Input Frequency
Preheating time
Altitude
Ambient operating temperatures
Ambient operating humidity
Protection type equipment
Protection grade of control equipment
Contour dimension (length x width x height)
Net weight
Weight in transport
1600mm (63inches)
300m (984 feet)
80-140˚C (176-284˚F)
300-1000mm/min
(11.82inches-3.28 feet/per per minute)
240 VAC rated / 208 VAC Minimum
9600W @ 240VAC / 7200W @ 208 VAC
40A @ 240 VAC / 36.4A @ VAC
60Hz
5 minutes
<1000m (<3280.8 Feet)
15˚ C (59˚F )- 40˚C (104˚F)
30% - 70%
Class I
IP5X
2030 x 706 x 1250mm (6.6ft. x 2.3ft. x 4.1ft.)
SL 1600R machine
SL 1600R machine
256Kg (784.8 Lbs)
440Kg (970 Lbs)
▲ Noise of machine is rated at < 60db
Type of fuse: R015 (Φ 10.3 x 38)
Fuse for heating box
Fuse for air drying fans
Fuse for machine electric
Fuse for transformer
Fuse for heating box’s fan
32A x 2
4A
2A
1A
1A
9
StarLam 1600R User Manual
Precautions Before Operating
■ Please read the instruction manual carefully before operating this machine.
■ Be sure that the power supply system is in compliance with the requirements of this machine
before operating. Failure to do so may cause damage from abnormal heat or electrical circuit
failure.
■ The width of the area to be coated shall not be more than the maximum laminating width.
■ Make sure the liquid reservoir bottle is installed in the correct position and the liquid
dispensing nozzle is in the closed position.
Make sure that the protective earth wire is reliably connected to the machine and to
protective earth ground.
Preparation Before Operation
•
•
•
Load liquid laminate into the liquid reservoir bottle and then screw on the reservoir cover.
Place the liquid reservoir bottle onto the support for the bottle. Use the liquid piping to
reliably connect the liquid reservoir bottle to the liquid dispensing nozzle.
Put the rolled substrate to be coated onto the appropriate paper cylinder core.
10
StarLam 1600R User Manual
Operation Instructions
Roll to Roll Lamination Instructions:
1. Core Holding Rod
2. Webbing / Rolled Media
3. Core
4. Core support Mandrel
5. Clutch discs
6. Lock Collar Tightening Bolts
7. Lock Collar
1. Load the media on the laminator.
a. Rotate the jacket of the core roller that is on the same side of the
machine as the main control console so that the core roller can be
slightly lifted and rotated outward and away from the machine. It may be
necessary to rotate the shaft collar lock into the unlocked position first.
11
StarLam 1600R User Manual
b. Slide the printed roll of substrate to be coated onto the core holding rod.
Pay close attention to make sure the face of the material to be coated
is on the outside face of the roll to be coated. The open flap should be
on the outside and facing upwards. (Please see Figure 8)
2. Repeat step 1 to load an empty take up core on the front of the machine. Rotate
the core slightly once in place to lock it into position.
12
StarLam 1600R User Manual
3. Lift the heating box assembly and gently lean it against its mainstays located on
the two sides of the machine body boxes (as shown in figure 9).
Figure 9
4. Feed the media through the laminator according to Figure 11.
a. Leave a 1.8 meter long blank leader at the front of the printed material to
be coated and a 1.5 meter long blank at the end of the printed roll media.
This will ensure consistent coating of the printed area.
b. Straighten up the material to be coated (webbing) and stretch it tightly.
c. Use adhesive tape to stick the leading edge of the media to the empty
paper core on the opposite side of the machine from the main control
console.
13
StarLam 1600R User Manual
Figure 11
▲ To ensure even film thickness and proper coating please stretch the material tightly and
evenly.
5. The substrate must be spooled onto strait and without variance from side to side.
6. Switch the main power supply to the on position. Next, switch the machine power
to the on position so that the power light illuminates. The fan in the heating box
should also begin rotation.
7. Switch the power for the electric motor on so that the roll of printed media moves
forward slightly. Continue this movement until the webbing is stretched evenly
and tightly. Once this is achieved immediately stop the rotation of the machine.
▲ When the front end of the webbing moves forward the printed portion does not move pass
the metering rod to avoid incompletion of the lamination run.
8. Make sure the heating box is in the raised position. Adjust the heater setting knob
on the main control console to the desired temperature position. Switch on the
heating power switch. The machine will begin preheating. At this moment it is
necessary to wait a few minutes for the heater to preheat.
9. Adjust the fluid control valves on the liquid reservoir bottle and the nozzle end so
that liquid is injected onto the webbing (material to be coated). The nozzle should
be adjusted to be in the center of the area to be coated.
14
StarLam 1600R User Manual
10. When the heater box has reached the preset working conditions the working ready
light will illuminate indicating that lamination process may begin.
11. Gently lower the heating box down and onto the heater door stop guides.
12. Switch on the machine cooling fans. Adjust the motor drive speed to the
appropriate position. This starts the lamination process.
Upon laminating long rolled material:
•
According to the requirements of the lamination job be sure to pay close attention to
when more liquid laminate should be added to the liquid laminate reservoir.
•
The external diameter of the drive roller will continually increase along with the
process of liquid laminating. The linear speed may also increase as the diameter of roll
increases. Keep in mind to adjust the settings properly to decrease linear speed as
required thus insuring optimal lamination effect.
13. If an urgent situation arises and it is needed to stop the machine immediately
simply press down on the available emergency stop button located at the top and
on either side of the machine.
14. Once the liquid lamination process is finished switch off the motor speed switch,
the heater power switch and cooling fan switch.
▲ Do not switch off the main power supply switch if it is within 5 minutes after ending the
liquid lamination process. This can damage the heater if it is not allowed to cool properly
after being used.
15. Rotate the locking sleeve/jacket to the take up core roller (drive roller) so that the
core holder rod can be lifted up and out of the machine gently. The coated and
rolled material on the paper core can be removed at this point.
16. Immediately clean the liquid metering rod, liquid trough to avoid drying and
hardening of the liquid laminate.
a. Loosen the metering rod retaining bolts on both side of the liquid
metering rod, and take it out and clean it immediately. For precise and
perfect cleaning use a pressure washer to remove built up coating and
any contaminates.
b. Remove fixed bolts on both sides of the liquid trough (this bolt is of a
special purpose during machine transportation and is not required to use
again once removed.
15
StarLam 1600R User Manual
The StarLam 1600R liquid laminator uses a peristaltic pump. A peristaltic pump
is a type of positive displacement pump used for pumping a variety of fluids. The fluid is
contained within a flexible tube fitted inside a circular pump casing (though linear
peristaltic pumps have been made). A rotor with a number of "rollers", "shoes" or
"wipers" attached to the external circumference compresses the flexible tube. As the rotor
turns, the part of tube under compression closes (or "occludes") thus forcing the fluid to
be pumped to move through the tube. Additionally, as the tube opens to its natural state
after the passing of the cam ("restitution" or "resilience") fluid flow is induced to the
pump.
The StarLam incorporates a bi-directional type peristaltic pump with a variable
speed capability allowing extreme versatility with different liquids and also aids in
cleaning out the laminate fluid lines. The pumping circuit allows for the fluid to remain in
the fluid lines and never contact and impeller or "freezable" pump part.
The Laminate pump is in the inside of the machine opposite the main control
housing.
16
StarLam 1600R User Manual
The StarLam peristaltic pump is composed of 6 main parts. The parts are as follows:
1 Pump housing
2
Pump tube
3 Plastic washer
4 Pump rollers
5
Pump cover
6 Thumb Screws
The Peristaltic pump roller assembly is as follows:
To remove the pump tube for replacement.
17
StarLam 1600R User Manual
18
StarLam 1600R User Manual
1
2
3
4
5
6
Pump Switch Forward
Pump Switch Reverse
Pump Switch Off
Pump Speed Control
Cleaning Pump On/Off Switch
Cleaning Pump Power Indicator
Lamp
19
StarLam 1600R User Manual
Laminate Pump Operation:
1. Make sure the laminate reservoir bottle valve is in the shut (off) position. Fill the
Laminate reservoir bottle with fresh liquid laminate.
2. After the substrate/webbing is properly fastened onto the rollers of the machine, open
the main laminate reservoir valve to the "on" position and then open the dispensing valve
to the "on" position.
3. Let the laminate run down and along the front side of the metering rod. Let the
laminate run off the sides of the substrate/webbing and into the laminate reclaiming
trough. Start the machine motor to begin the lamination process.
(The heater should already be preheated and lowered when the lamination process is
started. The cooling fans should be on as well.)
4. Once the laminate reclaiming trough has enough laminate that has pooled in the trough
and covered the drain spout and filter open the drain valve to the "on" position then turn
the peristaltic pump on by flipping the laminate pump power switch to the up position
(Position 1 in the diagram).
5. Turn the pump speed control knob (Diagram point 4) to the 20-25% position. The
laminate should start moving through the fluid lines. The clear filter should fill up with
laminate. When you see the clear fluid line going up to the laminate reservoir bottle then
the laminate has completed the circuit and is recycling properly.
(The laminate recycling pump can be left on during the lamination process of the
machine)
Cleaning the Laminate Pump:
1. Drain the laminate from the drain trough into the laminate storage container. Shut off
the laminate trough drain valve and fill the trough with water until the drain filter screen
is completely covered up to the top of the filter handle. (follow trough draining
instructions)
2. Disconnect the laminate jug from the machine using the quick connects. Lift the
laminate jug out of the reservoir holder. Unscrew the cap and pour the remaining liquid
laminate into the laminate storage container.
3. Replace the laminate reservoir bottle into the stand and re-connect the proper quick
disconnects.
4. Make sure the laminate reservoir bottle and main dispensing valve are shut off. Fill the
laminate reservoir with warm tap water.
5. Open the drain valve to the laminate trough, Open the main dispensing valve, and the
open the laminate reservoir valve.
20
StarLam 1600R User Manual
6. Start the laminate pump and set the speed to about 50%. Let the water cycle through
the system for a few minutes.
7. Stop the laminate pump after cycling plenty of water through the laminate lines.
8. Let all the water from the laminate reservoir drain into the laminate trough.
9. Drain all the water out of the laminate trough. (follow trough draining instructions)
Trough Draining Instructions:
1. Make sure the laminate trough valve is switched to the "off" or "closed" position.
2. Open up the side access panel where the pump and fluid lines are located. Locate the
laminate drain trough hose and quick connect fittings. This should be the hose coming
through the side of the machine close to the filter housing.
3. Disconnect the quick connects, and connect the supplied short drain hose to the female
quick connect. Place the open end into a container or five gallon bucket.
21
StarLam 1600R User Manual
4. Once the container is in place and the hose is hanging into it then open the laminate
trough drain valve.
5. Let the trough drain completely.
Preparation of machine before use:
1. Use 4 gallons of room temperature or warm water to fill the wash trough on the bottom
of the machine.
2. Hook up the cleaning hose to the wash hose connector on the machine. (Should be
located on the front of the machine just under the three valve switches)
3. Prime the wash hose by switching on the wash pump motor until a steady stream of
water is emitted at the end of the hose. Be sure to point the cleaning hose into the wash
trough. Once the hose is primed drape the hose so that the end is hanging over the wash
trough to avoid leaking water onto the floor.
4. Make sure the material to be coated is cored and fastened into the machine as
previously described in the manual.
Valve Functions:
To Perform:
Valve 1 Position
Valve 2 Position
Valve 3 Position
Lamination
Siphon from
Drum with
Peristaltic Pump
Laminating
Laminating
Laminating
Laminating
Cleaning
Cleaning
Cleaning the
Liquid Laminate
Circuit of the
Machine
Laminating
Laminating
Laminating
Lamination Procedure:
1. Make sure all three Valves are switched to the laminating position. (insert Picture)
2. Open the fluid reservoir valve.
3. Open the fluid dispensing valve.
22
StarLam 1600R User Manual
4. Once the laminate has filled up the area in front of the metering rod and starts running
off both sides of the media lower the heater, switch on the drying fans and then start the
drive motor at the 2.5 position. Once the media begins to coat and move adjust the speed
to the 3 position as the heater reaches 100 deg. Celsius.
5. Once the laminate reclaiming tray begins to fill up some start the peristaltic laminate
pump.
a. Start the laminate pump by switching the toggle switch up to the on position.
b. Turn the pump speed control knob so that it clicks on and adjust it to the 20%
or 1/4 position.
c. It is ideal to have the pump recycle the liquid without entirely draining the
reclaiming trough. (Running the laminate reclaiming trough dry will cause the
filter screen to dry out and clog)
Siphon from Drum with Peristaltic Pump:
1. Make sure the fluid reservoir valve is in the "off" position.
2. Switch the top valve to the laminating position. Switch the bottom two remaining
valves to the cleaning position.
3. Hook the siphoning hose to the inlet connector on the inside bottom left of the machine
(when facing the cleaning trough) just behind the cleaning trough.
4. Connect the other end of the siphoning hose to the siphoning drum connector in the
drum and loosen the other drum bung so air can ventilate through into the drum.
5. Turn the laminating power switch to the up (forward) position. Adjust the pump to the
desired speed using the rotary knob (Speed Controller).
6. Switch the rotary knob (Speed Controller) to the "off" position once the fluid reservoir
is filled to just under the fluid inlet port.
23
StarLam 1600R User Manual
Troubleshooting
Problem
● Power light does not turn on.
● The working indicator light does not illuminate
even after heating for some time.
● Surface of the webbing crumples.
● Surface of the coated substrate is not dry.
● Coated material is not drying
or is not dried uniformly.
● I am in the middle of a long run and I have
figured out my roll is not stretched evenly.
What can I do to save my job run with the machine
in motion?
● I have clear streaking going in the same direction
as the wires on my metering rod.
● I am getting an uneven coating result in just
certain areas of the job. The areas seem to be
a pattern or repetitious with some sort of symmetry
to it.
● The coated job feels dry coming out of the
machine, but when I go to unroll the coated roll
I hear a slight peeling sound as it unrolls.
Possible cause and remedy
● Be sure that the main power supply switches are switched on
● Check internal Breakers to make sure they are not tripped.
● The light shows that the machine is increasing in temperature.
Be patient and wait for awhile, and it should illuminate.
● If the working indicator light does not illuminate
after a long time then the system is in failure.
Stop immediately and have the machine repaired
before use.
● Temperature is too high.
Need to decrease temperature.
● Speed is too slow. Need to increase speed.
● Temperature is too low.
Need to increase the temperature.
● Speed is too high.
Need to decrease speed.
●Heater is not on.
●Too much liquid has leaked to the other side of the coating rod
● Rolled substrate may have not been stretched
tightly. Need to enhance the damping of the material roll
in the front part of the machine.
● Rolled substrate has not been stretched evenly.
Stretch again tightly and evenly according
to the above said steps.
●You can try tensioning the clutches tighter.
● If all the environmental requirements of the
machine are being met then the liquid laminate
may be too high in viscosity. Reduce the liquid laminate
as per its instructions to get the required viscosity to run
on the machine.
● The metering rod has built up material in the grooves and
on the surface. Clean the Metering rod very well with
appropriate cleaner and if necessary use a pressure washer
with water.
● The Metering rod is improperly tightened down.
Check tightening clamps and adjust as necessary.
● The material was coated at slightly too high of speed. Reduce
for same lamination combination in the future.
●Material was coated at slightly too low of a temperature.
Increase the temperature for same coating
combination in the future.
24
StarLam 1600R User Manual
● It is possible the heater box support tabs
have been damaged. Replace or repair box supports
before using machine again.
● The heater box heat trap flap may be bent
or damaged. Replace or repair part as necessary
before using machine again.
● Reduce some of the clutch friction to the core rod
● The material being coated seems to coat with a
where the material is being pulled from.
jerky motion somewhat resembles
(Core rod on same side as main control console).
a chattering motion.
●Apply some graphite powder to the clutches where the core
Contacts the clutch assembly.
● One of the fluid connectors is blocked. Remove connector
And force water the opposite way through the connector or
● Fluid flow from the main dispensing valve has
replace connector.
Started coming out slower. The fluid doesn't seem to
● Fluid valve is blocked and needs to be cleaned.
Keep the laminating area supplied.
● Fluid reservoir bottle needs to be refilled. Not enough
Head pressure.
● Fluid reservoir needs to thoroughly cleaned and scrubbed to
● Fluid Reservoir bottle is full but liquid is barely
remove dried laminate from the walls of the jug.
dispensing out of fluid valve or has dropped out
● Flush Fluid connectors in the opposite of flow direction to
completely.
remove dried laminate chunks.
● Machine heater temperature cannot be controlled
● Solid State Heater relay has gone bad and needs to be
or adjusted.
Replaced. Contact Clearstar.
● Liquid seems to run mostly to one side of the
● Machine needs to be leveled properly.
coating rod and barely saturates the other side.
● Rod is not seated correctly in the holding cradle.
● Metering rod is not rotating properly.
● Rod is not tightened down sufficiently to allow proper
friction between media and rod.
● Insure that the machine is getting the required voltage and
● Heater is not getting hot enough when turned up.
amperage.
● Too much tension is on the clutches holding the feed core.
● Machine is coating but motion is jerky or
● A small amount of graphite powder lubricant needs to be used
Chattering.
On the clutches where the discs rub against each other and
Where the core goes onto the clutches.
●
●
●
●
●
●
●
●
●
●
● Sections in the middle and sides of
the material being coated seem to be
rubbed off in spots. The coating can be
seen going on as a wet film but does not
come out that way when coming out of the heater.
25
StarLam 1600R User Manual
Warranty
WARRANTY COVER AND CONDITIONS
This is a limited 12-month warranty please read carefully. This warranty gives you specific
rights. Where products is sold by a reseller (“System Supplier”) as principal, the reseller has no authority
from Clearstar LP to give any additional warranty or guarantee on Clearstar LP’s behalf except as
contained or referred to in this document. All items carry warranty activated at time of invoice/purchase
notification to the invoiced Original Recipient Purchaser of the New Equipment
a. Clearstar LP warrants to the original consumer purchaser that each new StarLam 1600R
Liquid Laminator which proves defective in materials or workmanship within the applicable warranty
period will be repaired or, at our option, replaced without charge.
b. The applicable warranty period for new equipment shall be one year (parts), six months
(labor) from date of purchase.
c. This warranty only extends to and is enforceable by the original recipient purchaser of the
equipment, and only for the amount of time specified as the period of the warranty (Section B), which
the product must remain in the possession of the Original Recipient Purchaser of the New Equipment.
“Original Recipient Purchaser of the New Equipment” is defined as the person or
entity that first purchased the product covered by this warranty other than for
distributional and resale purposes. This warranty is null and void and does not apply if it
is found at any time the equipment has not been used for its intended purpose.
“Reseller” is defined as a “System Supplier” or “Distributor”. A “Reseller” is also
defined as any individual, entity, or company that purchases and then re-sells the “New
Equipment” to another individual, entity, or company whether or not for profit or for
gain. Any shell company that processes or facilitates the sale or distribution of the new
equipment shall be considered a “Reseller”.
“Entity” is defined as any person, company, corporation, organization, shell
company, or trade broker that engages in the reselling or distribution of the new
equipment.
It is the “Original Recipient Purchaser of the New Equipment’s” responsibility to ensure
that the equipment is connected to a UPS or similar circuit protector where power failures are
common. Damage caused by power failure to a system, peripherals, or structure is excluded from
warranty. This warranty is void if an incorrect power supply is attached to the unit that does not
comply with the product specifications. Clearstar LP will not cover under warranty any item that
has been connected to a power supply other than that supplied, mishandled, returned
inadequately packed and/or otherwise interfered with by unauthorized personnel. The removal of
any serial numbers will void the warranty. Clearstar LP will not repair under warranty, damaged
caused by operation outside of designed working and storage environments, power surges,
fluctuations and interference, and external peripheral devices. Clearstar LP accepts no additional
liability pursuant to this warranty for the cost of traveling, insurance or transportation of the
product or parts to and from the service agent or reseller (system supplier). These costs are not
26
StarLam 1600R User Manual
included in this warranty. This warranty does not cover parts that have been installed by
person(s) that are not registered Clearstar LP Dealer Installer(s).
Equipment Covered: StarLam LP technology architecture ONLY – this warranty does not cover
alterations made to the machine by unauthorized personnel.
Operating Environment: The New Equipment should be operated in a relatively clean dust free
environment to ensure optimal performance, as dust grime and moisture can contribute to breakdowns
that may not be covered under this warranty.
Geographical Coverage: United States qualified distributors within the States and Territories of the
United states of America. All other territories must be expressed and approved, and signed in writing in
order to be valid.
Warranty Response: Your system supplier or distributor should be responsible for return of hardware,
parts, and equipment. Proof of purchased will be required. Contact Clearstar LP Monday through Friday
(excluding public holidays) between the hours of 8am to 5 pm. (EST).
Unauthorized Persons: No unauthorized person should endeavor to repair or modify the system. For all
modifications or upgrades please contact your system/equipment supplier to ensure that your warranty
remains intact. All requests for warranty assistance should be directed to Clearstar LP. Failure to do so
will void the warranty.
Not Warranty works: Should Clearstar LP be called upon under the warranty and the fault found to be
not the new equipment or its parts, you will be invoiced for the cost associated with such works.
SUMMARY OF WARRANTY EXCLUSIONS
We shall not be liable under this warranty for:
1. Loss or damage caused by fire, explosion, direct lightening, power surge and the like, storm,
tempest, flood water damage, rainwater, earthquake, accident, impact, burglary, theft or attempts
thereof, malicious damage.
2. Loss of use of your equipment or other consequential loss, damage or consequential liability of any
description.
3. Damage or liability arising out of a willful act or your willful negligence.
4. Damage caused by the fair wear and tear, accidental and malicious damage or misuse, or attachment
of unauthorized additional components is excluded from the warranty.
5. Gradual deterioration, including corrosion, or other ongoing effects caused by environmental
conditions.
6. Loss or damage caused by interference by another party and/or attempted remote alterations by any
means.
27
StarLam 1600R User Manual
Maintenance
After using the StarLam 1600R the machine must be cleaned immediately, otherwise the liquid laminate
will solidify which is not beneficial. Before cleaning always switch off the power coming into the
machine.
1. Remove the metering rod and clean the laminate off the surface.
2. Take away the liquid trough. If there is waste liquid left after laminating pour back the waste liquid
into a liquid container. Clean the laminate off the surface and clean after filling up with water.
3. Soak and clean with a brush the remaining laminate left in the trough.
4. Clean the front and back guide rolls.
5. After air-drying, all parts should be reinstalled into their original position.
▲In order to protect this machine do not expose it to the weather. When storing the machine for a
long time, switch off power supply for the external line and cover it with machine cover.
After Sale Service
Thank you for your faith with our company’s product. As our client, you will obtain our company’s
sincere technical service and support. When you need us just contact your equipment supplier or contact
Clearstar LP directly.
If you have any questions please call our reseller agents, distributors or contact us directly through our
customer service or sales department.
The products of our company are subject to change without prior notice.
Clearstar LP
P.O. Box 390
North Charleston, SC 29423
1-888-253-2778
Fax# 1-843-886-3701
V# 1-843-886-0094
www.clearstarcorp.com
28
StarLam 1600R User Manual
Appendixes
Appendix A…………………………………………………………………………………………A1
Exploded view parts diagram
Appendix B…………………………………………………………………………………………A2
Parts list with part numbers
Appendix C…………………………………………………………………………………………A3
Electrical Schematic
29
StarLam 1600R User Manual
Appendix A1
30
StarLam 1600R User Manual
Appendix A2
Drawing No.
1
2
3
4
5
6
7
8
9
10
11
12
13
14
15
16
17
18
19
20
21
22
23
24
25
26
27
28
29
30
31
32
33
34
35
36
37
38
39
40
Part Description
Metering Rod Cradle
#25 Metering Rod
Nozzle Support Rod
Fluid Nozzle Holder
Fluid Dispensing Nozzle
Heat Deflection Shield
Laminate Drain Trough
Large Tension Roller
Drain Filter Screen
Stainless Steel Ball Valve
9600W Heater Box Unit
Discontinued-Omitted
Heat Shield Support Bracket
Motor Cover
Idle Roller 1
Drain Trough Bracket
Core support Mandrel
Flange Adjustment Pads
Core Support Bar Holder
Locking Collar Cover
Clutched Core Support
Core Support Bar
Heater Box Support Pegs
Heater Box Hang Sleeve
Right Support Plate
Selector Valve Bracket
Filter Mounting Bracket
Laminate Filter
Washing Pump
Female Quick Connect
2 way selector Valve
Main Frame Box Right
Laminate Bottle Stand
Laminate Reservoir Bottle
Right Frame Box Door
Door Lock Assembly
Door Hinge Assembly
Rolling Wheels
Swivel Hose Connectors
Fan Assembly Track R.S.
Clearstar Part No.
PLAM2001
PLAM2002
PLAM2003
PLAM2004
PLAM2005
PLAM2006
PLAM2007
PLAM2008
PLAM2009
PLAM2010
PLAM2011
Discontinued Part
PLAM2012
PLAM2014
PLAM2015
PLAM2016
PLAM2017
PLAM2018
PLAM2019
PLAM2020
PLAM2021
PLAM2022
PLAM2023
PLAM2024
PLAM2025
PLAM2026
PLAM2027
PLAM2028
PLAM2029
PLAM2030
PLAM2031
PLAM2032
PLAM2033
PLAM2034
PLAM2035
PLAM2036
PLAM2037
PLAM2038
PLAM2039
PLAM2040
31
StarLam 1600R User Manual
Drawing #
41
42
43
44
45
46
47
48
49
50
51
52
53
54
55
56
57
58
59
60
61
62
63
64
65
66
67
68
69
70
71
72
73
74
75
76
77
78
79
80
Part Description
R.S. Fan Track Screw
Core Rod Support Hinge
Core Rod Hinge Plates
Laminate Trough Mount
Idle Roller 2
Bushing
Heat Shield
Mid Main Support Bracket
Left Support Plate
Support Plate Bolts
DIN Rail
Control Board
Safety Relay Bracket
Main Frame Box Left
DC Transformer Bracket
DC Transformer Cover
Left Frame Box Door
Drive Chain
Grounding Bus Bar
Drive Chain Cover
Drive Motor Sprocket
Sprocket Retaining Bolt
Rod Drive Sprocket
C.S.R. Drive Shaft Collar
C.S.R. Drive Shaft
Take Up Core Mandrel
Rod Wash Trough
Top Fan Assembly
Bottom Fan Assembly
Push to Connect Elbows
Main Support Bracket
Main Support Bracket
Drive Motor
Control Switches
Control Knobs
LEDs
Main Display Board
Emergency Stop Switch
Small Wire Terminal Strip
Drive Motor Capacitor
Clearstar Part No.
PLAM2041
PLAM2042
PLAM2043
PLAM2044
PLAM2045
PLAM2046
PLAM2047
PLAM2048
PLAM2049
PLAM2050
PLAM2051
PLAM2052
PLAM2053
PLAM2054
PLAM2055
PLAM2056
PLAM2057
PLAM2058
PLAM2059
PLAM2060
PLAM2061
PLAM2062
PLAM2063
PLAM2064
PLAM2065
PLAM2066
PLAM2067
PLAM2068
PLAM2069
PLAM2070
PLAM2071
PLAM2072
PLAM2073
PLAM2074
PLAM2075
PLAM2076
PLAM2077
PLAM2078
PLAM2079
PLAM2080
32
StarLam 1600R User Manual
Drawing #
81
82
83
84
85
86
87
88
89
90
91
92
93
94
95
96
97
98
99
100
101
102
103
104
105
106
107
108
109
110
111
112
113
114
115
116
117
118
119
Part Description
Safety Relay System
Heater Control IC Board
40A Solid State Relay
SSR Heat Sink
DIN Magnetic Breaker
DIN Magnetic Breaker
DIN Magnetic Breaker
DIN Magnetic Breaker
Wire Terminal Strip
Drive Control IC Board
Small AC Transformer
Reverse Motor Switch
Forward Motor Switch
Fan Power Connector
Main Power Switch
Main Power Cable
Fan Power Cable
Wash Pump Transformer
PTC Swivel LP Elbow
PTC Plastic 1/4" Connector
PTC Plastic Swivel Elbow
Clearstar Part No.
PLAM2081
PLAM2082
PLAM2083
PLAM2084
PLAM2085
PLAM2086
PLAM2087
PLAM2088
PLAM2089
PLAM2090
PLAM2091
PLAM2092
PLAM2093
PLAM2094
PLAM2095
PLAM2096
PLAM2097
PLAM2098
1/4" ID Fluid Tubing
6.5mm ID Rigid Fluid Tube
Peristaltic Pump Assembly
T - strainer filter assembly
40x36 mesh Filter Screen
T-Strainer Bowl Seal
3/8" ID Fluid Tubing
SS 1/4" - 1/4" connector
SS 3/8" - 1/4" connector
Nylon 1/4" - 1/4" connector
Female Valved 1/4" Coupler
Female Panel 1/4" Coupler
Male Valved 1/4" Coupler
Male 1/4" Coupler
Male Valved 3/8" Coupler
33
StarLam 1600R User Manual
Drawing #
120
121
122
123
124
125
126
127
128
129
130
131
132
133
134
135
136
137
138
Part Description
Female Panel 3/8" Coupler
Male 3/8" Coupler
Clearstar Part No.
Coating Rod #18 Mayer
Coating Rod #25 Mayer
Coating Rod #32 Mayer
34
StarLam 1600R User Manual
Appendix A3
35
StarLam 1600R User Manual
Appendix A4
Tips and Tricks for the StarLam 1600R G3
Start -up Check List
1. Make sure machine power is on.
2. Make sure substrate is properly tensioned to take up core. Pull tension and tape in the center first then
pull tension on each side and tape. Substrate should be tight and not loose and sagging. Use the Que
(green) button to pull tension on the substrate and hold it after taping.
3. Make sure heater is in the raised position. Turn heater on and let it preheat to at least 100 Deg.
Celsius.
4. Open fluid flow valve so that liquid laminate is dispensed onto substrate. Wait until the laminate is
flowing off the sides of the substrate.
5. Start motor at the #2 speed.
6. Lower Heater.
7. Switch cooling fans on.
Let machine run until job is coated.
Clean-Up and Shut Down Check List
1. Shut off the fluid feed valve.
2. Stop the machine before the vinyl spools off of the feed roll. There should be approximately 2 to 3
wraps still on the core (1.5 meters total from the metering rod to the end of the substrate).
3. Using a foam brush push all the remaining laminate off the substrate and into the reclaiming trough.
4. Loosen the fastening screws that hold the metering rod in place and remove the metering rod.
5. Place the metering rod into the cleaning trough and rotate it a few times to wet the rod.
6.
36