1
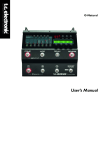
USER’S MANUAL
SNT IV
Built-in guitar tuner
4
1 2
3
Tuner function
of the SNT-IV preamp
Attention: all tuners only work properly when one note is played at a time.
DESCRIPTION:
1 Low battery LED: This LED light will illuminate when battery level is low and the battery needs to
be changed.
2 Mode Button: This switch changes the tuning mode between automatic chromatic tuning and manual
chromatic tuning. To affect the mode change, press the switch and hold in place for 2-3 seconds.
When in manual mode, this button is also used to switch from C, C#, D, D#, E, F, F#, G, G#, A, A#, B, C ,
C# etc ( push the button and release immediately).
In automatic mode the tuner will pick up the note played, indicate the closest key and whether the note is flat
(too low) or sharp (too high). Tune the string until the electronic needle on the display screen points 90° to
the centre and the green LED illuminates. This indicates that the string is now tuned to this key.
3 Power Switch: This switches the tuner on or off.
4 Red/ Green/ Red LED’s:
The red LED on the left will illuminate if the instrument is tuned lower than the note shown on the display. The
needle will be on the left side and will indicate the difference in cents. When the needle is in the middle the
green LED will illuminate indicating the string is correctly tuned to the key shown on the display. The red LED
on the right will illuminate if the instrument is tuned higher than the note shown on the display.
TUNING PROCEDURE:
WARNING: If you are tuning your guitar for the very first time, make sure that all the strings are strung
lower than they should be.
1. Activate the tuner. It will be set by default to automatic chromatic tuning.
2. Push the mode button once and the mode will change to manual chromatic tuning.
* Let’s start with the sixth string, the thickest, which should be tuned to E. Set the tuner in E while pressing
the mode button several times shortly until E is shown on the display screen. When you play the string the
needle will be on the left side. While turning the tuning peg to bring the pitch higher, the left red light will
illuminate, showing that you have come closer but are still tuned too low. The needle will then start to move
to the middle. Once in the middle the green led will glow. This means that the string is tuned to E.
Attention: Any guitar string can be in tune in several octaves, the note will be the same but the tone can be
different. Therefore, check if the physical tension on the string is normal. As a general rule, if while pushing
the string down with gentle pressure you can reach the next string above or below, the pitch is OK. However,
if when applying gentle pressure, you can touch two strings above or below, the pitch is one octave too low.In
that case you will need to wind up the tuning peg. The righthand LED will illuminate and the needle will move
to the right. The righthand red LED will then go out. As you continue winding the string tighter, the needle will
move from extreme right to extreme left. The lefthand red LED will illuminate and the needle will move to the
centre. Finally the green light will illuminate, indicating that you are now tuned in the right octave.
3. To tune the 5th string in A, (i.e. the 2nd thickest), set the tuner to A, using the Mode switch. Repeat the
same procedure as for the sixth string. Repeat the same procedure for 4th String in D, the 3rd string in G, the
2nd string in B and finally, the highest string in E.
Attention: When tuning the strings, the neck will bend very slightly, causing the strings that were already in
tune, to detune slightly. The needle and the LEDS will help you with the fine-tuning. Don’t forget to set the
note each time with the mode button, or switch to automatic mode.
Attention: It is recommended that you keep a spare set of strings in case of any strings breaking, which
can happen.
EMD Music 06-2007
staggmusic.com