1
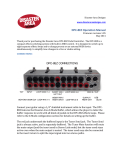
Technical Specification
LIGHT AND EASY
Power Input .................…………………………..…...9-12 DC
DMX Output .........................................……………..3 pin female XLR
Audio Input .....................……………….....………….By built-in microphone
Dimensions.....................……………….........……….280 x 170 x 66 mm
Weight......... ...................……............ ......................1.8 kgs
LED-0408
User Guide
Innovation, Quality, Performance
15-
Please read these instructions carefully before use
CONTENTS
1. Features ....................................................................................................... 2 2. General Instruction ....................................................................................... 3 3. Overview ...................................................................................................... 4 3.1 Front View ........................................................................................... 4 3.2 Rear View ........................................................................................... 5 4. Operation Guide ........................................................................................... 5 4.1 Store Colour Preset ............................................................................. 6 4.2 Delete Colour preset ........................................................................... 6 4.3 Program Chase ................................................................................... 7 4.4 Insert step to Chase ............................................................................ 7 4.5 Delete Step From Chase ..................................................................... 8 4.6 Delete Chase ...................................................................................... 9 4.7 Factory Reset...................................................................................... 9 4.8 Manual Mode .................................................................................... 10 4.9 Run Colour preset ............................................................................. 10 4.10 Run CHASE .................................................................................... 10 4.11 Over control ..................................................................................... 12 4.12 Strobe ............................................................................................. 12 4.13 Black Out Mode .............................................................................. 12 4.14 Foot Controller (CA-8F ).................................................................. 13 Following the provisions of the low voltage directive 73/23/EEC and 93/68/EEC
1-
14-
EC Declaration of Conformity
We declare that our products (lighting equipments) comply with the following
specification and bears CE mark in accordance with the provision of the
Electromagnetic Compatibility (EMC) Directive 89/336/EEC.
EN55103-1:199601-2; EN55103-2:1996;
EN61000-3-2:2000+A2:2005;
EN61000-3-3:1995+A1:2001+A2:2005.
&
Harmonized Standard
EN 60598-1: 2004
IEC 60598-1:2003+ corrigendum 2004
Part 1:General requirements and test
4.14 Foot Controller (CA-8F)
1. Features
LED-0408 can work with CA-8F, when the CA-8F connect with the
LED-0408, pressing the BLACKOUT button on LED-0408 for 3
seconds to active the CA-8F; pressing the STANDBY button on
1. Light and Easy is an user friendly LED controller.
2. Designed to work on all 4-Channel LED lighting fixtures
3. Control up to 32 channels of 8 LED groups
4. 8 individual button s for selecting 8 groups of lighting fixtures
CA-8F for 3 seconds to active the LED-0408. When the STAND BY indicator is blinking,
5. LED display for easy navigation
means the LED-0408 is active, when the indicator is not blinking, means the CA-8F is
6. 8 Colour pre-set buttons with 4 Banks, 32 pre-set colours in total.
active. The functions are shown below:
7. 8 Chases, each can save up to 32 scenes
8. 3 operation modes Auto, Sound, Manual.
9. Blackout function and instant strobe access button with variable speed.
STAND BY (LED1)
FUNCTION
LED blinking
LED off
LED on
SWITCH TO
LED-0408
CHASE
SELECT
CA-8F
ACTIVATE
STAND BY
NEXT STEP
STROBE
ACTIVATE
LED on
LED blinking
LED off
MUSIC RUN
MANUAL RUN
STROBE
MODE(LED2)
10. Optional Foot Controller (CA-8F) for ease of operation.
NOTE:
A knowledge of DMX is required to fully utilize this unit.
CA-8F
13-
2-
4.11 Over control
2. General Instruction
It can be used to manually control units when running COLOUR PRESET or CHASE.
Please read the user manual carefully, as it includes important information regarding
1
Ensure the LED above BLACK OUT button is off.
details of operation, maintenance, and technical data. Keep this manual with the unit for
2
Run COLOUR PRESET or CHASE directly.
future consult.
3
Press FIXTURE SELECTOR 1-8 button to choose units.
4
Push FADER 1-4 to adjust the lighting effect, the changes of the
WARNINGS!
y
Avoid any inflammable liquids, water or metal objects entering the unit.
y
Should any liquid be spilled on the unit, DISCONNECT the power supply to the unit
channel values are in dependent of the COLOUR PRESET or
CHASE.
immediately.
y
STOP using the unit immediately In the event of serious operation problems and either
contact your local dealer for a check immediately.
y
DO NOT open the unit--there are no user serviceable parts inside.
y
NEVER try to repair the unit yourself. Repairs by unqualified people could cause
damage or malfunction.
5
Back to the normal mode, please press DEL/CLEAR button.
4.12 Strobe
Press STROBE button when BLACK OUT LED on or off, all the units will
CAUTIONS!
strobe, at the same time you can jog STROBE SPEED fader to adjust the
y
This unit is NOT intended for home use.
y
After removing the packing Make that the unit is NOT damaged in any way. If in doubt,
y
Packaging material (plastic bags, polystyrene foam, nails, etc.) MUST NOT be left
strobe speed (1Hz-20Hz).
DON'T use it and contact an authorized dealer.
within children's reach, as it can be dangerous.
y
This unit must only be operated by adults. DO NOT allow children to tamper or play
with it.
y
NEVER use the unit under the following conditions:
1
LED off: LED-0408 is active.
2
LED on: Pressing BLACK OUT button, corresponding LED on,
all units blackout and outputs become “0” (exception
In places subject to vibrations or bumps.
the STROBE is still active).
Protect the unit from excessive dryness or humidity (ideal conditions are between 35%
and 80%).
y
There are 3 kinds of black out mode that indicate by the LED.
In places subject to excessive humidity.
In places with a temperature of over 45 C/113 F or less than 2 C/35.6 F.
y
4.13 Black Out Mode
3
LED blinking: Pressing BLACK OUT button for 3 seconds,
corresponding LED blinking, the units control by FOOT
CONTROLLOER (CA-8F), all the buttons will not work expect
DO NOT dismantle or modify the unit.
BLACK OUT button, so you can press to back to LED off mode
and control by LED-0408.
3-
12-
the MANUAL LED on indicating into Manual Mode.
3. Overview
3.1 Front View
4
Press UP/DOWN button to change the step, UP to the last step,
DOWN to the next step.
B. Sound Mode
1
Insure the LED above BLACK OUT is off.
2
Press CHASE 1-8 button to run the CHASE, the display will
show the present CHASE.
3
Press MANUAL/MUSIC/AUTO button to choose Sound
Mode, the MUSIC LED on indicating Sound Mode.
4
Press UP/DOWN button to adjust the sound sensitivity, the
CHASE will run to the music.
C. Auto mode
1
Insure the LED above BLACK OUT button is off.
2
Press CHASE 1-8 button,the display will show the present
CHASE.
3
4
FIXTURE SELECTOR 1-8
use to select fixtures
COLOUR PRESETS 1-8
select 32 colours by UP/SOWN button
CHASE 1-8
use to select chase 1-8
PROGRAM/REC
enter or exit program/record function
Press MANUAL/MUSIC/AUTO button to choose Auto Mode,
INSERT/TAP
Insert one step/set up a tap for chase
the AUTO LED on indicating Auto Mode.
DEL/CLEAR
delete preset colour, chase or step/clean output,
UP/DOWN
select bank, run chase manually, adjust the sound
sensitivity and the times chase auto run.
Push CHASE SPEED FADER to adjust the CHASE speed, push
FADE FADER to adjust the fade time (the percent of the chase
speed). Press UP/DOWN button to set the run time for CHASE
MANUAL/MUSIC/AUTO
use to select running mode, the corresponding LED on
indicating Manual Mode, Sound Mode or Auto Mode.
BLACK OUT
use to select black out mode or switch to CA-8 control
(It’s useful when you run more than one CHASE at one time).
FLASH
strobe function
You can also change the CHASE speed via INSERT/TAP
FADER 1-4
use to adjust the output of 1-4 channels
STROBE SPEED FADER
use to adjust the strobe speed (1-20Hz)
button. When running the CHASE, press the INSERT/TAP
button and the indicator will blinking, then press the
INSERT/TAP button and the indicator off, the blinking time will
be the CHASE speed.
11-
CHASE SPEED FADER
use to adjust the chase speed, the run time of each step
can be set from 0.1S to 60M.
FADE FADER
use to adjust the fade which show as percentage of the
run time
4-
3.2 Rear View
①
②
③
④
⑤
4.8 Manual Mode
POWER SWITCH
POWER IN
DMX Out
MICROPHONE
CA-8F FOOT CONTROLLER
Turn on/off the power
9-12DC
DMX-512 output
Receive music for running chase in sound mode
CA-8F connector
1
Insure the LED above the BLACK OUT button is off.
2
Press FIXTURE SELECTOR 1-8 button to choose units desired.
3
Push FADER 1-4 to adjust the effect.
ATTENTION: The LED which besides FIXTURE SELECTOR button on indicating the
correspond units could be control by faders, you can delete the setting that you do not
want to store by press DEL/CLEAR button.
4.9 Run Colour preset
4. Operation Guide
Turn on the power, the controller access to the last control status of
1
Insure the LED above the BLACK OUT is off.
2
Use UP/DOWN button to choose BANK 1-4 which store the
COLOUR PRESET desired.
LED-0408 or CA-8F. Pressing BLACK OUT button to switch to
LED-0408 or CA-8F control. Follow functions will be available under
3
LED-0408 controlling.
1、CP1.1-CP4.8
2、CAS1-CAS8
3、ST01-ST32
4、D000-D255
5、F01.0-F20.0
6、0.1 /08.8
21.30 /60.00
Press COLOUR PRESET 1-8 button to run COLOUR PRESET.
colour preset, 4 banks, each bank with 8 presets
chase
chase step
data
strobe speed
chase speed (the time interval of two steps)
4.10 Run CHASE
(1) one digital after radix point: the unit is second
There are three modes: Manual Mode, Sound Mode and Auto mode.
Be sure there are CHASES stored. Press CHASE 1-8 buttons to
run CHASE directly, the correspond LED will be on. If you choose
more than one CHASE at a time, then the first correspond LED will be on
and others will blinking (1Hz), all the CHASE will circuit run one by one.
(2) two digital after radix point: the digital before radix
point is minutes, and the digital after radix point is
7、P000---P100
8、M001-M100
9、L001-L200
10、NULL
seconds.
fade time: the percent of the chase speed
sound sensitivity
loop
null
A. Manual mode
1
Insure the LED above BLACK OUT button is off.
2
Press CHASE 1-8 button to run the CHASE, the display will
show the present CHASE.
3
5-
Press MANUAL/MUSIC/AUTO button to choose Manual Mode,
10-
stored).
Enter programming mode: hold PROGRAM/REC button for 3 seconds,
4
Press UP/DOWN button to choose the step desired to delete ( if
the LED above the button blinking indicating program in active.
you want to delete the fifth step, set the present display to “ST05”).
5
Press DEL/CLEAR button, all LEDs blinking for 3 times
4.1 Store Colour Preset
indicating deleted succeed. ( the steps behind it will move forward
1
Enter programming mode.
one step, for example, if you delete the fifth step, the sixth step will
2
Press FIXTURE SELECTOR 1-8 button to choose units.
3
Push fader FADER 1-4 to adjust the output.
4
Press PROGRAM/REC button.
5
Press UP/DOWN button to choose bank 1-4 to store colour preset
move to be the fifth step. If there is none step behind the step
deleted, It will show the last step. Delete all steps, then it will show
“NULL”.)
6
Repeat steps 4-6 to delete more steps.
7
Hold PROGRAM/REC button for 3 seconds to exit programming
mode, the LED above PROGRAM/REC button will be off.
4.6 Delete Chase
1
Enter programming mode.
2
Hold DEL/CLEAR button, and press one of the CHASE 1-8 button,
(jump this step if you chose a bank before).
all LEDs blinking for 3 times, the opposite LED off indicating
deleted succeed.
3
Repeat steps 2-3 to delete more chases.
4
Hold PROGRAM/REC button for 3 seconds to exit programming
6
Press COLOUR PRESETS 1-8 button, all LED blinking for 3
times, the corresponding LED blinking indicating store succeed
(when the LED indicator off, means there is null colour preset,
mode, the LED above PROGRAM/REC button will be off.
when the LED indicator blinking means one colours preset is
stored).
4.7 Factory Reset
Be careful, factory reset will delete all the settings!
1
Turn off the power.
2
Press the PROGRAN/REC and DEL/CLEAR button at the same
7
Repeat steps 2-6 to store more colour presets.
8
Hold PROGRAM/REC button for 3 seconds to exit programming
mode, the LED above PROGRAM/REC button will be off.
time, turn on the power, wait until all LEDs blinking, loose the
buttons, the LEDs stop blinking indicating factory reset succeed.
4.2 Delete Colour preset
1
Enter programming mode.
2
Use UP/DOWN button to choose bank 1-4 to store colour preset
(jump this step if you have choose bank before).
9-
6-
3
Hold DEL/CLEAR button, press COLOUR PRESETS 1-8
3
Press INSERT/TAP button, the LED above it will on, the present
button, all LED blinking for 3 times, the corresponding LED off
step will show on the display (for example, it will show “ST00”
indicating the colour preset deleted succeed.
when there is no step).
4
Repeat 2-3 steps to delete more colour presets.
5
Hold PROGRAM/REC button for 3 seconds to exit programming
4
Use UP/DOWN button to select the position of inserted steps ( If
you want to insert fifth step, you should set the present step to be
mode, the LED above PROGRAM/REC button will be off.
“ST05”).
4.3 Program Chase
1
Enter programming mode.
2
Press CHASE 1-8 button to choose chase which desired to store
5
UP/DOWN button to choose colour preset or push the FADER 1-4
in.
3
Press FIXTURE SELECTOR 1-8 button to choose units, use
Press FIXTURE SELECTOR 1-8
to adjust the lighting effect.
button to choose units, use
UP/DOWN button to choose bank 1-4 that desired to store colour
preset, push fader 1-4 to adjust the light effect, or open a colour
preset stored.
4
Press PROGRAM/REC
button, all LEDs blinking for 3 times
indicating one step stored succeed ( it will show “NULL” and do not
store if all outputs are ”0” ).
6
5 Repeat steps 3-4 to store more steps, each chase 32 steps
Press PROGRAM/REC
button, all LEDs blinking for 3 times
indicating insert one step succeed.
maximum, it will show “FULL” when up to 32 steps.
6
Repeat steps 2-5 to store more chases.
7
Hold PROGRAM/REC button for 3 seconds to exit programming
mode, the LED above PROGRAM/REC button will be off.
7
Repeat steps 3-6 to insert more steps, 32 steps maximum, more
than this it will show “FULL”.
8
Hold PROGRAM/REC button for 3 seconds to exit programming
mode, the LED above ROGRAM/REC button will be off.
ATTENTION: Before using any colour preset or lighting effect, press DEL/CLEAR button
to clean the output you set inadvertently, so that you can avoid storing the lighting effect
that unwished.
4.5 Delete Step From Chase
1
Enter programming mode.
2
Press CHASE 1-8 button, choose the chase whose step desired
4.4 Insert step to Chase
to delete.
1
Enter programming mode.
2
Press CHASE 1-8 button to choose the chase desired to insert
3
Press INSERT/TAP button, the LED above it will on, the present
step show on the display (it will show “ST00” if none step has been
step.
7-
8-


![[B40] RWS-TE2PAFZ39-IR(Videor)](http://vs1.manualzilla.com/store/data/005979657_1-986d79b0350f507a65bc366834e972e4-150x150.png)