1
WorldPenScan Series
User Manual
Release: November, 2014
Version: v4.0 Win
Penpower Technology Ltd.
Software User License Agreement
You are licensed to legally use this software program (“the Software”) by Penpower
Technology Ltd (“Penpower”) under this license agreement (“The Agreement”). If you do
not agree with any of the provisions in this Agreement, please do not install, copy or use the
Software. By using the Software, you are deemed to fully understand and accept the provisions of this Agreement.
1. Intellectual Property
All intellectual property rights in the Software, together with all information and documents included in the packaging for the Software (including but not limited to copyrights), are property of Penpower or have been licensed to Penpower, and are protected
by relevant laws and regulations.
2. License to Use
You are authorized to use the Software on one (1) single computer only. You may not
use the Software on any other machines other than the said single computer.
3. Authority to Copy
The Software and all documents included with the Software, and copyright thereof, are
property of Penpower. You are licensed to make one (1) copy of the Software for your
personal backup purposes. All other acts of copying are strictly prohibited. The backup
copy shall not be installed nor used while the Software is being used.
You may not sell, lease, dissemble, reverse engineer, copy, translate, adapt or derive the
Software, or obtain the source code of the Software by any other means. You may not
use the Software for any purposes other than those permitted under this Agreement.
4. Business Users
If you need to install or use the Software on more than one (1) computer, please contact
Penpower or our local distributor to purchase a license for the additional use.
5. Liability
You agree to indemnify Penpower against all losses, costs, debts, settlement payments
or other expenses (including but not limited to attorneys fees) arising from your breach
of this Agreement, and you agree to compensate Penpower for all of the abovementioned damages.
6. No Warranty
Effectiveness of a packaged software in handling information is closely related to its
software and hardware environment. The Software is published following careful development and product testing by Penpower, but Penpower is not able to conduct tests
based on all possible combinations of software and hardware environment. Therefore,
Penpower is unable to promise nor warrant that there will be absolutely no risk of loss
or damage of information, or any other kind of loss, during installation and/or execution
of the Software. You must be fully aware of your risks in using the Software.
Penpower will provide you with the Software and support services in respect of the
Software to the maximum extent permitted by law. However, Penpower does not warrant that the Software and information included in the package of the Software contain
no defects or errors. Penpower is not liable for any indirect, special or incidental loss
arising from the Software, including but not limited to loss of profits, damage to business reputation, cessation of work, hardware malfunction or damage, or any other commercial damage or loss arising from commercial use of the Software.
7. Third Party Offerings
The Software may allow you to access the contents, software applications and data services of a third party, including but not limited to a variety of Internet applications ("Third
Party Offerings") and interoperate with them. Your access to and use of any Third Party
Offering is governed by the agreed terms and conditions in connection with the offering
and the copyright laws of the country the third party belongs to.
Third Party Offerings are not owned or provided by the Penpower. Third Party Offerings may at any time for any reason be modified or discontinued. Penpower does not
control, endorse, or accept any responsibility associated with Third Party Offerings.
Any agreement between you and any third party in connection with a Third Party Offering, including privacy policies and use of your personal information, delivery of and
payment for goods and services, and any other terms, conditions, warranties, or representations of the third party associated with such agreement is solely a dealing between
you and the third party. You should take into consideration and shall assume all risks or
responsibilities in connection with the use of "Third Party Offerings."
8. Limitation of Liability and Damages
Except as expressly specified and expressly agreed to in writing by Penpower, Penpower shall not be responsible for any damage incurred by you for any reason under this
Agreement, The maximum amount of compensation payable by Penpower, in respect
of any damage incurred by you for any reason under this Agreement, is limited to the
amount you have already paid to Penpower in respect of the Software.
Under no circumstances will Penpower be held liable for the possibility of loss, notwithstanding Penpower may be aware of the possibility of such loss.
9. Prohibition Against Sublicense
You are prohibited to assign the license in respect of the Software granted to you under
this Agreement, or to grant a sublicense to another person.
10.Jurisdiction
With regards to any disputes arising from this Agreement, Penpower and you agree that
the court having jurisdiction over the business location of Penpower will be the court in
the first instance.0
11. Miscellaneous
In the event that any provision of this Agreement is found to be invalid at law, such invalidity will not affect the validity of any other provisions, or the legal enforceability of
such other provisions.
FCC Statement
This equipment has been tested and found to comply with the limits for a Class B digital
device, pursuant to Part 15 of the FCC Rules. These limits are designed to provide reasonable
protection against harmful interference in a residential installation.
This equipment generates, uses and can radiate radio frequency energy and, if not installed and used in accordance with the instructions, may cause harmful interference to radio
communications.
However,there is no guarantee that interference will not occur in a particular installation. If this equipment does cause harmful interference to radio or television reception,
which can be determined by turning the equipment off and on, the user is encouraged to try
to correct the interference by one of the following measures:
- Reorient or relocate the receiving antenna.
- Increase the separation between the equipment and receiver.
- Connect the equipment into an outlet on a circuit different from that to which the receiver
is connected.
- Consult the dealer or an experienced radio/TV technician for help.
CE Warning
The 20cm safe distance from antenna to the user shall be maintained.
< IC RSS-GEN 7.1.5>Industry Canada Caution
This device complies with Industry Canada licence-exempt RSS standard(s).
Operation is subject to the following two conditions:
(1) this device may not cause interference, and
(2) this device must accept any interference, including interference that may cause undesired operation of the device.
Le present appareil est conforme aux CNR d'IndustrieCanadaapplicables aux appareils
radio exempts de licence. L'exploitation est autorisee aux deux conditions suivantes :
(1) l'appareil ne doit pas produire de brouillage, et
(2) l'utilisateur de l'appareil doit accepter tout brouillage radioelectrique subi, meme si le
brouillage est susceptible d'en compromettre le fonctionnement.
Contents
Chapter 1 Product Introduction.................................................... 1-1
Chapter 2 Getting Started...............................................................................2 - 1
2.1 System Requirements.........................................................................................2 - 1
2.2 Hardware Specification......................................................................................2 - 1
2.2.1 WorldPanScan..........................................................................................2 - 1
2.2.2 WorldPanScan BT....................................................................................2 - 2
2.2.3 WorldPanScan X......................................................................................2 - 3
2.3 Software Installation...........................................................................................2 - 4
2.4 Running Penpower WorldPenScan Series..........................................................2 - 6
2.5 Connect to Pen Scanner......................................................................................2 - 7
2.5.1 Via USB Cable.........................................................................................2 - 7
2.5.2 Via Bluetooth (Only for WorldPenScan BT)...........................................2 - 8
Chapter 3 Scanning and Settings....................................................................3 - 1
3.1 WorldPenScan Series Toolbar............................................................................3 - 1
3.2 Scan Text and Image..........................................................................................3 - 3
3.2.1 Text Mode................................................................................................3 - 3
3.2.2 Image Mode.............................................................................................3 - 3
3.3 Online Translation..............................................................................................3 - 4
3.3.1 Dictionary................................................................................................3 - 4
3.3.2 Sentence Translation................................................................................3 - 5
3.4 Business Mode...................................................................................................3 - 6
3.5 Original Image....................................................................................................3 - 7
3.6 Settings...............................................................................................................3 - 8
3.6.1 General Settings.......................................................................................3 - 8
3.6.2 Recognition Settings..............................................................................3-10
3.6.3 Business Mode.......................................................................................3-12
3.6.4 Hardware Information (For WorldPenScan BT)....................................3-13
3.7 Help..................................................................................................................3-14
3.8 About................................................................................................................3-14
There may be newer versions of the software that was released during or after this product’s manufacturing date. If the content in the User Manual differs from the on-screen
interface, please follow the instructions on the on-screen interface instead of the User
Manual.
Chapter 1 Product Introduction
Chapter 1 Product Introduction
WorldPenScan series, the best input device, scans and recognizes lots of languges and
put the scanned material into your computer via the USB interface. Whenever you
come across any particular words or sentences that you do not understand, WorldPenScan series will scan for you.
With an ergonomic design, WorldPenScan series provides a comfortable handle which
fits all left and right-handed users. Scan away effortlessly with the transparent scan tip.
Where you see, where you scan.
• Recognition in lots of languages
The WorldPenScan can scan and recognize lots of languages, including English,
French, German, Italian, Spanish, European, and East Asia characters.
• Bluetooth wireless connection
WorldPenScan X adopts the Bluetooth 4.0 - BLE technology to facilitate the data transmission to any mobile devices. The scanned result can be immediately digitized into
texts and transmitted to Win/Mac PCs via USB port.
• Business Mode
The WorldPenScan has business mode, which can recognize bar codes and bank fonts
(OCR-A, OCR-B, and MICR). An ideal product for business.
• Output to multiple applications
The WorldPenScan can be used in any editing applications, such as Word, Excel, Outlook…etc. You can get the result instantly.
• Multiple Language Translation
By sending the scanned and recognized words or sentences directly to on-line translators, you can instantly see the translation results by one click.
• Scan image
The WorldPenScan lets you scan and save the images into your document.
1-1
Chapter 2 Getting Started
Chapter 2 Getting Started
2.1 System Requirements
· Windows 8 desktop mode/7 /Vista /XP SP3
· 650MB of available hard disk space
· USB port
· Bluetooth module-WIDCOMM or Microsoft Bluetooth stack(WorldPenScan BT)
2.2 Hardware Specification
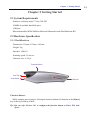
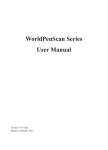
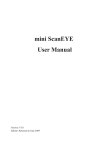
2.2.1 WorldPanScan
· Dimensions: 130mm x 37mm x 18.5mm
· Weight: 30g
· Interface: USB 2.0
· Scanning speed: 15 cm/sec.·
· Character size: 5~22 pt
Function Button
Scan Tip
Scan Button
USB Port
Function button:
While scanning text or images, clicking the function button will function as the [Enter]
key on the keyboard by default.
Tip: You can refer Section 3.6.1 to configure the function button as Enter, Tab, andSpace.
2-1
2-2
WorldPenScan Series
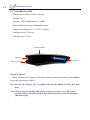
2.2.2 WorldPanScan BT
· Dimensions: 130mm x 37mm x 18.5mm
· Weight: 35g
· Interface: USB 2.0/Bluetooth v2.1+EDR
· Built-in lithium polymer rechargeable battery
· Voltage and amperage: 4.75~5.25V (<100mA)
· Scanning speed: 15 cm/sec.·
· Character size: 5~22 pt
Function Button
Scan Tip
Scan Button
USB Port
Function button:
While scanning text or images, clicking the function button will function as the [Enter]
key on the keyboard by default.
Tip: You can refer Section 3.6.1 to configure the function button as Enter, Tab, andSpace.
Note : Before using for the first time, please charge pen scanner over USB. It takes
around 5 hours to be fully charged. You can see the battery status in [Settings] >
[Hardware info]
Chapter 2 Getting Started
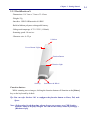
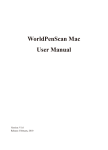
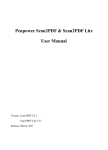
2.2.3 WorldPanScan X
· Dimensions: 114.7mm x 33mm x 22.45mm
· Weight: 55g
· Interface: USB 2.0/Bluetooth v4.0 BLE
· Built-in lithium polymer rechargeable battery
· Voltage and amperage: 4.75~5.25V (<100mA)
· Scanning speed: 10 cm/sec.·
· Character size: 6~22 pt
USB Port
Power Button/ Light
Function Button
Function Light
Scan Tip
Scan Button & Wheel
Function button:
While scanning text or images, clicking the function button will function as the [Enter]
key on the keyboard by default.
Tip: You can refer Section 3.6.1 to configure the function button as Enter, Tab, andSpace.
Note : Before using for the first time, please charge pen scanner over USB. It takes
around 5 hours to be fully charged. You can see the battery status in [Settings] >
[Hardware info]
2-3
2-4
WorldPenScan Series
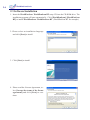
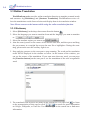
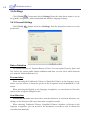
2.3 Software Installation
1. Insert the WorldPenScan/ WorldPenScan BT setup CD into the CD-ROM drive. The
installation program will start automatically. Click [WorldPenScan]/ [WorldPenScan
BT] to install WorldPenScan/ WorldPenScan BT. (WorldPenScan BT for example)
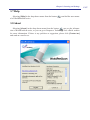
2. Please select an installation language
and click [Next] to install.
3. Click [Next] to install.
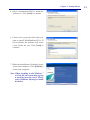
4. Please read the License Agreement, select [I accept the terms of the license
agreement] and click [Next] to continue.
Chapter 2 Getting Started
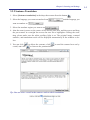
5. Select a destination folder to install the
software to. Click [Next] to continue.
6. Choose the program folder that you
want to install WorldPenScan BT to. If
left as default, the software will create
a new folder for you. Click [Next] to
continue.
7. When the installation is finished, please
restart your computer. Click [Finish] to
restart your computer.
Note: When installing in the Windows 7
or Vista OS, the system may pop-up
a warning message twice. Please
select [Continue Anyway] to install
the driver.
2-5
2-6
WorldPenScan Series
2.4 Running Penpower WorldPenScan Series
Go to [Start/ All Programs/ Penpower WorldPenScan or Penpower WorldPenScan BT/ WorldPenScan or Penpower WorldPenScan BT] or double-click the shortcut
or
or
on the desktop to start the WorldPenScan/ WorldPenScan BT toolbar.
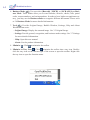
When running the software for the first time, a Registration Reminder will appear.
Please click on Register now to register and receive the warranty service. You can also
click Register later to close the reminder. When you need to register, click the Tools
button and select About from the toolbar and then click on Registration. If you've registered, please click Already Registered.
Tip: If you do not need to be reminded again, you can check [Don’t show this registering window at startup].
A Scanning Guide will appear after the registration reminder.
Note: If you would not like to read the message again, you can check [Do not display
this scanning guide next time], and click [OK].
Chapter 2 Getting Started
2.5 Connect to Pen Scanner
You can plug pen scanner into your computer's USB port via the USB cable to use
WorldPenScan or WorldPenScan BT. Besides, WorldPenScan BT can be connected with
computer via Bluetooth for use.
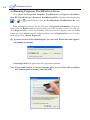
2.5.1 Via USB Cable
Please follow the instructions to connect pen scanner with computer.
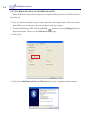
1. Plug in pen scanner into your computer’s USB port and a window will
appear. Select [No, not this time] and
click [Next] to continue.
Note: Some computers may shut down
accidentally after connection. This
is due to the lack of power to support several USB devices. To avoid
this problem, connect your WorldPenScan series and other USB
devices to an extra-powered USB
hub.
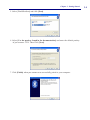
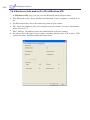
2. Select [Install the software automatically] and click [Next] to continue.
3. Click [Finish] to end the installation.
Note : When connecting the scan pen to another USB port, follow these same steps to
install again.
2-7
2-8
WorldPenScan Series
2.5.2 Via Bluetooth (Only for WorldPenScan BT)
Please follow the instructions to pair your computer and pen scanner with Bluetooth at
first time use.
1. Press the function button on pen scanner until the status light blinks. When the status
light blinks, you can begin to pair the computer with pen scanner.
2. Launch WorldPenScan BT and click [Tools] button to select [Settings] from the
drop-down menu. Then go to the [Hardware info] page.
3. Click [Pair].
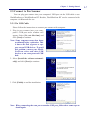
4. Follow the [Add Bluetooth Device Wizard] to pair your computer and pen scanner.
Chapter 2 Getting Started
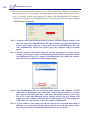
5. Select [WorldPenScan] and click [Next].
6. Select [Use the passkey found in the documentation] and enter the default passkey
of pen scanner: 1234. Then Click [Next].
7. Click [Finish] when pen scanner was successfully paired to your computer.
2-9
2-10
WorldPenScan Series
8. Then, the pen scanner will connect to your PC automatically. When pen scanner is
paired with your PC successfully, the status light on pen scanner blinks slowly (blink
every 3 seconds), and the pen scanner will connect with WorldPenScan BT automatically. You can begin to use WorldPenScan BT when the pen bluetooth status changed
to [Paired and connected].
Note 1: Long press the function button on pen scanner will turn off pen scanner. Next
time you want to use WorldPenScan BT, please shortly press function button to
turn on pen scanner. The pen scanner will connect to WorldPenScan BT software automatically. There is no need to pair your computer and pen scanner
again.
Note 2: If your computer has paired with pen scanner but cannot to connect to pen
scanner for use, you can go to [Start\Control Panel\Printers and Other Hardware\Bluetooth Devices ] to remove [WorldPenScan] and follow the instructions to pair your computer and pen scanner again.
Note 3: For WorldPenScan BT, you can connect pen scanner with computer via USB
cable and via Bluetooth at the same time. Follow the instructions to connect
pen scanner with USB cable first, and enter the default passkey of pen scanner: 1234 in the Add Bluetooth Device Wizard directly, the pen scanner will
connect to your computer automatically via Bluetooth. Now if you unplug the
USB cable, you can continue to use pen scanner via Bluetooth.
Note 4: If pen scanner is not connected with the software nor executed more than 10
minutes, or is connected with the software but not executed more than 30 minutes, the pen scanner will automatically shut down to save power.
Chapter 3 Scanning and Settings
Chapter 3 Scanning and Settings
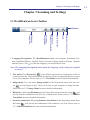
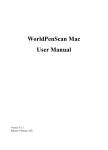
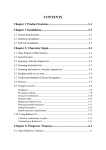
3.1 WorldPenScan Series Toolbar
Minimize
Minimize to Tray Icon
Tools
Business mode
Dictionary\
Sentence translation
Text mode\
Image mode
Language
recognition
1. Language Recognition: The WorldPenScan series can recognize Traditional Chinese, Simplified Chinese, English, French, German, Italian, Japanese, Korean, Spanish
and more text. Click to select the language you would like to scan.
Note: The Language Recognition must match the language of the content for optimal
accuracy.
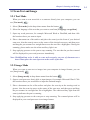
2. Text mode: The [Text mode] is the default scan mode for scanning an article or
a sentence directly. The scanned word or sentence will be recognized and sent as typed
text to your computer. Please refer to 3.2.1 Text Mode for more detailed information.
3. Image mode: You can select [Image mode] in the drop-down menu from the button to scan images or text. They will be sent to your computer in image formats.
Please refer to 3.2.2 Image Mode for more detailed information.
4. Dictionary: Selecting [Dictionary] in the drop-down menu from the button can
provide you the translation result of every scanned word. Please refer to 3.3.1 Online
Translation for more detailed information.
5. Sentence translation: Selecting [Sentence translation] in the drop-down menu from
the button will provide the translations of the sentences you scan. Please refer to
3.3.2 Online Translation for more detailed information.
3-1
3-2
WorldPenScan Series
6. Business Mode
: You can select [Barcode], [MICR], or [OCR A/B] from Business Mode. These modes allow you to scan barcodes, invoices, checks, bills, postal
codes, coupon numbers, and racing numbers. In order to have higher recognition accuracy, you may use the Business mode to recognize different documents. Please refer
to 3.4 Business Mode for more detailed information.
7. Tools : Provide Original Image, Bubble Window, Settings, Help and About
WorldPenScan series.
. Original Image: Display the scanned image. See 3.5 Original Image.
. Settings: Provide general, recognition, and business mode settings. See 3.7 Settings
for more detailed information.
. Help: Open this user manual.
. About: See the product information.
8. Minimize
: Click
to minimize the toolbar.
9. Minimize to Tray Icon : Click
minimize the toolbar into a tray icon. Doubleclick the tray icon on the bottom-right of the screen to open the toolbar. Right-click
the tray icon to open the function menu.
Chapter 3 Scanning and Settings
3.2 Scan Text and Image
3.2.1 Text Mode
When you want to scan an article or a sentence directly into your computer, you can
use [Text mode]
:
1. Select [Text mode] in the drop-down menu from the button .
2. Select the language of the text that you want to scan from [Language recognition].
3. Open any word processor, for example Microsoft Word or WordPad, and then click
the location where you want to input.
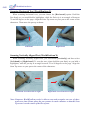
4. Place a document on a flat surface and place the scan tip at the front of your desired
scan area. Aim the scan tip arrow at the center of the desired scan area, and then press
and drag the pen scanner in a straight line across the area like a highlighter. During the
scanning, please make sure the white auxiliary light is on.
5. Stop applying pressure to the pen to stop scanning. The text that the pen has scanned
will be displayed in your word processor immediately.
Note: WorldPenScan series is able to scan and recognize one row of characters at a
time. Please place the scan tip arrow at the center of the line.
3.2.2 Image Mode
When you want to scan text or images into your computer in image formats, you can
use [Image mode]
.
1. Select [Image mode] in drop-down menu from the button .
2. Open a word processor that is able to input images, for example Microsoft Word. Click
the location where you would like to input the scanned images.
3. Place a document on the a flat surface and place the scan tip at the starting word or
picture. Aim the scan tip arrow at the center of the scan area, and then press and drag
the pen scanner in a straight line like a highlighter. The white auxiliary light from the
scan tip indicates the pen is scanning.
4. Stop applying pressure to the scan pen to stop scanning. The scanned picture will be
displayed in your word processor in an image format.
3-3
3-4
WorldPenScan Series
3.3 Online Translation
WorldPenScan series provides online translation function to translate scanned words
and sentences by [Dictionary] and [Sentence Translation]. WorldPenScan series collects the translations results from websites and display them in its translation window.
Note: Please connect to the internet while using the online translation function.
3.3.1 Dictionary
1. Select [Dictionary] in the drop-down menu from the button .
2. Select the language you want to translate from and the language you want to translate
to.
3. Select the translate engine you want to use
.
4. Aim the scan tip arrow at the center of the desired scan area, and then press and drag
the pen scanner in a straight line across the area like a highlighter. During the scanning, please make sure the auxiliary light is on.
5. Stop applying pressure to the scan pen to stop scanning. The word and its translation
result will be displayed in the window as below. At the bottom of the window, you
can see the source of the translation. If you scan more than one word, you can press
the [Function button] on the scan pen to see the translation of the next recognizable
word.
5. The translated word will also be shown in the search box. You can click
to listen
to the pronunciation of this word or click
to search for more information
on Google, Wikipedia, or YouTube. You can also type in the search bar to find more
information.
Chapter 3 Scanning and Settings
3.3.2 Sentence Translation
1. Select [Sentence translation] in the drop-down menu from the button 2. Select the language you want to translate from
want to translate to .
and the language you
.
3. Select the translate engine you want to use
.
4. Aim the scan tip arrow at the center of the desired scan area, and then press and drag
the pen scanner in a straight line across the area like a highlighter. During the scanning, please make sure the white auxiliary light is on. The original image, scanned
sentence, and translation result will be displayed automatically in the window as below.
5. You can click
e-mail, and click
to delete the contents, click
to listen to the pronunciation.
to send the scanned text out by
Tip: You can select words in the sentence and see their translations.
3-5
3-6
WorldPenScan Series
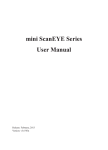
3.4 Business Mode
The Business Mode allows you to scan barcodes, invoices, checks, bills, postal codes,
coupon numbers and racing numbers etc.
The fonts that the Business Mode supports are OCR A, OCR B, MICR, and other
fonts as the samples below:
OCR A: 0 1 2 3 A B C a b c
OCR B:
MS Gothic: 0 1 2 3 A B C a b c
MICR :
The barcodes that the Business Mode supports are Codabar, Code 128, Code 39, Code
93, EAN 8, EAN 13, IATA 2 of 5, Industrial 2 of 5, Interleaved 2 of 5, Matrix 2 of 5,
Patch, PostNet, UCC-128, UPC-A and UPC-E.
In order to have higher recognition accuracy, you may use the [Business Mode] to
recognize these fonts:
1. Select [Barcode], [MICR], or [OCR A/B] in the drop-down menu from the button .
Note: For higer recognition accuracy, before you start the Business Mode, please select
the font that you want to scan in [Tools] \ [Settings] \ [Business Mode]. Please
refer to 3.7.2 Recognition Settings.
2. Open your application or any word processor, for example Microsoft Word. Click the
location where you would like to input the scanned text or numbers.
3. Place a document on a flat surface and place the scan tip at the front of your desired
scan area. Aim the scan tip arrow at the center of the desired scan area, and then press
and drag the pen scanner in a straight line across the area like a highlighter. During the
scanning, please make sure the white auxiliary light is on.
4. Stop applying pressure to the pen to stop scanning. The scanned text or numbers are
displayed in your application or word processor immediately.
Note 1: When scanning barcodes, please aim pen scanner at the upper side of
barcodes, not at the center, to have higher recognition accuracy.
Tip: You can select a range of your desired scan document in the Settings to have
higher recognition accuracy. Please refer to 3.7.3 Recognition Settings.
Chapter 3 Scanning and Settings
3.5 Original Image
Click [Tools] button and select the [Original Image] option from the drop-down
menu to open the [Original Image] window. After scanning, the [Original Image] window displays the scanned image. You can check the scanned image to compare with the
original text. This can help you improving your scan technique for more accurate recognition results.
Tip: You can right click on the original image to save the image to .bmp or .pcx file.
3-7
3-8
WorldPenScan Series
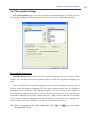
3.6 Settings
Click [Tools]
button and select [Settings] from the drop-down menu to set up
the general, recognition, online translation and interface language settings.
3.6.1 General Settings
Click [Tools]
preferences.
button and select [Settings] from the drop-down menu to set the
Button Definition
The default function of Function Button is Enter. You can replace Enter by Space and
Tab. Select the options under Button definition and then you can select which function
you want the Function Button to be.
Pronunciation
When choosing the Traditional Chinese or Simplified Chinese as the language recognition, you can choose to listen the speech of the recognized word in Mandarin or Cantonese.
When choosing the English as the language recognition, you can choose to listen the
speech of the recognized English word.
Scan Direction
WorldPenScan series must be used to scan the characters in consistent direction, any
changes to the direction will cause inaccurate recognition results.
When choosing Traditional Chinese, Simplified Chinese, Japanese or Korean as the
language recognition, you can accord to the document you want to scan to choose the
scan direction manually.
Chapter 3 Scanning and Settings
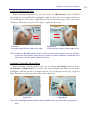
Scanning Horizontal Text
When scanning horizontal text, you can choose the [Horizontal] option. Hold the
Pen firmly, as you would hold a highlighter, while the Pen's tip is at an angle of between
70 and 80 degrees to the page. Align the Scan Tip arrow on your pen to the center of the
characters. Then move the pen left-to-right or right-to-left to scan.
Left hand:
Scan from right-to-left or from left-to-right
Right hand:
Scan from left-to-right or from right-to-left
Note: Penpower WorldPenScan series is able to scan and recognize one row of characters at a time. Please place the pen scanner in such a manner so that the Scan
Tip arrow is at the center of the line of text.
Scanning Vertically Aligned Text
When scanning vertically aligned text, you can choose [Vertically] and then select
[Left-hand] or [Right-hand]. To scan the text, please hold the pen firmly as you hold a
highlighter, with the pen tip at an angle between 70 to 80 degrees to the page. Align the
Scan Tip arrow on your pen to the center of the characters.
Left Hand
Right Hand
Note: The Left/Right-handed option only available when you select the vertical direction.
3-9
3-10
WorldPenScan Series
Scanning Horizontal Text (WorldPenScan X)
When scanning horizontal text, you can choose the [Horizontal] option. Hold the
Pen firmly, as you would hold a highlighter, while the Pen's tip is at an angle of between
70 and 80 degrees to the page. Align the Scan Tip arrow on your pen to the center of the
characters. Then move the pen up-to-down.
Left Hand
Right Hand
Scanning Vertically Aligned Text (WorldPenScan X)
When scanning vertically aligned text, you can choose [Vertically] and then select
[Left-hand] or [Right-hand]. To scan the text, please hold the pen firmly as you hold a
highlighter, with the pen tip at an angle between 70 to 80 degrees to the page. Align the
Scan Tip arrow on your pen to the center of the characters.
Left hand: Scan from left-to-right
Right hand: Scan from left-to-right
Note: Penpower WorldPenScan series is able to scan and recognize one row of characters at a time. Please place the pen scanner in such a manner so that the Scan
Tip arrow is at the center of the line of text.
Chapter 3 Scanning and Settings
3.6.2 Recognition Settings
In the [Recognition] page, you can set up the recognition languages, Chinese recognition option, recognition contents and at the end of scan, insert a space automatically.
Recognition Languages
WorldPenScan series provides lots of recognition languages for you to choose. In the
toolbar, you can drag down the recognition menu to select the recognition language you
want.
You can modify the recognition language menu in the Recognition Language tab of
Setting. In the Recognition Language Tab, the right column contains lots of recognition
languages for you to choose. The languages appear in the left column will all appear on
the recognition language drag down menu on the tool bar. In this tab, you can select the
recognition language in the right column and click [add] to add it into the left column.
If you want to remove a language from the left column, you can select the language you
want to remove and click [Remove] to remove it from the left column.
Tip: Select a language in the right column and click
this language's order.
or
, you can change
3-11
3-12
WorldPenScan Series
Chinese Recognition Option
When choosing Chinese Traditional or Chinese Simplified as the language recognition,
you can choose to output the recognized characters in Traditional Chinese or Simplified
Chinese. Check the [Output full-width punctuations] option to set the punctionations as
full-width. When choosing the Chinese Traditional as the language recognition, you can
check the [Recognize HK Character] to recognize Hongkong characters. If you do not
need to recognize Hongkong characters, please do not check it for higher recognition accuracy. You can connect to the http://www.microsoft.com/hk/hkscs/default.aspx to check
the Hong Kong characters list.
Recognize English characters & numbers
You can select [Recognize English characters & numbers] to make WorldPenScan
series recognize English characters and numbers when choosing Traditional Chinese,
Simplified Chinese, Japanese or Korean as the language recognition,
JIS Level 2 Kanji Characters
When choosing the Japanese as the language recognition, you can check the [JIS
Level 2 Kanji Characters] to recognize the JIS level 2 Kanji characters. If you do not
need to recognize JIS level 2 Kanji characters, please do not check it for higher recognition accuracy.
At the End of the Scan, Insert a Space Automatically
When choosing the English, French, German, Italian or Spanish as the language recognition, you can check the [At the end of the scan, insert a space automatically].
While scanning text, the system will automatically add a space at the end of the scan.
Chapter 3 Scanning and Settings
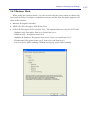
3.6.3 Business Mode
When using the business mode, you can accord with the scan content to choose the
scan mode as below for higher recognition accuracy and the font the mode supports will
show in the window.
yy Barcode: Recognize barcodes.
yy MICR (E-13B): Recognize MICR font Text.
yy OCR A/B: Recognize OCR A/B font Text. (The options below are only for OCR A/B)
-
Alphabet only: Recognize from A to Z and from a to z.
Numbers only: Recognize from 0 to 9.
Alphabet & Numbers: Recognize from A to Z, from a to z and from 0 to 9.
Hexadecimal: Recognize from A to F, from a to f and from 0 to 9.
Leave no space while scanning: Without leaving any space while scanning.
3-13
3-14
WorldPenScan Series
3.6.4 Hardware Information (For WorldPenScan BT)
In [Hardware info] page, you can view the Bluetooth status and pen status.
yy Host Bluetooth status: Show whether the Bluetooth of your computer is turned on or
not.
yy Pen Bluetooth status: Show the connecting status of pen scanner.
yy Pair: Press this button to pair your computer and pen scanner. For more information,
please refer to 2.5.2.
yy MAC Address: The address means the identification of the pen scanner.
yy Pen status: Show the status of pen scanner, including battery status, F/W version, USB
connection status, and Bluetooth connection status.
Chapter 3 Scanning and Settings
3.7 Help
Selecting [Help] in the drop-down menu from the button
al of WorldPenScan series.
can find the user manu-
3.8 About
Selecting [About] in the drop-down menu from the button
can see the information of WorldPenScan series, or you can go to Penpower Technology Ltd. official website
for more informaiton. If there is any problem or suggestion, please click [Contact us]
and send an e-mail to us.
3-15
Penpower WorldPenScan Series User Manual
Release: November, 2014
Version: v4.0