1
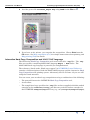
INTREPID User Manual
Library | Help | Top
Presenting regional depth and structure data (C06)
1
| Back |
Presenting regional depth and structure data (C06)
Top
This chapter shows how to synthesise INTREPID products in hard copy compositions.
This can enable more effective interpretation of your geophysical data.
The interactive INTREPID Hard Copy Composition tool creates hard copy
specifications in text files using our powerful MAPCOMP language.
You can edit or create MAPCOMP hard copy specifications using a text editor if you
wish.
A collection of MAPCOMP templates or modules can make composing a new version
of a product very simple.
This chapter contains
•
General tips for creating hard copy compositions for interpretation.
This section includes instructions for creating hard copy compositions of linear low
amplitude high frequency, such as strand line enhancement data.
•
A substantial oil exploration case study, creating the Magnetic Interpretation
Example poster, a hard copy composition that integrates data from four
INTREPID interpretation tools.
Location of sample data for Cookbooks
Where install_path is the path of your INTREPID installation, the project
directory for the Cookbooks sample data is
install_path\sample_data\cookbooks.
For example, if INTREPID is installed in
C:\Program Files\Intrepid\Intrepid4.5,
then you can find the sample data at
C:\Program Files\Intrepid\Intrepid4.5\sample_data\cookbooks
For information about installing or reinstalling the sample data, see "Sample data for
the INTREPID Cookbooks" in Using INTREPID Cookbooks (R19).
For a description of INTREPID datasets, see Introduction to the INTREPID database
(G20). For more detail, see INTREPID database, file and data structures (R05).
Tips for hard copy composition of INTREPID interpretation products
This section briefly lists the hard copy products available in INTREPID and suggests
appropriate combinations for displaying the INTREPID interpretation data.
Basic hard copy products
Here is a basic list of the hard copy products available in INTREPID. The references
listed under “Hard copy support” in INTREPID General Reference contains a
detailed explanation of all of them. The worked example in Oil exploration
interpretation case study in this chapter shows several of them in use. The
description includes corresponding MAPCOMP block names (e.g., SunAngle).
Displaying grid data
•
Library | Help | Top
Pseudocolour and grey scale images (PseudoColour and GreyScale). You can
distribute the available colours or shades evenly using a histogram stretch
available in the Legend Editor.
© 2012 Intrepid Geophysics
| Back |
INTREPID User Manual
Library | Help | Top
Presenting regional depth and structure data (C06)
2
| Back |
•
Sun angle images (SunAngle). You can vary the position of the sun as required.
The sun angle effect slightly displaces data peaks. You need to be aware of this
problem when exact location is important.
•
RGB images (FalseColour) displaying a different Z field with each colour. These
are mainly used with K U Th radiometric channels and Electromagnetic time
consistency principal component amplitude data.
•
Combination drapes (Drape and TernaryDrape). You can drape a sun angle or
grey scale image with a pseudocolour or RGB image. You can reduce the colour
saturation of pseudocolour images in Drape combinations.
•
Contours (Contour). INTREPID has a powerful and versatile contour
composition system. You can overlay contours on any of the other grid products.
Displaying line data
•
Line plotting (PathPlot). INTREPID can plot line datasets with a variety of
styles and annotations, coloured according to values in a Z field1. The special
bipole line style shows Z values as coloured line segments perpendicular to the
line.
•
Line plotting with stack profile (StackProfilePlot). Stack profile plots show
all data points along the line (as opposed to grids, which are interpolated
products) as a continuous profile of the Z field values. Stack profile plots also
have the standard line plot features.
Displaying point data
•
Point plotting (PointPlot) INTREPID can plot point datasets with a variety of
symbols and annotations. You can determine point marker colour, size and
symbol shape according to Z field values. INTREPID has three special purpose
symbol shapes, dip, pointer and rectangle, which we have designed
specifically for interpretation work.
Other MAPCOMP features
INTREPID provides a full range of hard copy composition features, sufficient for full
professional map composition and publication. See INTREPID Reference Manual
volume 4 for details
Recommended hard copy combinations for INTREPID interpretation data
Single grid products
The following products are commonly gridded before use. We recommend that you
use the hard copy products indicated.
•
Analytic signal: use histogram-stretched grey scale.
•
Complex amplitude: use sun angle.
•
Instantaneous frequency: use histogram-stretched grey scale or pseudocolour.
•
Phillips automatic depth: use contours or histogram-stretched pseudocolour.
1. A Z field contains measured quantities, such as TMI. The purpose of the survey is to
acquire Z field values. Non-Z fields locate or calibrate the survey, such as the fiducial field
or latitude and longitude.
Library | Help | Top
© 2012 Intrepid Geophysics
| Back |
INTREPID User Manual
Library | Help | Top
Presenting regional depth and structure data (C06)
3
| Back |
Combination products
•
Instantaneous frequency grid: Compose this grid in a Drape with a TMI grid.
•
K, U and Th radiometric channel grids: Compose these in a TernaryDrape with
TMI or Total Count as a sun angle image.
•
Complex amplitude grid: Compose this grid in a Drape with a TMI image, one as
a sun angle image and the other in pseudocolour with low saturation factor (pastel
colours)1. You can also overlay the grid with depth estimation points such as a
Naudy model point dataset.
•
Analytic signal grid: Compose this grid as a histogram-stretched grey scale
image. You can combine this with a pseudocolour TMI image in a Drape object.
This data correlates well with a point plot of Euler solutions, since they have a
common calculation path.
Illustrating linear low amplitude high frequency data (strand line enhancement)
See "Enhancing very shallow sources (strand line enhancement)" in Other useful
interpretation techniques (C05) for instructions on calculating the strand line data.
We recommend that you compose this data as a PathPlot (standard line dataset
plot) using the bipole style.
We supply a legend file for the bipole style, called bipole.leg, which resides in the
lut directory (install_path\lut).
Here is an example extract from a MAPCOMP module illustrating the use of the
bipole style with a field called strandline containing the linear low amplitude
high frequency data.)
(where install_path is the location of your INTREPID installation)
PathPlot Begin
...
TraverseLine Begin
...
Style = bipole
Zdata Begin
z = line_dataset/strandline
Legend = install_path/lut/bipole.leg
Zdata End
...
TraverseLine End
...
PathPlot End
1. Colour saturation control is only available in a Drape object.
Library | Help | Top
© 2012 Intrepid Geophysics
| Back |
INTREPID User Manual
Library | Help | Top
Presenting regional depth and structure data (C06)
4
| Back |
Oil exploration interpretation case study
The oil exploration dataset provided for the case study we shall call northsea. We
provide it with the Cookbook by courtesy of one of our users. We have modified its
location to maintain commercial confidentiality.
This case study explains how we obtained data for interpretation using the
INTREPID interpretation tools, then combined it for display in the Magnetic
Interpretation Example poster. It gives some tips about performing similar processes
with your data. (When you are ready to process your own data for production rather
than experimental purposes, we can provide further assistance.)
The worked example
The worked example here explains the structure of northsea_depth.map, the
MAPCOMP hard copy specification file that generates the Magnetic Interpretation
Example poster. It shows how the .map file is composed of Begin – End blocks,
which you can easily and quickly manipulate using a text editor. It also shows how to
view the composition using the Hard Copy Composition tool.
After following this worked example, you should be able to
•
View the composition using the INTREPID Hard Copy Composition tool.
•
Print a copy of the Magnetic Interpretation Example poster. (You require an A1
printer for this.)
•
Experiment with obtaining interpretation products from your own data. (Data
often requires some conditioning before hard copy composition. Please contact our
technical support service for assistance if required.)
Location of sample data for Cookbooks
Where install_path is the path of your INTREPID installation, the project
directory for the Cookbooks sample data is
install_path\sample_data\cookbooks.
For example, if INTREPID is installed in
C:\Program Files\Intrepid\Intrepid4.5,
then you can find the sample data at
C:\Program Files\Intrepid\Intrepid4.5\sample_data\cookbooks
For information about installing or reinstalling the sample data, see "Sample data for
the INTREPID Cookbooks" in Using INTREPID Cookbooks (R19).
For a description of INTREPID datasets, see Introduction to the INTREPID database
(G20). For more detail, see INTREPID database, file and data structures (R05).
Viewing the poster with Hard Copy Composition tool
Library | Help | Top
1
Go to the directory containing the Oil Interpretation datasets. This is normally
install_path\cookbooks\interp_oil. Start INTREPID Hard Copy
Composition, using Compose Hardcopy from the Printing menu of the
INTREPID Project Manager, or the command mapcomp.exe.
2
Increase the Hard Copy Composition tool window size.
3
Set the scale (zoom level) to 8:1 using the Scale from the View menu.
© 2012 Intrepid Geophysics
| Back |
INTREPID User Manual
Library | Help | Top
Presenting regional depth and structure data (C06)
5
| Back |
4
Load the poster file northsea_depth.map using Load for the File menu.
5
If you have an A1 printer, you can print the composition. Choose Print from the
File menu. See Map composition (G17) for simple instructions about printing, and
Map printing (T46) for details.
Interactive Hard Copy Composition and MAPCOMP language
The interactive Hard Copy Composition tool creates and edits .map files. The .map
files are text files containing MAPCOMP language Begin – End blocks. The
MAPCOMP hard copy language is powerful yet straightforward.
The references listed under “Hard copy support” in INTREPID General Reference
contains a full description of both the MAPCOMP language and the interactive Hard
Copy Composition and printing system. Alternately refer to Volume 4 if you are still
using the bound manuals.
You can create your own hard copy compositions using a combination of the following:
Library | Help | Top
•
The powerful interactive INTREPID Hard Copy Composition tool,
•
A text editor,
•
The sample hard copy specification (.map) files we have supplied with this worked
example in the cookbooks/interp_oil directory and the further examples in
the INTREPID examples\maps directory (e.g., d:\intrepid\examples\maps),
© 2012 Intrepid Geophysics
| Back |
INTREPID User Manual
Library | Help | Top
Presenting regional depth and structure data (C06)
6
| Back |
Summary of files provided with the Magnetic Interpretation Example poster
The data we have provided with the poster belongs in
install_path\cookbooks\interp_oil
(for example, d:\intrepid\sample_data\cookbooks\interp_oil).
It includes
Library | Help | Top
•
The master hard copy specification .map file northsea_depth.map, from which
INTREPID can produce the Magnetic Interpretation Example poster.
•
A .map file for each set of interpretation data, from which INTREPID can produce
a version of the poster showing only that product. For example, euler_ns.map
will produce the poster showing only the Euler solution circle symbols, including
the symbol colour legend.
•
MAPCOMP modules (.map files), each describing a single object from the poster.
We include these for use as learning templates and building blocks. You can
•
Combine the modules to make your own subset versions of the poster;
•
Use the modules as templates for including similar data in your own hard copy
compositions.
•
Legend files, which associate data values with attributes of objects in the
composition, such as colour or size.
•
The original northsea line dataset under investigation in this worked example.
•
Grid and point datasets containing interpretation products from INTREPID tools.
All of these originate from he TMI field mag_fin in the northsea dataset.
© 2012 Intrepid Geophysics
| Back |
INTREPID User Manual
Library | Help | Top
Presenting regional depth and structure data (C06)
7
| Back |
The following table contains details of the worked example files and datasets,
including the components required by each hard copy specification (.map) file.
Name
Purpose
Requires
Hard copy composition (.map) files
northsea_depth.map
full poster specification
Embedded .map files
title.map
description.map
legend_labels.map
Legend files
tmi_ns_colour.leg
depth_colour.leg
naudy_dip_size.leg
euler_circle_size.leg
naudy_pointer_size.leg
Grid datasets
tmi_ns
hilbert_c_amp_ns
phillips_ns
Point datasets
naudy_ns
euler_ns
tmi_ca_ns.map
Poster with TMI and
complex amplitude
grids only
title.map
description_tmi_ca.map
legend_labels_grid.map
tmi_ns_colour.leg
Grid datasets
tmi_ns
hilbert_c_amp_ns
phillips_ns.map
Poster with Phillips
grid contours only
title.map
description_phillips.map
legend_labels_grid.map
phillips_ns grid dataset
naudy_ns.map
Poster with Naudy
solutions only
title.map
description_naudy.map
legend_labels_pnt.map
depth_colour.leg
naudy_dip_size.leg
naudy_pointer_size.leg
naudy_ns point dataset
Library | Help | Top
© 2012 Intrepid Geophysics
| Back |
INTREPID User Manual
Library | Help | Top
Presenting regional depth and structure data (C06)
8
| Back |
Name
Purpose
Requires
euler_ns.map
Poster with Euler
solutions only
title.map
description_euler.map
legend_labels_pnt.map
depth_colour.leg
euler_circle_size.leg
euler_ns point dataset
northsea_shell.map
tmi_ca_mod.map
phillips_mod.map
naudy_mod.map
euler_mod.map
pnt_leg.mod.map
tmi_ca_leg.mod.map
colour_symbol_leg_mod.map
Copies of sections of
the poster file
northsea_depth.map
for study and use as
building block modules
and templates
Corresponding embedded .map files,
legend files and datasets. Examine the
module files to determine the
requirements
Legend (.leg) files
tmi_ns_colour.leg
Legend for TMI grid pseudocolour
depth_colour.leg
Legend for colours of Naudy and Euler symbols
naudy_pointer_size.leg
Legend for size of Naudy pointer (coloured rectangle) symbols
naudy_dip_size.leg
Legend for size of black Naudy dip (T shape) symbols
euler_circle_size.leg
Legend for size of Euler (coloured circle) symbols
Datasets
northsea
Original line dataset under investigation (not directly used in the
poster); Contains levelled and corrected TMI field mag_fin
tmi_ns
Grid dataset of TMI created from mag_fin field of northsea
represented in low colour saturation pseudocolour
hilbert_ca_ns
Grid dataset of Hilbert complex amplitude created from
hilbert_c_amp field of northsea represented using sun angle
(hilbert_c_amp created from mag_fin)
phillips_ns
Grid dataset of phillips field of northsea represented using
contours (phillips created from mag_fin).
naudy_ns
Naudy model point dataset derived from mag_fin field of
northsea and represented using black T-shaped ‘dip’ symbols
superimposed on coloured rectangular ‘pointer’ symbols
euler_ns
Euler solutions dataset derived from mag_fin field of northsea
and represented using coloured circle symbols
Library | Help | Top
© 2012 Intrepid Geophysics
| Back |
INTREPID User Manual
Library | Help | Top
Presenting regional depth and structure data (C06)
9
| Back |
Tips for creating your own compositions
MAPCOMP and the interactive Hard Copy Composition tool are powerful and
complex tools. The brief tips provided in this section may assist you to readily create
simple compositions using your own data.
Reference manual and technical support
The references listed under “Hard copy support” in INTREPID General Reference
contains a full description of both the MAPCOMP language and the interactive Hard
Copy Composition and printing system. Alternately, refer to Volume 4 if you are still
using the bound manuals.
We can assist you with learning advanced techniques and with implementing the
process in your production system.
New compositions
We suggest that you use the interactive Hard Copy Composition tool to set up the
page size and scale and create the data box by placing the first dataset. See Map
composition (G17) for an introductory exercise. This automatically sets the
dimensions for the composition, including scale and extent.
Zoom in in the Hard Copy Composition tool
To see more of the composition, select a different scale from the View menu or make
the Hard Copy Composition window larger
Editing properties of an object
You can edit the properties of an object in the interactive tool by double clicking it. If
the object has components, choose the component whose properties you wish to edit
from the list displayed. INTREPID will then display the corresponding properties
dialog box.
Moving objects in the composition
To move an object, select it using a single click, then hold down CTRL while you drag
the object to the new location.
Using the interactive tool vs a text editor
You can use a combination of the interactive tool and a text editor to create the
composition. It may often be more convenient for you to insert a MAPCOMP text
block into the file and edit it to specify the data you require using a text editor than to
specify it interactively. INTREPID offers you the choice of methods.
The X = and Y = statements
The X = and Y = statements in each object=s Begin – End block specify the
position of the lower left corner of the object in millimetres from the lower left corner
of the object that contains it.
Library | Help | Top
© 2012 Intrepid Geophysics
| Back |
INTREPID User Manual
Library | Help | Top
Presenting regional depth and structure data (C06)
10
| Back |
Using MAPCOMP modules as templates– creating legends
You may find it convenient to use a text editor to create a composition by adapting
existing modules.
You may specify a different dataset or field from the one in the module that you are
using as a template. In this case it is most important that you remove the existing
reference to the legend1. It will have cutoff values corresponding to the original data,
not the new dataset or field you have specified, and will most likely distribute data
values to attribute values wrongly.
The simplest way to change the legend over to the new data is to remove the Legend
= statement altogether. This will force INTREPID to create a new default legend for
the data.
If you wish to create or edit a legend you will find it much easier to use the interactive
Hard Copy Composition tool.
Creating and editing legends using the Hard Copy Composition tool
To create legends for an existing hard copy specification, load the .map file into Hard
Copy Composition and edit each dataset object.
To create a legend, choose the Legend button in the object=s dialog box or the
Variable option in an attribute value palette.
INTREPID displays the Legend Editor. The Legend Editor will save each legend in
its own .leg file and automatically include a reference to it in the .map file.
SeeMap Legend Editor (T45f) for instructions.
1. By legend here, we mean the definition of the assignment of data values to attribute
values. This definition resides in a .leg file. The reference to it in the dataset Begin –
End block is a simple Legend = statement, typically after a Z = statement specifying a Z
field to be represented by the attribute (e.g., by colour).
You can show a legend in a composition, so that the user can see the values
represented by the colours or other attribute values. Use a Legend Begin –
End block, which specifies the .leg file and dimensions, font, etc., of the legend
object.
Library | Help | Top
© 2012 Intrepid Geophysics
| Back |
INTREPID User Manual
Library | Help | Top
Presenting regional depth and structure data (C06)
11
| Back |
The skeleton of the .map file
This listing shows the skeleton of the hard copy specification file, indicating the place
for the data from datasets and for annotations.
The file northsea_shell.map in our worked example data contains this skeleton
and the tick marks, titles, descriptive text, North arrow, scale bar and INTREPID
logo. See Full listing of hard copy specification file northsea_depth.map if you wish
to see these objects in location
Important note: We have placed comments at the ends of statements in this listing
to assist your understanding of the MAPCOMP language. INTREPID will not
accept comments placed at the ends of statements in this way. You must
place MAPCOMP comments on separate lines beginning with the # symbol.
# Demonstration hard copy specification file
#
Call = hpgl2
#language for print to file operation
#
# Outer margin, border, page object blocks
#
Margin Begin
X =
0.0000000000
#position of composition on paper
Y =
0.0000000000
#(in mm from bottom left corner)
Internal = No
#default size of Margin is 2 mm
Border Begin
X =
0.0000000000
#position of Border within Margin
Y =
0.0000000000
Thickness = 1.000000
Colour = Black
Style = Solid
Page Begin
X =
0.0000000000
Y =
0.0000000000
Width = 594.000000
#Page dimensions in mm (A1 size)
Height = 841.000000
#
# Data box object containing the data
#
Data Begin
X = 64.202500 #position of the Data object within the page
Y = 82.535922
MapProjection Begin
Projection = NUTM31
Datum = WGS84
XScale = 100000.000000
YScale = 100000.000000
MapProjection End
MapExtent Begin
Xmin = 540129.158056#geographical region covered by Data object
Xmax = 576129.158056#using coordinates of the projection
Ymin = 7245236.000000
Ymax = 7305236.000000
MapExtent End
Library | Help | Top
© 2012 Intrepid Geophysics
| Back |
INTREPID User Manual
Library | Help | Top
#
#
#
#
Presenting regional depth and structure data (C06)
12
| Back |
Begin - End blocks for datasets and tick marks go here.
For best results, place the tick mark blocks last.
Data End
#
#
#
#
Begin-End blocks for other objects in the composition go here,
For example, legends, titles, North arrows, scale bars.
Page End
Border End
Margin End
#Ends of outer blocks
The TMI grid (low colour saturation pseudocolour)
How we obtain this data from the northsea..DIR dataset
1
Grid the field mag_fin with the following parameters: Cell size: 100 m, Nominal
bearing: 45°, Minimum Curvature grid refinement with default values, Other
parameters: default values.
2
Save the grid dataset as tmi_ns.
The MAPCOMP module for the TMI grid display
The TMI data display is of a grid using low colour saturation1 pseudocolour.
The display represents values in the tmi_ns grid dataset.
The display also requires the legend file tmi_ns_colour.leg.
The Drape block contains the specifications for both the TMI and the Hilbert complex
amplitude data. The sections of the Drape block that apply to the TMI data are
shown here in bold.
The version of the poster that displays only the TMI and Hilbert complex amplitude
data components is called tmi_ca_ns.map.
The MAPCOMP module containing only this Drape block is called tmi_ca_mod.map.
If you are creating your own composition and wish to include both TMI and Hilbert
complex amplitude data, make sure that you do not include it twice.
This data has a colour legend display outside the data box. The MAPCOMP module
containing the legend block is called tmi_ca_leg_mod.map.
1. Colour saturation reduced using MAPCOMP statement SaturationFactor = 0.2
Library | Help | Top
© 2012 Intrepid Geophysics
| Back |
INTREPID User Manual
Library | Help | Top
Presenting regional depth and structure data (C06)
13
| Back |
TMI (and Hilbert complex amplitude) MAPCOMP module listing
#
Pseudocolour image of TMI (tmi_ns grid)
#
Sun angle image of Hilbert Complex Amplitude (hilbert_c_amp grid)
#
Drape Begin
X =
0.0000000000
Y =
0.0000000000
Width = 100.000000
Height = 100.000000
ImagePseudoColour = ./sample_data/cookbooks/interp_oil/tmi_ns
LegendPseudoColour = ./sample_data/cookbooks/interp_oil/tmi_ns_colour
SaturationFactor =
0.2000000000
SunAngleOp Begin
X =
0.0000000000
Y =
0.0000000000
Image = ./sample_data/cookbooks/interp_oil/hilbert_c_amp_ns
Declination = 45.000000
Inclination = 45.000000
VerticalEx = 30.000000
SunAngleOp End
Drape End
Library | Help | Top
© 2012 Intrepid Geophysics
| Back |
INTREPID User Manual
Library | Help | Top
Presenting regional depth and structure data (C06)
14
| Back |
Colour legend display for TMI grid
The TMI pseudocolour grid display has an accompanying colour legend display
outside the data box.
The legend display requires the legend file tmi_ns_colour.leg
The MAPCOMP module containing only the legend block is called
tmi_ca_leg_mod.map.
# Legend display showing key to TMI (tmi_ns grid) pseudocolour
display
#
Legend Begin
X = 483.051514
Y = 88.545382
Width = 15.000000
Height = 100.000000
Name = ./sample_data/cookbooks/interp_oil/tmi_ns_colour
ShowHighClip = No
ShowLowClip = No
ShowOutOfRange = No
Horizontal = No
Length = 100.000000
Breadth = 15.000000
Text Begin
Colour = Black
Size = 2.000000
Font = 0
Angle =
0.0000000000
Justify = lb
Gap =
0.0000000000
VGap =
0.0000000000
TextThickness =
0.0000000000
Text End
Decimals = 0
Style = 0
Legend End
Library | Help | Top
© 2012 Intrepid Geophysics
| Back |
INTREPID User Manual
Library | Help | Top
Presenting regional depth and structure data (C06)
15
| Back |
Hilbert Complex Amplitude grid (sun angle)
How we obtain this data from the northsea..DIR dataset
1
Using the Line Filter tool, apply the Hilbert Complex Amplitude filter to
mag_fin, producing a temporary field hilb_temp. Use default parameters.
2
Using the Line Filter tool, apply a median filter with a window size of 5 and
default values for other parameters to hilb_temp. Save the resulting field as
hilbert_c_amp.
3
Grid hilbert_c_amp with: Cell size: 150 m, Nominal bearing: 45°, Minimum
Curvature grid refinement with default values, Other parameters: default values.
4
Save the grid dataset as hilbert_c_amp_ns.
The MAPCOMP module for the Hilbert complex amplitude grid display
The Hilbert complex amplitude data display is of a grid using the sun angle effect.
The display represents values in the hilbert_c_amp_ns grid dataset.
The Drape block contains the specifications for both the TMI and the Hilbert complex
amplitude data. The sections of the Drape block that apply to the Hilbert complex
amplitude data are shown here in bold.
The version of the poster that displays only the TMI and Hilbert complex amplitude
data components is called tmi_ca_ns.map.
The MAPCOMP module containing only this Drape block is called tmi_ca_mod.map.
If you are creating your own composition and wish to include both TMI and Hilbert
complex amplitude data, make sure that you do not include it twice.
Hilbert complex amplitude (and TMI) MAPCOMP module listing
#
#
Pseudocolour image of TMI (tmi_ns grid)
#
Sun angle image of Hilbert Complex Amplitude (hilbert_c_amp grid)
#
Drape Begin
X =
0.0000000000
Y =
0.0000000000
Width = 100.000000
Height = 100.000000
ImagePseudoColour = ./sample_data/cookbooks/interp_oil/tmi_ns
LegendPseudoColour = ./sample_data/cookbooks/interp_oil/tmi_ns
SaturationFactor =
0.2000000000
SunAngleOp Begin
X =
0.0000000000
Y =
0.0000000000
Image = ./sample_data/cookbooks/interp_oil/hilbert_c_amp_ns
Declination = 45.000000
Inclination = 45.000000
VerticalEx = 30.000000
SunAngleOp End
Drape End
Library | Help | Top
© 2012 Intrepid Geophysics
| Back |
INTREPID User Manual
Library | Help | Top
Presenting regional depth and structure data (C06)
16
| Back |
Phillips automatic depth grid contours
How we obtain this data from the northsea..DIR dataset
1
Using the Line Filter tool, apply the Phillips automatic depth filter to mag_fin,
producing a temporary field phil_temp. Use default parameters.
2
Using the Spreadsheet Editor, remove spikes by setting to phil_temp to null
whenever it is greater than 3000.
3
Using the Line Filter tool, apply a median filter with a window size of 5 and
default values for other parameters to phil_temp. Save the resulting field as
phillips.
4
Grid phillips with: Cell size: 150 m, Nominal bearing: 45°, Minimum Curvature
grid refinement with default values, Other parameters: default values.
5
Save the grid dataset as phillips_ns.
The MAPCOMP module for the Phillips automatic depth grid display
The Phillips automatic depth dataset display is a set of contours.
The contours represent values in the phillips_ns grid dataset.
There are two sets of contours:
•
Black contours every 200 m
•
Annotated blue contours every 1000 m.
The Phillips automatic depth data display requires the Phillips automatic depth grid
phillips_ns
The version of the poster that displays only this component is called
phillips_ns.map.
The MAPCOMP module containing only this block is called phillips_mod.map.
Library | Help | Top
© 2012 Intrepid Geophysics
| Back |
INTREPID User Manual
Library | Help | Top
Presenting regional depth and structure data (C06)
17
| Back |
Phillips MAPCOMP module listing
#
#
Contour plot of Phillips automatic depth estimation
#
(phillips_ns grid)
#
Black every 200 m
#
Blue, annotated, every 1000 m
#
Contour Begin
X =
0.0000000000
Y =
0.0000000000
Detail = Draft
Grid = ./sample_data/cookbooks/interp_oil/phillips_ns
LowClip = -5499.729980
HighClip = -516.524292
GapBetweenLabels = 100.000000
DrawIncrement =
0.5000000000
Tension = 1.000000
MinIslandSizeFactor = 1.000000
MinSegmentLengthFactor =
0.5000000000
ContourWeedFactor = -1.000000
Cut Begin
Interval = 200.000000
Density = 40.000000
LineColour = Black
LineThickness =
0.0000000000
Cut End
Cut Begin
Interval = 1000.000000
Density = 40.000000
LineColour = blue
LineThickness =
0.0000000000
Annotate = Yes
TextSize = 2.000000
TextColour = Black
TextThickness =
0.0000000000
Decimals =
0.0000000000
Font = 0
Cut End
Contour End
Library | Help | Top
© 2012 Intrepid Geophysics
| Back |
INTREPID User Manual
Library | Help | Top
Presenting regional depth and structure data (C06)
18
| Back |
Colour legend display for Euler and Naudy symbols
The Euler solutions and Naudy mode points display has an accompanying colour
legend display outside the data box.
The legend display requires the legend file depth_colour.leg
The MAPCOMP module containing only the legend block is called
depth_colour_symbol_leg_mod.map.
#
# Legend display showing key to Pointer (Naudy) and Circle (Euler)
symbol pseudocolour
# representing depth
#
Legend Begin
X = 532.051514
Y = 88.545382
Width = 15.000000
Height = 100.000000
Name = ./sample_data/cookbooks/interp_oil/depth_colour
ShowHighClip = No
ShowLowClip = No
ShowOutOfRange = No
Horizontal = No
Length = 100.000000
Breadth = 15.000000
Text Begin
Colour = Black
Size = 2.000000
Font = 0
Angle =
0.0000000000
Justify = lb
Gap =
0.0000000000
VGap =
0.0000000000
TextThickness =
0.0000000000
Text End
Decimals = 0
Style = 0
Legend End
Library | Help | Top
© 2012 Intrepid Geophysics
| Back |
INTREPID User Manual
Library | Help | Top
Presenting regional depth and structure data (C06)
19
| Back |
Naudy Automatic Model point dataset plot
How we obtain this data from the northsea..DIR dataset
1
Using the Naudy Automatic Model tool, calculate a Naudy model point dataset
called naudy_ns from the mag_fin field. Use Naudy-derived dips: ON, Line
spacing 550 m, Calculate Trends from Line, Use the default value for all other
parameters.
2
Using the Spreadsheet Editor, create a new field called width_mm in the
naudy_ns dataset, which scales the width field from kilometres to millimetres
(i.e., width_mm = width / 1000000).
Use the field width_mm as the width field in the hard copy composition.
3
Using the Spreadsheet Editor, create a new field called depth_rev in the
naudy_ns dataset, which is the negative of the depth field (i.e., depth_rev = –
depth).
Use the field depth_rev as the depth field in the hard copy composition.
The MAPCOMP module for the Naudy model point dataset display
The Naudy point dataset display consists of two superimposed point plots.
The first plot uses the ‘pointer’ symbol, a rectangle shape, which displays the data as
follows.
Attribute
Attribute Description
Field or value
Colour
colour of symbol
depth_rev (depth of inferred structure)
Size
length of symbol
depth_rev (depth of inferred structure)
Thickness
width of symbol
width_mm (width of inferred structure parallel to line
direction)
Angle
orientation of symbol
strike (strike of inferred structure)
The second plot uses the ‘dip’ symbol, a T shape, which displays the data as follows.
Attribute
Attribute Description
Field or value
Colour
colour of symbol
black (constant value)
Size
length of T crossbar
depth_rev (depth of inferred structure)
Thickness
length of T shaft
dip (dip of inferred structure)
Angle
orientation of symbol
strike (strike of inferred structure)
Library | Help | Top
© 2012 Intrepid Geophysics
| Back |
INTREPID User Manual
Library | Help | Top
Presenting regional depth and structure data (C06)
20
| Back |
The Naudy model display requires
•
Naudy model point dataset naudy_ns
•
Legend files depth_colour.leg, naudy_pointer_size.leg,
naudy_dip_size.leg
The version of the poster that displays only this component is called naudy_ns.map.
The MAPCOMP module containing only this block is called naudy_mod.map.
The MAPCOMP module containing the legend block for symbol colour is called
depth_colour_symbol_leg_mod.map. It is also used by the Euler data, so don=t
include it twice if you are including the Euler data in the composition. See Colour
legend display for Euler and Naudy symbols.
Naudy MAPCOMP module listing
#
#
Point plots of Naudy model point dataset naudy_ns
#
Pointer symbols (coloured rectangles)
#
colour and size (length of rectangle) associated with depth
#
(depth_rev field)
#
thickness (width of rectangle) associated with body width
#
(width_mm field)
#
angle (orientation) associated with body direction (strike field)
#
Dip symbols (black T shapes superimposed on Pointers)
#
size (length of T cross-bar) associated with depth (depth_rev field)
#
thickness (length of T shaft) associated with body dip (dip field)
#
angle (orientation of T cross-bar) associated with body direction
#
(strike field)
#
PointPlot Begin
X =
0.0000000000
Y =
0.0000000000
Dataset = ./sample_data/cookbooks/interp_oil/naudy_ns
Marker Begin
X =
0.0000000000
Y =
0.0000000000
Colour Begin
Z = ./sample_data/cookbooks/interp_oil/naudy_ns/depth_rev
Legend = ./sample_data/cookbooks/interp_oil/depth_colour
Colour End
Size Begin
Z = ./sample_data/cookbooks/interp_oil/naudy_ns/depth_rev
Legend = ./sample_data/cookbooks/interp_oil/naudy_pointer_size
Size End
Thickness = ./sample_data/cookbooks/interp_oil/naudy_ns/width_mm
Symbol = Pointer
Angle = ./sample_data/cookbooks/interp_oil/naudy_ns/Strike
Marker End
PointPlot End
Library | Help | Top
© 2012 Intrepid Geophysics
| Back |
INTREPID User Manual
Library | Help | Top
Presenting regional depth and structure data (C06)
21
| Back |
PointPlot Begin
X =
0.0000000000
Y =
0.0000000000
Dataset = ./sample_data/cookbook/interp_oil/naudy_ns
Marker Begin
X =
0.0000000000
Y =
0.0000000000
Colour = Black
Size Begin
Z = ./sample_data/cookbook/interp_oil/naudy_ns/depth_rev
Legend = ./sample_data/cookbook/interp_oil/naudy_dip_size
Size End
Thickness = ./sample_data/cookbook/interp_oil/naudy_ns/Dip
Symbol = Dip
Angle = ./sample_data/cookbook/interp_oil/naudy_ns/Strike
Marker End
PointPlot End
Euler solutions point dataset plot
How we obtain this data from the northsea..DIR dataset
Use the tmi_ns grid derived from the mag_fin field.
1
Using the Grid Operations tool resample tmi_ns to a cell size of 600 m, producing
a temporary grid with a name of your choice.
2
Using the Euler Deconvolution tool with the temporary grid, calculate an Euler
solutions point dataset called euler_ns. Set a maximum depth of 10000 m and
use default values for all other parameters. Use the Extended Calculate SI option
to get improved depth estimates.
3
Using the Spreadsheet Editor, create a new field called depth_rev in the
euler_ns dataset, which is the negative of the depth field (i.e., depth_rev = –
depth).
Use the field depth_rev as the depth field in the hard copy composition.
The MAPCOMP module for the Euler solutions point dataset display
The Euler solutions dataset display is a point plot.
The plot uses the ‘circle’ symbol, which displays the data as follows.
Attribute
Attribute Description
Field or value
Colour
colour of symbol
depth_rev (depth of Euler solution)
Size
diameter of symbol
depth_rev (depth of Euler solution)a1
a.1 This is a departure from the tradition of displaying the reliability field using the
size attribute. If you to wish show the reliability data in the current example,
remove the Legend = statement from the Size Begin – End block. (It will have
incorrect cutoff values for the reliablity field.) Substitute reliability for
depth_rev in the Z = statement. INTREPID will create a default legend when you
view or print the composition. If you wish to edit the legend, you can do so using the
interactive Hard Copy Composition tool.
Library | Help | Top
© 2012 Intrepid Geophysics
| Back |
INTREPID User Manual
Library | Help | Top
Presenting regional depth and structure data (C06)
22
| Back |
The Euler solutions display requires
•
Euler solutions point dataset euler_ns
•
Legend files depth_colour.leg, euler_circle_size.leg
The version of the poster that displays only this component is called euler_ns.map.
The MAPCOMP module containing only this block is called euler_mod.map.
The MAPCOMP module containing the legend block for symbol colour is called
colour_symbol_leg_mod.map. It is also used by the Naudy data, so don=t include
it twice if you are including the Naudy data in the composition. See Colour legend
display for Euler and Naudy symbols.
Euler MAPCOMP module listing
#
#
Point plot of Euler solutions point dataset euler_ns
#
Circle symbols
#
colour and size associated with solution depth (depth_rev field)
#
PointPlot Begin
X =
0.0000000000
Y =
0.0000000000
Dataset = ./sample_data/cookbooks/interp_oil/euler_ns
Marker Begin
X =
0.0000000000
Y =
0.0000000000
Colour Begin
Z = ./sample_data/cookbooks/interp_oil/euler_ns/depth_rev
Legend = ./sample_data/cookbooks/interp_oil/depth_colour
Colour End
Size Begin
Z = ./sample_data/cookbooks/interp_oil/euler_ns/depth_rev
Legend = ./sample_data/cookbooks/interp_oil/euler_circle_size
Size End
Thickness =
0.1000000000
Symbol = Circle
Angle = 0.000000
Marker End
PointPlot End
Library | Help | Top
© 2012 Intrepid Geophysics
| Back |
INTREPID User Manual
Library | Help | Top
Presenting regional depth and structure data (C06)
23
| Back |
Full listing of hard copy specification file northsea_depth.map
Here is a listing of the file supplied with the Cookbook worked examples.
#
# Demonstration hard copy specification file northsea_depth.map
# As described in the Intrepid Cookbook
#
#
# Specify the output format for printing the composition to a file
#
Call = hpgl2
#
# Outer margin, border, page object blocks
#
Margin Begin
X =
0.0000000000
Y =
0.0000000000
Internal = No
Border Begin
X =
0.0000000000
Y =
0.0000000000
Thickness = 1.000000
Colour = Black
Style = Solid
Page Begin
X =
0.0000000000
Y =
0.0000000000
Width = 594.000000
Height = 841.000000
#
# Data box object containing the survey and interpretation data
#
Data Begin
X = 64.202500
Y = 82.535922
MapProjection Begin
Projection = NUTM31
Datum = WGS84
XScale = 100000.000000
YScale = 100000.000000
MapProjection End
MapExtent Begin
Xmin = 540129.158056
Xmax = 576129.158056
Ymin = 7245236.000000
Ymax = 7305236.000000
MapExtent End
Library | Help | Top
© 2012 Intrepid Geophysics
| Back |
INTREPID User Manual
Library | Help | Top
Presenting regional depth and structure data (C06)
24
| Back |
#
#
Pseudocolour image of TMI (tmi_ns grid)
Sun angle image of Hilbert Complex Amplitude (hilbert_c_amp grid)
Drape Begin
X =
0.0000000000
Y =
0.0000000000
Width = 100.000000
Height = 100.000000
ImagePseudoColour = ./sample_data/cookbooks
/interp_oil/tmi_ns
LegendPseudoColour = ./sample_data/cookbooks
/interp_oil/tmi_ns_colour
SaturationFactor =
0.2000000000
SunAngleOp Begin
X =
0.0000000000
Y =
0.0000000000
Image = ./sample_data/cookbooks
/interp_oil/hilbert_c_amp_ns
Declination = 45.000000
Inclination = 45.000000
VerticalEx = 30.000000
SunAngleOp End
Drape End
#
#
Contour plot of Phillips automatic depth estimation (phillips_ns grid)
#
Black every 200 m
#
Blue, annotated, every 1000 m
Contour Begin
X =
0.0000000000
Y =
0.0000000000
Grid = ./sample_data/cookbooks/interp_oil/phillips_ns
LowClip = -5499.729980
HighClip = -516.524292
GapBetweenLabels = 100.000000
DrawIncrement =
0.5000000000
Tension = 1.000000
MinIslandSizeFactor = 1.000000
MinSegmentLengthFactor =
0.5000000000
ContourWeedFactor = -1.000000
Cut Begin
Interval = 200.000000
Density = 40.000000
LineColour = Black
LineThickness =
0.0000000000
Cut End
Library | Help | Top
© 2012 Intrepid Geophysics
| Back |
INTREPID User Manual
Library | Help | Top
Presenting regional depth and structure data (C06)
25
| Back |
Cut Begin
Interval = 1000.000000
Density = 40.000000
LineColour = blue
LineThickness =
0.0000000000
Annotate = Yes
TextSize = 2.000000
TextColour = Black
TextThickness =
0.0000000000
Decimals =
0.0000000000
Font = 0
Cut End
Contour End
#
#
#
#
#
#
#
#
#
#
#
#
#
#
Point plots of Naudy model point dataset naudy_ns
Pointer symbols (coloured rectangles)
colour and size (length of rectangle) associated with depth
(depth_rev field)
thickness (width of rectangle) associated with body width
(width_mm field)
angle (orientation) associated with body direction (strike field)
Dip symbols (black T shapes superimposed on Pointers)
size (length of T cross-bar) associated with depth (depth_rev field)
thickness (length of T shaft) associated with body dip (dip field)
angle (orientation of T cross-bar) associated with body direction
(strike field)
PointPlot Begin
X =
0.0000000000
Y =
0.0000000000
Dataset = ./sample_data/cookbooks/interp_oil/naudy_ns
Marker Begin
X =
0.0000000000
Y =
0.0000000000
Colour Begin
Z = ./sample_data/cookbooks/interp_oil
/naudy_ns/depth_rev
Legend = ./sample_data/cookbooks
/interp_oil/depth_colour
Colour End
Size Begin
Z = ./sample_data/cookbooks/interp_oil
/naudy_ns/depth_rev
Legend = ./sample_data/cookbooks
/interp_oil/naudy_pointer_size
Size End
Thickness = ./sample_data/cookbooks
/interp_oil/naudy_ns/width_mm
Symbol = Pointer
Angle = ./sample_data/cookbooks/interp_oil
/naudy_ns/Strike
Marker End
PointPlot End
Library | Help | Top
© 2012 Intrepid Geophysics
| Back |
INTREPID User Manual
Library | Help | Top
Presenting regional depth and structure data (C06)
26
| Back |
PointPlot Begin
X =
0.0000000000
Y =
0.0000000000
Dataset = ./sample_data/cookbooks/interp_oil/naudy_ns
Marker Begin
X =
0.0000000000
Y =
0.0000000000
Colour = Black
Size Begin
Z = ./sample_data/cookbooks/interp_oil/naudy_ns/depth_rev
Legend = ./sample_data/cookbooks/interp_oil/naudy_dip_size
Size End
Thickness = ./sample_data/cookbooks/interp_oil/naudy_ns/Dip
Symbol = Dip
Angle = ./sample_data/cookbooks/interp_oil/naudy_ns/Strike
Marker End
PointPlot End
#
#
#
#
#
Point plot of Euler solutions point dataset euler_ns
Circle symbols
colour and size associated with solution depth (depth_rev field)
PointPlot Begin
X =
0.0000000000
Y =
0.0000000000
Dataset = ./sample_data/cookbooks/interp_oil/euler_ns
Marker Begin
X =
0.0000000000
Y =
0.0000000000
Colour Begin
Z = ./sample_data/cookbooks/interp_oil
/euler_ns/depth_rev
Legend = ./sample_data/cookbooks/interp_oil/depth_colour
Colour End
Size Begin
Z = ./sample_data/cookbooks/interp_oil
/euler_ns/depth_rev
Legend = ./sample_data/cookbooks
/interp_oil/euler_circle_size
Size End
Thickness =
0.1000000000
Symbol = Circle
Angle = 0.000000
Marker End
PointPlot End #
Library | Help | Top
© 2012 Intrepid Geophysics
| Back |
INTREPID User Manual
Library | Help | Top
#
#
#
#
#
#
Presenting regional depth and structure data (C06)
27
| Back |
Tick marks for data box object
Latitude and Longitude on border
Metres on border
Metre tick marks within data box
Ticks Begin
X =
0.0000000000
Y =
0.0000000000
MetreGrid = No
LongInterval = 0:5:0
LatInterval = 0:5:0
Format = DMS
LabelAtTop = Yes
LabelAtLeft = Yes
Style = Tick
Internal = No
TextSize = 2.000000
TextFont = 3
TextThickness =
0.0000000000
TickSize = 3.000000
TickThickness =
0.0000000000
LabelOffset =
0.0000000000
Ticks End
Ticks Begin
X =
0.0000000000
Y =
0.0000000000
MetreGrid = No
LongInterval = 0:5:0
LatInterval = 0:5:0
Format = DMS
Style = Border
Internal = No
TextSize = 2.000000
TextFont = 3
TextThickness =
0.0000000000
TickSize = 3.000000
TickThickness =
0.0000000000
LabelOffset =
0.0000000000
Ticks End
Library | Help | Top
© 2012 Intrepid Geophysics
| Back |
INTREPID User Manual
Library | Help | Top
Presenting regional depth and structure data (C06)
28
| Back |
Ticks Begin
X =
0.0000000000
Y =
0.0000000000
MetreGrid = Yes
EastInterval =
0.0000000000
NorthInterval =
0.0000000000
Format = NESW
LabelAtBottom = Yes
LabelAtRight = Yes
Style = Tick
Internal = No
TextSize = 2.000000
TextFont = 3
TextThickness =
0.0000000000
TickSize = 3.000000
TickThickness =
0.0000000000
LabelOffset =
0.0000000000
Ticks End
#
# End of Data box block
#
Data End
#
# Legend display showing key to TMI (tmi_ns grid) pseudocolour display
#
Legend Begin
X = 483.051514
Y = 88.545382
Width = 15.000000
Height = 100.000000
Name = ./sample_data/cookbooks/interp_oil/tmi_ns_colour
ShowHighClip = No
ShowLowClip = No
ShowOutOfRange = No
Horizontal = No
Length = 100.000000
Breadth = 15.000000
Text Begin
Colour = Black
Size = 2.000000
Font = 0
Angle =
0.0000000000
Justify = lb
Gap =
0.0000000000
VGap =
0.0000000000
TextThickness =
0.0000000000
Text End
Decimals = 0
Style = 0
Legend End
#
Library | Help | Top
© 2012 Intrepid Geophysics
| Back |
INTREPID User Manual
Library | Help | Top
Presenting regional depth and structure data (C06)
29
| Back |
# Legend display showing key to Pointer (Naudy) and Circle (Euler)
# symbol pseudocolour representing depth
#
Legend Begin
X = 532.051514
Y = 88.545382
Width = 15.000000
Height = 100.000000
Name = ./sample_data/cookbooks/interp_oil/depth_colour
ShowHighClip = No
ShowLowClip = No
ShowOutOfRange = No
Horizontal = No
Length = 100.000000
Breadth = 15.000000
Text Begin
Colour = Black
Size = 2.000000
Font = 0
Angle =
0.0000000000
Justify = lb
Gap =
0.0000000000
VGap =
0.0000000000
TextThickness =
0.0000000000
Text End
Decimals = 0
Style = 0
Legend End
#
# Title, Description, Legend Display captions
#
Included for display from separate map files
#
Include Begin
X = 80.522672
Y = 754.292349
File = ./sample_data/cookbooks/interp_oil/title.map
Include End
Include Begin
X = 459.557042
Y = 393.939855
File = ./sample_data/cookbooks/interp_oil/description.map
Include End
Include Begin
X = 486.658250
Y = 205.605490
File = ./sample_data/cookbooks/interp_oil/legend_labels.map
Include End
#
Library | Help | Top
© 2012 Intrepid Geophysics
| Back |
INTREPID User Manual
Library | Help | Top
Presenting regional depth and structure data (C06)
30
| Back |
# Scale bar, North arrow and Intrepid logo display
#
ScaleBar Begin
X = 64.202472
Y = 26.091279
Length = 100.000000
Interval = 20.000000
Unit = Metres
ShowScale = Yes
Style = 0
TextFont = 3
TextSize = 2.000000
TextThickness =
0.0000000000
ScaleBar End
NorthArrow Begin
X = 204.595964
Y = 4.441079
Length = 30.000000
GridNorth =
0.0000000000
TrueNorth =
0.0000000000
MagneticNorth = 2.000000
ShowProjection = Yes
TextFont = 3
TextSize = 2.500000
TextThickness =
0.0000000000
NorthArrow End
Flexible Begin
X = 357.034324
Y = 8.442692
Width = 64.887769
Height = 60.830034
Isotropic = Yes
Image Begin
Pixels Begin
Format = dfaTIFF
File = ./sample_data/cookbooks/interp_oil/intrepid.tif
Pixels End
Image End
Flexible End
#
# End of outer blocks
#
Page End
Border End
Margin End
Library | Help | Top
© 2012 Intrepid Geophysics
| Back |