1
5.0
SET UP
CAUTION:
The
measurement
and
reference electrodes mounted
in the probe are provided with
protection cap. Remember to
remove before use.
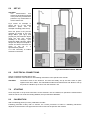
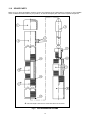
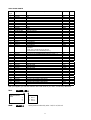
Fig.3 shows an example of
typical set up of the SI/32
immersion
probe
and
an
example of floating probe set up.
Place the probe in the process
vertically by means of the rest
flange DN”% (see fig.3) and
properly ad just immersion depth
using the two inox screws
sideways to the flange
(min
immersion depth 100 mm); make
always sure that process liquid is
moved and stirred and that the
probe
is
set
up
in
a
representative position.
It is now necessary to realize
electrical connections.
Fig.3 SI/32 PROBE TYPICAL SET UP
6.0
ELECTRICAL CONNECTIONS
Sensor is supplied complete with its wire.
Realize connection in the electronic unit following instructions in the specific user manual.
CAUTION!
7.0
Connection wires to the electronic unit must be steady set up and don’t have to pass
together with other cables. This eliminates troubles and interferences and allows to set up
the probe to a distance up to 50 m from the electronic unit.
STARTING
Once the probe is set up and connections to the electronic unit are realized, let operate the measurement
chain for half on hour to let the reading stabilize, then proceed with calibration.
8.0
CALIBRATION
After conditioning period (1/2 hour) calibration can start.
Following procedure mainly refer to sensors, the correct procedure to follow in calibrating electronics
depends on the electronic unit type used and can be found in the specific user manual.
6