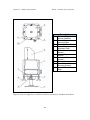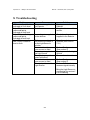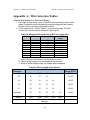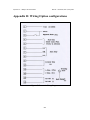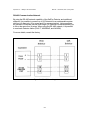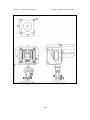
1
Series 300
Open-Path Gas Detection System
User and Maintenance Manual
TM 794100, Rev. D, June 2004
UL Approved
E209870, Class I Group C and D
ATEX (Cenelec) Approved
Ex II 2 G,
EExd IIB +H 2 T5
EExde IIB +H 2 T5
218 Little Falls Rd., Cedar Grove, NJ 07009 USA;
Phone: +1 (973) 239 8398 Fax: +1 (973) 239 7614
Web -Site: www.spectrex-inc.com ; Email: [email protected]
The SafEye monitoring system described in this document is the property of
Spectrex, Inc.
No part of the hardware, software or documentation may be reproduced,
transmitted, transcribed, stored in a retrieval system, or translated into any
language or computer language, in any form or by any means, without prior
written permission of Spectrex, Inc.
While great efforts have been made to assure the accuracy and clarity of this
document, Spectrex, Inc. assumes no liability resulting from any omissions in this
document, or from misuse of the information obtained herein. The information in
this document has been carefully checked and is believed to be entirely reliable
with all of the necessary information included. Spectrex Inc. reserves the right to
make changes to any products described herein to improve reliability, function, or
design, and reserves the right to revise this document and make changes from
time to time in content hereof with no obligation to notify any persons of revisions
or changes. Spectrex, Inc. does not assume any liability arising out of the
application or any use of any product or circuit described herein; neither does it
convey license under its patent rights or the rights of others.
Warning:
This manual should be carefully read by all individuals who have or will have
responsibility for using, maintaining or servicing the product.
The Source and Detector are not field-repairable due to the meticulous internal
alignment and calibration of the sensors and the respective circuits. Do not
attempt to modify or repair the internal circuits or change their settings, as this
will impair the system's performance and void the Spectrex Inc. Product
warranty.
Spectrex Inc. - SafEyeTM 300 Gas Detector
Manual – TM 794100, Rev. D, May 2004
TABLE OF CONTENTS
1. Scope ............................................................................................................................1
1.1 Product Overview................................................................................................... 1
1.2 Document Overview................................................................................................ 1
2. Technical Description...............................................................................................2
2.1 Features.................................................................................................................... 2
2.2 Applications ............................................................................................................. 2
2.3 Principle of Operation............................................................................................ 2
2.3.1 Definitions of Terms .......................................................................................... 3
2.3.2 Spectral Finger Print .......................................................................................... 3
2.3.3 Optical Path........................................................................................................ 3
2.3.4 Microprocessor Based........................................................................................ 3
2.3.5 Gas Sensitivity ................................................................................................... 4
2.3.6 Gas and Mixture Selection and Setting .............................................................. 4
2.4 Product Marking..................................................................................................... 5
2.5 Models and Types ................................................................................................... 5
2.6 Description.............................................................................................................. 6
2.6.1 Light Source Unit ............................................................................................... 6
2.6.2 Detector Unit (Figure 2)..................................................................................... 7
3. Operation Mode..........................................................................................................8
3.1 Normal Mode........................................................................................................... 8
3.2 Fault Mode............................................................................................................... 8
3.3 Alignment Mode ...................................................................................................... 8
3.4 Zero Calibration Mode (1mA Output) ................................................................. 8
3.5 Mode Selection......................................................................................................... 9
3.6 Visual Indications LEDs ......................................................................................... 9
3.7 Output Signals ....................................................................................................... 10
3.7.1 4-20mA Current Output ................................................................................... 10
3.7.2 Relays............................................................................................................... 11
3.7.3 RS-485 Interface .............................................................................................. 11
3.8 Terminals ............................................................................................................... 12
3.8.1 Detector Terminal ............................................................................................ 12
3.8.2 Light Source Terminals.................................................................................... 14
3.9 System Setup.......................................................................................................... 15
3.9.1 Detector Setting................................................................................................ 15
4. Technical Specifications .......................................................................................19
4.1 General Specifications .......................................................................................... 19
I
Spectrex Inc. - SafEyeTM 300 Gas Detector
Manual – TM 794100, Rev. D, May 2004
4.2 Electrical Specifications ........................................................................................ 20
4.3 Mechanical Specifications .................................................................................... 21
4.4 Environmental Specifications .............................................................................. 22
5. Installation Instructions .........................................................................................23
5.1 Introduction........................................................................................................... 23
5.2 General Considerations ........................................................................................ 23
5.2.1 Personnel.......................................................................................................... 23
5.2.2 Tools Required ................................................................................................. 23
5.2.3 Site Requirements ............................................................................................ 23
5.2.4 The Source and Detector.................................................................................. 23
5.2.5 Guidance Tips for Gas Detector Locations...................................................... 24
5.3 Preparations for Installation................................................................................ 24
5.4 Mounting for Standard Open-Path Installation ................................................ 25
5.4.1 Swivel Mount Kit............................................................................................. 25
5.4.2 Swivel Installation (Figure 6) .......................................................................... 25
5.4.3 Tilt Mount Kit .................................................................................................. 27
5.4.4 Detector / Source Installation (Figure No. 7 and 8) ......................................... 29
5.5 Mounting for Duct Installation............................................................................ 29
5.5.1 Duct Mount Set (Figure 10, 11)....................................................................... 29
5.5.2 Duct Alignment Set (Figure 12) and Accessories ............................................ 30
5.5.3 Duct Installation - Surface Preparation (Figure 9)........................................... 30
5.5.4.Duct Mount Installation (Figures 10,11) ......................................................... 32
5.5.5 Duct Mount Alignment (Figures 11,12) .......................................................... 35
5.6 Detector Wiring (see appendix D if EExde version used) ................................. 37
5.6.1 Conduit/Cable Installation ............................................................................... 37
5.6.2 Harness Connection (Figure 13) ...................................................................... 38
5.6.3 Detector Terminal Wiring................................................................................ 40
5.7 Light Source Wiring ............................................................................................. 41
5.7.1 Power Supply ................................................................................................... 41
5.7.2 Harness Connection (Figure 13) ...................................................................... 41
5.7.3 Terminal Wiring (Table 6) ............................................................................... 41
6. Operating Instructions ...........................................................................................43
6.1 SafEye Operation.................................................................................................. 43
6.2 Alignment of Unit (Figures 15 through 16) Using Swivel Mount ..................... 43
6.3 Alignment of Unit (Figure 7, 8) Using Tilt Mount ............................................. 46
6.4 Powering on the system........................................................................................ 47
6.5 Safety Precautions ................................................................................................. 47
6.6 Zero Calibration.................................................................................................... 47
6.7 Functional Check of Unit ..................................................................................... 48
II
Spectrex Inc. - SafEyeTM 300 Gas Detector
Manual – TM 794100, Rev. D, May 2004
7. Maintenance Instructions...................................................................................... 49
7.1 General Maintenance............................................................................................ 49
7.2 Periodic Maintenance ........................................................................................... 49
7.2.1 Routine Optical Surface Cleaning ................................................................... 50
7.2.2 Signal Verification ........................................................................................... 50
7.2.3 Function Check of Unit.................................................................................... 51
7.2.4 Maintenance Records ....................................................................................... 51
8. Troubleshooting.......................................................................................................52
Appendix A - Wire Selection Tables .......................................................................53
Appendix B: Wiring Option configurations...........................................................55
Appendix C: Outline Drawing ...................................................................................59
Appendix D - Mounting the “EExde approved” version....................................63
LIST OF FIGURES
Figure 1: Light Source – Reflector Type ............................................................................ 6
Figure 2: Detector .............................................................................................................. 7
Figure 3. Detector’s Wiring Diagram .............................................................................. 12
Figure 4. Detector Terminal Board .................................................................................. 13
Figure 5. Light Source Terminal Board ........................................................................... 14
Figure 6. Detector/Light Source and Swivel Mount Assembly for Standard Installation 26
Figure 7. Tilt Mount Assembly.......................................................................................... 27
Figure 8. Detector/Source and Tilt Mount Assembly ....................................................... 28
Figure 9. Drilling Layout Dimensions for Duct Installation ............................................ 31
Figure 10. Detector/Light Source and Duct Mount Installation scheme.......................... 33
Figure 11. Duct Mount Installation - Outline Drawing ................................................... 34
Figure 12. Telescope Alignment Set ................................................................................. 36
Figure 13. Detector with Cover (removed)....................................................................... 39
Figure 14. Light Source - Open View ............................................................................... 42
Figure 15. Alignment and Mode Selection ....................................................................... 44
Figure 16. SafEye Light Source/ Detector Alignment ...................................................... 44
Figure 17. Detector’s Wiring Diagram ............................................................................ 55
Figure 18. 4-20mA Source Output .................................................................................... 56
Figure 19. Typical 4 Wire Controller ............................................................................... 56
Figure 20. RS -485 Networking ......................................................................................... 57
Figure 21. Detector Outline Drawing With Swivel Mount .............................................. 59
Figure 22. Source Outline Drawing (Reflector Type) With Swivel Mount...................... 60
Figure 23. Detector and Tilt Mount Outline Drawing .................................................... 61
Figure 24. Source and Tilt Mount Outline Drawing ....................................................... 62
Figure 25: Flame Detector Assembly - Wiring Diagram ................................................. 64
Figure 26: OPTION A Detector Assembly - Wiring Diagram ....................................... 65
Figure 27: OPTION B Detector Assembly - Wiring Diagram ........................................ 65
III
Spectrex Inc. - SafEyeTM 300 Gas Detector
Manual – TM 794100, Rev. D, May 2004
LIST OF TABLES
Table 1: Model Selection Guideline for SafEye Series 300 IR Type .................................. 5
Table 2. LED Status Indication........................................................................................... 9
Table 3. Alignment Indication LED Color........................................................................ 10
Table 4. Standard (default) 4-20mA Current for the Gas Channel .................................. 11
Table 5. Discrete reading of 4-20mA at different detector’s modes................................. 11
Table 6. Light Source Terminals....................................................................................... 14
Table 7. SW1 DIPswitches Configuration ........................................................................ 15
Table 8. Gas Type Calibration Setup................................................................................ 16
Table 9. SW2 DIPswitches Configuration ........................................................................ 17
Table 10. SW3 DIPswitches Configuration ...................................................................... 18
Table 11: Detection Distance Range ................................................................................ 19
Table 12: Sensitivity Range............................................................................................... 19
Table 13: Dry Contact Relays........................................................................................... 20
Table 14. Detector/ Source Weight & Dimensions ........................................................... 21
Table 15. Swivel Mount Kit............................................................................................... 25
Table 16. Tilt Mount Kit.................................................................................................... 27
Table 17. Duct Mount Kit ................................................................................................. 29
Table 18. LED Signal Adjustment..................................................................................... 50
Table 19. Maximum DC resistance at 68°F for copper wire ............................................ 53
Table 20. Wiring length in feet (meter)............................................................................. 53
IV
Spectrex Inc. - SafEyeTM 300 Gas Detector
Manual – TM 794100, Rev. D, May 2004
1. Scope
1.1 Product Overview
The SafEye 300 Series is an IR Open-Path Gas Detector that detects ambient
combustible gases at LEL.m concentrations over a path length from 2ft (0.6m) up
to 49 ft. (15 m), even in harsh environments where dust, fog, rain, snow or
vibration can cause a high reduction of signal.
The shorter path lengths are usually associate with application in ducts/air
intakes to provide fast response to ingress of flammable gases.
Due to its unique combination of triple optics and dual-spectrum reference
sensor, the SafEye can maintain operation in up to 90% signal obscuration and
±2 degree of misalignment.
SafEye has a fast response detection time of no more than 2-10 seconds. This
feature enables an adequate time to take appropriate safety measures.
The SafEye Source and Detector unit enclosures are ATEX certified EExd
flameproof or EExde (with additional separate EExe terminal box connected to
the unit.)
This manual consists of a full description of the Detector and its features. It
contains instructions on the installation, operation and maintenance. The system
is intended to be operated by qualified personnel.
1.2 Document Overview
This manual describes the Detector and its features and provides instructions on
the installation, operation and maintenance.
This manual is divided into separate sections as follows:
Section 1.
Section 2.
Section 3.
Section 4.
Section 5.
Section 6.
Section 7.
Section 8.
Appendix A.
Appendix B.
Appendix C.
Scope - a general introduction and overview of the product and the
Manual, with a brief description of its content.
Technical Description - the Detector’s theory of operation.
Operation Mode - the Detector’s operation modes, user interface and
indications.
Technical Specifications - the Detector’s electrical, mechanical and
environmental specifications.
Installation Instructions, including wiring and mode setting.
Operating Instructions and power-up procedures.
Maintenance Instructions and support procedures.
Troubleshooting
Wiring Selection Tables for electrical wire selection according
to installation configuration.
Wiring option Configurations - wiring diagrams for
installation.
Detector and Source Outline Drawing
1
Spectrex Inc. - SafEyeTM 300 Gas Detector
Manual – TM 794100, Rev. D, May 2004
2. Technical Description
2.1 Features
• Operating distance from 2ft (0.6m) up to 49 ft (15m)
• Simultaneous detection of C1-C8 flammable gases
• High Sensitivity and fast response to Hydrocarbon gases
• Continuous operation in extreme and harsh environmental
Conditions
• Withstands extreme vibration conditions
• Interfaces with most commonly used control panels
• Standard 4-20mA and Dry Contact Relays Outputs
• RS-485 Output for PC Communication Network for a maximum of 64
systems
• Simple one person installation, alignment, and calibration
• ATEX Approved - EX II 2 G, EExd IIB + H2 T5; EExde IIB + H 2 T5
• UL Approved – E209870 Class I, Group C and D
• Programmable configuration
2.2 Applications
The SafEye system may be used to monitor flammable gas concentration in
various applications, such as fence-line monitoring and area monitoring in
processing facilities, air-intakes and duct installations in various industries
including:
• Petrochemical, pharmaceutical and other chemical storage and production
areas.
• Flammable and toxic chemical storage sites and hazardous waste disposal
areas.
• Refineries, oil platforms, pipelines, refueling stations and fuel storage
facilities.
• Hazardous loading docks, transportation depots and shipping warehouses
• Engine rooms
• Compressor and pumping stations
• Hazardous enclosures and test cells
• LNG-LPG Systems
• Offshore Floating Production Storage and Shipping vessels (FPSO), and
fixed oil rigs.
2.3 Principle of Operation
The SafEye system detects gases through a dual spectral range monitoring,
analyzing the absorption of radiation caused by gases in the atmosphere and
comparing it (ratio) to background atmospheric absorption.
2
Spectrex Inc. - SafEyeTM 300 Gas Detector
Manual – TM 794100, Rev. D, May 2004
2.3.1 Definitions of Terms
The following list defines gas concentrations measurement terms that are used in
this manual:
LEL
Lower Explosive Limit - The minimum concentration of a substance
(gas/vapor) in air mixture that can be ignited. This mixture is
different for every gas/vapor, measured in % of LEL.
LEL.m
Integral of Concentration in LEL units (1 LEL = 100% LEL) and the
operation distance, or path length, in meters (m).
2.3.2 Spectral Finger Print
Each hazardous material is detected at a specific wavelength selected according
to its specific spectral absorption or "finger print". There are three IR sensors: two
signals and one reference. The detection process involves two separate filters,
one transmitting radiation that is absorbed by a particular gas and one that is not
sensitive to it.
2.3.3 Optical Path
The presence of hazardous airborne vapors, gases, or aerosols in a monitored
area is detected when the defined substance crosses/enters the optical path
between the radiation source unit and the detector.
Hazardous gases /vapors present in the atmosphere cause absorption of the
radiation pulse in the optical path between the radiating source and the detector
unit at some specific wavelengths. This causes a change in the signal intensity
received by the detector, which is translated into an output related to the
detector’s measuring scale.
The system analyzes the defined open path at the spectral bands specific to the
materials being monitored. The Automatic Gain Control (AGC) unit compensates
for environmental disturbances such as fog, rain, etc., through a constant
comparison with its dual spectral beam.
2.3.4 Microprocessor Based
The incoming signals are analyzed by the built in microprocessor.
A sophisticated mathematical algorithm calculates between the various functions
of the detected signal thresholds. Statistics, ratio algorithms, data
communications, diagnostics and other functions are performed.
3
Spectrex Inc. - SafEyeTM 300 Gas Detector
Manual – TM 794100, Rev. D, May 2004
2.3.5 Gas Sensitivity
The SafEye IR Model uses wavelengths around 3.4µ spectral band to measure
air flammability potential between the source and detector. At this wavelength,
all hydrocarbon materials have a strong absorption peak. This peak enables the
detector to achieve both regular sensitivity of 0-5 LEL.m or high sensitivity of 0-2
LEL.m according to functions set up.
In the short-range duct Model 301, the standard full scale is 2.5 LEL.m or 1
LEL.m by DIPSwitch.
However, since the desired detection information is air flammability and the
actual measurement is radiation absorption around the 3.4µ spectral band, the
detector has a different sensitivity to different gases or gas combinations.
This difference in sensitivity is irrelevant if in the protected area the gas
composition is known. However, if in a protected area the gas composition can
vary substantially, then the difference in sensitivity should be considered in
determining the Detector calibration.
2.3.6 Gas and Mixture Selection and Setting
At the 3.4µ spectral band of the SafEye, the least sensitive gas is pure (100%
vol) methane and the most sensitive gases are various mixtures of Methane with
heavier alkanes where the Methane percentage is less than 90%. For pure
Ethane the sensitivity is close to the high sensitivity gases and for pure Propane
it lies somewhere between the two extremes. Every SafEye has 4 built-in gas
calibration settings that can be changed by function set up The setting for each
Safeye is detailed on the calibration datasheet provided with each unit.
The calibration settings are designed for use in various applications:
Gas 1 Gas 2 -
Gas 3 Gas 4 -
Pure methane and is for use in methane storage and piping
applications
92% methane, 4% propane and 4% ethane (default) Universal oil
and gas production mixture to be used in all cases where methane
concentration in the mixture does not exceed 98%. It can also be
used for pure Ethane applications.
Pure propane and is good for propane/butane detection.
99% methane and 1% propane and is for use in detecting
methane mixture with heavier gases where the methane
component can vary between 100% to 95%. It is also good for
protecting areas where a leak can be either pure methane or pure
propane.
The four internal gas calibrations cover most of the flammable gas detection
applications. Actual selections should be made by the user in consultation with
experts to provide for safety requirements. However, for special cases where
4
Spectrex Inc. - SafEyeTM 300 Gas Detector
Manual – TM 794100, Rev. D, May 2004
none of the four calibrations are appropriate, Spectrex, through local agents can
advise how to calibrate a SafEye Detector to any specific gas.
2.4 Product Marking
The SafEye 300 Series open path gas Detector and source unit are certified to:
1. ATEX Ex II 2 G per SIRA 00 ATEX 1161 & 1165
EExd IIB +H2 T5 and EExde IIB +H2 T5 Amb. Temp. -40°C to +70°C
2. UL E209870 Class I, Group C and D
2.5 Models and Types
This manual includes information for SafEye Series 300 models. Table 1
identifies the detector model options in reference to the required gas type and
detection range.
Table 1: Model Selection Guidelin e for SafEye Series 300 IR Type
Model
Distance
Detector* Light
Option
Option for
Source*
for Duct St.St
Ft.
m.
Mount
Enclosure
301
2-11.5
0.6-3.5 OP-IL000x OPS-LI0x Yes
Yes
302
9.8-49
3-15 OP-IL100x OPS-LI0x Yes
Yes
* Notes
For standard installation add “S” suffix. For duct installation add “D” suffix. For St.
St. version add “St” suffix after the “D” or the “S” suffix.
5
Spectrex Inc. - SafEyeTM 300 Gas Detector
Manual – TM 794100, Rev. D, May 2004
2.6 Description
The system comprises two main units; the Light Source and the Detector. The
SafEye system detects gases over an open path transmitted from the Light
Source to the Detector.
2.6.1 Light Source Unit
The Light Source unit emits IR radiation pulses, in a collimated beam (for
maximum intensity) to the detector unit. The model number is OPS-LI0x (Figure
1).
Figure 1: Light Source – Reflector Type
6
Spectrex Inc. - SafEyeTM 300 Gas Detector
Manual – TM 794100, Rev. D, May 2004
2.6.2 Detector Unit (Figure 2)
The detector's sensors receive the transmitted pulsed radiation signals from the
Light Source. The signals are then amplified and fed into an analog to digital
signal converter to be processed by the internal microprocessor.
When the signals drop below a prescribed level, the internal microprocessor will
compensate for them. This will allow the signal to be maintained even in severe
weather conditions. The data is sent to the output interface section. The signals
can be sent to a standard control panel or to a central computer.
The Series 300 Detector is available in two basic types:
1. Model OP-IL000X for short-range installation
2. Model OP-IL100X for medium-range installation.
Figure 2: Detector
7
Spectrex Inc. - SafEyeTM 300 Gas Detector
Manual – TM 794100, Rev. D, May 2004
3. Operation Mode
The SafEye system has three operation modes; Normal, Alignment and Zero
Calibration.
3.1 Normal Mode
This mode is used for gas detection. The following status signals are possible:
(see Table 2 for visual indications).
Normal
Warning
Alarm
- Signal received from gas detection is at safe levels.
- Gases have been detected at warning levels.
- Gases have been detected at alarm levels.
3.2 Fault Mode
There are three fault types:
• Fault 1 (2mA Output) – Non critical
If this occurs, it is due to blockage, poor alignment, very low signal or in
the case of partial obscuration or full beam block and detection is no
longer possible. The Detector’s proper operation will be restored (Auto
reset) during operation if the condition causing the problem is removed or
resolved. This mode will occur after a delay of 60 sec. from the moment
of the fault. This delay is important to eliminate momentary obscuration
due to objects/people passing through the beam.
• Low Voltage Fault (0mA Output)
In this case, detection is disabled due to low voltage being supplied to
the Detector. The Detector returns to proper operation only when proper
voltage level restored.
Fault 2 (0mA Output) – Critical
In this case, the detection is disabled due to electrical / software
operational failure or central device (memory, processor) fault. Such fault
causes the Detector to cease operation.
3.3 Alignment Mode
This mode is used when the received signal needs to be measured (i.e.
Installation & Periodic Maintenance). LED indications represent the received
signal strength for precise alignment. There is a temporary Standby Mode to give
the option of switching from Alignment Mode to Calibration Mode.
3.4 Zero Calibration Mode (1mA Output)
This mode zeros the base level from which the Detector will read gas.
It should only be performed when there are:
•
•
•
No combustible gases present
Clear path between the Light Source and Detector
Clear weather conditions.
8
Spectrex Inc. - SafEyeTM 300 Gas Detector
Manual – TM 794100, Rev. D, May 2004
Zero calibration must be done after installation, re-alignment and window
cleaning, using magnetic mode selection
3.5 Mode Selection
A Magnetic Mode Selector is used to change to alignment and calibration modes
by placing the magnet on the side of the detector (Figure 16).
3.6 Visual Indications LEDs
There are two indicators (LEDs) located in the detector’s front window, referred
to as the right and left LEDs. They display red, orange and green light that can
be either ‘On’ steady or flashing or ‘Off’
Status
Normal
Warning
Alarm
Fault 1
Fault 2
Low
Voltage
Alignment
Mode
Table 2. LED Status Indication
Remarks
Left LED
Right
LED
Green
Off
See Note 4
Red
Off
See Note 4
Red
Red
Orange
Off
Orange
Orange
Orange
Orange
First receives the
intensity compared
to the last
calibration: The
intensity is min.
80% of the last
calibration intensity
80% - 60%
60% or less
After 20 seconds
the color
represents the
signal intensity
(See Note 2).
Green
Orange
Red
See Note
1
Green
Green
Orange
See Note
1
Standby
mode
Green
Green
Calibration See Note 3
mode
Off
Off
9
LED
Status
On
On
On
On
On
Both LEDs
flash at
rate of 2Hz
4-20mA
Output
4 mA
14 mA
19 mA
2 mA
0 mA
0 mA
0 mA
0 mA
0 mA
0 mA
Both LEDs
flash
alternately
at a rate of
2Hz.
0 mA
0 mA
Spectrex Inc. - SafEyeTM 300 Gas Detector
Manual – TM 794100, Rev. D, May 2004
Notes:
1 The number of flashes shows the intensity of the received signals while the
color represents the gain (see Table 3). The left LED shows the “tens” unit of
the number while the right LED displays the “one” unit of the number of the
signal intensity. Each LED will flash 0 to 9 times (9 being the maximum
possible signal intensity). When the left LED has reached its highest signal,
look at the right LED for fine adjustment.
2
Table 3. Alignment Indication LED Color
Left LED
Right LED
Gain
Red
Red
3
Orange
Orange
2
Green
Orange
1
Green
Green
0
After 20 minutes at alignment mode the detector will return to normal mode.
3
After zero calibration is finished, the detector will return to normal mode and
the signal intensity will be saved for next alignment comparison.
4
The 4-20mA level in this Table refers to discrete indication option. A different
(continuous reading) option is described later in section 3.7.1
3.7 Output Signals
The SafEye system provides the following outputs:
• Standard 4-20mA port
• Three dry contact relays
• Optional RS-485 Output for PC Communications
3.7.1 4-20mA Current Output
The 4-20mA output can provide the detector status measurement in one of the
two following methods:
1. It can be measured proportionally (default) showing a continuous reading
of the exact gas concentration (see Table 4).
2. It can be a discrete indication according to the detector mode or the
Warning or Alarm signal at a defined gas concentration. Setting of this
method can be done by SW3-2 selection (see Table 5).
The 4-20mA functions as current source. The maximum permitted load
resistance for the 4-20mA output is 600 ohms. The minimum permitted load
resistance is 100 ohms.
10
Spectrex Inc. - SafEyeTM 300 Gas Detector
Manual – TM 794100, Rev. D, May 2004
Table 4. Standard (default) 4-20mA Current for the Gas Channel
Current
Status and Description
0mA +0.5mA
Fault 2 or Low Voltage
2mA ±0.5mA
Fault 1
4mA ±0.5mA
Zero reading - No gas detected
4-20mA
Continuous measuring of gas concentration at a range
between 0 and 5 LEL.m or full scale
21mA
Concentration is over the range limit (more than full scale
concentration).
Table 5. Discrete reading of 4-20mA at different detector’s modes
Current Reading
Mode
LEL.m Setting
301
302
0 +0.5mA
Fault 2 or Low Voltage
2 ±0.5mA
Fault 1
4 ±0.5mA
Standby
0
0
14 ±0.5mA
Warning
0.6
1
19 ±0.5mA
Alarm
1
2.5
3.7.2 Relays
The detector includes three relays:
• Fault relay
• Alarm relay
• Accessory relay
Fault Relay contacts are normally energized closed, and opened when in Fault
condition
3.7.3 RS-485 Interface
The RS-485 input/output sends complete data information to a PC and receives
data or control commands from the PC. The communication with the PC is
operated through this interface is executed only when used with appropriate host
software.
The following PC minimal hardware requirements are as follows:
• 386 PC using DOS Ver. 5.0 or higher
• 1 MB RAM.
• 2 MB free hard disk space.
• 1.2 or 1.44 MB floppy drive
• Color VGA
• RS-485 Interface Card to be defined as COM1 or COM2. Isolated Adapter
is preferred.
11
Spectrex Inc. - SafEyeTM 300 Gas Detector
Manual – TM 794100, Rev. D, May 2004
3.8 Terminals
Terminal outputs are described for the Detector and the Light Source.
For EExde version with separate EExe terminal section, see Appendix D
3.8.1 Detector Terminal
Terminal Wiring: Figure 3 displays a schematic diagram of the terminals and
Figure 4 shows their location.
Figure 3. Detector’s Wiring Diagram
12
Spectrex Inc. - SafEyeTM 300 Gas Detector
Manual – TM 794100, Rev. D, May 2004
1
2
3
4
5
Descrip tion
Detector Cover
Terminal Board
Terminal Screw
Securing Cable
Conduits
Figure 4. Detector Terminal Board
13
Spectrex Inc. - SafEyeTM 300 Gas Detector
Manual – TM 794100, Rev. D, May 2004
3.8.2 Light Source Terminals
Figure 5 shows the terminal board and Table 6 describes their use.
Figure 5. Light Source Terminal Board
Table 6. Light Source Terminals
Light Source
Description
Terminal Number
1
VIN
2
RTN
14
Spectrex Inc. - SafEyeTM 300 Gas Detector
Manual – TM 794100, Rev. D, May 2004
3.9 System Setup
3.9.1 Detector Setting
The detector consists of the following DIPswitches, which enable the user to
adapt the detector operation to specific application:
SW1
Function Selection Switch. Contains. 8 DIPswitches. Used for Calibration
of different gas selection, response time control and Relays response
configuration (see table 7)
SW2
Address Selection Switch. Contains 8 DIPswitches. Used for Detector’s
address setting and 4-20mA output configuration setting (see table 9)
SW3
Alarm Options Selection Switch. Contains 4 DIPswitches. Used for
Detector’s Alarm Latching configuration and 4-20mA level reading
configuration (see table 10)
Function Selection Switch:
Table 7 describes SW1 DIPswitches position and the required function for setting
the detector according to the necessary configuration
Table 7. SW1 DIPswitches Configuration
Off position
On position
Switch
No.
1
Not Used
2
Not Used
3
Gas type control bit 0 at “0”
(see note 1 below)
4
Gas type control bit 1 at “0”
(see note1 below)
5
Full scale sensitivity is 0-5
LEL.m (see note 2 below)
6
Zero calibration is
performed according to
background
7
Accessory Relay is
activated at Warning level
8
Accessory Relay is
activated according to SW17 position
Gas type control bit 0 at “1”
(see note 1 below)
Gas type control bit 1 at “1”
(see note 1 below)
Full scale sensitivity is 0-2
LEL.m (see note 2 below)
Gas level detection
performed without
background Zero calibration
Accessory Relay is activated
at Alarm level (with the
Alarm Relay)
Accessory Relay is Activated
at Power on continuously
(used as End of Line)
15
Default
setting
on
off
on
off
off
off
off
off
Spectrex Inc. - SafEyeTM 300 Gas Detector
Manual – TM 794100, Rev. D, May 2004
Notes:
1 Four Gas types can be selected for maximum compatibility to Gas spectral
properties. The selection of the appropriate type is defined by pre-setting of
SW1-3 and SW1-4 according to the following table:
Table 8. Gas Type Calibration Setup
bit # 0 position bit # 1 position
Detected Gas
(SW1-3)
(SW1-4)
Type
off
on
off
on
off
off
on
on
Methane
Mixture
Propane
Mixture
Gas type as
defined in
Section 2.3.6
Gas 1
Gas 2
Gas 3
Gas 4
2 In Model 301 the standard full scale is 2.5 LEL.m and 1 LEL.m by DIPSwitch.
Address Selection Switch
The Address selection Switch provides up to 64 different addresses for the
detector upon a network installation. Each detector can be recognized at its
specific address in RS485 network. The address should be determined by a presetting of SW2-1 to SW2-6 switches.
Attention!
SW2-7 and SW2-8 should be always at on.
16
Spectrex Inc. - SafEyeTM 300 Gas Detector
Manual – TM 794100, Rev. D, May 2004
Table 9 describes SW2 DIPswitches position and the required function for setting
the detector according to the necessary configuration
Table 9. SW2 DIPswitches Configuration
Switch
Switch Definition
Off
On position
No.
position
1
Address bit 0 (LSB)
0
1
2
Address bit 1
0
1
3
Address bit 2
0
1
4
Address bit 3
0
1
5
Address bit 4
0
1
6
Address bit 5 (MSB)
0
1
7
4-20mA direction
N/A
4-20mA output at source
setting (1)
position
8
4-20mA direction
N/A
4-20mA output at source
setting (2)
position
Default
setting
off
off
off
off
off
off
on
on
Alarm Options Selection Switch
This switch is used for the following function setting:
• Selection of the Alarm status to be latched or to auto-reset after the Alarm
disappears.
• Selection between two different 4-20mA reading modes, continuous
analog reading or discrete level reading which appropriate to the
detector’s status.
This switch also enables impedance matching to the serial link by providing a
connection to a loading resistor through the switch.
17
Spectrex Inc. - SafEyeTM 300 Gas Detector
Manual – TM 794100, Rev. D, May 2004
Table 10 describes SW3 DIPswitches position and the required function for
setting the detector according to the necessary configuration
Table 10. SW3 DIPswitches Configuration
Off position
On position
Switch
No.
1
Non latching Alarm
Relay
2
3
4
Continuous reading
of the 4-20mA
output reading
Non-latching Alarm
indications during
Blocking Mode
Normal Position
(open)
Alarm Relay latches. Latching reset
can be provided by momentarily power
disconnection or when the detector is
set to alignment mode.
Discrete Reading of the 4-20mA output
according to the detector status (see
table 5).
Alarm indications are latched when the
detector turns to Blocking Mode from
Alarm position. Latching reset can be
provided only if the detector turns to
Normal Mode.
Communication line termination for
impedance matching
18
Default
setting
off
off
off
off
Spectrex Inc. - SafEyeTM 300 Gas Detector
Manual – TM 794100, Rev. D, May 2004
4. Technical Specifications
4.1 General Specifications
Detected Gases: Simultaneous detection of C1-C8 flammable gases
Detection Distance range:
Table 11: Detection Distance Range
Model No.
301
302
Distance (ft)
2-11.5 9.8-49
Distance (m)
0.6-3.5
3-15
Response Time
2 Sec. 10 Sec.
Spectral Response:
3.0 - 4.0 micron
Sensitivity Range:
Table 12: Sensitivity Range
301
302
Standard 0-2.5 LEL.m
0-5 LEL.m
DIPswitch
0-1 LEL.m
0-2 LEL.m
Field of View:
Alignment Tolerance:
Drift:
Temperature Range:
Immunity to false alarm:
Line of Sight
± 2°
Long term ± 5% of full scale
-40°F (-40°C) to +158°F (+70°C)
Does not produce false alarm by Hydrocarbon
Flames and must of IR Radiation Sources.
19
Spectrex Inc. - SafEyeTM 300 Gas Detector
Manual – TM 794100, Rev. D, May 2004
4.2 Electrical Specifications
•
•
Operating Voltage: 18- 32 VDC
Power Consumption
Detector
150 mA @ 24 VDC (200 mA Peak)
Source
100 mA @ 24 VDC (220 mA Peak)
•
Electrical input protection:
The input circuit is protected against voltage-reversed polarity, voltage
transients, surges and spikes according to MIL-STD-1275A.
•
Electrical Interface (see figure 4)
•
Electrical outputs
A. 4-20mA Current Output:
The 4-20mA is source configuration. The maximum permitted load
resistance is 600 Ohm.
Two 4-20mA options:
• Continuous reading - default
• Discrete reading
(See Table 4)
(See Table 5)
B. Communication Network:
The Detector is equipped with an RS 485-communication link that can
be used in installations with computerized controllers. It enables
continuous communication with up to 64 Detectors.
C. Relays Output:
The Detector include up to three relays.
Relay
Alarm
Accessory
Fault *
Table 13: Dry Contact Relays
Type
Normal
Maximum Ratings
SPDT
NO, NC
2A at 30VDC or 0.5 at 250 VAC
SPST
NO
5A at 30VDC or 250 VAC
SPST
NC
5A at 30VDC or 250 VAC
* Fault Relay is normally energized, the contact will be closed, and when it is in
Fault situation, the relay is opened.
20
Spectrex Inc. - SafEyeTM 300 Gas Detector
Manual – TM 794100, Rev. D, May 2004
4.3 Mechanical Specifications
Enclosure:
Explosion Proof:
Electrical Modules:
Electrical connection:
Water and dust tight:
Weight & Dimensions
The source and detector housings are made of either
anodized aluminum with less than 1% Mg with an epoxy
enamel finish, or St.St. 316L enclosure with electro
polish finish
The back covers are all sealed with special "O" rings to
prevent intrusions such as dust, salt and sprays. The
circuit boards are conformal coated and protected from
mechanical vibrations and a slight impact.
Alignment Base is Stainless Steel 316L for all models.
ATEX (Cenelec)
Ex II 2 G, EExd IIB + H2 T5
EExde IIB + H2 T5
Temp -40°F (-40°C) to 158°F (70°C)
UL
E209870, Class I Group C and D
hazardous Location
FM
Class I Div. 1 Group B, C, and D.
(Designed to meet)
Class II Div. 1 Groups E, F and G.
Conformal coated.
(Two options - specified at time of order)
2 X M25 (ISO)
or 2 X 3/4” - 14NPT conduits.
IP 66 and IP 67
NEMA 250 type 6p
See Table 15
Table 14. Detector/ Source Weight & Dimensions
Detector/ Source
Al.
St.St.
Dimensions
type and
enclosure
enclosure
application
Lb
Kg
Lb
Kg
Inch
mm
Detector for Duct
8.1
3.7
13.4
6.1
5.2x5.2x4.7 132x132x120
Mount
Detector for
8.8
4.0
14.4 6.55
5.2x5.2x9
132x132x230
Standard Mount
Source for Duct
8.5
3.9
13.8
6.3
5.2x5.2x4.7 132x132x120
Mount.
Source (reflector)
9.5
4.3
14.9
6.8
5.2x5.2x9
132x132x230
21
Spectrex Inc. - SafEyeTM 300 Gas Detector
Manual – TM 794100, Rev. D, May 2004
4.4 Environmental Specifications
The SafEye system is designed to withstand harsh environmental conditions.
The Source and Detector units compensate for adverse conditions while
maintaining accuracy.
• High Temperature:
Designed to meet MIL-STD-810C, method 501.1 procedure II
Operating temperature:
+158 ºF (+70 º C)
Storage temperature:
+158 ºF (+70 º C)
•
Low Temperature:
Designed to meet MIL-STD-810C, method 502.1, procedure I
Operating temperature:
-4 º F (-20 º C)
Storage temperature:
-40 º F (-40 º C)
•
Humidity:
Designed to meet MIL-STD-810C, method 507.1, procedure IV
Relative humidity of up to 95% for the operational temperature range.
•
Salt and Fog:
Designed to meet MIL-STD-810C, method 509.1 procedure I.
Exposure to a 5% salt solution for 48 hours.
•
Water and Dust:
IP67 per En60529
IP66 per En60529
Dust:
Liquids:
Totally protected against dust.
Protected against immersion between 15 cm and 1m in depth.
Protected against all water jets from all directions.
• Shock and Vibration:
Vibration:
Designed to meet MIL-STD-810C, method 514.2,
procedure VIII.
Mechanical Shock:
Designed to meet MIL-STD-810C, method 516.1,
procedure I.
• Electromagnetic Compatibility (EMC):
The detector is designed and approved according to the following EMC
requirements:
Electrostatic Discharge (ESD)
IEC1000-4-2:1995-1
Conducted emission
EN55011, Class B
Radiated emission
EN55011, Class B
Radiated immunity
ENV50140:1994 (80-1000 MHz)
EFT/B
IEC801-4: 1988
22
Spectrex Inc. - SafEyeTM 300 Gas Detector
Manual – TM 794100, Rev. D, May 2004
5. Installation Instructions
The Detector and Light Source units can be installed and maintained with the use
of general-purpose common tools and equipment. The installation procedure has
to be performed by suitably qualified personnel.
5.1 Introduction
This section does not attempt to cover all of the standard practices and codes of
installation. Rather, it emphasizes specific points of consideration and provides
some general rules for suitably qualified personnel. Special safety precautions
are stressed wherever applicable.
5.2 General Considerations
5.2.1 Personnel
Only suitably qualified personnel, familiar with the local codes and practices,
trained for gas detection maintenance should be employed. Wiring should only
be performed or supervised by someone with knowledge of electronics and in
particular wiring installation.
5.2.2 Tools Required
The SafEye system requires the following tools:
• Set of screwdrivers
• Set of hex keys/Allan wrenches (supply with commissioning kit)
• Voltage Multimeter
5.2.3 Site Requirements
The installation position of the SafEye system must take into account if the gas
being monitored is heavier or lighter than air, the prevailing wind directions and
the individual site requirements.
The site selected must give the Detector a direct view to the Source.
The mounting point for each item should be secure and stable with minimal
vibrations.
Equipment should be either mounted in a position where it cannot be knocked
out of alignment, or guarded from physical impact.
5.2.4 The Source and Detector
The appropriate Detector should be selected for the length of open path to be
monitored. To allow for ageing of the Source and a reduction of the IR signal due
to adverse weather, we recommend using a Detector that is not at the limit of its
operating range. As a guide, select a Detector that is installed at a distance from
the Source of not more than 75% of the specified operating distance. In severe
weather conditions such as offshore oil production and exploration, this should
be reduced to 50%.
23
Spectrex Inc. - SafEyeTM 300 Gas Detector
Manual – TM 794100, Rev. D, May 2004
The open path between the Source and Detector and the immediate
surroundings should be kept clear of obscuration that might hinder the free
movement of air in the protected area or block the infrared beam.
5.2.5 Guidance Tips for Gas Detector Locations
Guidance Tips for Gas Detector locations in order to provide the best detection
coverage:
1. Below potential leak source for heavier than air gases
2. Above potential leak sources for lighter than air gases
3. Near to leak sources along the expected leak trajectory, taking into
account prevailing wind directions
4. Between leak source and potential ignition sources
5. In area with expected heavy fog, rain or snow, consider the effect of longrange installation and install the detector at shorter range with the
maximum intensity model available.
5.3 Preparations for Installation
1. Upon receipt, verify the appropriate Purchase Order and record the Part
Number and Serial Number of the Source and Detector units in the
appropriate Log Book.
2. Carefully unpack the following equipment observing any instructions
printed on or contained in the packaging list. Check the contents for any
possible damage caused from shipping and handling. In the event of
damage or loss in transit, notify the carrier and your Supplier immediately.
The System should include the following (in addition to this manual):
• Detector unit
• Source unit
• Two tilt or swivel Mounting Bases – one for the Detector and one for the
Light Source.
• Telescope Kit
• Functional Filter
• Magnetic Mode Selector
Notes:
1 The Magnetic Mode Selector, the Calibration Filter and the Telescope Kit are
used during each SafEye’s installation and then removed. They can be
reused for all other SafEye installations on the site. Therefore, only one set
is provided for several detectors.
2 There are two different Telescope Kits:
For standard installation
P/N 794110
For Duct installation
P/N 794245
3 There are two different types of Functional Filter. One for standard mount
and the other for Duct Mount. Each type has five different models for
different gas reading.
For standard installation
P/N 794260 - 1 to 5
For Duct installation
P/N 794220 - 1 to 5
24
Spectrex Inc. - SafEyeTM 300 Gas Detector
Manual – TM 794100, Rev. D, May 2004
5.4 Mounting for Standard Open-Path Installation
The following instructions are applicable for both the Light Source unit and the
Detector unit. The detector may be mounted on special Swivel Mounts (see
5.4.1) or
i.
Tilt Mounts (see 5.4.3)
ii.
Duct mounts – (see5.5)
iii.
Also see appendix D if EExde version used
5.4.1 Swivel Mount Kit
Note
For Aluminum and St. St. detector enclosure use Swivel Mount:
• P/N 794765 for inches measure
• P/N 794765-1 for metric measure.
The Swivel Mounts models are made of St. St. 316L.
Table 15. Swivel Mount Kit
QTY
Location
Swivel Mount
1
Screw 1/4”-20UNC or M6 x 1P
4
Detector - Holding plate
1/4” Spring Washer
4
Detector - Holding plate
Item
5.4.2 Swivel Installation (Figure 6)
1 Place the swivel mount Securing Plate (2) in its designated location and
secure it with four M6 or 1/4”-20UNC screws (9), placed 3 in. (76.2 mm.)
apart.
Note
Skip this step if the mounting is already installed. Also detector removal for
maintenance purpose does not require Swivel Mount removal.
2 Unpack the detector carefully
3 Place the detector with its conduit inlets/electrical entries pointing down on
the holding plate of the swivel mount (10). Secure the detector by four 1/4”20UNC allen screws or M6 x 1P (8) with 1/4” spring washers from the swivel
mount kit (use No. 5 Hex Key for M6 screws, or 3/16” Hex Key for 1/4”20UNC screws).
4 Tighten the three locking 3/8”-24UNF screws (5) of the swivel mount ring until
the friction in the ball joint holds the detector in its position. Yet, still permits it
to be moved by hand-applied force (use 3/16 Hex Key).
5 Point the detector towards the Light Source and make certain that the view of
the area is not obstructed. Secure the detector in that position by tightening
the locking screws of the swivel mount ring.
6 Repeat mounting and Swivel Mount installation described in this chapter for
installing the Light Source.
The detector is now correctly located and ready for the electrical connection to
the system prior to fine alignment.
25
Spectrex Inc. - SafEyeTM 300 Gas Detector
Manual – TM 794100, Rev. D, May 2004
Description
Detector / Light
Source Assembly
2 Swivel Mount
Securing Plate
3 Protective Front Cover
4 Swivel Mount
Alignment Plate
5 Swivel Mount Locking
Screws
6 Vertical Adjustment
Screws
7 Horizontal Adjustment
Screws
8 Detector Screws
9 Swivel Mount Plate
Securing Screws
10 Swivel Mount Holding
Plate
1
Figure 6. Detector/Light Source and Swivel Mount Assembly for Standard Installation
26
Spectrex Inc. - SafEyeTM 300 Gas Detector
Manual – TM 794100, Rev. D, May 2004
5.4.3 Tilt Mount Kit
The Tilt Mount kit includes the items listed in Table 16 as follows:
Table 16. Tilt Mount Kit
Qty
DWG
Tilt Mount
1 799220
Cap Socket
1 Screw 5/16 - 18 UNC - 2H 3/4” St.St.
Spring Washer
1 Spring Washer 5/16” St.St.
Detector Base Assembly
1 799110
Cap Socket Screw
4 Screw 1/4” - 20 UNC - 3A x 1/22
Spring Washer
4 1/4” St.St
Item
1 Tilt Mount
2 Detector Base
3 Cap Socket
Description
4 Spring washer
5 Holding Plate
Figure 7. Tilt Mount Assembly
27
Spectrex Inc. - SafEyeTM 300 Gas Detector
1 Tilt Mount Holding Plate
2 Detector base
Manual – TM 794100, Rev. D, May 2004
Description
7
8
3 Horizontal crude alignment tighten
screw
4 Horizontal fine alignment tighten screw
5 Vertical fine alignment tighten screw
6 Vertical crude alignment tighten screw
9
Vertical fine alignment screw
Horizontal fine alignment
tighten screw
Telescope
10
11
Telescope tightening bolt
Detector / Source
Figure 8. Detector/Source and Tilt Mount Assembly
28
Spectrex Inc. - SafEyeTM 300 Gas Detector
Manual – TM 794100, Rev. D, May 2004
5.4.4 Detector / Source Installation (Figure No. 7 and 8)
1. Place the Tilt Mount holding plate (Item 1) in its designated location and
secure it with (4) fasteners through four (4) holes dia. 8.5mm.
2. Install the Detector Base Assy. (Item 2) on the Tilt Mount use cap socket
screw (Item 3) and Spring Washer (Item 4).
Notes:
1
Skip steps 1 and 2 if the Tilt Mount is already installed.
2
Detector removal for maintenance purpose does not require Tilt
Mount removal
3. Place the detector, with its conduit/cable inlets pointing downwards on the
detector base assy. of the Tilt Mount (Item 2). Secure the detector with
four 1/4”- 20 UNC - 3A x 1/2” screw with No. 1/4” spring washers to the Tilt
Mount. Use 1/4” Hex Key for 3/16” screw.
4. Repeat 1 - 2 to install the Source
5.5 Mounting for Duct Installation
The following instructions are applicable for both the Source unit and the
Detector unit.
The detector may be mounted on a special Duct Mount. The Duct Mount enables
the detector to be rotated up to ±3 degrees in the X-Y directions in order to
provide fine alignment.
For duct installation use Duct Mount P/N 794716.
The Duct Mount Kit supplied with the item listed in Table 17 as follows:
Table 17. Duct Mount Kit
Item
Duct Mount Set
Open & closed Wrench No. 10 key
Closed No. 10 Key
Qty
1
1 per installation
1 per installation
5.5.1 Duct Mount Set (Figure 10, 11)
The Duct Mount set consists of Fitting Plates, Sealing Rings, Windowed plate,
and securing elements combined with appropriate screws and nuts. It provides a
reliable attachment of the detector to the air intake as well as good sealing and
accurate alignment capability.
29
Spectrex Inc. - SafEyeTM 300 Gas Detector
Manual – TM 794100, Rev. D, May 2004
5.5.2 Duct Alignment Set (Figure 12) and Accessories
Air Duct Installation has a limitation, which is the disability of viewing the
Detector’s front and performing fine alignment through detector aiming such as
performed in standard installation. As a result, fine alignment of the Detector’s
Mount should be performed before the detector assembly is mounted to it.
The Alignment Set solves this problem by enabling the installer to align the
Detector Mount first, and then to install the Detector. The Alignment Set includes
a Mount that is identical to the Detector Mount Surface and a telescope that is
installed in the middle of the Mount Surface. The Telescope is centered in the
Duct mount in a way that it is located in the same optical axis as the detector that
will be mounted later in the same location.
The Accessories supplied with the kit includes one No.10 Key for installation and
for alignment. One Accessories Set is supplied for each installation.
5.5.3 Duct Installation - Surface Preparation (Figure 9)
The following instructions are applicable for both the Light Source unit and the
Detector unit.
1. Check the Air Duct Installation Surface (1) stability. It should be as near as
possible to a rigid girder connection in order to assure proper support to
the mounting and the unit. Also the surface must be stable and free of
vibrations.
2. Locate the best installation surface for the Detector/ Light Source. The
location of the central point of each Duct Hole (3) should be at the same
distance from the surface edge. This will provide that both Detector and
Source optical axis will be in parallel to the Air Duct wall lines such that
any blocking in the interior area will be prevented.
3. Preparation of the surface: Prior to hole drilling, it should be verified that
the Installation surface is straight, clean and free of corrosion.
Drilling and cutting: Mark the Location and dimensions of the Installation
Figure 9 show surface drilling dimensions. Drill the Duct Hole (3) and the Screw
Holes (2) carefully.
Caution!
Since the installation is done in a potentially explosive, any
workmanship in the installation area should be performed under
the appropriate rules and regulations.
30
Spectrex Inc. - SafEyeTM 300 Gas Detector
1
2
3
Manual – TM 794100, Rev. D, May 2004
Description
Air Duct Installation Surface
Duct Mount Screw Securing Hole
Hole for Detector / Light Source
Figure 9. Drilling Layout Dimensions for Duct Installation
31
Spectrex Inc. - SafEyeTM 300 Gas Detector
Manual – TM 794100, Rev. D, May 2004
5.5.4.Duct Mount Installation (Figures 10,11)
The following instructions are applicable for both the Light Source unit and the
Detector unit.
1. Insert the first Internal Plate (1) through the Air Duct Hole. Hold it by hand
and press the Base Plate Gasket (2) to the Installation Surface against the
Internal Plate. The Internal Plate Screws should be inserted into the
Gasket holes and hold it from falling. Then remove your hand and repeat
the process for the second Internal Plate.
2. Attach the Base Plate (3) to the Gasket (2) carefully. The Internal Plate
screws should be inserted slightly to the Base Plate holes.
3. Secure the Base Plate to the Installation Surface using four Nuts and Flat
Washers (4).
4. Attach the Window Plate (5) by threading its holes on the Base Plate
Screws. The Window (7) Protection Ring of the plate should be directed
outside. Secure it by four Nuts and Flat Washers (6).
5. Alignment Plate installation: Screw together the Internal Vertical Alignment
Nut and the Washer (9) to the Base Plate Screws. Then thread the
Alignment plate (8) on the screws. Connect the two External Alignment
Nuts and Flat Washers (10) without fastening. The Plate is now
connected.
6. Connect the Horizontal Alignment Screw with the Nut and Flat Washer
(11) directed according the illustration. The Alignment Plate should be
held but set free for alignment.
At this point, the Duct Mount is ready for alignment.
32
Spectrex Inc. - SafEyeTM 300 Gas Detector
1
Internal Plate
2
Base Plate Gasket
3
Base Plate
4
7
Base Plate Securing Nut
and Flat Washer
Window Plate
Window Plate Nut and Flat
Washer
Window
8
Alignment Plate
5
6
Manual – TM 794100, Rev. D, May 2004
Description
9
Internal Vertical Alignment Nut and
Flat Washer
10 External Alignment Nut and Flat
Washer
11 Horizontal Alignment Nut and Flat
Washer
12 Detector / Light Source Plate
13
14
Detector / Light Source
Horizontal Adjustment Locking Screw
15
Detector/ Light Source Securing Nut
and Flat Washer
Window Nut
16
Figure 10. Detector/Light Source and Duct Mount Installation scheme
33
Spectrex Inc. - SafEyeTM 300 Gas Detector
1
2
3
4
5
6
7
8
Manual – TM 794100, Rev. D, May 2004
Description
Internal Plate
9
Internal Vertical Alignment Nut
and Flat Washer
Base Plate Gasket
10 External Alignment Nut and Flat
Washer
Base Plate
11 Horizontal Alignment Nut and Flat
Washer
Base Plate Securing Nut and Flat
12 Detector / Light Source Plate
Washer
Window Plate
13 Detector / Light Source
Window Plate Nut and Flat Washer 14 Horizontal Adjustment Locking
Screw
Window
15 Detector/ Light Source Securing
Nut and Flat Washer
Alignment Plate
16 Window Nut
Figure 11. Duct Mount Installation - Outline Drawing
34
Spectrex Inc. - SafEyeTM 300 Gas Detector
Manual – TM 794100, Rev. D, May 2004
5.5.5 Duct Mount Alignment (Figures 11,12)
The following instructions are applicable for both the Light Source unit and the
Detector unit.
1. Connect the Telescope Plate (Figure 12, item 1) to the Duct Mount
Alignment Plate (Figure 11, item 8).
Insert each one of four Screws (Figure 11, item 15) from the Duct Mount
side through the Hole (Figure 12, item 2), and secure it with Nut and Flat
Washer (Figure 11, item 15).
2. Locate the Telescope Aim (Figure 12, item 3) to be in vertical to the
Installation surface.
3. Look at the Aim view and locate the ‘Aim Cross’ in the middle of
Installation Surface Hole on the opposite side. Rotate the Vertical and
Horizontal Nuts (Figure 11, items 10,14) to achieve best result.
Provide stability of the plate by securing and releasing the opposite nuts or
screws gently.
4. Repeat step 3 until best result is achieved.
5. Provide final Screws and Nuts securing (Figure 11, items 9,11).
6. Remove the Alignment set carefully by unscrewing The Nuts and Screws
from the Hole (Figure 12, item 2).
7. Perform detector wiring according to section 5.6 Note that in case of Air
Duct installation the Detector is mounted at the front side. Therefore, it
must be removed from its mounting before any cover opening.
8. Install the Detector/ Light Source on the Alignment Plate (Figure 11, item
8).
9. Secure the Detector/ Light Source with Nuts and Flat Washers (Figure 11,
item 15).
35
Spectrex Inc. - SafEyeTM 300 Gas Detector
1
2
3
Manual – TM 794100, Rev. D, May 2004
Description
Telescope Plate
Detector / Light Source Securing Screw Hole
Telescope Aim
Figure 12. Telescope Alignment Set
36
Spectrex Inc. - SafEyeTM 300 Gas Detector
Manual – TM 794100, Rev. D, May 2004
5.6 Detector Wiring (see appendix D if EExde version used)
This section does not attempt to cover all of the standard practices and codes of
installation. It emphasizes specific points providing the basic concept for qualified
wiring installation personnel.
Warning!
Do not separate or close the housing section from
the cover while the power is at “on” position.
Caution!
It is very important that the Cover and Housing sections be exposed
to the environment for the least amount of time due to the internal
circuitry. Proper planning of the wiring is required in order to reduce
the amount of time the Cover and Housing sections are apart.
5.6.1 Conduit/Cable Installation
1. To avoid water condensation in the detector, it should be installed with the
conduits/electrical entries facing downward.
2. When using the Swivel Mount or Duct Mount, use flexible conduits for the
last portion connecting to the detector.
3. When pulling the cables through the conduits, ensure that they are not
tangled or stressed. Extend the cables about 12 in. (30cm.) beyond the
detector location to accommodate wiring after installation.
4. After the conductor cables have been pulled through the conduits, perform
a continuity test.
37
Spectrex Inc. - SafEyeTM 300 Gas Detector
Manual – TM 794100, Rev. D, May 2004
5.6.2 Harness Connection (Figure 13)
1. Remove the four Threaded Plugs (13) from detector front.
2. Release the four Socket-Head Screws (14) that secure the detector
housing (1) to its back cover (2) using No. 5 Hex Key for M6 screw. Hold
the housing during the removal of the screws. Pull the detector housing
from its cover. The cover remains attached to the detector swivel mount.
The housing slides under the cover and remains attached to it by a
securing cable (8). Do not let cover simply drop but rather support it until it
hangs.
The terminal board (12) inside the detector cover is now revealed.
3. Remove the protective plug (6) mounted on the detector conduit inlet. Pull
the wires through the detector cover (2) and secure them firmly to the
cover using the cable-tie (16) attached to it. Use a 3/4”-14NPT or M25 x
1.5P explosion -proof conduit/electrical entry connection to assemble the
conduit/cable to the detector.
4. Connect the wires to the required terminals (12) according to the wiring
diagram. See Appendix B.
5. Connect a Grounding Cable to the Ground Terminal (7) outside the
detector cover (2). The detector must be well grounded to Earth Ground
for proper operation.
6. Verify the wiring. Improper wiring may damage the detector.
7. Check the wires for secure mechanical connection and press them neatly
against the Terminal Board (12) to prevent them from interfering while
closing the detector’s housing.
8. Dress all wires so they will not interfere with the closure of the unit.
9. Seal the conduit inlet and outlet.
10. Align the two connectors guide pins in the Housing section with the correct
openings in the housing section.
11. Carefully slide the Housing section onto the floating holes in the Female D
Connector.
12. Using the long handled Hex key, tighten the four M6 1.0PX50 screws (14).
13. Insert the four Threaded Plugs (13).
38
Spectrex Inc. - SafEyeTM 300 Gas Detector
1
2
3
4
5
6
7
8
Housing
Cover
Screw Hole
Female D Connector
Male D Connector
Conduit Inlet Plug
Ground Terminal Screw
Securing Cable
Manual – TM 794100, Rev. D, May 2004
Description
9
SW1
10 SW3
11 SW2
12 Terminal Board
13 Threaded Plug
14 Socket Head Screw (M6x1.0Px50)
15 Screw Pan Head (No. 4-40UNC-2Ax3/8”)
16 Cable Tie
Figure 13. Detector with Cover (removed)
39
Spectrex Inc. - SafEyeTM 300 Gas Detector
Manual – TM 794100, Rev. D, May 2004
5.6.3 Detector Terminal Wiring
The detector contains a terminal board consisting of two terminal blocks.
Power Supply:
The input power is supplied to terminal 1. The Return is connected to 2.
Note
Ensure that the detector unit receives a minimum of 18 Volts DC and
does not exceed 32 Volts DC.
Fault Relay:
The Fault Relay is normally open. The SPST relay is at terminal 4 and 5. The
contacts are normally energised closed when the detector is in normal operation.
Alarm Relay:
The Alarm Relay is SPDT Relay. Terminals 6 and 7 are Normally Open and the
contacts are closed when the detector is in the Alarm status. Terminals 7 and 8
are Normally Closed and the contacts are open when the detector is in the Alarm
status.
Accessory Relay:
The Accessory output is Normally Open SPST relay. Its contacts are at terminals
9 and 10. It can be defined per user requirements (See Appendix B.)
Note
To protect the dry contacts from voltage surges when connected to reactive
loads (electric motors, sirens, etc.) connect an appropriate varistor over these
contacts.
4-20mA Output:
Terminals 11 and 12 are used for 4-20mA current output as specified in section
3.7.1 (See Appendix B.)
RS-485 Output:
Terminal 13 and 14 are used for the communication network (See Appendix B.)
40
Spectrex Inc. - SafEyeTM 300 Gas Detector
Manual – TM 794100, Rev. D, May 2004
5.7 Light Source Wiring
5.7.1 Power Supply
Input power is supplied to terminal 1.
The return is connected to terminal 2 (see figure 14).
Note
Ensure that the Light Source unit will receive a minimum of 18 Volts DC and
does not exceed 32 Volts DC.
Pre-wiring requirements and wiring requirements are identical to the appropriate
requirements for the detector, as described in appendix A.
5.7.2 Harness Connection (Figure 13)
The instructions for this are identical to the detector. Refer to section 5.6.2
5.7.3 Terminal Wiring (Table 6)
The Light Source contains a terminal board. Terminal Wiring Instructions are
identical to the Detector Wiring instructions. The Light Source consists of two
wires only. The Positive supply power connected to terminal 1, and the common
return connected to terminal 2.
Connect the Grounding Cable to the Ground Terminal (Figure 14, item 4) outside
the Light Source cover (Figure 14, item 2). The detector must be well grounded
to Earth Ground for proper operation.
41
Spectrex Inc. - SafEyeTM 300 Gas Detector
1
2
3
4
Housing
Cover
Conduit /cable Inlet Plugs
Ground Terminal Screw
Manual – TM 794100, Rev. D, May 2004
Description
5 Grounding Wire
6 Securing Cable
7 Screw Hole
8 DIPswitches
Figure 14. Light Source - Open View
42
Spectrex Inc. - SafEyeTM 300 Gas Detector
Manual – TM 794100, Rev. D, May 2004
6. Operating Instructions
6.1 SafEye Operation
Once the system is positioned, it will monitor for possible specified gases,
automatically sending signals to a standard control panel or a PC.
This chapter describes the alignment, calibration and operation.
Important!
Accurate Alignment is essential for proper operation of the SafEye system.
6.2 Alignment of Unit (Figures 15 through 16) Using Swivel Mount
(See 6.3 for Alignment using Tilt mounts)
This section applies to open-path installation only. For duct mount applications
the alignment is performed according to section 5.5.5. Therefore, skip steps 1
through 10 when duct mount installation is performed.
The Telescope is used for full alignment. Alignment procedure should be
performed in two stages: Crude alignment then fine adjustment.
The Telescope includes a Periscope that consists of a prism and an ocular
located vertical to the Telescope assembly. This allows the user to observe the
opposite unit perpendicular to the alignment when access from the rear of the
unit is difficult/impossible. In installations where rear access is possible, the
Periscope is not necessary. In this case it can be removed by releasing the
Periscope Fastening Screw (item 5 at figure 16).
Important Notes
a. Prior to Telescope Installation, verify that the Telescope and Its
Sight Mounting are free from any dirt to ensure proper
alignment according to factory calibration.
b. Do not Attempt to change any factory calibration of the
Telescope or its mounting. This may prevent optimal alignment.
1. Make sure that the Detector and the Light Source are installed properly.
Installation instructions are described in section 5 of this document.
2. Refer to Figure 15. Slightly release four Protective Sight Covers’ screws
(Figure 15, item 6) from the Detector and the Light Source. Do not remove the
screws from the Covers. Remove the Protective Sight Covers (Figure 15, item
7) from the Detector/Light Source Assembly. Store the Cover in a clean place
for reinstallation after alignment is completed.
3. Refer to Figure 17. Install the Telescope Assembly (1) on the Telescope Sight
Mounting (2) of the Detector according to the drawing. Fasten the Telescope
with Fastening Screw (3).
43
Spectrex Inc. - SafEyeTM 300 Gas Detector
1
2
3
4
Manual – TM 794100, Rev. D, May 2004
Description
Magnetic Mode Selector
5 Horizontal Adjustment Screw
Detector Housing
6 Sight Cover Screw
Detector Cover
7 Protective Sight Cover
Vertical Adjustment Screw
8 Adjustment Screw Securing Nut
Figure 15. Alignment and Mode Selection
1
2
3
4
5
Description
Telescope Assembly
6
Light Source/Detector Housing
Sight Mounting
7
Socket Set Screws (3)
Telescope Fastening Screw
8
Vertical Adjustment Screw (2)
Periscope
9
Horizontal Adjustment Screw (2)
Periscope Fastening Screw
10 Adjustment Screw Securing Nut
Figure 16. SafEye Light Source/ Detector Alignment
44
Spectrex Inc. - SafEyeTM 300 Gas Detector
Manual – TM 794100, Rev. D, May 2004
4. Detector Crude Alignment:
Refer to Figure 16 for all the following instructions.
a. Use 3/16” Allen screwdriver to loosen up the 3 socket set screws (7).
b. Tilt the Light Source in the general direction of the Detector.
c. Rotate the Periscope (4) until its ocular is positioned in front of your
aiming eye for most convenient observation.
d. Observe through the Periscope (4) and locate the Detector in the
center of view of source unit.
e. Tighten three socket set screws (7) of the Detector’s Swivel Mount.
5. Release the Fastening Screw (3) and remove the Telescope from the
Detector.
6. Light Source Crude Alignment
Repeat Steps 3 through 4 for the Light Source.
7. Light Source Fine Adjustment:
a. Release the Adjustment Screw Securing Nuts (10) from all Adjustment
Screws (8,9) to enable fine alignment.
b. Watch through the Periscope (4). The cross midpoint inside the
Telescope Lens should be aimed to the opposite unit (Light Source)
such that it is observed in the Periscope.
c. Rotate the Vertical Adjustment Screws (8) and the Horizontal
Adjustment Screws (9). This should be performed until the cross
midpoint is combined with the center of the top of the Light Source
Telescope Sight Mounting (Figure 16, item 2).
d. Carefully secure the four Adjustment Screw Securing Nuts (10).
Release the Fastening Screw (3) and remove the Telescope (1) from
the unit.
8. Detector Fine Adjustment
Repeat Steps 3 and 7 for the Detector.
9. Repeat steps 3,7 and 8 if additional Adjustment is required.
10. Upon alignment completion perform the following:
a. Reinstall Protective Sight Covers on the Detector and the Light
Source by screwing four Sight Cover screws (Figure 16, item 6).
b. Return the Telescope to its Original case.
11. Power on the system according to section 6.4
12. Perform zero calibration according to section 6.6
13. Perform Signal Intensity Check (SIC) according to section 7.2.2
14. Perform Functional Check (FC) according to section 6.7
45
Spectrex Inc. - SafEyeTM 300 Gas Detector
Manual – TM 794100, Rev. D, May 2004
6.3 Alignment of Unit (Figure 7, 8) Using Tilt Mount
Using the Telescope performs full alignment.
Alignment procedure should be performed in two stages: Crude alignment then
fine adjustment.
The Telescope includes a Periscope that consists of a prism and an ocular
located vertical to the Telescope assembly. This allows the user to observe the
opposite unit perpendicular to the alignment when access from the rear of the
unit is impossible. For installations where rear access is possible, the Periscope
is not necessary. In this case it can be removed by releasing the Periscope
Fastening Screw.
Important Notes
a. Prior to Telescope Installation, verify that the Telescope and its Sight
Mounting are free from any dirt to ensure proper alignment according to
factory calibration.
b. Do not attempt to change any factory calibration at the Telescope or its
mounting. This may prevent optimal alignment.
Alignment procedure (refer to Figure 8):
1. Make sure that the Detector and the Light Source are installed properly.
Installation instructions are described in section 5 of this document.
2. Install the Telescope Assembly (9) on the Telescope Site Mounting of the
Source according to the drawing. Fasten the Telescope with Fastening Screw
(10).
3. Crude Alignment - Source
a. Use 1/4” Allen screwdriver for all alignment screws.
b. Loosen screws 5, 6.
c. Approximately aim the Source horizontally toward the Detector.
d. Tighten screw 5
e. Loosen screws 3, 4
f. Approximately aim the Source vertically toward the Detector
g. Tighten screw 3
4. Repeat 3 for the Detector
5. Fine Alignment- Source
a. Aim the source at the Detector within horizontal axis using screws 7.
Aim the cross to the upper level of the telescope site of the detector.
b. Tighten screw 6.
c. Aim within the vertical axis using screw 8.
d. Tighten screw 4
e. Make sure the telescope cross is pointing at the top of the telescope
site of the detector.
4. Repeat 5 for the Detector fine alignment.
46
Spectrex Inc. - SafEyeTM 300 Gas Detector
Manual – TM 794100, Rev. D, May 2004
6.4 Powering on the system
Important!
Prior to any operation or maintenance follow the Safety Precautions given at
section 6.5
1.
2.
3.
4.
Make sure that the source and detector are connected to the power.
Make sure that the 4-20mA meter is connected to the detector.
Power up the system 18-32VDC.
After 60 seconds, the left LED lights at green, the current meter will
indicate 4mA.
Note
If it is the first operation after installation, the LED may indicate any status. Zero
calibration should be performed after powering the system (see section 6.5).
6.5 Safety Precautions
After powering-up, the detector requires minimal attention in order to function
properly, but the following should be noted:
1. Follow the instructions in the manual and refer to the drawings and
specifications issued by the manufacturer.
2. Do not open the detector housing, while power is supplied.
3. Do not touch internal parts other than the two functional switches.
Interference with internal circuits may impair detector performance and will
invalidate manufacturers warranty.
4. Disconnect external devices, such as automatic extinguishing systems
before carrying out any maintenance task.
6.6 Zero Calibration
Precise alignment must be performed prior to the calibration procedure.
Calibration should be performed in nice weather conditions with insignificant gas
concentrations in the surrounding environment or indoors.
Note
To change modes, place the Magnetic Mode Selector (see Figure 15, item 1) on
the detector for 2 seconds and wait for the LED indication.
After mode change allow a time lapse of 5 seconds before changing mode again.
Standby mode is a temporary mode lasting about 20 seconds used to facilitate
Zero Calibration mode selection. If the mode selector is not placed during this 20
seconds period, the detector will be switched to Normal mode.
1. Switch from Normal to Alignment mode. See Table 2 for LED status
indication.
47
Spectrex Inc. - SafEyeTM 300 Gas Detector
Manual – TM 794100, Rev. D, May 2004
2. Switch from Alignment to Standby mode. The LEDs will flash alternately
with a green color.
3. Switch from Standby to Calibration mode. The LEDs will turn off.
4. Wait up to 60 seconds until it switches to Normal mode (right LED green)
The detector reading is now set to normal. The 4-20mA output should
indicate 4mA.
6.7 Functional Check of Unit
The SafEye system has been calibrated at the factory for the User's specific gas
or vapor detection requirements. The following procedure validates the functional
operation of the system. The Functional Check Filter is a convenient operational
check used to confirm that response has not changed from previous readings.
The filter is not used for calibration, which is unnecessary, nor does it equate to a
particular quantity of gas.
Caution:
Automatic activation or any external device that should not be
activated during the calibration check should be disconnected.
Notes:
1. This functional verification procedure is for a standard
4-20mA output.
2. Prior to starting the functional check, verify that the
power to the units is on and that the current of the 4 20mA channel is stable. Record the reading.
1. Position the Functional Check filter in front of the SafEye Detector.
2. The functional check filter's window must be centered over the viewing
window of the Detector.
3. Wait 20 seconds.
4. Read the 4-20mA current. Determine the difference between the reading
taken with and without the Functional Check Filter. This difference is the
4-20mA current variance.
5. Record the 4-20mA current variance in a Maintenance Logbook. If the
variance is more than a 30% change when compared to the previous
check (see delivery form), repeat the alignment.
48
Spectrex Inc. - SafEyeTM 300 Gas Detector
Manual – TM 794100, Rev. D, May 2004
7. Maintenance Instructions
7.1 General Maintenance
The SafEye system requires only simple periodic maintenance to provide
satisfactory service and achieve maximum performance. The Detector and
Source units can be maintained with the use of common tools and equipment.
Record the periodic test results in a Maintenance Logbook with a copy of the
delivery form inside.
Note
The maintenance can be performed through RS-485, for more details refer to
TM792050.
7.2 Periodic Maintenance
Recommended cleaning of optical surfaces to be performed periodically.
Note:
The frequency of cleaning operations is ultimately dependent upon
the existing environmental conditions and the applications used.
1 Proper maintenance will allow the SafEye system to retain maximum
performance and reliability.
2 The optical surfaces of the Source and Detector viewing windows should be
kept as clean as possible as it is an active device.
3 Alignment procedures must be performed each time that the Source or the
Detector unit has been opened or moved for any reason.
4 The Signal Verification Check corroborates the current signals from the Light
Source compared to that of previous alignments. It is recommended to
perform this check every 6-12 months. The signal should be checked
according to threshold levels (see. 7.2.2).
5 The functional check should be performed every 6 months (see 6.7)
6 Zero calibration (see 6.6) must be done every time the Detector or Source is
realigned or windows cleaned.
49
Spectrex Inc. - SafEyeTM 300 Gas Detector
Manual – TM 794100, Rev. D, May 2004
7.2.1 Routine Optical Surface Cleaning
The SafEye system, being an optical device, must be kept as clean as possible.
The optical surfaces concerned are the Source and Detector viewing windows.
To clean the optical window, proceed as follows:
1. Turn off the power to the SafEye detector and source.
2. Where dust or dirt has accumulated on the optical surface, clean the
surface with a small, soft-bristle brush.
3. The surfaces must then be washed thoroughly with water and a mild nonabrasive detergent.
4. Thoroughly rinse the glass surface with clean water; ensuring no residue
is left behind.
5. Dry the glass with a clean dry soft cloth.
6. Enter in the Maintenance Logbook: Date, name of person and company
who performed the maintenance service.
7. Turn on power to the SafEye detector and source.
8. Perform signal verification (section 7.2.2).
9. Perform zero calibration (see section 6.6).
10. Perform functional check (see section 6.7)
7.2.2 Signal Verification
The Signal Intensity Check determines if there is a misalignment or if the Light
Source signal is wearing over a period of time. Clean the optical surfaces prior to
performing this check (see 7.2.1). This procedure should be performed in clear
weather.
1. Enter Alignment Mode by placing the mode selector on the side of the
detector for 2 seconds.
2. Within the first 20 seconds the Detector indicates 3 different indication
levels. See Table 1
3. Wait 20 seconds and count the number of LED flashes with the color, and
adjust the value (see Table 18).
4. Record the new results in the maintenance log book.
5. Determine the absolute variance compared with the previous alignment
reading in the maintenance logbook.
6. If the variance is more than 30%, perform alignment (see section 6) and
zero calibration (see section 6.6). Call a technician for service if the SIC is
less than 66 with both LED’s flash in red color.
Table 18. LED Signal Adjustment
Color (left-right)
Number to be
added
Red-Red
0
Orange-Orange
62
Green-Orange
124
Green-Green
186
50
Spectrex Inc. - SafEyeTM 300 Gas Detector
Manual – TM 794100, Rev. D, May 2004
Example:
At a hypothetical installation the LEDs are Green-Orange with 3 green flashes
(left LED) and 6 orange flashes (right LED).
The number is 36 + 124 = 160
The next periodic maintenance reading has Orange-Orange LEDs with 8 orange
blinks (left LED) and 8 orange flashes (right LED).
The number is 88 + 62 = 150
The variance is 160-150 = 10 Units
The percentage of variance will be (10/160)*100 = 6.25% less then previous
alignment.
7.2.3 Function Check of Unit
The SafEye system has been calibrated at the factory per the user’s specific gas
or vapor detection requirements. This procedure validates the functional
operation. The functional check must be done periodically. Refer to 6.7 for
instructions.
Caution:
Automatic activation or any external device that should not be activated
during the calibration check should be disconnected.
7.2.4 Maintenance Records
Record every maintenance operation performed on the Source and/or Detector in
a Maintenance Log-book. The logs should include but not be restricted to the
following:
•
•
•
•
•
The information identifying the measurement units.
The date of installation and contractor.
Entries for every maintenance operation performed to include at least the
description of the operation, date and personnel ID.
Signal intensity records with SIC results.
Calibration check (CC) results.
If the unit(s) is (are) sent to the authorized Supplier, a copy of the Maintenance
Records must accompany the unit concerned.
51
Spectrex Inc. - SafEyeTM 300 Gas Detector
Manual – TM 794100, Rev. D, May 2004
8. Troubleshooting
Problem
LEDs are off and Fault is
indicated at 0 mA level
Both LEDs are on at
yellow and fault is
indicated at 0mA level
Both LEDs are flashing at
yellow and fault is
indicated at 0mA level
One LED is on at yellow
and 4-20mA indication
level is 2mA
Cause
Power is not supplied to
the Detector
Fault 2
Solution
Supply power to the
Detector
Bring the detector unit for
service.
Low voltage is supplied
to the detector
Check the voltage level
supplied to the detector
Dirt has accumulated on
the detector's window or
on the Light Source's
window
One unit at least has
been moved or tilted
Power is not supplied to
the Light Source
The optical open path
beam is blocked
One unit at least has
been moved or tilted
Electrical problem at the
Light Source
Clean the optical
windows (See Section
7.2.1).
Perform Realignment
(See section 6)
Supply power to the Light
Source
Remove the obstruction
Perform Realignment
(See section 6)
Perform SIC in order to
measure signal intensity
Bring the Light Source to
a technician for service if
it is not flashing
52
Spectrex Inc. - SafEyeTM 300 Gas Detector
Manual – TM 794100, Rev. D, May 2004
Appendix A - Wire Selection Tables
General Instructions For Electrical Wiring
1. mA output or relay wiring - refer to Table 20 to determine the required wire
gauge for general wiring Calculate the permitted voltage fall with respect
to loads current, wire gauge and length of wires.
2. Power supply wires - refer to Table 21 to select wire gauge. DO NOT
connect any circuit or load to Detectors’ supply inputs.
Table 19. Maximum DC resistance at 68°F for copper wire
AWG # mm2
Ohm per 100 ft.
Ohm/100
meter
26
0.12 - 0.15
4.32
14.15
24
0.16 - 0.24
3.42
11.22
22
0.30 - 0.38
1.71
5.60
20
0.51 - 0.61
1.07
3.50
18
0.81 - 0.96
0.67
2.20
16
1.22 - 1.43
0.43
1.40
14
1.94 - 2.28
0.27
0.88
12
3.09 - 3.40
0.17
0.55
10
4.56 - 6.64
0.11
0.35
1. Select "Number of Detectors" connected in one circuit.
2. Select "wiring length" per your installation requirements.
3. Refer to "power supply range" for voltage extreme applied.
No. of
Detectors
24
Table 20. Wiring length in feet (meter)
Recommended Wire Diameter
18
16
14
-
-
Power Supply
Range (VDC)
22-32
20
18
16
14
-
-
22-32
16
20
18
16
14
-
22-32
12
20
18
16
14
-
20-32
8
20
18
16
14
-
20-32
20
18
16
16
14
20-32
4 and less
Feet
(Meters)
164
328
492
656
820
(50)
(100)
(150)
(200)
(250)
Max. Length from Power Supply to Last
Detector
53
Spectrex Inc. - SafEyeTM 300 Gas Detector
Manual – TM 794100, Rev. D, May 2004
54
Spectrex Inc. - SafEyeTM 300 Gas Detector
Manual – TM 794100, Rev. D, May 2004
Appendix B: Wiring Option configurations
Figure 17. Detector’s Wiring Diagram
55
Spectrex Inc. - SafEyeTM 300 Gas Detector
Manual – TM 794100, Rev. D, May 2004
Figure 18. 4-20mA Source Output
Figure 19. Typical 4 Wire Controller
56
Spectrex Inc. - SafEyeTM 300 Gas Detector
Manual – TM 794100, Rev. D, May 2004
RS-485 Communication Network
By using the RS-485 network capability of the SafEye Detector and additional
software, it is possible to connect up to 32 Detectors in an addressable system
with four (4) wires only (2 for power and 2 for communication). Using repeaters,
the number of Detectors can be much larger (32 Detectors for each repeater) up
to 64 on the same four (4) wires. When using the RS-485 network, it is possible
to read each Detector status (FAULT, WARNING, and ALARM).
For more details, consult the factory.
Figure 20. RS-485 Networking
57
Spectrex Inc. - SafEyeTM 300 Gas Detector
Manual – TM 794100, Rev. D, May 2004
58
Spectrex Inc. - SafEyeTM 300 Gas Detector
Manual – TM 794100, Rev. D, May 2004
Appendix C: Outline Drawing
Figure 21. Detector Outline Drawing With Swivel Mount
59
Spectrex Inc. - SafEyeTM 300 Gas Detector
Manual – TM 794100, Rev. D, May 2004
Figure 22. Source Outline Drawing (Reflector Type) With Swivel Mount
60
Spectrex Inc. - SafEyeTM 300 Gas Detector
Manual – TM 794100, Rev. D, May 2004
Figure 23. Detector and Tilt Mount Outline Drawing
61
Spectrex Inc. - SafEyeTM 300 Gas Detector
Manual – TM 794100, Rev. D, May 2004
Figure 24. Source and Tilt Mount Outline Drawing
62
Spectrex Inc. - SafEyeTM 300 Gas Detector
Manual – TM 794100, Rev. D, May 2004
Appendix D - Mounting the “EExde approved”
version
The EExde approved version provides an additional EExe terminal box attached
below the EExd detector and therefore allows easier access in hazardous areas
(see fig. 25). The unit is prewired to the terminals in the additional EExe terminal
section ready for field wiring connections
1. Detector/Source Mounting
The detector should be mounted by one of the following options:
a. Swivel mount refers to paragraph 5.4.1.
b. Tilt mount refers to paragraph 5.4.3.
c. Duct mount refers to paragraph 5.5.
1.1
Installation
All the installation instructions are the same as defined in Paragraph 5.4.1, 5.4.3
and 5.5.
a. On swivel mount option there are two options of detector/source install on the
swivel mount.
You can use the thread on the de cover marked either Triangle Symbol or
a Square Symbol (Figure 25).
b. On tilt mount option you must use the Triangle Symbol.
c. On duct mount the detector is installed from the front of the detector.
2. W IRING (REFER TO FIG. 25.)
1 Disconnect power.
2 Release the four (4) slotted-head screws (item 3) that secure the chamber
cover (Item 2). The chamber is now revealed.
3 Remove the protective plug mounted on the detector conduit inlet, pull the
wires through the detector chamber (Item 7). Use M25x1.5 explosion-proof
conduit connection to assemble the conduit to the detector.
4 Connect the wires to the required terminals (Item 4) according to the wiring
diagram. See paragraph 2.1 and figures no. 26 and no. 27.
5 Connect the grounding wire to the ground screw outside the detector cover
(Item 5).
The detector must be well grounded to Earth Ground for proper
operation.
6 Verify the wiring. Improper wiring may damage the detector.
7 Check the wires for secure mechanical connection and press them neatly
against the terminal to prevent them from interfering while closing the cover
(Item 2).
8 Place and secure the cover chamber (Item 2) using four (4) slotted-head
screws (Item 3).
63
Spectrex Inc. - SafEyeTM 300 Gas Detector
Manual – TM 794100, Rev. D, May 2004
Description
1. Modified Back Cover
2. EExe Chamber Cover
3. Slotted Screw
4. Terminal Block
5. Ground Terminal
6. Mounting Thread
7. EExe Chamber
8. Conduit Inlet
Figure 25: Flame Detector Assembly - Wiring Diagram
64
Spectrex Inc. - SafEyeTM 300 Gas Detector
Manual – TM 794100, Rev. D, May 2004
2.1 Terminal Wiring
Each detector and source unit has a separate EExe terminal box directly
attached/assembled to it and prewired to the terminal strip in the EExe box (Item
4). There are two possible wiring options – please follow the wiring scheme
below which is appropriate to that ordered:
The terminal block is labeled 1 to 6 (See Fig. No.25)
The following describes the function of each electrical terminal of the detector:
RS-485 & 4-20mA Version
Option A (See Fig. No. 26)
Power Supply
(Terminal Numbers 1, 2):
Alarm & Fault Relays Version
Option B (See Fig. No. 27)
Power Supply
(Terminal Numbers 1, 2):
Input power - Terminal No. 1.
RETURN - Terminal No. 2.
RS-485 as specified in appendix C.
Input power - Terminal No. 1.
RETURN - Terminal No. 2.
Alarm Relay (Terminal Numbers 3, 4):
The Alarm output is a NO. SPST
contact at Terminal Numbers 3 and 4.
The contacts are closed at Alarm
Mode.
Fault Relay (Terminal Numbers 5, 6):
The Fault output is N.C. SPST contact
at Terminal Numbers 5 and 6. The
contacts are open at Fault condition.
(Terminal Numbers 3, 4):
Terminal No. 3 - positive (+) lead.
Terminal No. 4 - negative (-) lead.
4-20mA Output (Terminal Numbers 5,
6): as specified in paragraph 5.e
Terminal No. 5 - output Terminal.
Terminal No. 6 - input Terminal.
(see appendix B for more details)
Figure 26: OPTION A
Detector Assembly - Wiring Diagram
Figure 27: OPTION B
Detector Assembly - Wiring Diagram
65
Spectrex Inc. - SafEyeTM 300 Gas Detector
Manual – TM 794100, Rev. D, May 2004
For additional details or assistance, please contact
218 Little Falls Road
Cedar Grove, NJ 07009, USA
Tel: +1 (973) 239-8398
Fax: +1 (973) 239-7614
Email: [email protected]
Web-site: www.spectrex-inc.com
Your Local Authorized Distributor:
66