1
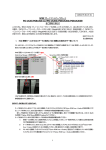
P3FY-A050-01
SCSI アレイコントローラカード GP5-147 ご使用前に
この度は、弊社のSCSIアレイコントローラカードをお買い求めいただきまして、まことにありがとうござい
ます。本書は、本製品に添付されている「SCSIアレイコントローラカード GP5-147/148(eXtremeRAID
2000/AcceleRAID352)取扱説明書」の記述を補足しております。本製品をご利用になる前に必ずお読
みください。
2001 年 10 月 富士通株式会社
1 制限事項
1.1
メモリの搭載制限について
本製品に接続されたハードディスクに OS をインストールする場合(本製品から OS をブートする場
合)、サーバ本体に搭載できるメモリ容量は最大 4GByte となります。
2 留意事項
2.1
Intelligent BBU 機能について(GAM)
機能について
GAM の Administration メニューから Intelligent BBU 機能を選択した際に、以下のようなエラーが
出ることがあります。
Get BBU Status Command error failed code : fffffffe
Error returned by firmware error code : 0x2
これらのエラーが表示された場合は、エラーウィンドウを閉じた後、一旦「Intelligent Battery Backup
Unit」ウィンドウを閉じてからもう一度同機能(Intelligent BBU)を実行してください。
2.2
容量拡張について(EzAssist/GAM)
容量拡張について
EzAssist にてフィジカルパックの容量拡張(Add Capacity to Existing Disk Array)を実行するにあた
って、追加するハードディスクを選択した後に図 2-1の画面が表示されることがあります。
図2-1
図 2-1は追加可能なハードディスクがまだ余っていることを示していますが、ここでは必ず「No」を選
択してください。「Yes」を選択してさらにディスクを追加した場合、容量拡張処理が実行されないこ
とがあります。
1/15
また、EzAssit / GAM で容量拡張を行う際、容量拡張時に同時にロジカルドライブの作成を行わな
いでください。容量拡張時にロジカルドライブの作成を行うと、正しく作成されない場合があります。
ロジカルドライブの追加は、容量拡張終了後に GAM を使用して行ってください。ロジカルドライブ
の追加の方法については、取扱説明書の「6.4.3 RAID Assist」を参照してください。
2.3
ローレベルフォーマットについて(EzAssist)
ローレベルフォーマットについて
EzAssist でハードディスクをローレベルフォーマットする場合、ハードディスクのフォーマット実行中
には、同じコントローラに接続されたハードディスクに対するフォーマット以外の操作は行わないで
ください。特にコントローラの切り替えやデバイスのリスキャンなどの操作は行わないでください。
特にコントローラの切り替えやデバイスのリスキャンなどの操作は行わないでください。
ハードディスクのフォーマットに失敗することがあります。必ずハードディスクのアクセス LED により
フォーマットが終了したことを確認してから、他のの操作を行ってください。万一、フォーマットに失
敗した場合は、EzAssist を終了してサーバを再起動してから、再度フォーマットを行ってください。
2.4
Intel® LANDesk® Server Manager(LDSM)を使用する際
を使用する際の注意事項
を使用する際の注意事項
本製品に添付されている「Mylex RAID 監視機能追加ディスク」は GP5-148 用となっていますが、
本製品(GP5-147)でも問題なく使用できます。「Mylex RAID 監視機能追加ディスク」のインストール
手順については、添付の「Mylex RAID 監視機能追加ディスクをお使いになる前に」を参照してく
ださい。
2.5
ServerWizard を使用する際の注意事項
ServerWizard を用いた本製品への OS インストールは、ServerWizard V2.0L34 以降でサポートして
います。それ以前の ServerWizard を用いて本製品への OS インストールを行うことは出来ません。
2/15
3 正誤表
取扱説明書本文に誤りがございましたので、ここに謹んでお詫び申し上げますとともに、下記の通
り訂正させていただきます。
1.
取扱説明書ページ 3-7 の表 3-2 「アレイカード・プロパティ一覧」のデフォルト設定値は以下
の表のようになります。
表 3-2 アレイカード・プロパティ一覧
プロパディ
Global
パラメータ
Automatic Rebuild Management
StorageWorks Fault Management
Background Process Rate (%)
Drive Size Coercion
Disk Spin Up
Number of Disk Drives per Spin
Startup
Initial Delay (seconds)
Delay Between Spins (seconds)
Patrol Read
Patrol Read Delay (hours)
Temporary Offline
Advanced
Device Health Monitoring
(S.M.A.R.T)
S.M.A.R.T Polling Interval
(minutes)
Bus Speed (MHz)
Physical Drive
Tag Queuing
SCSI Properties
Bus Width
3/15
デフォルトの設定
GP5-147: Enabled
GP5-148: Disabled
Disabled
50
GP5-147: Enabled
GP5-148: Disabled
On Command
2
5
6
Disabled
0
Disabled
Disabled
0
80
16
16
2.
取扱説明書ページ 6-12 の表 6-1 の GAM のデフォルト設定は以下の表の設定が正しい設
定となります。
表 6-1
オプションの種類
Global Parameters
パラメータ
Enable Automatic Rebuild Management
Rebuild Rate
Cache Line Size (KB)
Disk Spin-up
Device Per Spins
Initial Delay
Delay Between Spins
Enable Clustering
Controller Host ID
Enable
デフォルト設定
GP5-147: Enabled
GP5-148: Disabled
Enabled
GP5-147: Enabled
GP5-148: Disabled
50
8
On Command
2
5
6
Disabled
7
Disabled
Enable Polling
Polling Interval
Disabled
0
Start Automatically on Start Up
Delay between Iterations
Disabled
0
Enable Background Initialization
Enable Auto Drive Sizing
Startup Parameters
Clustering Parameters
Temporarily Offline
RAID Array
Device Health
Monitoring
(S.M.A.R.T/I.E.C)
Patrol Read
Microsoft、Windows、Windows NT は米国 Microsoft Corporation の米国
及びその他の国における登録商標です。
RAID EzAssist、Global Array Manager は、米国 Mylex 社の商標です。
4/15
Additional Notes on Use of
RAID Card GP5-147 (eXtremeRAID 2000)
Thank you for your purchase of the Fujitsu RAID Card. This document provides additional
explanations for the User Guide that is supplied with this product. Read this document
before you start using this product.
October 2001, Fujitsu Limited
1 Checking the Contents of the Package
Check that the following items are included in the package before using this product. If any item is
missing contact a Fujitsu sales person.
RAID Card
Floppy Disks (4disks)
”GP5-147/148 Windows 2000 Drivers Disk”
”GP5-147/148 Windows NT Drivers Disk”
”Additional Disk for RAID Card GP5-148 Disk1”
”Additional Disk for RAID Card GP5-148 Disk2”
CDCD-ROM (2discs)
”GP5-147/148 Global Array Manager (GAM)”
”RAID Card GP5-147/PG-143B/144B User Guide”
User Guide (Japanese)
2 Features of RAID Card
The specifications of this product are as follows.
Table 2-1 Specifications
Type
Channel
GP5-147
4
BBU
*1
Cache
Present 128MB
Supported
RAID Level
RAID
0,1,5,0+1(6)
*2*3
Supported OS
Windows NT
Windows 2000
*1: BBU is for the backup of cache data.
*2: TCP/IP is essential for all supported operating systems.
*3: Please apply the latest Service Pack with each operating system.
The following tables give the default settings for BIOS, EzAssist and GAM. Always use this product
with the following settings.
Table 2-2 BIOS Setting
Default Setting
BIOS enabled
CD-ROM boot disabled
8GB drive geometry
5/15
Table 2-3 Controller Properties (EzAssist)
Properties
Global
Startup
Advanced
Physical Drive
SCSI Properties
Parameters
Automatic Rebuild Management
StorageWorks Fault Management
Background Process Rate (%)
Drive Size Coercion
Disk Spin Up
Number of Disk Drives per Spin
Initial Delay (seconds)
Delay Between Spins (seconds)
Patrol Read:
Patrol Read Delay(hours)
Temporary Offline
Device Health Monitoring(S.M.A.R.T)
S.M.A.R.T Polling Interval(minutes)
Bus Speed (MHz)
Tag Queuing
Bus Width
Default Settings
Enabled
Disabled
50
Enabled
On Command
2
5
6
Disabled
0
Disabled
Disabled
0
80
16
16
Table 2-4 Controller Options (GAM)
Kinds of
Parameters
Global
Parameters
Startup
Parameters
Clustering
Parameters
Temporarily
Offline
RAID Array
Device Health
Monitoring
(S.M.A.R.T/I.E.C)
Patrol Read
❢
Enable Automatic Rebuild Management
Enable Background Initialization
Enable Auto Drive Sizing
Rebuild Rate
Cache Line Size (KB)
Disk Spin-up
Device per Spins
Initial Delay
Delay Between Spins
Enable Clustering
Controller Host ID
Enable
Default
Settings
Enable
Enable
Enable
50
8
On Command
2
5
6
Disable
7
Disable
Enable Polling
Polling Interval
Disable
0
Start Automatically on Start Up
Delay between Iterations
Disable
0
Parameters
EXCEPTION : Depending on the system you are using, the setting pattern may
differ from those in the tables. If so, follow the instructions on your system.
6/15
3 Installation of BDIMM
Before using this product it is necessary to install a BDIMM (Battery Dual Inline Memory Module)
to this product. This section explains the procedure by which BDIMM is installed on the RAID card.
The method of installing BDIMM is roughly divided into the following two steps.
Connect the battery plug with the socket of BDIMM.
Install BDIMM on the RAID card.
3.1
1.
How to install
Turn BDIMM inside out. Confirm the location of the battery, the 14-pin connector,
the standoff posts, the red and black lead wires, the socket, and the battery plug.
Socket
Battery Plug
Standoff posts
Battery
14pin-Connector
Lead Wires
Standoff post
Figure 3-1
2.
Insert the battery plug in the socket. Arrange the lead wires of the battery along
the side of the battery. (See Figure 3-2)
Figure 3-2
❢
3.
If the lead wires are out of place, they may be cut or shorted out when the
14-pin connector is connected to the controller.
Remove the screw from three standoff posts. Don’t detach the standoff posts from
the board of BDIMM.
7/15
Figure 3-3
4.
Align both bottom corners of the BDIMM card into the memory ejector sockets. See
Figure 3-4 for an enlargement of the left bottom corner.
Figure 3-4
At the same time confirm that the position of the 14-pin connector matches up.
Insert the board of BDIMM in the memroy slot of the RAID card firmly.
❢
Insert BDIMM board until the lever at both ends of the memory slot shut.
(See Figure 3-5)
Figure 3-5
8/15
5.
Turn the RAID card inside out. Attach and tighten the three screws of the figure
below, and fix BDIMM board firmly.
Attach and tighten the three screws.
Figure 3-6
Installing BDIMM is completion.
4 User Guide CD-ROM
The documents contained in this CD-ROM are as follows:
Table 4-1 Contents of CD-ROM
Filename
ER2000.pdf
Ezassist.pdf
Gamcpci.pdf
Gamsrvr.pdf
PCIDrvr.pdf
Document’s Title
Installation Guide
RAID EzAssistTM Configuration Utility
User Reference Guide
Global Array ManagerTM Client Software for Mylex PCI
Disk Array Controllers with Workstation Array
ManagerTM
Installation Guide and User Manual
Global Array ManagerTM Server Software
Installation Guide and User Manual
PCI Disk Array Controller Drivers Installation Guide and
User Manual
eXtremeRAIDTM
For Driver Installation instructions, refer to PCIDrvr.pdf.
For Hardware Installation instructions, refer to ER2000.pdf.
When using GAM refer to Gamcpci.pdf, Gamsrvr.pdf.
For EzAssist , refer to Ezassist.pdf
9/15
5 Restriction
5.1
Restriction of memory
If installing OS in hard disk attached with this product (when OS is booted from this product), the
maximum memory capacity that can load it to the server is 4GByte. In this case, don't install
memory more than 4GByte in a server.
6 Attentions
Take note of the following attentions when handling this product.
6.1
Regarding Intelligent BBU function (GAM)
Following errors may appear rarely when you execute “Intelligent BBU” function from
“Administration” menu.
Get BBU Status Command error failed code : fffffffe
Error returned by firmware error code : 0x2
Close error windows and “Intelligent Battery Backup Unit” window if you see this messages. After
that, execute “Intelligent BBU” function again.
6.2
About “Add Capacity” (EzAssist / GAM)
When using “Add Capacity to Existing Disk Array” of EzAssist, the notice window(Figure 6-1) may
be shown after the hard disks is selected.
Figure 6-1
Select [No] always. Add capacity process may not run, if selecting [Yes] and adding the hard drives.
Furthermore, with EzAssist or GAM, do not add any logical drives when you are going to perform
Expand Array. Select “Apply” with adding no logical drives. If any logical dries are added, those
logical drives may not be correctly created. Add new logical drives after Expand Array has been
finished.
10/15
6.3
About formating hard disk (EzAssist)
When formating hard disk with EzAssist, don’t do operation except a format for hard disks
connected to a current controller during format. Don’t do operation of changing target RAID card
and Rescaning for new devices especially. A format may be failed. Don’t do another operation
until confirming that a format was completed by LED of hard disks. Confirm a completion of format
by LED of hard disks. If a format was failed in, format it again after rebooting the server.
6.4
Notice before using Intel® LANDesk® Server Manager(LDSM)
“Additional Disk for RAID Card GP5-148” is usable in GP5-147. Concerning how to install
“Additional Disk for RAID Card GP5-148”, refer to “README.1ST Additional Disks for RAID
Card GP5-148”.
6.5
Notice about ServerWizard
Installing OS into a logical drive of this product by ServerWizard is supported by ServerWizard
V2.0L34 or later. ServerWizard before V2.0L34 can not install OS to this product.
11/15
7 Precautions
Take note of the following precautions when handling this product.
7.1
Installing this product in the server
WARNING
Before installing this product in the server, be sure not only to turn off the server and all
other devices connected with it, but for safety unplug their power cords from the AC
outlets. If this product is installed with the server and connected devices turned on, it may
cause malfunction, fire, electric shock, etc.
CAUTION
While the server is operating, the temperature of this product is extremely high. When
removing this product from the server, wait for quite a while, after turning off server, before
touching this product.
✔ Don’t connect this product with any device (CD-ROM drive, MO drive, DAT
drive, etc.) other than hard disks.
✔ Don’t connect any hard disks to this product other than those specified for the
server
✔ Don’t connect any SCSI cable except the specified cable for this product.
✔ If an internal/external SCSI connector is used, don’t use the external/internal
connector of the same channel.
✔ Don’t connect this product with hard disks which have the same capacity but
different rotational speed.
✔ Pre-used hard disk drives may contain unnecessary partition table data or
RAID configuration data. This data may cause unexpected problems. Please
execute a low level format of the drives prior to connecting them physically to
this product.
7.2
Precaution about using this product
✔ For the IRQ(interrupt level) of this product, refer to the instructions provided
with the server. If nothing is specified with the server, avoid IRQ sharing with
another card.
✔ When connecting a hard disk that was previously used in a disk array to a
general SCSI adapter, always perform a low level reformat before it is used
with the SCSI adapter.
✔ While the server is turned on, don’t remove any hard disks except for replacing
a failed hard disk with another (hot-swap).
✔ When turning on the server again immediately after turning it off, wait for 10
seconds or more to avoid reset problems.
✔ This product does not support clustering.
✔ Don’t use RAID Level 3 and JBOD. These RAID Level is not supported.
✔ This product supports up to 8 logical drives.
7.3
Precautions concerning EzAssist
✔ Don’t put a bootable CD-ROM in the CD-ROM drive of the server when
12/15
✔
✔
✔
✔
✔
✔
✔
✔
✔
✔
✔
✔
✔
✔
✔
✔
7.4
executing EzAssist. If a bootable CD-ROM is present it is possible that
EzAssist will not activate.
Don’t use “Automatic Configuration” and “Assisted Configuration” features.
These features are not supported. Please use “Custom Configuration” to
configure disk arrays.
If changing configuration using “Custom Configuration” feature. Be sure to
backup the current configuration before connecting the hard disks.
Hard disks comprising a physical pack should be the same model, with the
same storage capacity and rotational speed.
The spare disk must also be the same model, with the same capacity and
rotational speed as other hard disks comprising the physical pack.
Don’t set different RAID levels for logical drives in the same physical pack.
Don’t initialize more than one logical drive simultaneously using the “Initialize
Drive” function.
Always set “Stripe Size” to 64KB in the logical drive definition.
Always set “Spanning” function of “Custom Configuration” feature to disabled.
Always set “Read Cache” in Device Configuration to Enabled.
Always set “Write Cache” in Device Configuration to Disabled.
Don’t use “Update Flash Code” feature unless otherwise stated.
Be sure to use flash data provided by Fujitsu, if required.
Don’t use “Restore Configuration” and “Clear Configuration” features except
when instructed by your Fujitsu service engineer. If these features are used,
current configuration and data are erased.
Don’t use “Make Drive Offline” and “Make Drive Online” features except when
instructed by your Fujitsu service engineer. If these features are used, the data
may become unreliable.
When using “Check Consistency” function, usually select “No” when the
message “Repair Inconsistent data?” is shown. If “Yes” is selected, then the
redundant data part (parity data or mirror data) will be restored to make it
consistent. But the data part being used by the operating system is not
changed.
When a consistency error is detected in “Check Consistency”, do as follows.
If a consistency error occurs in “Check Consistency” after using “Make Drive
Online” or “Restore Configuration” the data in the logical drive concerned may
be corrupted. It will be necessary to re-initialize the logical drive and re-install
the correct data.
If a consistency error occurs when running a “Check Consistency” for a regular
check run “Check Consistency” again selecting “Yes” when the message “Repair
Inconsistent data?” is shown. After this consistency error is detected you should
rerun “Check Consistency” again by selecting “No” following the message
“Repair Inconsistent data?” to confirm that consistency is now OK.
Precautions when installing Windows NT
✔ Apply the latest service pack for Windows NT.
✔ You will not be able to perform correct installation of Windows NT if your
system environment contains one of the following:
There is more than one logical drive.
The first logical drive (#0) has capacity of more than 1024MB.
The system drive is not partitioned.
In that case create an 8MB MS-DOS partition on the logical drive onto which you
wish to install Windows NT. When setting up partitions during Windows NT
installation, delete the DOS partition created earlier, and instead create a new
13/15
partition for Windows NT.
If you are running initialization in the background, do not turn off the system’s
power just after setting up the MS-DOS partition on the screen. Wait a few
minutes.
✔ If you intend to perform background initialization without using EzAssist, do
not turn off the system’s power when the system is rebooting during Windows
NT installation. Instead execute a reset as instructed by Windows NT to reboot
the system.
✔ Before driver installation, be sure to configure disk arrays using EzAssist.
7.5
Precaution about GAM
✔ Do not interrupt the “Expand Array” process, or you will lose data.
✔ Don’t use the “Open Configuration” and “Clear Configuration” features unless
instructed to do so by a Fujitsu service engineer. If these features are used,
current configuration and data are erased.
✔ The “Enclosure Information” in Administration menu is not supported. This
function cannot be used to monitor the enclosure.
✔ “Settings” in Administration menu is not supported. Don’t use this function.
✔ Don’t use “Automatic Configuration” and “Assisted Configuration” features.
These features are not supported. Please use “Manual Configuration” to
configure disk arrays.
✔ Hard disks comprising a physical pack should be the same model, with the
same storage capacity and rotational speed.
✔ The spare disk must also be the same model, with the same storage capacity
and rotational speed as the other hard disks in the physical pack.
✔ Don’t set different RAID levels for logical drives in the same physical pack.
✔ Don’t initialize more than one logical drive simultaneously.
✔ Always set “Stripe Size” to 64KB in logical drive definition.
✔ Always set “Cache Size” to 8KB in logical drive definition.
✔ Don’t use the logical drive during initialization if you use “Initialize Logical
Drives” feature in Administration menu.
✔ Don’t use “Make Offline” and “Make Online” features except when instructed by
your Fujitsu service engineer. If these features are used, data may become
corrupted.
✔ This product doesn’t support “Statistic View” in View menu.
✔ This product doesn’t support “Performance Analysis” in Administration menu.
✔ The “Current Power” and “Maximum Power” values shown in “Intelligent
Battery Backup Unit” window is only an approximate value. The values may
differ from actual time due to battery degradation.
✔ When using “Consistency Check” function, usually select “No” when the
message “Restore consistency if …” is shown. If “Yes” is selected, then the
redundant data part (parity data or mirror data) will be restored to make it
consistent. But the data part being used by the operating system is not
changed.
✔ When a consistency error is detected in “Consistency Check”, do as follows.
If a consistency error occurs in “Consistency Check” after using “Make Online”
or “Restore Configuration” the data in the logical drive concerned may be
corrupted. It will be necessary to re-initialize the logical drive and re-install the
correct data.
If a consistency error occurs when running a “Consistency Check” for a regular
check run “Consistency Check” again selecting “Yes” when the message “Restore
consistency if …” is shown. After this consistency error is detected you should
14/15
rerun “Consistency Check” again by selecting “No” following the message
“Restore consistency if …” to confirm that consistency is now OK.
7.6
Battery Precautions
✔ Battery life deteriorates with time. It will need to be replaced about every one
and a half years..
✔ A new battery can hold cache data for 60 hours, but this storage capability will
shorten over time.
✔ Be sure to replace the battery to a schedule.
✔ Battery replacement is at the customers cost.
✔ The battery is recyclable. At the end of its useful life, ensure that you adhere to
your local state and local laws, when disposing of this item. It may be illegal to
dispose of this battery into the normal municipal waste system. Check with
your local solid waste officials for details in your area for recycling options or
proper disposal.
“Microsoft”, “Windows” and “Windows NT” are registered
trademarks of Microsoft Corporation, U.S.A. in the United States
and other countries.
“RAID EzAssist” and “Global Array Manager” are trademark of
Mylex Corporation, U.S.A.
15/15