1
Page 2 of 4
WARNING: Failure to snap back and seat frames together may cause injury.
Operation of the Tray
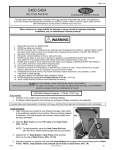
5. Slide the Tray Arms into the Tray Receiving Tubes; Located under bottom edge of the Upholstered
Armrests (see photo for location – next page).
6. When the Tray is pushed into position for use, the Tray will automatically lock into the first position, depress
the Latch Button and continue for 2 more positions - closer to the user.
7. The Right Tray Arm is movable to compensate for minor variations in the width of the chair.
8. Storing the Tray; Insert the left tray arm tube into the right tray receiving tube and the Latch Button will lock it
into place. Allow the right side of the table to hang down vertically on the right side of chair (Left & Right; as if
you are seated in chair).
Operation of the Chair
9. NON-RESTRAINT: To make the chair permanently non-restraint, remove the Snap Button of the Right Tray
Arm, and unbolt the Position Lock Bar from the back of the chair.
10. POSITION LOCK: Attendant may hold the chair in a reclined position by engaging the Position Lock. To
safely accomplish this, recline the chair to the 2nd or 3rd recline position and lower the position lock with your
hand until the notches on the Position Lock bars engage with the Position Lock Pins.
To release Position Lock, raise the Position Lock off of the Pins and return chair to upright position.
WARNING: Attendant must release Position Lock before patient can exit chair – If patient attempts to
exit chair with Position Lock engaged, SERIOUS INJURY MAY RESULT.
WARNING: Failure to release the Position Lock before changing positions will result in damage to the
chair and void the warranty.
11. To ensure proper operation of the reclining mechanism, lubricate all pivot points with a silicone lubricant
(approved by your facility) at least twice yearly.
Wrinkles in Vinyl – Storage and shipping can cause wrinkles of the vinyl on your Winco chair. This is normal.
Please allow 1-2 weeks at room temperature (approx. 70 degrees) to allow for vinyl to expand back to original
appearance.
Periodically recheck tightness of all screws and bolts, and never use the chair arms, backrest, legrest or
tray as a seat or the tray as a restraint.
Operating Instructions for OPTIONS available for your recliner:
*Lateral Supports (LS option only)
1. Use Phillips screwdriver to loosen the upper Back Frame screw (do not remove).
2. Position the T-slot on Lateral Support Bracket around the screw between Back
Frame and Upholstered Back.
3. Be sure that screw is seated completely in T-slot and Lateral Support drops down
into T-slot.
4. Re-tighten the upper Back Frame screw. (REPEAT FOR BOTH SIDES)
Visit our website www.wincomfg.com/product-documents/parts-lists for a complete parts list catalog of your
chair or call Customer Service @ 1-800-237-3377 to request it by mail.
006095
Rev P Date 11-08-11
JWC