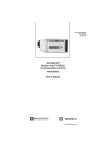
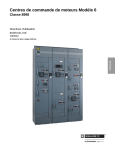
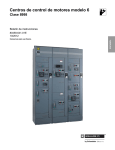
1
Instruction Bulletin
80442-507-01A
February 1998
ALTIVAR™ Drive Controller Units
In Class 8998 Motor Control Centers
Installation and Maintenance Manual
50–350 HP Constant Torque
50–75 HP Variable Torque Low Noise
60–400 HP Variable Torque
SQUARE D,
, and ALTIVAR are Registered Trademarks of Square D Company.
© 1997 Square D
All Rights Reserved. This document may not be copied in whole or in part,
or transferred to any other media without the written permission of Square D.
Electrical equipment should be serviced only by qualified electrical maintenance personnel. No responsibility is
assumed by Square D for any consequences arising out of the use of this material.
Bulletin No. 80442-507-01A
February 1998
CONTENTS
ALTIVAR™ Drive Controller Units in Class 8998 MCCs
Contents
SECTION 1—INTRODUCTION . . . . . . . . . . . . . . . . . . . . . . . . . . . . . . . . . . . . . . . . . . . . . 1
SECTION 2—SAFETY PRECAUTIONS . . . . . . . . . . . . . . . . . . . . . . . . . . . . . . . . . . . . . . 2
SECTION 3—RECEIVING, HANDLING AND STORAGE . . . . . . . . . . . . . . . . . . . . . . . . 3
SECTION 4—INSTALLATION . . . . . . . . . . . . . . . . . . . . . . . . . . . . . . . . . . . . . . . . . . . . . 4
UNIT IDENTIFICATION . . . . . . . . . . . . . . . . . . . . . . . . . . . . . . . . . . . . . . . . . . . . . . . . 4
CONTROL AND LOAD WIRING . . . . . . . . . . . . . . . . . . . . . . . . . . . . . . . . . . . . . . . . . 6
CABLE CONNECTION TORQUE VALUES . . . . . . . . . . . . . . . . . . . . . . . . . . . . . . . . . 7
WIRE ROUTING AND INTERCONNECTION . . . . . . . . . . . . . . . . . . . . . . . . . . . . . . .
Wire Class . . . . . . . . . . . . . . . . . . . . . . . . . . . . . . . . . . . . . . . . . . . . . . . . . . . . . . . .
Noise Class . . . . . . . . . . . . . . . . . . . . . . . . . . . . . . . . . . . . . . . . . . . . . . . . . . . . . . .
Quiet Wiring 1 (QW1) . . . . . . . . . . . . . . . . . . . . . . . . . . . . . . . . . . . . . . . . . . . . . .
Quiet Wiring 2 (QW2) . . . . . . . . . . . . . . . . . . . . . . . . . . . . . . . . . . . . . . . . . . . . . .
Standard Wiring 1 (SW1) . . . . . . . . . . . . . . . . . . . . . . . . . . . . . . . . . . . . . . . . . . .
Standard Wiring 2 (SW2) . . . . . . . . . . . . . . . . . . . . . . . . . . . . . . . . . . . . . . . . . . .
Standard Wiring 3 (SW3) . . . . . . . . . . . . . . . . . . . . . . . . . . . . . . . . . . . . . . . . . . .
Pulse Wiring 1 (PW1) . . . . . . . . . . . . . . . . . . . . . . . . . . . . . . . . . . . . . . . . . . . . . .
Voltage Class . . . . . . . . . . . . . . . . . . . . . . . . . . . . . . . . . . . . . . . . . . . . . . . . . . . . . .
8
8
8
8
8
8
8
8
8
8
SECTION 5—OPERATION . . . . . . . . . . . . . . . . . . . . . . . . . . . . . . . . . . . . . . . . . . . . . . . 10
FACTORY SETTINGS . . . . . . . . . . . . . . . . . . . . . . . . . . . . . . . . . . . . . . . . . . . . . . . . 10
SECTION 6—MAINTENANCE . . . . . . . . . . . . . . . . . . . . . . . . . . . . . . . . . . . . . . . . . . . . 12
POWER FUSE RECOMMENDATION AND LOCATION . . . . . . . . . . . . . . . . . . . . . . 13
COOLING SYSTEM MAINTENANCE . . . . . . . . . . . . . . . . . . . . . . . . . . . . . . . . . . . . 16
Motorized Impeller Removal . . . . . . . . . . . . . . . . . . . . . . . . . . . . . . . . . . . . . . . . . 16
Motorized Impeller Installation . . . . . . . . . . . . . . . . . . . . . . . . . . . . . . . . . . . . . . . . 19
DUCT-SYSTEM CLEANING FOR SIZE 5 AND 6 UNITS . . . . . . . . . . . . . . . . . . . . . . 19
DUCT-SYSTEM CLEANING FOR SIZE 7 UNITS . . . . . . . . . . . . . . . . . . . . . . . . . . . 19
INSULATION TEST . . . . . . . . . . . . . . . . . . . . . . . . . . . . . . . . . . . . . . . . . . . . . . . . . . 20
TROUBLESHOOTING— DRIVE OVERHEATING . . . . . . . . . . . . . . . . . . . . . . . . . . . 21
TROUBLESHOOTING— DRIVE WILL NOT RUN . . . . . . . . . . . . . . . . . . . . . . . . . . . 22
SPARE PARTS . . . . . . . . . . . . . . . . . . . . . . . . . . . . . . . . . . . . . . . . . . . . . . . . . . . . . . 23
APPENDIX A—SAMPLE ALTIVAR PARAMETER SHEET . . . . . . . . . . . . . . . . . . . . 25
APPENDIX B—FIELD WIRING TERMINATION DRAWINGS . . . . . . . . . . . . . . . . . . 26
MAINTENANCE LOG . . . . . . . . . . . . . . . . . . . . . . . . . . . . . . . . . . . . . . . . . . . . . . . . . 38
FIGURES
Figure 1:
Unit label locations for Frame Size 5 basic unit . . . . . . . . . . . . . . . . . . . . . . . 4
Figure 2:
Unit label locations for Frame Size 6 basic unit . . . . . . . . . . . . . . . . . . . . . . . 5
Figure 3:
Field Control Terminal Block and Unit Label locations
for Frame Size 7 Basic Unit . . . . . . . . . . . . . . . . . . . . . . . . . . . . . . . . . . . . . . . 6
Figure 4:
Field Control Terminal Block location (Sizes 5 and 6) . . . . . . . . . . . . . . . . . . . 7
Figure 5:
Field Control Terminal Block . . . . . . . . . . . . . . . . . . . . . . . . . . . . . . . . . . . . . . 7
Figure 6:
Fuse location for Frame Size 5 . . . . . . . . . . . . . . . . . . . . . . . . . . . . . . . . . . . 13
Figure 7:
Fuse location for Frame Size 6 . . . . . . . . . . . . . . . . . . . . . . . . . . . . . . . . . . . 14
© 1997 Square D All Rights Reserved
i
ALTIVAR™ Drive Controller Units in Class 8998 MCCs
Contents
Bulletin No. 80442-507-01A
February 1998
Figure 8:
Fuse location for Frame Size 7 . . . . . . . . . . . . . . . . . . . . . . . . . . . . . . . . . . . .15
Figure 9:
Impeller Wiring Removal . . . . . . . . . . . . . . . . . . . . . . . . . . . . . . . . . . . . . . . .17
Figure 10: Protective Grill and Impeller Screw Removal . . . . . . . . . . . . . . . . . . . . . . . . .18
Figure 11: Motorized Impeller Removal . . . . . . . . . . . . . . . . . . . . . . . . . . . . . . . . . . . . . .18
Figure 12: Vent Plate Removal . . . . . . . . . . . . . . . . . . . . . . . . . . . . . . . . . . . . . . . . . . . .19
Figure 13: Field Wire Termination for Basic Frame Size 5 ALTIVAR
Adjustable Frequency Controller in MCCs . . . . . . . . . . . . . . . . . . . . . . . . . . .27
Figure 14: Field Wire Termination for Frame Size 5 ALTIVAR
Frequency Controller with Extended Options in MCCs . . . . . . . . . . . . . . . . .29
Figure 15: Field Wire Termination for Frame Size 5 ALTIVAR
Frequency Controller with Extended Options in MCCs . . . . . . . . . . . . . . . . .30
Figure 16: Field Wire Termination for Basic Frame Size 6 ALTIVAR
Adjustable Frequency Controller in MCCs . . . . . . . . . . . . . . . . . . . . . . . . . . .32
Figure 17: Field Wire Termination for Frame Size 6 ALTIVAR 66
Adjustable Frequency Controller with Extended Options in MCCs . . . . . . . .34
Figure 18: Field Power Wire Termination for Basic Frame Size 7
ALTIVAR 66 Adjustable Frequency Controller in MCCs . . . . . . . . . . . . . . . . .36
Figure 19: Field Control Wire Termination for Basic Frame Size 7 ALTIVAR 66
Adjustable Frequency Controller in MCCs . . . . . . . . . . . . . . . . . . . . . . . . . . .37
TABLES
Table 1:
Wire Routing and Interconnection . . . . . . . . . . . . . . . . . . . . . . . . . . . . . . . . . . .9
Table 2:
Power Fuse Recommendation and Location . . . . . . . . . . . . . . . . . . . . . . . . . .13
Table 3:
Fused Switch Disconnects . . . . . . . . . . . . . . . . . . . . . . . . . . . . . . . . . . . . . . . .23
Table 4:
Circuit Breaker Disconnects . . . . . . . . . . . . . . . . . . . . . . . . . . . . . . . . . . . . . . .23
Table 5:
CL1 and CL2 Fuses . . . . . . . . . . . . . . . . . . . . . . . . . . . . . . . . . . . . . . . . . . . . .24
Table 6:
Fan Fuses . . . . . . . . . . . . . . . . . . . . . . . . . . . . . . . . . . . . . . . . . . . . . . . . . . . . .24
Table 7:
Bulbs . . . . . . . . . . . . . . . . . . . . . . . . . . . . . . . . . . . . . . . . . . . . . . . . . . . . . . . . .24
Table 8:
Air Movers . . . . . . . . . . . . . . . . . . . . . . . . . . . . . . . . . . . . . . . . . . . . . . . . . . . .24
Table 9:
Meters . . . . . . . . . . . . . . . . . . . . . . . . . . . . . . . . . . . . . . . . . . . . . . . . . . . . . . . .24
Table 10: Field Wire Termination Chart for Basic Frame Size 5
Adjustable Frequency Controller in MCCs . . . . . . . . . . . . . . . . . . . . . . . . . . . .26
Table 11: Field Wire Termination for Frame Size 5
ALTIVAR Frequency Controller with Extended Options in MCCs . . . . . . . . . .28
Table 12: Field Wire Termination Chart for Basic Frame Size 6
ALTIVAR Adjustable Frequency Controller in MCCs . . . . . . . . . . . . . . . . . . . 31
Table 13: Field Wire Termination for Frame Size 6
ALTIVAR 66 Frequency Controller with Extended Options in MCCs . . . . . . . .33
Table 14: Field Wire Termination for Frame Size 7
ALTIVAR 66 Frequency Controller with Extended Options in MCCs . . . . . . . .35
ii
© 1997 Square D All Rights Reserved
Bulletin No. 80442-507-01A
February 1998
ALTIVAR™ Drive Controller Units in Class 8998 MCCs
Section 1—Introduction
SECTION 1—INTRODUCTION
This document is an addendum to two manuals:
1. Class 8998, Motor Control Center Instruction Bulletin for Model 6
Bulletin number: 8998IM9201R1/93, dated February 1994
2. Class 8998, Motor Control Center Installation and Maintenance Manual for Model 5
Bulletin number: 8998IM9101R5/92, dated May 1992
Several features of ALTIVAR drive controller units differ from standard Motor
Control Centers (MCC). The purpose of this document is to provide necessary
information for initial installation and maintenance of MCCs with ALTIVAR drive
controller units.
Reference documents were shipped with equipment for ALTIVAR drive controller
units and MCCs. These documents are listed below:
• Model 6 Motor Control Center Instruction Bulletin, Class 8998
Bulletin number: 8998IM9201R1/93, dated February 1994
–or–
Model 5 Motor Control Center Installation and Maintenance Manual, Class 8998
Bulletin number: 8998IM9101R5/92, dated May 1992
NOTE: These two bulletins are referred to herein as “MCC instruction
bulletin.”
• ALTIVAR 66 Receiving, Installation, and Start-up Instruction Bulletin
Bulletin number: VDOC06S304C, dated December 1996
–or–
ALTIVAR 56 User’s Manual
Bulletin number: 50006-519-01B, dated December 1996
• ALTIVAR 66 Level 1 and 2 Configuration Instruction Bulletin
Bulletin number: VDOC06S305C, dated November 1996
• ALTIVAR 66 I/O Extension Module and Level 3 Configuration Instruction Bulletin
Bulletin number: VDOC06T306, dated September 1995
NOTE: Included in package only if I/O extension module was provided.
• Drawings specific to the order
To replace missing documents, contact your local Square D field office.
The Square D motor control center ALTIVAR drive controller unit consists of a
pre-engineered motor control center unit with disconnect and an ALTIVAR ac
drive controller for adjustable speed control of standard 3-phase asynchronous
motors.
Each MCC drive controller unit contains current limiting fuses to achieve the short
circuit rating of the unit. Each unit also contains a cooling system for thermal
management. Various control and power contactor options may be included with
the unit. Drawings shipped with the unit list all included options.
The ALTIVAR drive controller is factory set for use in most common applications.
Many settings are programmed according to the power or control options ordered
with the MCC drive controller unit and should not be adjusted. To adjust the drive
controller for a particular installation, refer to the drawings included with the
order and to the ALTIVAR 66 Level 1 and 2 Configuration Instruction Bulletin or
ALTIVAR 56 user’s manual (listed above).
© 1997 Square D All Rights Reserved
1
ALTIVAR™ Drive Controller Units in Class 8998 MCCs
Section 2 — Safety Precautions
Bulletin No. 80442-507-01A
February 1998
SECTION 2—SAFETY PRECAUTIONS
Read these instructions carefully and look at the equipment to become familiar
with the device before trying to install, operate, or maintain it.
!
DANGER
HAZARD OF ELECTRIC SHOCK, BURN, OR EXPLOSION.
•
Turn OFF all power supplying this equipment before working on or inside
the motor control center. Equipment must be de-energized during all
installation and maintenance operations.
• Before performing visual inspections, tests, or maintenance on the
equipment, disconnect all sources of electric power. Assume that all
circuits are live until they have been completely de-energized, tested,
grounded, and tagged. Pay particular attention to the design of the power
system. Consider all sources of power, including the possibility of
backfeeding.
• Use a properly rated voltage sensing device to confirm that all power is off.
• After disconnecting power, wait one minute before servicing a drive
controller in order to allow the dc bus capacitors to discharge. After one
minute, measure the dc bus capacitor voltage between the “+” and “–”
terminals to verify that dc voltage is less than 45 Vdc. The dc bus LED is
not an accurate indication of the absence of dc bus voltage. For additional
information, refer to page 51 of the Altivar 66 Receiving, Installation, and
Startup Manual (VD0C06S304A, Dec. 1996) or ALTIVAR 56 User’s
Manual (50006-519-01B, Dec. 1996).
• Do not short across dc bus capacitors or touch unshielded components
or terminal strip screw connections with voltage present.
• Many parts in the drive controller—including printed wiring boards—
operate at line voltage. Do not touch. Use only electrically insulated tools.
• Use out-of-service tags and padlocks when working on equipment. Leave
the tags in place if you leave the area or until the work is completed and
the equipment is ready for service.
• Use only test equipment rated for the service intended.
• All personnel involved in handling, installation, testing, operation,
and maintenance should be thoroughly familiar with the information in this
instruction bulletin and the reference documents listed on page 1 of this
bulletin before working on this equipment. Personnel must have a
thorough understanding of electrical equipment in general, the specific
operation of this particular equipment, and the types and severity of
potential injury.
• Follow all applicable OSHA 29 CFR Part 1910, NFPA 70E Part II, and any
other applicable local standards and regulations before working on this
equipment.
• Personnel must also be trained in the proper use of appropriate protective
equipment.
Failure to observe these precautions will result in death, severe personal
injury, or equipment damage.
2
© 1997 Square D All Rights Reserved
Bulletin No. 80442-507-01A
February 1998
ALTIVAR™ Drive Controller Units in Class 8998 MCCs
Section 3—Receiving, Handling, and Storage
SECTION 3—RECEIVING, HANDLING AND STORAGE
Refer to the appropriate MCC instruction bulletin (Model 5 or Model 6) for
information about receiving, handling, and storage of MCC units and enclosures.
Before installing MCC control units, locate and tighten any connections loosened
during shipment and handling. Refer to the procedures in the Maintenance section
of the appropriate MCC instruction bulletin (Model 5 or Model 6).
© 1997 Square D All Rights Reserved
3
ALTIVAR™ Drive Controller Units in Class 8998 MCCs
Section 4—Installation
Bulletin No. 80442-507-01A
February 1998
SECTION 4—INSTALLATION
This section contains installation details specific to MCC ALTIVAR drive
controller units. For details specific to MCC installation, refer to the
“INSTALLATION” section in the appropriate MCC Model 5 or Model 6 instruction
bulletin.
UNIT
IDENTIFICATION
Refer to the Unit Identification label located on the inside wall of the MCC drive
controller unit for the unit identification information. Also, on the inside wall of the
MCC drive controller unit is the drive unit rating label (see Figure 1, Figure 2, or
Figure 3). In addition to the labels mentioned above, each ALTIVAR drive
controller has a rating label on the right side of the drive controller. This label
contains, among other items of information, the ALTIVAR drive controller catalog
number (e.g. ATV**N4U).
➁
➀
➂
➃
➀
➁
➂
➃
Unit ID Label
UL Label
Unit Rating Label
Wire Size and Torque Label
Figure 1: Unit label locations for Frame Size 5 basic unit
4
© 1997 Square D All Rights Reserved
Bulletin No. 80442-507-01A
February 1998
ALTIVAR™ Drive Controller Units in Class 8998 MCCs
Section 4—Installation
Labels are on
left side plate
as shown
➁
➂
➀
➃
➀
➁
➂
➃
Unit Rating Label
UL Label
Unit ID Label
Wire Size and Torque Label
© 1997 Square D All Rights Reserved
5
ALTIVAR™ Drive Controller Units in Class 8998 MCCs
Section 4—Installation
UNIT
IDENTIFICATION
(cont.)
Bulletin No. 80442-507-01A
February 1998
Figure 2: Unit label locations for Frame Size 6 basic unit
Field Control
Terminal Block
Labels are on
left side plate
as shown
SHORT CIRCUIT CURRENT RATING
THE SHORT CIRCUIT CURRENT RATING OF THIS
MOTOR CONTROL CENTER SECTION IS EQUAL TO THE
LOWEST RATING OF: (1) ANY SECTION ELECTRICALLY
CONNECTED IN SERIES OF (2) ANY DEVICE OR
APPROVED SERIES CONNECTED DEVICES, BUT NOT
MORE THAN
DANGER
RMS SYMMETRICAL AMPERES
HAZARD OF ELECTRICAL SHOCK, BURN OR EXPLOSION
VOLTS MAXIMUM
ADDITIONAL OR REPLACEMENT DEVICES SHALL BE
OF THE SAME MANUFACTURE AND TYPE, WITH AN
EQUAL OR GREATER SHORT CIRCUIT RATING.
REFER TO THE INDIVIDUAL DEVICE RATING LABEL OR
THE SERIES COMBINATION LABEL (WHEN
APPLICABLE) TO DETERMINE MAXIMUM SHORT
CIRCUIT CURRENT RATINGS
FAILURE TO FOLLOW THE ABOVE INSTRUCTIONS
WILL RESULT IN ELECTRICAL SHOCK, SEVERE
A30325-324-02
PERSONAL INJURY OR DEATH.
➂
➁
➀
B
R
B
R
B
R
4
1
3
L1
L2
5
L3
1
3
L1
L2
5
L3
DANGER
OFF
OFF
CB1
2
T1
CB2
4
T2
6
T3
2
T1
4
T2
6
T3
➃
4
➀
➁
➂
➃
Unit Rating Label
UL Label
Unit ID Label
Wire Size and Torque Label
TB2
Figure 3: Field Control Terminal Block and Unit label locations
for Frame Size 7 basic unit
CONTROL AND LOAD
WIRING
On Frame Sizes 5 and 6, pull-apart terminals for field control wiring are mounted
on top of the air discharge duct (Figure 4). On Frame Size 7, pull-apart terminals for
field control wiring are mounted on the upper left side (Figure 3). Terminate field
control wiring on the removable portion of the block (Figure 5).
NOTE: Depending on power and control options ordered, several analog or digital inputs
and outputs are available at the control terminal blocks on the ALTIVAR drive controller.
Refer to the wiring diagram supplied with the MCC drive controller unit for
I/O availability. Refer to the ALTIVAR drive controller configuration instruction bulletins
(listed on page 1) for I/O specifications and adjustments.
6
© 1997 Square D All Rights Reserved
Bulletin No. 80442-507-01A
February 1998
ALTIVAR™ Drive Controller Units in Class 8998 MCCs
Section 4—Installation
Field Control
Terminal Block
Field Control
Terminal Block
Figure 4: Field Control Terminal Block location (Sizes 5 and 6)
10 A Control Wire Terminal Block
To separate or remove the top portion of
the terminal block from the base, grasp
the top half and pull apart as shown.
Each terminal is rated for one 16–12 AWG
wire or two 16 AWG wires.
Torque terminal screws to 5 lb-in.
The terminal block is designated “FTB”
on the wiring diagram associated with
the unit and in the figures of this bulletin.
Figure 5: Field Control Terminal Block
If a barriered bypass is supplied, additional pull-apart type terminal blocks are
provided in the bypass starter. Some control schemes require connection to the
terminal blocks in the bypass starter for field control wiring. In this instance the
wiring diagram designates the terminal blocks as “FTB” in the bypass starter
location.
CABLE CONNECTION
TORQUE VALUES
Refer to the torque label inside the drive controller unit for load-terminal wire and
torque requirements. See Figure 1 on page 4, Figure 2 on page 6, or Figure 3 on
page 6 for exact location on basic units. The label is near the user connection point
on other configurations with power contactor options installed.
© 1997 Square D All Rights Reserved
7
ALTIVAR™ Drive Controller Units in Class 8998 MCCs
Section 4—Installation
Bulletin No. 80442-507-01A
February 1998
WIRE ROUTING AND
INTERCONNECTION
The controller Field Wiring Termination information in “APPENDIX B—FIELD
WIRING TERMINATION DRAWINGS” on page 26, provides the required torque
and maximum allowable wire size for each field wiring terminal. This information
also provides requirements for the Wire Class, Noise Class, and Voltage Class of
the field connected conductors. These classes are described below.
Wire Class
Compatibility of the field wiring terminal with the conductor material and
insulation system are described by Wire Class. When used with the required
conductor current rating and controller-rated ambient temperature, the Wire Class
forms the basis for the selection of a conductor size, which limits the temperature
on the conductor insulation at the field wiring terminal to an acceptable range.
Conductors with operating temperatures exceeding those specified by the Wire
Class may be used, but the conductor size must be selected based on Wire Class
limits.
Noise Class
Electromagnetic properties of the voltages and currents present are categorized by
Noise Class. Wiring is classified into the following six noise classes for selection of
wiring methods and physical segregation purposes.
Quiet Wiring 1 (QW1)
High susceptibility analog and digital control signals.
Signals in this classification include digital communication and network circuits,
controller analog input/output (I/O), and analog process signals.
Quiet Wiring 2 (QW2)
Medium susceptibility, analog, and digital control signals.
Signals in this classification include 24 volt dc and ac control circuits.
Standard Wiring 1 (SW1)
Low susceptibility control or power circuits rated less than 600 Vac (250 Vdc) and
less than 15 A. NOTE: Voltage and current spectra are generally contained within
0.05–9 kHz.
Signals in this classification include 120 Vac control circuits.
Standard Wiring 2 (SW2)
Power circuits rated greater than 15 A. NOTE: Voltage and current spectra are
generally contained within 0.05–9 kHz.
Signals falling under this classification include line power to controllers.
Standard Wiring 3 (SW3)
Reserved.
Pulse Wiring 1 (PW1)
Control or power circuits whose voltage or current spectra significantly exceed
9 kHz.
Signals in this classification include motor and dynamic braking circuits fed from
pulse width modulated (PWM) power converters.
Voltage Class
The voltages present at the field wiring terminals are categorized by Voltage Class.
Voltage is classified into recognized conductor insulation categories (30 V, 150 V,
300 V, and 600 V) for the selection of conductor insulation voltage rating and
physical segregation purposes.
Based on the noise class and voltage class of the conductors, apply the wiring
methods listed in Table 1 to the drive system.
8
© 1997 Square D All Rights Reserved
Bulletin No. 80442-507-01A
February 1998
ALTIVAR™ Drive Controller Units in Class 8998 MCCs
Section 4—Installation
Table 1: Wire Routing and Interconnection
Wiring Methods and Considerations
Noise Class of Conductors
QW1
QW2
SW1
SW2
PW1
Conductor Grouping in Wireways/Conduits
1.
All conductors of a 1- or 3-phase power circuit must be bundled to minimize stray magnetic fields.
X
X
X
2.
All conductors of a dc power circuit must be bundled to minimize stray magnetic fields.
X
X
X
3.
When paralleled conductors must be run in separate wireways or conduit. Minimize stray
magnetic fields by bundling the conductors into groups.
X
X
4.
Maintain conductor runs short as practical.
X
X
X
X
X
Separation of Circuits
1.
DO NOT run different Noise Class conductors in the same conduit.
X
X
X
X
X
2.
DO NOT run different Voltage Class conductors in the same conduit unless all
conductors are insulated for maximum Voltage Class present.
X
X
X
X
X
3.
Outside the enclosure, all PW conductor groups must be individually segregated
using metallic conduit.
4.
Segregate all conductors by Noise Class. Use the following circuit separation
when conductors can run parallel for more than 12 inches:
• Metallic conduit: 3 inches between QW to SW/PW
X
X
X
• Metallic tray: 3 inches between SW and PW
• Metallic tray: 6 inches between QW and SW/PW
X
X
• Against continuous metal surface: 3 inches between SW and PW
X
X
X
X
X
X
X
X
X
X
• Against continuous metal surface: 6 inches between QW and SW/PW
X
X
X
X
X
• Metallic conduit housing of QW: 12 inches to non-metallic conduit SW/PW
X
X
X
X
X
X
X
X
• Non-metallic conduit: 24 inches between QW to SW/PW
X
X
X
X
X
If QW and SW wiring must cross SW2 or PW1 wiring, the bundles must cross at right angles.
X
X
X
X
X
X
X
X
X
• Non-metallic conduit: 3 inches between SW and PW
5.
X
X
Common Mode Noise Issues
1.
Provide adjacent signal returns using twisted pair cable.
X
X
2.
Galvanically isolate signal and associated signal return path when possible.
X
X
Shielding
1.
Use metallic conduit for all power and control circuits external to the controller enclosure.
X
X
X
2.
Shields should be continuous and equipped with a drain wire.
X
X
X
3.
DO NOT group different Noise Class conductors within the same shield.
X
X
X
4.
Minimize the non-shielded portion of conductor at the ends of shielded cable.
X
X
5.
When shielding ac or dc power conductors, group conductors to minimize magnetic field in shield.
X
X
X
X
X
X
X
X
X
Grounding
1.
Ground shields at one end only (controller end).
X
X
2.
Use separate ground wire for each shield ground.
X
X
X
X
X
3.
Provide a ground wire with all conductor groups whether in tray or conduit.
X
X
X
4.
When multiple grounds must be made to a shielded power cable, the shield must have the same
short circuit withstand capability as the ground conductor in the power cable.
X
X
X
5.
Terminate all power grounds and shield ground s to the controller grounding point or bar.
X
X
X
6.
Terminate all signal shield grounds to the terminals provided.
7.
Always supply a separate equipment grounding conductor with the controller power feed.
DO NOT depend upon metallic conduit for ground connection.
X
X
X
© 1997 Square D All Rights Reserved
X
X
9
ALTIVAR™ Drive Controller Units in Class 8998 MCCs
Section 5—Operation
Bulletin No. 80442-507-01A
February 1998
SECTION 5—OPERATION
!
WARNING
UNINTENDED EQUIPMENT ACTION.
Read and understand the ALTIVAR 66 Level 1 and 2 Configuration
Instruction Bulletin (VD0C06S305C) or ALTIVAR 56 User’s Manual
(50006-519-01B) before using the keypad display.
• Lock keypad after making parameter adjustments.
• Do not reset drive parameters to configurations other than those specified
on the parameter sheets supplied by Square D with the drive controller.
Some factory-set drive parameters are critical for MCC drive controller
unit control and power configurations.
• Do not alter programming of factory installed control devices or power
contactors.
Failure to observe these precautions can result in death, severe personal
injury, or equipment damage.
•
NOTE: Before operating the drive controller, perform the procedures listed in Factory
Settings (below).
For complete information about MCC ALTIVAR drive controller unit operation,
refer to ALTIVAR 66 Level 1 and 2 Configuration Instruction Bulletin (VD0C06S305C)
or ALTIVAR 56 User’s Manual (50006-519-01B) and any drawings supplied with
the unit.
If an I/O extension module was provided, refer to ALTIVAR 66 I/O Extension
Module and Level 3 Configuration Instruction Bulletin (VD0C06T306) or ALTIVAR 56
User’s Manual (50006-519-01B) for operation information.
FACTORY SETTINGS
The ALTIVAR drive controller is software driven. The drive controller unit has
been pre-programmed to match the power and control options purchased with the
MCC drive controller unit.
NOTE: Do not change the factory-set parameters as indicated on the parameter sheet(s)
supplied with the MCC drive controller unit. Several settings are critical to unit control
and power configurations.
For information on these settings, refer to the ALTIVAR Parameter Sheets included
with your shipment in the packet labeled “Installation/Maintenance
Information.” (A sample parameter sheet is shown in Appendix A.)
NOTE: For factory settings, refer only to the ALTIVAR parameter sheet(s) shipped with
your package. These parameters supercede any parameter information shown in other
ALTIVAR drive controller documentation.
The following key parameters should be checked and adjusted prior to motor
operation:
1) Nominal Current
2) Motor Overload
The drive controller is equipped with a number of control algorithms and features
for flexibility in application. Self-tuning is incorporated into several of the control
algorithms to allow optimal control of the motor.
10
© 1997 Square D All Rights Reserved
Bulletin No. 80442-507-01A
February 1998
ALTIVAR™ Drive Controller Units in Class 8998 MCCs
Section 5—Operation
If the drive controller has been configured as Normal Torque or High Torque
control type, follow these precautions:
• The adjustment range of the Nominal Current parameter is 45% to 105% of the
drive controller rated output current. This allows the use of motors of equal
horsepower size or one horsepower size less than the drive controller
horsepower rating. To adjust the Nominal Current parameter, refer to the
ALTIVAR 66 Level 1 and 2 Configuration Instruction Bulletin (VD0C06S305C,
December 1996) or ALTIVAR 56 User’s Manual (50006-519-01B,
December 1996).
• Before powering up for the first time, compare the motor-nameplate current
rating with the output current in:
ALTIVAR 66:
Table 1, Table 2, or Table 3 (depending on the drive controller Torque
Type setting) in ALTIVAR 66 Receiving, Installation, and Start-up
Instruction Bulletin (VD0C06S304C, December 1996).
–or–
ALTIVAR 56:
Table 1 or Table 2 (depending on the drive controller Torque Type
Setting) in ALTIVAR 56 User’s Manual (50006-519-01B, December 1996).
If the motor rating is not within 45% to 105% of the value in the table, a
different drive controller must be used.
!
CAUTION
MOTOR OVERHEATING.
Do not use motors with a full load current rating that is not within the adjustment
range of the drive controller Nominal Current parameter.
Failure to observe these precautions can result in severe personal injury
or equipment damage.
•
•
•
•
Each time an ALTIVAR 66 drive controller is powered up with Normal or
High Torque control type selected, direct current equal to the drive controller
rated current is injected into the motor. This allows the drive controller to
determine the resistance of the motor and set the motor parameters.
For optimal torque performance, the drive controller and motor should be
operated under no load at 50/60 Hz during initial commissioning or any time
the motor is changed. This allows the drive controller to measure key motor
parameters.
The Nominal Current parameter must be set on the drive controller keypad
display to match the motor full load current rating. If the Nominal Current
parameter cannot be adjusted to the motor full load current, Normal and
High Torque control types cannot be used for the application.
For applications using multiple motors, contact the factory.
© 1997 Square D All Rights Reserved
11
ALTIVAR™ Drive Controller Units in Class 8998 MCCs
Section 6—Maintenance
Bulletin No. 80442-507-01A
February 1998
SECTION 6—MAINTENANCE
!
DANGER
HAZARD OF ELECTRIC SHOCK, BURN OR EXPLOSION.
•
Turn OFF all power supplying this equipment before working on or inside
a motor control center.
• The unit disconnect switch must be in the OFF position before installation
or removal of power fuses.
• Use a properly rated voltmeter to check that all circuits are de-energized.
• Control units must be de-energized before maintenance is performed.
• After disconnecting power, wait one minute to allow the dc bus capacitors
to discharge. After one minute, measure dc bus capacitor voltage
between the “+” and “–” terminals to verify that dc voltage is less than
45 Vdc. The dc bus LED is not an accurate indication of the absence of
dc bus voltage. For additional information, refer to page 51 of the
Altivar 66 Receiving, Installation, and Startup Manual (VD0C06S304C,
December 1996) or Altivar 56 User’s Manual (50006-519-01B,
December 1996).
• Do not short across dc bus capacitors or touch unshielded components
or terminal strip screw connections with voltage present.
Failure to observe these precautions will result in death, severe injury, or
equipment damage.
Perform maintenance on the MCC drive controller unit a minimum of once per
year, or more frequently if indicated by service conditions and your established
maintenance policy. Details specific to maintenance of MCC ALTIVAR drive
controller units are outlined herein.
Details specific to maintenance of motor control centers are outlined in the Model 5
and Model 6 MCC instruction bulletins.
All maintenance must be performed by qualified personnel.
12
© 1997 Square D All Rights Reserved
Bulletin No. 80442-507-01A
February 1998
ALTIVAR™ Drive Controller Units in Class 8998 MCCs
Section 6—Maintenance
Power fuse clips in MCC ALTIVAR drive controller units accommodate either
600 V Class T fuses, 500 V Bussman FWH Series fuses, or 700 V Bussman
semiconductor fuses, depending on the unit rating. See Table 2 for the approprate
fuse type and mounting location.
POWER FUSE
RECOMMENDATION
AND LOCATION
NOTE: Every MCC ALTIVAR drive controller unit is shipped with power fuses factory
installed.
Table 2: Power Fuse Recommendation and Location
Contstant Torque Variable
or Variable Torque Torque
(low noise) HP
HP
50
➀
➁
Drive
Frame
Size
ALTIVAR Drive
Catalog Number
(Square D)
Fuse Catalog
Number
(Bussmann)
5
ATV➁D54N4U
JJS-125
T
—
Fuse
Fuse
Class Ampere
Rating
Fuse
Location
Square D
Part
Number
125
Figure 5
25417-21250
—
60
5
ATV➁D54N4U
JJS-150
T
150
Figure 5
25417-21250
60
—
5
ATV➁D64N4U
JJS-150
T
150
Figure 5
25417-21250
JJS-175
T
175
Figure 5
25417-21750
JJS-175
T
175
Figure 5
25417-21750
—
75
5
ATV➁D64N4U
75
—
5
ATV➁D79N4U
—
100
5
ATV➁D79N4U
JJS-225
T
225
Figure 5
25417-22500
100➀
125
6
ATV66C10N4U
FWH-400
—
400
Figure 6
25418-60400
125➀
150
6
ATV66C13N4U
FWH-400
—
400
Figure 6
25418-60400
150➀
200
6
ATV66C15N4U
FWH-500
—
500
Figure 6
25418-62501
200➀
—
6
ATV66C19N4U
FWH-600
—
600
Figure 6
25418-62600
250➀
250
7
ATV66C23N4U
170M6711
—
700
Figure 7
25705-00700
—
300
7
ATV66C23N4U
170M6711
—
700
Figure 7
25705-00700
300➀
—
7
ATV66C28N4U
170M6712
—
800
Figure 7
25705-00800
—
350
7
ATV66C28N4U
170M6713
—
800
Figure 7
25705-00800
350➀
—
7
ATV66C31N4U
170M6713
—
900
Figure 7
25705-00900
—
400
7
ATV66C31N4U
170M6713
—
900
Figure 7
25705-00900
Variable Torque (low noise) not available.
ALTIVAR 56 or 66
Power fuses
Control fuses
Figure 6: Fuse location for Frame Size 5
© 1997 Square D All Rights Reserved
13
ALTIVAR™ Drive Controller Units in Class 8998 MCCs
Section 6—Maintenance
Bulletin No. 80442-507-01A
February 1998
Control fuses
Power fuses
(inside drive
controller)
Figure 7: Fuse location for Frame Size 6
14
© 1997 Square D All Rights Reserved
Bulletin No. 80442-507-01A
February 1998
ALTIVAR™ Drive Controller Units in Class 8998 MCCs
Section 6—Maintenance
➁
SHORT CIRCUIT CURRENT RATING
THE SHORT CIRCUIT CURRENT RATING OF THIS
MOTOR CONTROL CENTER SECTION IS EQUAL TO THE
LOWEST RATING OF: (1) ANY SECTION ELECTRICALLY
CONNECTED IN SERIES OF (2) ANY DEVICE OR
APPROVED SERIES CONNECTED DEVICES, BUT NOT
➀
MORE THAN
DANGER
RMS SYMMETRICAL AMPERES
HAZARD OF ELECTRICAL SHOCK, BURN OR EXPLOSION
VOLTS MAXIMUM
ADDITIONAL OR REPLACEMENT DEVICES SHALL BE
OF THE SAME MANUFACTURE AND TYPE, WITH AN
EQUAL OR GREATER SHORT CIRCUIT RATING.
REFER TO THE INDIVIDUAL DEVICE RATING LABEL OR
THE SERIES COMBINATION LABEL (WHEN
APPLICABLE) TO DETERMINE MAXIMUM SHORT
CIRCUIT CURRENT RATINGS
A30325-324-02
➂
Power fuses
FAILURE TO FOLLOW THE ABOVE INSTRUCTIONS
WILL RESULT IN ELECTRICAL SHOCK, SEVERE
PERSONAL INJURY OR DEATH.
B
R
B
R
B
R
4
1
3
L1
L2
5
L3
1
3
L1
L2
5
L3
DANGER
OFF
CB1
2
T1
➃
OFF
CB2
4
T2
6
T3
2
T1
4
T2
6
T3
4
TB2
Figure 8: Fuse location for Frame Size 7
© 1997 Square D All Rights Reserved
15
ALTIVAR™ Drive Controller Units in Class 8998 MCCs
Section 6—Maintenance
COOLING SYSTEM
MAINTENANCE
Bulletin No. 80442-507-01A
February 1998
!
DANGER
HAZARD OF ELECTRIC SHOCK, BURN, OR EXPLOSION.
• Turn off all power supplying the equipment before working inside motor
control centers.
• Use a properly rated voltage sensing device to check that all circuits are
de-energized. Equipment must be de-energized before maintenance is
performed.
Failure to observe these precautions will result in death, severe personal
injury, or electric shock.
Motorized Impeller Removal
Frame Size 5 units have a cooling system that uses a motorized impeller. A
motorized impeller is an air mover that either draws in or exhausts air, and that
changes the direction of the air flow at right angles. Frame Sizes 6 and 7 are cooled
by other systems, which are described in the ALTIVAR drive component receving,
installation, and startup instruction bulletin.
Cooling system air movers do not require any scheduled maintenance. Fan/
impeller removal is necessary only when fan/impeller replacement is indicated by
troubleshooting (see “TROUBLESHOOTING— DRIVE OVERHEATING” on
page 21).
NOTE: All maintenance must be performed by qualified personnel.
Follow these steps should the need arise to remove the motorized impeller in
Frame Size 5 units:
1. Disconnect all power supplying the equipment.
2. Remove the motorized impeller wiring from the control wiring terminal block
(Figure 9 on page 17).
3. Remove the two screws located in the front of the protective grill and the two
screws located on the side of the duct housing (Figure 10 on page 18).
4. Remove the protective grill (Figure 10).
5. Remove the four impeller mounting screws located on top of the duct housing
(Figure 10).
6. Remove the motorized impeller through the front of the duct housing.
Carefully feed the impeller motor wires through the hole in the top of the duct
housing (Figure 11 on page 18).
16
© 1997 Square D All Rights Reserved
Bulletin No. 80442-507-01A
February 1998
ALTIVAR™ Drive Controller Units in Class 8998 MCCs
Section 6—Maintenance
Impeller wiring
Protective grill
Figure 9: Impeller Wiring Removal
© 1997 Square D All Rights Reserved
17
ALTIVAR™ Drive Controller Units in Class 8998 MCCs
Section 6—Maintenance
Bulletin No. 80442-507-01A
February 1998
Impeller screws in top
of duct housing (4)
Protective grill
screws (4)
Figure 10: Protective Grill and Impeller Screw Removal
Top of duct
housing
Impeller Wires
Motorized
Impeller
Figure 11: Motorized Impeller Removal
18
© 1997 Square D All Rights Reserved
Bulletin No. 80442-507-01A
February 1998
Motorized Impeller
Installation
ALTIVAR™ Drive Controller Units in Class 8998 MCCs
Section 6—Maintenance
To install the impeller, which is included only on Frame Size 5 units, follow these
instructions:
1. Disconnect all power supplying the equipment.
2. Install the motorized impeller through the front of the duct housing. Carefully
feed the impeller motor wires through the hole in the top of the duct housing
(Figure 11 on page 18).
3. Install the four impeller mounting screws on top of the duct housing
(Figure 10 on page 18).
4. Replace the protective grill (Figure 10).
5. Replace the two screws in the front of the protective grill and the two screws
on the side of the duct housing (Figure 10).
6. Insert the motorized impeller wiring into the control wiring terminal block
(Figure 9 on page 17). Wires are color coded for proper placement.
DUCT-SYSTEM CLEANING
FOR SIZE 5 AND 6 UNITS
In order to ensure proper ventilation of the drive controller unit, periodically clean
the duct system using these steps:
1.
2.
3.
4.
Remove the top duct cover.
Vacuum all of the top and bottom duct areas.
Replace the top duct cover when complete.
Vacuum all vented openings in the drive controller unit door.
NOTE: Do not use compressed air; it will redistribute contaminants to other surfaces.
DUCT-SYSTEM CLEANING
FOR SIZE 7 UNITS
In order to ensure proper ventilation of the drive controller unit, periodically clean
the duct system using these steps:
1. Remove the vent plate at the bottom front of the unit (Figure 12). This vent
plate covers the inlet duct.
2. Vacuum all of the inlet duct areas.
3. Replace the vent plate when complete.
4. Vacuum all vented openings, including the outlet vent on the top and upper
right rear of the unit.
NOTE: Do not use compressed air; it will redistribute contaminants to other surfaces.
DANGER
HAZARD OF ELECTRICAL SHOCK, BURN OR EXPLOSION
FAILURE TO FOLLOW THE ABOVE INSTRUCTIONS
WILL RESULT IN ELECTRICAL SHOCK, SEVERE
PERSONAL INJURY OR DEATH.
DANGER
HAZARDOUS VOLTAGE
WILL CAUSE SEVERE
INJURY OR DEATH
Turn off power
supplying this
equipment before
working inside
Vent plate
DANGER
DANGER
HAZARDOUS VOLTAGE.
Figure 12: Vent Plate Removal
© 1997 Square D All Rights Reserved
19
ALTIVAR™ Drive Controller Units in Class 8998 MCCs
Section 6—Maintenance
Bulletin No. 80442-507-01A
February 1998
INSULATION TEST
!
CAUTION
HAZARD OF EQUIPMENT DAMAGE.
Do not use a megger to test solid-state devices, capacitor units, or any devices
that are not designed to withstand megger voltages. Disconnect these devices
before testing the rest of the motor control center.
Failure to observe this precaution can result in personal injury or
equipment damage.
Refer to the appropriate MCC bulletin (Model 5 or Model 6) for MCC insulation
test procedures.
20
© 1997 Square D All Rights Reserved
Bulletin No. 80442-507-01A
February 1998
ALTIVAR™ Drive Controller Units in Class 8998 MCCs
Section 6—Maintenance
The following flow chart demonstrates necessary steps to take if the drive
overheats.
TROUBLESHOOTING—
DRIVE OVERHEATING
Controller
overheating?
N
Y
Fan running?
N
Control
fuses blown?
N
Replace fan.
Y
Y
Fans
running?
N
Replace fuses.
Y
Fans
running?
Y
Return to
service.
N
Y
Fans
running?
Replace fan.
Air flowing?
N
Y
Airways
clear?
N
N
Clear airways.
Y
Return to
service.
Contact your
local service
representative.
© 1997 Square D All Rights Reserved
21
ALTIVAR™ Drive Controller Units in Class 8998 MCCs
Section 6—Maintenance
TROUBLESHOOTING—
DRIVE WILL NOT RUN
Bulletin No. 80442-507-01A
February 1998
The following flow chart demonstrates necessary steps to take if the drive will
not run.
Drive not
running?
Drive fault on
keypad?
N
Fuses blown?
Y
Y
Replace fuses.
Refer to
Instruction Bulletin
VDOC06S304C,
Table 22 or 23
or
50006-519-01B,
Fig. 27 or Table 19
Fault message
found?
Return to
service.
Y
N
Call your
local service
representative.
22
N
© 1997 Square D All Rights Reserved
Follow
troubleshooting
procedures detailed
in the instruction
bulletin referred to in
the previous step.
Bulletin No. 80442-507-01A
February 1998
SPARE PARTS
ALTIVAR™ Drive Controller Units in Class 8998 MCCs
Section 6—Maintenance
This section details the spare parts available for ALTIVAR drive controller units in
motor control centers. For drive controller spare parts, see Table 24 of Instruction
Bulletin VDOC06S304C or Appendix C of ALTIVAR 56 User’s Manual (50006-51901B). For power fuse recommendation and location, refer to Table 2 on page 13 of
this manual.
Table 3: Fused Switch Disconnects
Description
Drive Controller
Square D Part
Number
CT or VT
(low noise)
HP at 460 V
VT HP
Drive
Frame Size
50
60
5
ATV66D54N4U
KHL36000M
60
75
5
ATV66D64N4U
KHL36000M
➀
75
100
5
ATV66D79N4U
KHL36000M
100➀
—
6
ATV66C10N4U
KAL36250-26M
—
125
6
ATV66C10N4U
KAL36250-30M
125➀
—
6
ATV66C13N4U
KAL36250-30M
—
150
6
ATV66C13N4U
LAL36400-32M
150➀
—
6
ATV66C15N4U
LAL36400-32M
—
200
6
ATV66C15N4U
LAL36400-35M
200➀
—
6
ATV66C19N4U
LAL36400-35M
250➀
250–300
7
ATV66C23N4U
MHL360008M
300➀
350
7
ATV66C28N4U
MHL360008M
350➀
400
7
ATV66C31N4U
MHL360008M
Drive Controller
Square D Part
Number
VT (low noise) not available.
Table 4: Circuit Breaker Disconnects
Description
CT or VT
(low noise)
HP
VT HP
Drive
Frame Size
50
60
5
ATV66D54N4U
KAL36250-25M
60
75
5
ATV66D64N4U
KAL36250-25M
75
—
5
ATV66D79N4U
KAL36250-25M
➀
—
100
5
ATV66D79N4U
KAL36250-29M
100➀
—
6
ATV66C10N4U
KAL36250-26M
—
125
6
ATV66C10N4U
KAL36250-30M
125➀
—
6
ATV66C13N4U
KAL36250-30M
—
150
6
ATV66C13N4U
LAL36400-32M
150➀
—
6
ATV66C15N4U
LAL36400-32M
—
200
6
ATV66C15N4U
LAL36400-35M
200➀
—
6
ATV66C19N4U
LAL36400-35M
250➀
250–300
7
ATV66C23N4U
MHL360008M
300➀
350
7
ATV66C28N4U
MHL360008M
350➀
400
7
ATV66C31N4U
MHL360008M
VT (low noise) not available.
© 1997 Square D All Rights Reserved
23
ALTIVAR™ Drive Controller Units in Class 8998 MCCs
Section 6—Maintenance
SPARE PARTS (cont.)
Bulletin No. 80442-507-01A
February 1998
Table 5: CL1 and CL2 Fuses
Rating
Drive Controller
Square D Part Number
KTK-R-3
D54-C15
25430-10300
Table 6: Fan Fuses
Description
Rating
PRI (FF)
SEC (FF)
Drive Controller
Square D Part
Number
FNQ-R-1/4
ATV66 with 50 VA CPT
25430-20025
FNQ-R-1/2
ATV66 with 100 VA CPT
25430-20050
FNQ-R-3/4
ATV66 with 150 VA CPT
25430-20074
FNQ-R-1-6/10
ATV66 with 300 VA CPT
25430-20161
FNQ-R-2-8/10
ATV66 with 500 VA CPT
25430-20281
FNQ-R-4
ATV66 with 750 VA CPT
25430-20400
FNQ-R-5
ATV66 with 1000 VA CPT
25430-20500
FNQ-R-1/2
ATV66 with 50 VA CPT
25430-20050
FNQ-R-8/10
ATV66 with 100 VA CPT
25430-20080
FNQ-R-1-1/4
ATV66 with 150 VA CPT
25430-20126
FNQ-R-2-1/2
ATV66 with 300 VA CPT
25430-20250
FNQ-R-4
ATV66 with 500 VA CPT
25430-20400
FNQ-R-6 1/4
ATV66 with 750 VA CPT
25430-20625
FNQ-R-9
ATV66 with 1000 VA CPT
25430-20900
Rating
Drive Controller
Square D Part
Number
Red LED
24 Vdc
ATV66 All Sizes
25501-03043
Green LED
24 Vdc
ATV66 All Sizes
25501-03044
Yellow LED
24 Vdc
ATV66 All Sizes
25501-03045
Pilot Lamp
120 Vac
ATV66 All Sizes
DL1CE130
Table 7: Bulbs
Description
Table 8: Air Movers
Description
Size
CFM
Manufacturer
Reference
Number
Square D Part
Number
Axial Fans
4.69 X 4.69
115
Comair-Rotron
MX2A3
26016-31529
5.72 X 6.75
235
Comair-Rotron
MR2B3
26016-31528
Motorized
Impeller
7.48 diameter
365
EBM Industries
R2E190-AE50-29
26016-31532
Table 9: Meters
Description
Potentometer
MMIR
24
Rating
Square D Part Number
2.5 Kohms
80442-273-01
24 Vdc
80442-247-50
© 1997 Square D All Rights Reserved
Bulletin No. 80442-507-01A
February 1998
ALTIVAR™ Drive Controller Units in Class 8998 MCCs
Appendix A—Sample Altivar 66 Parameter Sheet
APPENDIX A—SAMPLE ALTIVAR PARAMETER SHEET
MENU INDEX NO.
PARAMETER NAME
SETTINGS BY
MCC FACTORY
6.1
TORQUE TYPE
VARIABLE (VT)
6.2
COMMAND TYPE
2 WIRE (Maintained)
7.2
SPEED REF 1
AI1
7.2
SPEED REF 2
7.2
AUTO/MANUAL
YES, LOGIC IN:LI5
AUTO RUN = LI6
7.2
CONTROLLED STOP
BY LOGIC INPUT = LI7
ACTIVE STATE = LOW
STOP TYPE = FREE
7.2
BYPASS
YES DEFINE I/O
SEQUENCE INPUT = LI8
RUN OUT. COMMAND = R2
7.3
FAULT STATE
LO2
7.3
MOTOR SPEED
AO1
SELECT 0-20mA
7.4
FAULT RESET
LI4
© 1997 Square D All Rights Reserved
AI2 4-20mA
25
ALTIVAR™ Drive Controller Units in Class 8998 MCCs
Appendix B—Field Wiring Termination Drawings
Bulletin No. 80442-507-01A
February 1998
APPENDIX B—FIELD WIRING TERMINATION DRAWINGS
Table 10:Field Wire Termination Chart for Basic Frame Size 5 Adjustable
Frequency Controller in MCCs (see Figure 13 on page 27)
50–75 HP at 460 Vac, Constant Torque (CT) and Variable Torque Low Noise (VTLN)
60–100 HP at 460 Vac, Variable Torque (VT)
Termination
Designation
Device
Torque
(lb-in/N•m)
Maximum
Wire Size
(AWG/mm2)
Wire Class
Noise Class
Voltage Class
Applicable
HP Ratings
T1, T2, T3
Converter
Fuse Block
375 / 43➀
250 kcmil➁
60° / 75° C
CU-AL
SW2
600 V
All
L1, L2, L3
Power Converter
70/9➂
#2 / 35➂
75° C CU
SW2
600 V
All
T1, T2, T3
Power Converter
70/9➂
#2 /
35➂
75° C CU
PW1
600 V
All
PA, PB
Power Converter
27 / 3
#2 / 35
75° C CU
PW1
600 V
All
Any
Power Converter
J1
3.5 /0.4
#14 / 1.5
75° C CU
SW1
150 V / 300 V
All
Any
Power Converter
J12, J22, J24
3.5 / 0.4
#14 / 1.5
75° C CU
QW2
30 V
All
Any
Power Converter
J13, J23
3.5 / 0.4
#14 / 1.5
75° C CU
QW1
30 V
All
X1, X2, S1, S2,
1, 2, 3 through n
Terminal Block
FTB
5 / 0.57
#14 / 1.5
75° C CU
SW1
150 V
All
C1, C2, C3
through Cn
Terminal Block
FTB
5 / 0.57
#14 / 1.5
75° C CU
QW1
30 V
All
D1, D2, D3
through Dn
Terminal Block
FTB
5 / 0.57
#14 / 1.5
75° C CU
QW2
30 V
All
➀
For VT 100 HP — Converter fuse block torque is 500 lb-in / 57 N•m.
➁
For VT 100 HP — Converter fuse block maximum wire size is 600 kcmil.
➂
These are recommended wire sizes and torque. The maximum wire size is #4/0 AWG / 70 mm2 and the recommended torque for this wire size
is 170 lb-in / 19 N•m.
26
© 1997 Square D All Rights Reserved
Bulletin No. 80442-507-01A
February 1998
ALTIVAR™ Drive Controller Units in Class 8998 MCCs
Appendix B—Field Wiring Termination Drawings
Disconnect
means
Converter fuses
and fuse block
Line
reactor
(optional)
location
Fan
FTB
B1 MOD
(if supplied)
Legend➀
QW1, QW2
SW2, PW1
Figure 13:
Field Wire Termination for Basic Frame Size 5 Altivar
Adjustable Frequency Controller in MCCs
50–75 HP at 460 Vac, Constant Torque (CT)
and Variable Torque Low Noise (VTLN)
60–100 HP at 460 Vac, Variable Torque (VT)
Notes:
➀
For description, refer to “WIRE ROUTING AND INTERCONNECTION” on
page 8.
➁
Arrange conductor groups depth-wise within the unit and structure to
maximize separation of each noise class.
© 1997 Square D All Rights Reserved
27
ALTIVAR™ Drive Controller Units in Class 8998 MCCs
Appendix B—Field Wiring Termination Drawings
Bulletin No. 80442-507-01A
February 1998
Table 11:Field Wire Termination for Frame Size 5, Altivar Frequency Controller
with Extended Options in MCCs (see Figure 14 on page 29 and Figure 15 on page 30)
50–75 HP at 460 Vac, Constant Torque (CT) and Variable Torque Low Noise (VTLN)
60–100 HP at 460 Vac, Variable Torque (VT)
Termination
Designation
Device
Torque
(lb-in/N•m)
Maximum
Wire Size
(AWG/mm2)
Wire Class
Noise Class
Voltage Class
Applicable
HP Ratings
T1, T2, T3
Converter
Fuse Block
375 / 43➀
250 MCM
60° / 75° C
CU-AL
SW2
600 V
All
L1, L2, L3
Power Converter
70 / 9➁
#2 / 35➁
75° C CU
SW2
600 V
All
T1, T2, T3
Power Converter
70 / 9➁
#2 / 35➁
75° C CU
PW1
600 V
All
PA, PB
Power Converter
27 / 3
#2 / 35
75° C CU
PW1
600 V
All
T1, T2, T3
Iso/Bypass Starter of
Isolation Contactor
(if applicable)
35 / 4
#3 / —
75° C CU
PW1
600 V
50–60 HP
88 / 10
#1 / —
75° C CU
PW1
600 V
75 HP
159 / 18
1/0 / —
75° C CU
PW1
600 V
100 HP VT
L1, L2, L3
Line Contactor
(if applicable)
88 / 10
2/0 / —
75° C CU
SW2
600 V
50–60 HP
159 / 18
3/0 / —
75° C CU
SW2
600 V
75–100 HP
Any
Power Converter
J1
3.5 /0.4
#14 / 1.5
75° C CU
SW1
150 V / 300 V
All
Any
Power Converter
J12, J22, J24
3.5 / 0.4
#14 / 1.5
75° C CU
QW2
30 V
All
Any
Power Converter
J13, J23
3.5 / 0.4
#14 / 1.5
75° C CU
QW1
30 V
All
X1, X2, S1, S2,
1, 2, 3 through n
Terminal Block FTB
5 / 0.57
#14 / 1.5
75° C CU
SW1
150 V
All
C1, C2, C3
through Cn
Terminal Block FTB
5 / 0.57
#14 / 1.5
75° C CU
QW1
30 V
All
D1, D2, D3
through Dn
Terminal Block FTB
5 / 0.57
#14 / 1.5
75° C CU
QW2
30 V
All
➀
For VT 100 HP—Converter fuse block torque is 500 lb-in / 57 N•m.
➁
These are recommended wire sizes and torque. The maximum wire size is #4/0 AWG / 70 mm2 and the recommended torque for this wire size
is 170 lb-in / 19 n•m.
28
© 1997 Square D All Rights Reserved
Bulletin No. 80442-507-01A
February 1998
ALTIVAR™ Drive Controller Units in Class 8998 MCCs
Appendix B—Field Wiring Termination Drawings
Disconnect
means
Converter fuses
and fuse block
Line
reactor
(optional)
location
FTB
Fan
Isolation and/or
bypass contactors
(if supplied)
Overload relay
(if supplied)
B1 MOD
Legend➀
QW1, QW2
SW2, PW1
Figure 14:
Field Wire Termination for Frame Size 5, Altivar Frequency
Controller with Extended Options in MCCs
(Table 11 on page 28)
50–75 HP at 460 Vac, Constant Torque (CT)
and Variable Torque Low Noise (VTLN)
60–100 HP at 460 Vac, Variable Torque (VT)
Notes:
➀
For description, refer to “WIRE ROUTING AND INTERCONNECTION” on
page 8.
➁
Arrange conductor groups depth-wise within the unit and structure to
maximize separation of each noise class.
© 1997 Square D All Rights Reserved
29
ALTIVAR™ Drive Controller Units in Class 8998 MCCs
Appendix B—Field Wiring Termination Drawings
Bulletin No. 80442-507-01A
February 1998
Disconnect
means
Converter fuses
and fuse block
Bypass contactor
(if supplied)
Line
reactor
(optional)
location
FTB
Isolation
Overload relay
(if supplied)
B1 MOD
Legend➀
QW1, QW2
SW2, PW1
Figure 15:
Field Wire Termination for Frame Size 5 Altivar Frequency
Controller with Extended Options in MCCs
(Table 11 on page 28)
50–75 HP at 460 Vac, Constant Torque (CT)
and Variable Torque Low Noise (VTLN)
60–100 HP at 460 Vac, Variable Torque (VT)
Notes:
30
➀
For description, refer to “WIRE ROUTING AND INTERCONNECTION” on
page 8.
➁
Arrange conductor groups depth-wise within the unit and structure to
maximize separation of each noise class.
© 1997 Square D All Rights Reserved
Bulletin No. 80442-507-01A
February 1998
ALTIVAR™ Drive Controller Units in Class 8998 MCCs
Appendix B—Field Wiring Termination Drawings
Table 12:Field Wire Termination Chart for Basic Frame Size 6 ALTIVAR
Adjustable Frequency Controller in MCCs (see Figure 16 on page 32)
100–200 HP at 460 Vac, Constant Torque (CT) and Variable Torque Low Noise (VTLN)
125–200 HP at 460 Vac, Variable Torque (VT)
Termination
Designation
Device
Torque
(lb-in/N•m)
Maximum
Wire Size
(AWG/mm2)
T1, T2, T3
Converter Fuse Block
148 / 16.8
250 kcmil
N/A
SW2
600 V
All
L1, L2, L3
Power Converter
325 / 36.7
350 kcmil / 185
75° C CU
SW2
600 V
100–125 HP
375 / 42.4
2–300 kcmil / 2–150
75° C CU
SW2
600 V
150–200 HP
T1, T2, T3
Power Converter
325 / 36.7
350 kcmil / 185
75° C CU
PW1
600 V
All
Wire Class
Noise Class
Voltage
Class
Applicable
HP Ratings
PA, PB
Power Converter
50 / 5.6
1/0 / 50
75° C CU
PW1
600 V
All
Any
Power Converter J1
3.5 /0.4
#14 / 1.5
75° C CU
SW1
150 V / 300 V
All
Any
Power Converter
J12, J22, J24
3.5 / 0.4
#14 / 1.5
75° C CU
QW2
30 V
All
Any
Power Converter
J13, J23
3.5 / 0.4
#14 / 1.5
75° C CU
QW1
30 V
All
X1, X2, S1, S2,
1, 2, 3 through n
Terminal Block FTB
5 / 0.57
#14 / 1.5
75° C CU
SW1
150 V
All
C1, C2, C3
through Cn
Terminal Block FTB
5 / 0.57
#14 / 1.5
75° C CU
QW1
30 V
All
D1, D2, D3
through Dn
Terminal Block FTB
5 / 0.57
#14 / 1.5
75° C CU
QW2
30 V
All
© 1997 Square D All Rights Reserved
31
ALTIVAR™ Drive Controller Units in Class 8998 MCCs
Appendix B—Field Wiring Termination Drawings
Bulletin No. 80442-507-01A
February 1998
Disconnect
means
FTB
Fan
Fan
Note 2
Legend➀
QW1, QW2
SW2, PW1
Figure 16:
Field Wire Termination for Basic Frame Size 6 ALTIVAR
Adjustable Frequency Controller in MCCs
(Table 12 on page 31)
100–200 HP at 460 Vac, Constant Torque (CT)
125–200 HP at 460 Vac, Variable Torque (VT)
Notes:
32
➀
For description, refer to “WIRE ROUTING AND INTERCONNECTION” on
page 8.
➁
Arrange conductor groups depth-wise within the unit and structure to
maximize separation of each noise class.
© 1997 Square D All Rights Reserved
Bulletin No. 80442-507-01A
February 1998
ALTIVAR™ Drive Controller Units in Class 8998 MCCs
Appendix B—Field Wiring Termination Drawings
Table 13:Field Wire Termination for Frame Size 6 ALTIVAR 66 Frequency Controller
with Extended Options in MCCs (see Figure 17 on page 34)
100–200 HP at 460 Vac, Constant Torque (CT) and Variable Torque Low Noise (VTLN)
125–200 HP at 460 Vac, Variable Torque (VT)
Termination
Designation
Device
T1, T2, T3
Converter Fuse Block
L1, L2, L3
Power Converter
T1, T2, T3
Power Converter
Torque
(lb-in/N•m)
Maximum
Wire Size
(AWG/mm2)
Wire Class
148 / 16.8
N/A
75° C CU-AL
SW2
600 V
All Above
325 / 36.7
350 kcmil / 185
75° C CU
SW2
600 V
All Above
375 / 42.4
2–300 kcmil / 2–150
75° C CU
SW2
600 V
All Above
325 / 36.7
350 kcmil / 185
75° C CU
PW1
600 V
All Above
Noise Class
Voltage
Class
Applicable
HP Ratings
PA, PB
Power Converter
50 / 5.6
1/0 / 50
75° C CU
PW1
600 V
All Above
T1, T2, T3
Iso/Bypass Starter or
Isolation Contactor
(if applicable)
158 / 18
3/0 / —
75° C CU
PW1
600 V
100–150 HP
308 / 35
250 kcmil / —
75° C CU
PW1
600 V
200 HP
Line Contactor
(if applicable)
158 / 18
2/0 / —
75° C CU
SW2
600 V
100 HP
308 / 35
250 kcmil / —
75° C CU
SW2
600 V
125–200 HP
L1, L2, L3
Any
Power Converter J1
3.5 /0.4
#14 / 2.5
75° C CU
SW1
150 V / 300 V
All Above
Any
Power Converter
J12, J22, J24
3.5 / 0.4
#14 / 2.5
75° C CU
QW2
30 V
All Above
Any
Power Converter
J13, J23
3.5 / 0.4
#14 / 2.5
75° C CU
QW1
30 V
All Above
X1, X2, S1, S2,
1, 2, 3 through n
Terminal Block FTB
5 / 0.57
#14 / 2.5
75° C CU
SW1
150 V
All Above
C1, C2, C3
through Cn
Terminal Block FTB
5 / 0.57
#14 / 2.5
75° C CU
QW1
30 V
All Above
D1, D2, D3
through Dn
Terminal Block FTB
5 / 0.57
#14 / 2.5
75° C CU
QW2
30 V
All Above
© 1997 Square D All Rights Reserved
33
ALTIVAR™ Drive Controller Units in Class 8998 MCCs
Appendix B—Field Wiring Termination Drawings
Bulletin No. 80442-507-01A
February 1998
Fans
FTB
Legend➀
QW1, QW2
SW2, PW1
Figure 17:
Field Wire Termination for Frame Size 6 ALTIVAR 66 Adjustable
Frequency Controller with Extended Options in MCCs
(Table 13 on page 33)
100–200 HP at 460 Vac, Constant Torque (CT)
125–200 HP at 460 Vac, Variable Torque (VT)
Notes:
34
➀
For description, refer to “WIRE ROUTING AND INTERCONNECTION” on
page 8.
➁
Arrange conductor groups depth-wise within the unit and structure to
maximize separation of each noise class.
© 1997 Square D All Rights Reserved
Bulletin No. 80442-507-01A
February 1998
ALTIVAR™ Drive Controller Units in Class 8998 MCCs
Appendix B—Field Wiring Termination Drawings
Table 14:Field Wire Termination for Frame Size 7 ALTIVAR 66 Frequency Controller
with Extended Options in MCCs (see Figure 18 on page 36 and Figure 19 on page 37)
250–350 HP at 460 Vac, Constant Torque (CT)
250–400 HP at 460 Vac, Variable Torque (VT)
Termination
Designation
Device
Torque
(lb-in/N•m)
Maximum
Wire Size
(AWG/mm2)
Wire Class
Noise Class
Voltage
Class
Applicable
HP Ratings
T1, T2, T3
Power Converter
375 / 42.4
3–500 kcmil / 185
75° C CU
PW1
600 V
All
PA, PB
Power Converter
375 / 42.4
3X500 kcmil
75° C CU
PW1
600 V
All
Any
Power Converter J1
3.5 /0.4
#14 / 2.5
75° C CU
SW1
150 V / 300 V
All
Any
Power Converter
J12, J22, J24
3.5 / 0.4
#14 / 2.5
75° C CU
QW2
30 V
All
Any
Power Converter
J13, J23
3.5 / 0.4
#14 / 2.5
75° C CU
QW1
30 V
All
X1, X2, S1, S2,
1, 2, 3 through n
Terminal Block FTB
5 / 0.57
#14 / 2.5
75° C CU
SW1
150 V
All
C1, C2, C3
through Cn
Terminal Block FTB
5 / 0.57
#14 / 2.5
75° C CU
QW1
30 V
All
D1, D2, D3
through Dn
Terminal Block FTB
5 / 0.57
#14 / 2.5
75° C CU
QW2
30 V
All
© 1997 Square D All Rights Reserved
35
ALTIVAR™ Drive Controller Units in Class 8998 MCCs
Appendix B—Field Wiring Termination Drawings
Bulletin No. 80442-507-01A
February 1998
4
1
3
L1
L2
5
L3
1
3
L1
L2
5
L3
DANGER
OFF
OFF
CB1
2
T1
CB2
4
T2
6
T3
2
T1
4
T2
6
T3
4
Legend➀
SW2, PW1
Figure 18:
Field Power Wire Termination for Basic Frame Size 7
ALTIVAR 66 Adjustable Frequency Controller in MCCs
(Table 14 on page 35)
250–350 HP at 460 Vac, Constant Torque (CT)
250–400 HP at 460 Vac, Variable Torque (VT)
Notes:
36
➀
For description, refer to “WIRE ROUTING AND INTERCONNECTION” on
page 8.
➁
Arrange conductor groups depth-wise within the unit and structure to
maximize separation of each noise class.
© 1997 Square D All Rights Reserved
Bulletin No. 80442-507-01A
February 1998
ALTIVAR™ Drive Controller Units in Class 8998 MCCs
Appendix B—Field Wiring Termination Drawings
4
1
3
L1
L2
5
L3
1
3
L1
L2
5
L3
DANGER
OFF
OFF
CB1
2
T1
CB2
4
T2
6
T3
2
T1
4
T2
6
T3
4
Legend➀
QW1, QW2
Figure 19:
Field Control Wire Termination for Basic Frame Size 7
ALTIVAR 66 Adjustable Frequency Controller in MCCs
(Table 14 on page 35)
250–350 HP at 460 Vac, Constant Torque (CT)
250–400 HP at 460 Vac, Variable Torque (VT)
Notes:
➀
For description, refer to “WIRE ROUTING AND INTERCONNECTION” on
page 8.
➁
Arrange conductor groups depth-wise within the unit and structure to
maximize separation of each noise class.
© 1997 Square D All Rights Reserved
37
ALTIVAR™ Drive Controller Units in Class 8998 MCCs
MAINTENANCE LOG
Bulletin No. 80442-507-01A
February 1998
MAINTENANCE LOG
38
© 1997 Square D All Rights Reserved
Square D Company
1990 Sandifer Blvd.
Seneca, SC 29678 USA
80442-507-01A February 1998 Printed in USA
© 1997 Square D All Rights Reserved