Transcript
You can download the user's manual from our website.
For User's manual
http://panasonic.net/id/pidsx/global
1P2W
Power supply
terminals
Voltage input terminals
(Main Unit)
(Main Unit)
1. Before use
●Refer to Installation instructions of Main Unit.
■For your safety, make sure to satisfy the following conditions.
・ Overvoltage category:Ⅲ, Pollution degree 2
・ Indoor use
・ An ambient temperature of -10 to 50℃
・ An ambient non-condensing humidity of 30 to 85%RH (at 20℃)
・ Altitude of 2000m or less
■Do not use in the following environments.
・ Where it will be exposed to direct sunlight
・ Where inflammable or corrosive gas might be produced
・ Where it will be exposed to excessive airborne dust or metal particles
・ Where it will be exposed to water, oil or chemicals
・ Where direct vibration or shock might be transmitted
・ Where the place near high-voltage cable, power line or machineries which
occurs the big switching serge.
Hook
Expansion
connector
(male)
Hook
・Be sure to wire correctly according to the wiring diagrams.
・Never open the secondary circuit of CT under applying current to load,
never remove the terminal block under applying current to load, it will
cause electric shock or breakdown CT.
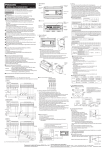
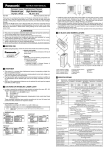
◆Terminal arrangement
2. Parts Name
◆Side
CH1
Current input terminals
(Upper)
Name
Part number
0.75mm2
1.25mm2
H0.75/14D GR
H1.5/14D SW
9019040000
◆Dimensions
(unit: mm)
(tolerance:±1.0)
70
20
85
45
48.8
65
http://panasonic.net/id/pidsx/global
6 7
NC
1
2
3
4
5
6
1
2
3
4
5
6
CH2 CH2 CH2 CH2 CH2 CH2
CT1 CT1 CT2 CT2 CT3 CT3
k
k
k
CH1 CH1 CH1 CH1 CH1 CH1
CT1 CT1 CT2 CT2 CT3 CT3
k
k
k
Vn
(To measure
each-circuit)
(To measure each-circuit)
X
CT1
CT2
CT3
L1(R)
N
K
CT1
L
Power supply
terminals
Voltage input terminals
(Main Unit)
(Main Unit)
CT2
CT3
1
2
1
2 3
4
5
6 7
L+
N-
V1
NC V2
NC
V3
NC
9019120000
2mm2 ※
H2.5/15D BL
X
1
2
3
4
5
6
1
2
3
4
5
6
CH2 CH2 CH2 CH2 CH2 CH2
CT1 CT1 CT2 CT2 CT3 CT3
k
k
k
CH1 CH1 CH1 CH1 CH1 CH1
CT1 CT1 CT2 CT2 CT3 CT3
k
k
k
Vn
(To measure
each-circuit)
X
AUX
(Power supply)
CT1
L1(R)
L2(N/S)
L3(T)
K
CT3
L
CT1
3P4W
Power supply
terminals
Voltage input terminals
(Main Unit)
(Main Unit)
9019160000
・ Use CT that the secondary side current is 5A or 1A.
・ One CT is needed when measuring 1-circuit of 1P2W.
Two CTs are needed when measuring 1P3W/3P3W (4 CTs for 2-circuit).
Three CTs are needed when measuring 3P4W (6 CTs for 2-circuit).
Using all CTs for one unit should be the same.
・ Use the applicable wire, or it might cause a breakdown, burnout or
electric shock.
・ When connecting CT, connect the secondary side to the terminal of the
main unit first, and after that wire the primary side to a load electric wire.
Incorrect order might cause an electric shock or break CT.
・ The CT has polarity. Wire correctly according to the K and L marks.
Wrong direction can’ t measure correctly.
・ If there is some distortion by harmonic or waveform, it may not measure
correctly. Please check with the actual system before adopts it.
・ Separate the wiring (strong electric part) of the measured voltage input
terminal (operating power supply terminal) from the CT cable.
It may not satisfy the accuracy due to noise.
X
Current input terminals Current input terminals
(Expansion Unit : Upper) (Expansion Unit : Lower)
Breaker
1
2
1
2 3
4
5
6 7
L+
N-
V1
NC V2
NC
V3
NC
XX
X
X
X
CT3
Current input terminals Current input terminals
(Expansion Unit : Upper) (Expansion Unit : Lower)
1
2
3
4
5
6
1
2
3
4
5
6
CH2 CH2 CH2 CH2 CH2 CH2
CT1 CT1 CT2 CT2 CT3 CT3
k
k
k
CH1 CH1 CH1 CH1 CH1 CH1
CT1 CT1 CT2 CT2 CT3 CT3
k
k
k
Vn
(To measure
each-circuit)
X
Breaker
AUX
(Power supply)
L1(R)
Power
supply side
3. How to Mount
5
V3
X
AUX
(Power supply)
5. How to attach Current Transformer
CH2
Current input terminals
(Lower)
4
NC
Breaker
Power
supply side
1
2
k
CH1(CT1)
◆Applicable ferrules (by Weidmuller)
Wire size
2 3
NC V2
XX
3
4
5
6
k
k
Functions
CH1(CT2)
CH1(CT3)
Measured current(CH1)
*Lower terminals are used for CH2.
◆Applicable wire (Crimp-type terminal is recommended.)
・Stripping length: 7 to 8mm
・Measured current (CT input)
Push IN type
Sectional area: single /stranded wire 0.13 to 1.5mm2(AWG24 to 16)
*Use applicable wire according to the measured current.
■This product has been developed / produced for industrial use only.
1
V1
XX
Current input terminals (Upper)
Terminal number
2
N-
1P3W/3P3W
Hook
4. Wiring
■Pursuant to the directive 768/2008/EC
Manufacturer : Panasonic Industrial Devices SUNX Co.,Ltd.
2431-1 Ushiyama-cho, Kasugai-shi, Aichi, 486-0901, Japan
Importer
: Panasonic Electric Works Europe AG
Rudolf-Diesel-Ring 2, 83607 Holzkirchen, Germany
Contact for CE: Panasonic Marketing Europe GmbH Panasonic Testing Center
Winsbergring 15, 22525 Hamburg, Germany
◆Front
Expansion
connector
(male)
Power
supply side
Hook
1
L+
Current input terminals Current input terminals
(Expansion Unit : Upper) (Expansion Unit : Lower)
Load side Load side
Read these instructions carefully for proper installation.
After installation, keep it in a safe place for reference when required.
・ Recommended breaker: 3 -15A (IEC approved or UL listed)
・ Recommended fuse: Time-lag fuse Rated current 2A (IEC approved or UL listed)
Load side Load side
Expansion Unit
6. Wiring Diagram
CT1
L2(S)
Load side
KW2M-A Eco-POWER METER
· Turn off the power when connecting the expansion units.
· Peel off connector label on the side before connecting.
· (Do not peel off connector labels when not connecting.)
· It expands by connecting each male connector to female connector on the
each side.
· After connecting, push the hooks into the unit to fix the expansion units.
· Up to 3 expansion units can be connected per one main unit.
Caution) Communication will be stopped or the measurement data will be lost
when the units are removed or connected with the power on.
CT2
L3(T)
CT3
N
K
L
CT1
CT2
CT3
Vn terminal should be connected to N-phase which is grounded.
8A3 M56 7000 1
Overseas Sales Division (Head Office)
2431-1 Ushiyama-cho, Kasugai-shi, Aichi, 486-0901, Japan Phone: +81-568-33-7861 FAX: +81-568-33-8591
© Panasonic Industrial Devices SUNX Co., Ltd. 2015 PRINTED IN JAPAN
About our sale network, please visit our website.
Load side
◆How to connect the expansion unit
Installation instructions