1
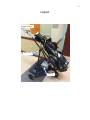
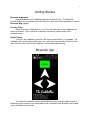
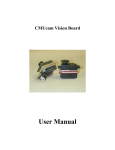
User Manual
Contents
1.
2.
3.
4.
5.
6.
Layout ………………………………………………………………………………….2
Getting Started ………………………………………………………………………..3
Bluetooth App………………………………………………………………………….3
Charging…………………………………………………………………..……………4
Vision System …………………………………………………………………………4
Troubleshooting………………………………………………………………………..5
2
Layout
Toggle Switch
Pixy Cam
Battery
3
Getting Started
Bluetooth Application
Download Bluetooth LE Caddiellac application (Android only). The Bluetooth
override feature is only available for Android devices. See more of the application in section
Bluetooth App (page X).
Pre-start Setup
Before turning the Caddiellac on, put on the color code vest so the Caddiellac can
track your position. Also, ensure all connections are secure (battery wires, motor
connections etc.).
Simple Startup
To turn on the Caddiellac, press the ‘ON’ switch located XXXX (X in Layout). The
Caddiellac will now be ready to follow the color code on the reverse side of the color code
vest. Walk 4-6 feet in front of the Caddiellac, and it should start following.
Bluetooth App
To control the Caddiellac via the Android Bluetooth app, open the app and scroll to
the bottom script to ensure your mobile device has connected to the Bluetooth chip located
on the Caddiellac control board.
4
Next, tap the green ‘Enable’ button to equip Bluetooth override.
Now, the user is able to control the movement of the Caddiellac with the directional
arrows on the screen. To stop Bluetooth override, press the red ‘Disable’ button.
Charging
To charge the Caddiellac battery, first ensure the Caddiellac is off and detach the
battery from the cart. Next, charge the battery using a standard 12-Volt car charger. When
the battery is fully charged, reconnect the battery to the Caddiellac.
Vision System
(http://www.cmucam.org/projects/cmucam5/wiki/Teach_Pixy_an_object_2)
How to Change the Color Code
1. Install PixyMon on your personal computer
i. Mac:http://www.cmucam.org/projects/cmucam5/wiki/Install_PixyMon_
on_Mac
ii. Windows:http://www.cmucam.org/projects/cmucam5/wiki/Install_PixyM
on_on_Windows_Vista_7_8
2. Hook up the PixyCam through USB connection
3. Select Action → Set CC signature 1 from the pulldown menu
4. Using the mouse, click and drag to select the region you want Pixy to learn as the
color 1
5. Select Action → Set CC signature 2 from the pulldown menu
6. Using the mouse, click and drag to select the region you want Pixy to learn as the
color 2
7. Repeat for additional colors for the color code if desired. Note: There need to be at
least colors in the color code. If there more than two, the Pixy will recognize any
combination of two colors; it does not need to have all colors shown to register.
8. On the main screen, click the home button to put the Pixy in default mode.
How to Improve Quality of Color Capture
1. Select File → Configure
2. Under Pixy Parameters, select Signature Tuning
3. Use the slider for Signature 1 range to adjust the inclusiveness of CC signature 1
(assuming it's signature 1 you're wanting to adjust). Slide it to the left if you want to
be less inclusive.
4. Select Apply or OK to save the slider ranges.
Common Problems
1. Make sure the Pixy is receiving 5V from the board. (Jumper in appropriate place)
2. If signal is not constant due to varying light conditions, reset the Color Code for
better control.
5
3. The white button on top of the Pixy will reset the camera settings, so if pressed,
follow the directions about for changing the color code to reset the desired
parameters.
4. When reprogramming the Pixy, be sure to always have it in default mode (Blue and
white house on home screen of PixyMon) before integrating it back into the
Caddiellac. The color code will not properly register if the Pixy is not left in default
mode.
Troubleshooting
Following
If the Caddiellac does not follow the golfer, first ensure the camera is picking up the
color code on the vest. To do this, hold up the color code vest with the colors facing the
camera up to the lens (3-5 feet away).
If the camera’s LED (located on the bottom of the camera module) lights up, it is
capturing the color code on the vest and the Caddiellac should move and follow the user at
a distance (several feet). If the LED does not light up when the color code is shown in front
of the lens, a systematic problem may be the issue (consult Vision System on page X).
Bluetooth Application
If the Bluetooth override feature is not working for the user’s phone, first consult the
script at the bottom of the app to ensure the device is connected to the Bluetooth device on
the Caddiellac control board.
If the device is connected and the Caddiellac is not responding, disconnect the
phone from the Bluetooth device, close the app, and restart the Caddiellac. With the
Caddiellac on, reopen the app and reconnect the phone to the Bluetooth device. Check the
script at the bottom of the application to ensure connection was successful. Press the
green ‘Enable’ button and a directional arrow to see if the Caddiellac responds to the app.
If problems persist, power off the Caddiellac and disconnect from the application.
Power
If the Caddiellac does not turn on, first check the battery charge level. If the charge
level is insufficiently low, disconnect the battery from the Caddiellac and recharge the
battery. Reconnect the battery to the Caddiellac and check if the Caddiellac powers on.
If the battery is sufficiently charged, check the control board. If the red LED labeled
‘PWR’ is not lit, the control board is not on. This would be a systematic error: disconnect
the battery from the control board and check all other connections.