1
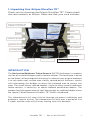
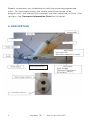
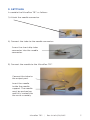
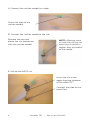
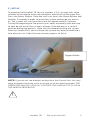
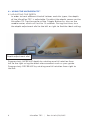
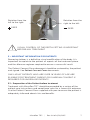
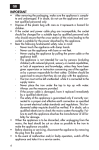
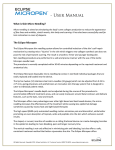
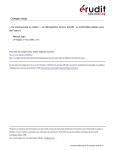
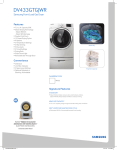
T A T T O O R E M O V A L USER MANUAL Don’t regret it... Remove it! METR Mechanized Epidermal Tattoo Removal TABLE OF CONTENTS PAGE 1. UNPACKING YOUR MICROPEN TR™.......................................................................... 1 INTRODUCTION................................................................................................................... 1 2. DESCRIPTION...................................................................................................................... 2 3. SETTINGS..............................................................................................................................3 3.1 – SET UP...........................................................................................................................5 4. USING THE MICROPEN TR™........................................................................................6 4.1 ADJUSTING THE SPEED OF THE MOTOR......................................................6 4.2 ADJUSTING THE INJECTION DEPTH...............................................................6 5. IMPORTANT INFORMATION FOR PATIENTS....................................................... 7 5.1 – PREPARATION OF THE PATIENT BEFORE TREATMENT.................... 7 6. CHARGING THE BATTERY...........................................................................................8 7. MAINTENANCE...................................................................................................................8 8. CAUTIONS & WARNINGS..............................................................................................9 9. CONTRAINDICATIONS...................................................................................................9 10. GENERAL FEATURES.................................................................................................. 10 10.1 IDENTIFICATION....................................................................................................... 10 10.2 GENERAL CONFIGURATION............................................................................ 10 11. TECHNICAL CHARACTERISTICS............................................................................ 10 1. Unpacking Your Eclipse MicroPen TR™ Thank you for choosing the Eclipse MicroPen TR™. Please check the case contents as follows. Make sure that your case includes: Protocols, information and registration of the patient User manual 3 templates 1 USB key 3 needle’s connector 1 MicroPen TR™ device 1 power supply 1 MicroPen TR™ support 3 needles treatment 2 cleaning liquids 3 needles 50 mm of suction product 1 METR vials 6 tubes 130 mm 1 Female to Female Luer Lok INTRODUCTION The Mechanized Epidermal Tattoo Removal (METR) technique is a modern version of an old technique used to remove tattoos. The technique is based on the theory of localized partial healing. Its advance over original methods is to rely upon small surface area, closely spaced partial thickness injuries with intervening skin bridges to return the tattooed area to normal skin color. The use of closely spaced needles, similar to those used in traditional tattoo devices, is necessary to obtain defined penetration depths. The needles facilitate penetration of the tattoo target to a defined depth where the special Tattoo Removal MicroPen TR™ fluid is introduced. The tattooed area will reject the ink through cutaneous exfoliation and produce a scab or eschar. The treated area will heal over a period of 2 to 3 weeks and the scab will fall away leaving clear skin beneath. MicroPen TR™ | Rev. 02 of 6/16/2015 1 Repeat treatments are scheduled to treat the remaining pigmented areas. This technique allows the whole area of the tattoo to be progressively and sequentially covered, and then removed, in three - five sessions. See Treatment Information Form for full detail. 2. DESCRIPTION Output Port Input Port Depth-adjustment dial Charging On/Off Power Button 2 MicroPen TR™ | Rev. 02 of 6/16/2015 3. SETTINGS Assemble the MicroPen TR™ as follows: 1) Attach the needle connector 2) Connect the tube to the needle connector Screw the short drip tube connector into the needle connector. 3) Connect the needle to the MicroPen TR™ Connect the tube to the output port. Insert the needle inside the needle support. The needle must be pushed up and fully seated into the nose assembly. MicroPen TR™ | Rev. 02 of 6/16/2015 3 4) Connect the suction needle to a tube. Screw the tube to the suction needle. 5) Connect the suction needle to the vial Remove the cap and pierce the vial membrane with the suction needle. NOTE: Allowing some air into the vial may be necessary to obtain a regular flow of product to the needle. 6) Set up the METR vial Insert the vial in the upper housing chamber of MicroPen TR™. Connect the tube to the Input Port. 4 MicroPen TR™ | Rev. 02 of 6/16/2015 3 .1 SET UP To prepare the MicroPen TR for use, connect a 3 cc syringe with saline solution to the female to female connector and attach to the Input Port. Press the Power Button. Once the unit is on, press the Power Button and hold for 3 seconds in order to prime the system and purge any excess air. The system will run the prime cycle for approximately 2 minutes. During the beginning of the prime cycle, apply extremely light pressure to (but do not push) the syringe’s plunger. Hold the pen in a vertical position during the process. Once you see droplets exiting the system from the Output Port, you will know the system has been primed and is free of excess air. Allow the two-minutes process to finish. Trigger Button NOTE: If you do not see droplets exiting from the Output Port, you may need to repeat the prime cycle to ensure all air has been removed. THE OPERATOR SHOULD VISUALLY CONTROL THE AMOUNT OF FLUID IN THE NEEDLE RESERVOIR ! MicroPen TR™ | Rev. 02 of 6/16/2015 5 4 – USING THE MICROPEN TR™ 4.1 ADJUSTING THE DEPTH In order to treat different kind of tattoos and skin types, the depth of the MicroPen TR™ is adjustable. To adjust the depth, power on the MicroPen TR. Tap the center of the Trigger Button to turn on the needle motor, which will last for 12 seconds. During that time, turn the depth-adjustment dial to the left or right to find the ideal setting. Depth-adjustment dial Progressively INCREASE depth by rotating one full rotation from left to the right using the black measurement mark as your guide. Progressively DECREASE by rotating one full rotation from right to the left. 6 MicroPen TR™ | Rev. 02 of 6/16/2015 Rotation from the left to the right: Rotation from the right to the left: DEEP ! DEEP VISUAL CONTROL OF THE DEPTH SETTING IS IMPORTANT BEFORE ANY TREATMENT 5 – IMPORTANT INFORMATION FOR PATIENTS Removing tattoos is a definitive visual modification of the body. It is important to explain to the patient all aspects of the treatment phase and the aftercare regimen required to ensure a successful result. The Patient Consent Form document should be reviewed by the patient and signed. See Patient Consent Form documents. ONLY ADULT PATIENTS WHO ARE OVER 18 YEARS OF AGE ARE ELIGIBLE FOR TREATMENT. PARENT OR GUARDIAN CONSENT IS REQUIRED FOR UNDER-AGE PATIENTS. 5.1 - Preparation of the Patient before treatment Treatment with MicroPen TR™ should be preceded by a review of the patient care instructions and compliance rules for a successful outcome. Use the Patient Consent Form supplied with pen to ensure the patient is adequately informed about risks and benefits. MicroPen TR™ | Rev. 02 of 6/16/2015 7 6 – CHARGING THE BATTERY The MicroPen TR™ is equipped with an internal Lithium/Ion battery which has a life of 2 hours treatment time. The battery level is indicated by the light indicator on the device: - Full battery: Green light - Empty battery: Red flashing light - Charging: Green and red light simultaneous When a red flashing light appears, the battery should be recharged by plugging the pen into the power supply. . Charging time is approximately about 1 hour. NOTE: MicroPen TR™ may be used while the battery is charging. 7 – MAINTENANCE If MicroPen TR™ is not used daily, the system should be ‘bled’ to remove old treatment fluid. Connect a 3 cc syringe with saline solution to the female to female connector and attach to the Input Port. Press the Power Button. Once the unit is on, press the Power Button and hold for 3 seconds in order to remove any old fluid from the MicroPen TR. The system will run the priime cycle for approximately 2 minutes. During the beginning of the prime cycle, apply light pressure to (but do not press) the syringe plunger. Allow the cycle to complete. Regularly clean the device with a soft, lint-free wipe or cloth. Do not use proprietary cleaning solution on any component of MicroPen TR™. Parts that come into contact with a patient must be changed between each patient or sterilized according to the manufacturer’s instructions. SINGLE-USE PARTS: MICROPEN TR™ NEEDLE – SHORT DRIP – SUCTION NEEDLE – METR VIAL MUST BE CHANGED BETWEEN EACH PATIENT. REUSABLE PARTS: NEEDLE CONNECTOR MUST BE REPLACED OR DECONTAMINATED IN A COLD SOLUTION OF 2% GLUTARALDEHYDE BEFORE EACH USE. Please check individual state, local, federal and country regulations for correct care and sanitation of each component used in the MicroPen TR™ process. To extend the life of the MicroPen TR™ system, an ANNUAL FACTORY tune up is highly recommended. 8 MicroPen TR™ | Rev. 02 of 6/16/2015 MicroPen TR™ and the battery are guaranteed for one (1) year from the date of purchase. The MicroPen TR™ components and its battery are subject to strict environmental rules and should be disposed of according to local, state, federal and country regulations. 8 – CAUTIONS & WARNINGS THE OPERATION OF MICROPEN TR™ IS STRICTLY LIMITED TO HEALTH CARE PROFESSIONALS WHO HAVE RECEIVED SPECIFIC TRAINING IN THE USE OF THE DEVICE AND HAVE BEEN CERTIFIED BY THE COMPANY OR ITS REPRESENTATIVE. All users must know and understand the risks and contraindications associated with MicroPen TR applications and treatments. The METR fluid product used with the MicroPen TR must not come in contact with the eyes, the mouth or mucous membranes. In case of accidental contact, rinse well with water. ONLY THE METR FLUID PRODUCT SUPPLIED BY THE MANUFACTURER OF THE MICROPEN TR CAN BE USED BY THE HEALTH CARE PROFESSIONAL SUPERVISING THE TREATMENT. Failure to adhere to this warning, absolves the manufacturer of any and all liability. The practitioner must acknowledge the possibility of a negative or a partial result. Risks of poor healing, hyperpigmentation, hypopigmentation or allergies to the technique can occur. Please review the supplied documentation covering Risks and Contraindications to treatment. 9 – CONTRAINDICATIONS The METR treatment is contraindicated for the following conditions: - Pregnant or breast feeding - Patients who have demonstrated allergy to hydroxypropanoic acid - Patients who have demonstrated healing difficulties - Patients with suppressed immune response - Patients with hemophilia It is necessary to exercise caution for the following patients: - Diabetic patients - Patients with poor healing capacity - Patients undergoing long-term steroid treatment - Patients immunocompromised either through drug or disease MicroPen TR™ | Rev. 02 of 6/16/2015 9 10 – GENERAL FEATURES 10 – GENERAL FEATURES 10.1 - IDENTIFICATION 10.1 IDENTIFICATION - Model: MAGIC-PEN TR1000 - OwnerModel: of the homologation: BFP Electronique Pôle TechnologiqueOwner de Vimenet of the homologation: - Manufactured for: 48100 MONTRODAT - France BFP Electronique Eclipse Aesthetics, LLC. : +33 (0)4 66 32 44 99 Technnologique de Vimenet Pole 13988 Diplomat Drive, Suite 160 48100 MONTRODAT - France Dallas, Texas 75234 - Manufacturer of the device: Idem +33 (0)4 66 32 44 99 800-759-6876 10.2 GENERAL CONFIGURATION - Manufacturer of the device: Idem - Model reference: MAGIC PEN - Serial number: MG amm-0000 10.2 GENERAL CONFIGURATION - Model reference: MicroPen TR™ Tattoo Removal 11- TECHNICAL CHARACTERISITICS - Serial Dimensions : 23 xnumber: 10 x 3 cmMG amm-0000 Weight: 170 g Voltage: 5 V = 11 –IPTECHNICAL CHARACTERISTICS Protection: 20 Power: 8Dimensions W : 23 x 10 x 3 cm Battery:Weight: 170 g Type: Li-Ion Voltage: 5 V = Capacity: 0,80 Ah Protection: IP 20 Autonomy: 2 hours Power: 8W ChargingBattery: time: 1 hour Charge voltage: 5V Type: Li-Ion Capacity: 0.80 Ah Electric Autonomy: security: (type B) 2 hours Charging time: 1 hour Charge voltage: 5 V Manufacturer Electric security: (type B) WARNING: Refer to instruction WARNING: Refer to manual instruction manual Class II Identification of waste electrical and electronic equipment (WEEE) according En 50419 Identification of waste electrical and electronic equipment (WEEE) according En -PEN of 25/02/2014 / 12 version Made by: BFP Electronique Pôle Technologique de Vimenet 48 100 MONTRODAT +33 (0)4 66 32 44 99 + 33 (0)4 66 32 45 03 0459