1
GB
IMPORTANT
•
•
•
•
•
•
•
4
After removing the packaging, make sure the appliance is complete and undamaged. If in doubt, do not use the appliance and contact qualified personnel only.
Dispose of the plastic bag with care as it represents a hazard for
children.
If the socket and power cable plug are incompatible, the socket
should be changed for a suitable type by qualified personnel only
who should ensure that the cross-section of the wires leading to the
socket is suitable for the power absorbed by the appliance.
Bear the following fundamental safety rules in mind:
Never touch the appliance with damp hands.
Never use the appliance with bare or wet feet.
Never unplug the appliance by pulling the power cable or the
appliance itself.
The appliance is not intended for use by persons (including
children) with reduced physical, sensory or mental capabilities,
or lack of experience and knowledge, unless they have been
given supervision or instruction concerning use of the appliance by a person responsible for their safety. Children should be
supervised to ensure that they do not play with the appliance.
The Iron must not be left unattended while it is connected to the
supply mains.
Never place the iron under the tap to top up with water.
Always use the measure provided.
If the power cable is damaged, have it replaced immediately
by a qualified electrician.
The safety of this appliance is guaranteed only if correctly connected to a proper and effective earth connection as specified
by current electrical safety standards and regulations. This fundamental safety requisite should be verified. If in doubt, ask a
qualified electrician to check the mains system thoroughly. Failure to earth the appliance absolves the manufacturer of all liability for damage.
When the appliance is to be discarded, after unplugging from the
mains, the lead should be cut as close as possible to the iron to
make the appliance unusable.
Before cleaning or servicing, disconnect the appliance by removing
the plug from the socket.
In the event of malfunction and/or faulty operation, switch off the
appliance and take it to a service centre.
•
This appliance must be used exclusively for the purpose for which it
was expressly conceived. Any other use is considered improper
and thus dangerous.
• The manufacturer is not liable for damage caused by inappropriate, incorrect or irresponsible use or for damage resulting from
repairs carried out by unqualified personnel.
• In the event of malfunction, take the iron to an authorised service
centre.
• Never overfill the tank and never add stain removers or similar products.
• Save these instructions for future reference.
• When placing the iron on its stand, ensure that the surface on
which the stand is placed is stable.
• If the appliance is dropped causing visible damage, do not use.
Take to a professional service centre.
• When placing the iron on the iron rest, make sure the iron rest is
located on a stable surface. The iron should be placed on a flat surface extremely resistant to high temperatures.
This appliance complies with directive 89/336/EEC on radio interference suppression.
MAIN COMPONENTS
A
B
C
D
E
Plate
Transparent tank
Spray
Opening for filling tank
with cover
Steam regulator
F
G
H
I
Super steam button
Spray button
Indicator light
Thermostat knob
Read this manual thoroughly before using the appliance.
This will ensure optimum results and maximum safety.
Important: Before plugging the appliance in, check that
the mains voltage corresponds to the voltage (V) indicated on the rating plate of the iron. The socket must be
efficiently earthed.
5
STEAM IRONING
This iron works with normal tap water.
a) Before filling the tank, make sure the steam regulator E
is in the
position ("dry" position) (fig. 1). Make sure
the power cable is unplugged from the mains socket.
b) Open the cover of the opening D and pour the water
into the iron (fig. 2) keeping the iron in a horizontal
position.
It is important that the iron is always unplugged from the
mains every time you fill or top up the water in the tank.
c) Plug the iron into the mains socket.
d) A special segment on the thermostat knob I identifies the
steam range. The steam will be wet if the thermostat
pointer I is at the beginning of the segment and dryer if
it is towards the end. Make sure the fabric to be ironed
is suitable for steam ironing. When using the iron for the
first time, you are recommended to pass it several times
over a piece of cloth first.
e) After these checks, select the required temperature by
rotating the thermostat knob I.
f) The indicator light H will come on to show the iron is on.
After about a minute in the case of maximum temperature, the indicator light will go off showing that the iron
is ready for use.
g) Continuous steam delivery is obtained by positioning
the steam regulator E in the
or
position (to obtain
more steam). Steam delivery ceases whenever the iron
is placed in a vertical position on the rear rest (position
recommended during pauses in ironing) or with the iron
horizontal when the steam regulator E is in the dry position.
Note: On the back of the iron there is a useful guide giving
information on the temperature to set according to
the garment being ironed:
6
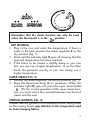
Remember that the steam function can only be used
when the thermostat is in the
position.
DRY IRONING
• Plug in the iron and select the temperature, if there is
water in the tank, position the steam regulator E on the
dry position (fig. 1).
• Wait until the indicator light H goes off showing that the
required temperature has been reached.
• If the fabric to be ironed is slightly damp or you iron
fast, you can use a higher temperature. If, on the other
hand, the garments are dry or you iron slowly, use a
higher temperature.
SUPER STEAM (FIG. 3)
• Position the steam regulator on the dry position (fig. 1).
• Place the thermostat knob (I) on maximum. When the
indicator light (H) goes off, press the super steam button
(F). For correct operation of the super steam function, you must wait a few seconds between one burst of
steam and the next.
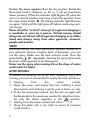
VERTICAL IRONING (FIG. 4)
Enables delicate garments to be steamed without resting them
on the ironing board: pay attention to the temperature used
to steam hanging fabrics.
7
Position the steam regulator E on the dry position. Rotate the
thermostat knob I clockwise as far as it will go (maximum
steam position). When the indicator light H goes off, place the
iron in a vertical position and move it near the garment. Press
the super steam button
(F) until the indicator light H comes
on again. Wait until the light goes off before continuing vertical ironing.
Never direct the "vertical" steam jet at a garment hanging in
a wardrobe or worn by a person. Vertical ironing should
always be carried out with the garment hanging on a clothes
stand and always away from other garments, elements,
people and animals.
SPRAY
If during ironing, you note particularly resistant creases or if
your garment requires a higher level of dampness, you can
use the spray. Make sure the tank contains water. Press the
spray button (G) repeatedly, directing the spray jet towards
the parts of the garment to be dampened.
Never use the spray when ironing silk as the drops of water
could mark the fabric.
AFTER IRONING
To extend the working life of the iron, whenever you finish
ironing, you are recommended to empty the tank as follows:
• Unplug
from
the
mains
socket.
• Open the cover and empty the iron, holding it point
downwards and shaking it gently over a basin or sink.
. • To dry the remaining moisture, turn the iron on again with
the thermostat in the maximum position for about two minutes with the steam regulator in the
position.
• Unplug from the mains socket and allow to cool.
• Clean the plate with a dry cloth as traces of moisture
could mark it.
8
• Wind the power cable around the cable winder.
• Store the iron in a vertical position.
MAINTENANCE AND CLEANING
After use, always wait until the iron is cold before putting
away. Allow to cool in a vertical position. Keep the surface
of the plate clean. Do not rest or use the iron on zips, hooks,
rings etc to avoid scratching the plate. Clean the plate with a
damp cloth only, never use abrasives or solvents.
ELECTRICAL CONNECTION (UK ONLY)
A)
If your appliance comes fitted with a
plug, it will incorporate a 13 Amp fuse.
If it does not fit your socket, the plug
should be cut off from the mains lead,
and an appropriate plug fitted, as
below.
WARNING: Very carefully dispose
of the cut off plug after removing the
fuse: do not insert in a 13 Amp
socket elsewhere in the house as this
could cause a shock hazard.
With alternative plugs not incorporating a fuse, the circuit must be protected by a 15 Amp fuse.
WARNING - THIS APPLIANCE MUST BE
EARTHED
IMPORTANT
The wires in the mains lead are coloured
in accordance with the following code:
Green and yellow:
Earth
Blue:
Neutral
Brown:
Live
E
L
N
As the colours of the wires in the mains
lead may not correspond with the colou-
B)
If the plug is a moulded-on type, the
fuse cover must be re-fitted when
changing the fuse using a 13 Amp
Asta approved fuse to BS 1362. In
the event of losing the fuse cover, the
plug must NOT be used until a replacement fuse cover can be obtained
from your nearest electrical dealer.
The colour of the correct replacement
fuse cover is that as marked on the
base of the plug.
If your appliance is not fitted with a
plug, please follow the instructions
provided below:
red markings identifying the terminals in
your plug, proceed as follows:
The green and yellow wire must be connected to the terminal in the plug marked
with the letter E or the earth symbol
or coloured green or green and
yellow.
The blue wire must be connected to the
terminal marked with the letter N or
coloured black.
The brown wire must be connected to the
terminal marked with the letter L or
coloured red.
9