1
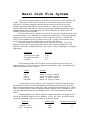
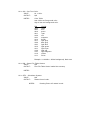
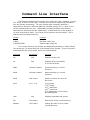
Exacta Operating System
Version 4.0
Created By Robert Svec
Conceived On June 22, 2005
Copyright 2005-2007 VectraSoft
February 18, 2007
Contents
Section 1
Part I
Part II
Part III
Part IV
Introduction
Description
Basic Disk File System
Core Kernel
Command Line Interface
Page
Page
Page
Page
Page
3
4
5
7
14
Introduction
An operating system designed for an IBM compatible PC must include the
following four things: I/O Control, File System, Memory Management and an
Application Programming Interface (API). These four characteristics are the absolute
minimum requirements for a program to be defined as an operating system.
As most PC users know, Microsoft Windows the most common operating
system. This operating system has advanced I/O Control in the form of being able to
use any type of I/O device available on the market (keyboard, mouse, printer, USB
devices, CD-ROM drives, etc). The simplest I/O devices are the keyboard input and
monitor output. The Exacta operating system utilizes these two I/O functions.
The older DOS and Windows 9x operating systems had a file system called
the File Allocation Table (FAT). The new Windows 2000/XP uses a file system called
New Technology File System (NTFS). These file systems provide data organization
on a disk, which can be anything including a floppy disk, hard drive or CD-ROM. The
Exacta operating system uses the Basic Disk File System version 16.
Memory Management is the organization and utilization of RAM. The most
common CPU is the Intel x86 Architecture CPU (ex: Pentium 4). This CPU can access
up to 4GBs of RAM using 32-bit operation codes. An operating system needs to
make sure this possible 4GB of RAM is organized, protected and properly utilized by
applications. The old days of Microsoft DOS had quite a bit of user level memory
managers such as drivers like HIMEM.SYS and EMM386.EXE, but the current
Microsoft technology takes care of memory management in the background.
An Application Programming Interface is simply a way for programmers to
write applications that use functions provided by the operating system. There are
many ways in which a modern operating system provides an API, one of which is
called the Interrupt. Microsoft DOS provided an API through Interrupt 21h and 20h.
Functions that programmers can access via interrupt API include Create File, Open
File, Run Program, etc. If the operating system does not provide a good API then
programmers cannot create applications that utilize the operating system functions.
Exacta uses the same interrupt scheme as Microsoft DOS, which allows programs
written for Microsoft DOS to be compatible with Exacta.
As stated earlier, an operating system needs to have these four parts. The
only thing that distinguishes a good operating system from a bad one is the amount
of efficiency each of the four parts. The goal of Exacta is to become more efficient in
the two most important functions of an operating system: the File System and
Memory Management.
Description
The Exacta operating system runs on an IBM compatible PC with an Intel x86
CPU. All versions of Exacta run in 16-bit Real Mode, typically on a 1.44MB floppy
disk. Applications are flat binary linear execution files commonly known in the
Microsoft world as .com executables. Exacta will run any Microsoft .com executable
as long as all of the interrupts are available in Exacta.
Version 4.0 optimizes all functions of the 3.x series as well as provides
improved error handling and reduced external applications bundled with the
installation. Complete with a Kernel and a Command Line Interface, Exacta allows
complete freedom of usage and expansion. This publication will list all available API
functions and known processes for complete user customization of the operating
system. The ability of any programmer to assist in the evolution of the operating
system is the main reason Exacta was written.
Basic Disk File System
A file system organizes data on a hard drive into files for users to access and
modify. Utilizing the most of the hard drive is the ultimate goal of a file system.
How well a file system organizes data as well as utilizing the most of the disk
possible determines how efficient the file system is. There are a few major file
systems that exist today that are used by the common operating systems for IBM
compatible PCs such as FAT (Windows 9x), NTFS (Windows XP), HFS+ (Mac OS
X/UNIX), and EXT/2 (Linux/UNIX).
The file system takes up space on the disk, so the most compact way to store
all the information in the database is a large factor of efficiency. Since the operating
system kernel will control file routines such as create file, open file, read file and
write file the database structure needs to be set up in a way the kernel can easily
access the data structures, modify them and create new entries.
Disks store data in physical sectors that can hold 512 bytes. The actual
geometry of the disk is quite complicated and in turn creates a problem for a file
system to accurately manage each and every sector. Here is a diagram of a physical
floppy disk:
Breakdown
Identifiers
18 Sectors Per Track
80 Tracks Per Head
2 Heads
1-18
0-79
0-1
A file system typically uses a logical numeric method to keep track of the
physical sectors. This is known as a Logical Sector Number (LSN). An example of a
LSN and a physical sector is below:
Logical
Physical
LSN
LSN
LSN
LSN
Sector
Sector
Sector
Sector
1
17
18
2879
2, Track 0, Head 0
18, Track 0, Head 0
1, Track 0, Head 1
18, Track 79, Head 1
To make this structure easier to use, a typical file system will group several
physical disk sectors into one organizational unit called an allocate block and keep
track of each allocation block rather than each individual physical disk sector. Basic
Disk File System (BDFS) does not allocate multiple sectors into one allocation unit; it
uses each individual sector as one allocation unit. This method wastes less disk
space.
Comparing BDFS to the other major file systems shows the increased level of
efficiency that BDFS brings to the PC platform. NTFS, FAT, HFS+ and EXT/2 group
several physical disk sectors into a single unit called a Cluster.
Disk Size
Cluster Size
1,025 MB – 2 GB
2 GB – 2 terabytes
2 KB
4 KB
Physical Disk Sectors
4
8
If a single text file is 50 bytes long it will take up one cluster since the system
sees one cluster as the smallest addressable unit of storage. If you have a modern
20 GB hard drive with NTFS and this 50-byte text file is stored on the disk, you have
3,950 bytes (8 physical sectors) that contain no usable data and cannot be allocated
to anything besides the 50-byte text file. The more small files you have on the disk,
the larger the wasted space becomes.
BDFS fixes this problem by using Logical Sector Numbers to keep track of
each physical disk sector. Taking the 50-byte text file and 20GB hard drive from the
previous example we can compute the amount of wasted space that BDFS will allow.
Since each Logical Sector Number is 512 bytes and is the smallest addressable unit
of storage there is a total of 462 bytes wasted.
NTFS, FAT, HFS+ and EXT/2 waste 3,950 bytes per every 50 bytes, and BDFS
wastes 462 bytes per every 50 bytes, which means Exacta wastes 88% less disk
space than Microsoft.
The BDFS file system is broken down into three databases: the File Table,
Location Block and an optional Directory Table. The File Table holds 16 byte entries
for each file and directory, hence it is BDFS version 16. The breakdown of the File
Table entry is below.
AAAAAAAAAAABBCCD
A = Filename (11 characters)
B = Location Block if file, Directory Number if directory
C = Size in bytes if file, FFFFh if directory
D = Directory file or directory resides in
Since each entry is 16 bytes and the maximum number of Location Blocks
usable for files is 65,532 and the maximum number of directories is 254, there is a
maximum of 65,786 entries. The maximum number of disk sectors the File Table
takes up is 129, which makes the maximum File Table size 66Kb.
The Location Block is a database that tracks each disk sector for file
allocation. The values for a Location Block are listed below.
Value
0000h
FFFEh
FFFFh
0001h-FFFDh
Definition
Free
Reserved
End of entry
Pointer to next block
Since each block equals one disk sector (512 bytes) and a maximum of
65,532 blocks limits BDFS to a maximum amount of storage 32MB, which is
extremely less than other file systems. The only limiting factor is the 2-byte length
of the allocation block. Future Exacta file systems will be 32-bit which will bring the
maximum storage value over 2 Terabytes. The Location Block takes up 128 disk
sectors, which makes the maximum size 65.5Kb.
The Directory Table keeps track of the directory numbers. It is 254 bytes
long, which is less than one disk sector. The value of each byte is either 0, which
means the directory number is free or 1, which means that directory number is
taken. There is a maximum number of 254 directories in each file system until
future versions increase the table to 2-byte and 4-byte values.
Kernel
The Exacta Kernel Version 4.0 has four main goals. Provide efficient I/O
functions, efficient memory management, efficient file system functions and an
efficient application-programming interface.
The Exacta Kernel currently supports Interrupt I/O from applications as well
as some minute keyboard input and monitor output. The Kernel creates interrupt
20h and 21h. Interrupt 21h is identical to Microsoft DOS in syntax for compatibility,
but Interrupt 20h is defined for Exacta operation. The complete Interrupt reference
is contained below.
Interrupt 21h
AH = 1 – Character Input from Keyboard
INPUT:
N/A
OUTPUT:
AL = Character received
AH = 2 – Character Output to Screen
INPUT:
AL = ASCII Character
OUTPUT:
Character on screen
AH = 9 – Print String
INPUT:
DS:DX = segment:offset of $ terminated string
OUTPUT:
string printed on screen
AH = A – Buffered Input
INPUT:
DS:DX = segment:offset of buffer
OUTPUT:
Character from keyboard stored in DS:DX
DX = Incremented
NOTES:
Maximum size = 65,536 bytes
AH = 30h – Get Kernel Version
INPUT:
ES:DX = segment:offset of input string buffer
OUTPUT:
DH = Major
DL = Minor
AH = 3Ah – Remove Directory
INPUT:
DS:DX = segment:offset of $ terminated directory name
OUTPUT:
AX = 0 Success
NOTES:
Removes directory only if it is under current directory
AH = 3Ch – Create File
INPUT:
DS:DX = segment:offset of $ terminated filename
OUTPUT:
AX = 0 Success
NOTES:
Creates file in current directory, size = 0 bytes
AH = 3Dh – Open File
INPUT:
AL=mode (0)
DS:DX = segment:offset of $ terminated filename
OUTPUT:
AX = File handle
BP = Segment where file contents are located
NOTES:
Opens file under current directory only.
AH = 39h – Create Directory
INPUT:
DS:DX = segment:offset of $ terminated directory name
OUTPUT:
AX = 0 Success
NOTES:
Creates directory under current directory
AH = 40h – Write File
INPUT:
BX = handle
CX = # of bytes to read
DS:DX = segment:offset of buffer
OUTPUT:
AX = 0 Success
NOTES:
AH = 48h – Allocate Memory
INPUT:
BX = Number of paragraphs to allocate (bytes / 16)
OUTPUT:
AX = Segment of allocated memory
NOTES:
Offset is always 0
AH = 49h – Release Memory
INPUT:
CX = Number of bytes to release
OUTPUT:
N/A
NOTES:
AH = 4Bh – Execute Program
INPUT:
DS:DX = segment:offset of filename
OUTPUT:
Jump to program code
NOTES:
Filename does not need to be in current directory
AH = 4Eh – Find File
INPUT:
DS:DX = segment:offset of $ terminated filename
OUTPUT:
AX = 0 Success
BX = Starting Block or Directory Number
CX = Size (FFFF if directory)
DH = Directory file located in
BP = File Table offset of entry beginning
AH = 3Eh – Close File
INPUT:
BX = Handle
OUTPUT:
AX = 0 Success
NOTES:
Kernel: File handle variable is cleared
Kernel: Memory is released
AH = 41h – Delete File
INPUT:
DS:DX = segment:offset of $ terminated filename.
OUTPUT:
AX = 0 Success
NOTES:
File must be under current directory
AH = 25h – Set Interrupt Vector
INPUT:
DS:DX = segment:offset of new handler code
AL = Interrupt number
OUTPUT:
AX = 0 Success
NOTES:
AH = 35h – Get Interrupt Vector
INPUT:
AL = Interrupt number
OUTPUT:
AX:BX = segment:offset of handler code
NOTES:
AH = 0Eh – Set Current Drive
INPUT:
DL = Drive
OUTPUT:
AX = 0 Success
NOTES:
AH = 19h – Get Current Drive
INPUT:
N/A
OUTPUT:
AL = Drive
NOTES:
Interrupt 20h
AH = 0 – Terminate Program
INPUT:
N/A
OUTPUT:
Resets registers and restarts kernel code.
NOTES:
Use RET command in a COM executable to return to CLI.
AH = 1 – Read File system
INPUT:
N/A
OUTPUT:
AX = 0 Success
NOTES:
AH = 2 – Write File system
INPUT:
N/A
OUTPUT:
AX = 0 Success
NOTES:
AH = 3 – Get Free Segment
INPUT:
N/A
OUTPUT:
DX = Free segment
NOTES:
Offset is always 0
AH = 4 – Get File handle information
INPUT:
AL = File Handle
OUTPUT:
BX = Starting LSN Block
CX = Size
DH = Directory
BP = File Table Offset
NOTES:
AH = 5 – Next free LSN
INPUT:
N/A
OUTPUT:
DX = Free LSN
NOTES:
AH = 6 – Convert Hexadecimal to ASCII character
INPUT:
ES:DI = segment:offset of buffer
DX = hex character
OUTPUT:
ES:DI = $ terminated ASCII string
NOTES:
AH = 7 – Load Byte From File Table
INPUT:
SI = Offset in File Table
OUTPUT:
AL = Byte
NOTES:
This function will read the next File Table sector into
memory if needed
AH = 8 – Read Logical Sector
INPUT:
DX = Logical Sector Number
BP:BX = segment:offset of buffer
OUTPUT :
AX = 0 Successful
AX = 1 Disk Read Error
NOTES:
Make sure your buffer is 512 bytes
AH = 9 – Write Logical Sector
INPUT:
DX = Logical Sector Number
BP:BX = segment:offset of buffer
OUTPUT:
AX = 0 Successful
AX = 1 Disk Write Error
NOTES:
Make sure your buffer is 512 bytes
AH = 0Ah – Set Text Color
INPUT:
AL = Color
OUTPUT:
N/A
NOTES:
Color Table:
Low 4 bits set foreground color
High 4 bits set background color
BIN
0000
0001
0010
0011
0100
0101
0110
0111
1000
1001
1010
1011
1100
1101
1110
1111
COLOR
black
blue
green
cyan
red
magenta
brown
light gray
dark gray
light blue
light green
light cyan
light red
light magenta
yellow
white
Example: 1110000b = White background, black text
AH = 0Bh – Reset File Table Sectors
INPUT:
N/A
OUTPUT:
First File Table Sector loaded into memory
NOTES:
AH = 0FFh – Shutdown System
INPUT:
N/A
OUTPUT:
Restart kernel code.
NOTES:
Pressing Enter will restart kernel.
This interrupt I/O is also the application-programming interface. Any
programmer can use the above interrupt definitions when writing a program to
accomplish a task the core kernel provides.
The kernel accomplishes memory management in a very simple way since
this version runs in 16-bit Real Mode. The first segment of memory available is held
in a variable that the kernel will modify when a program attempts to load. When a
program exits, the kernel will decrease the variable by the same size that was
requested when the program first ran. Memory management will be a larger factor
when the Exacta operating system is run in 32-bit Protected Mode.
Exacta 4.0 changed the way file handling is controlled. There are four file
handles to which an Open File call will assign to the operation. The only contents of
this file handle are the File Table entry offset value. There is another kernel function
that controls outputting the contents of the entry.
Command Line Interface
The Exacta Command Line Interface (CLI) takes user input, transfers it to the
core kernel in terms of Interrupts, receives the core kernel output and translates it
into user friendly terminology. The user prompt most commonly identifies a
command line interface. Microsoft DOS has a default prompt of C:\> which in turn
can be customized by the user. UNIX/LINUX operating systems have different
command line interfaces that are called shells. A Bash shell has a user prompt of
@> and various other shells. The Exacta CLI is called the Aurora Prompt. This is
what the Aurora Prompt looks like:
Prompt
#>
#:BIN>
#:BIN:SYSTEM>
Location
Root
Bin folder under root
System folder under Bin
The current directory and its path are displayed and always in capital letters.
The pound sign (#) shows that this is the Exacta Aurora Prompt. There are several
commands that the CLI provides, which are outlined below:
Command
Parameters
Function
Ver
N/A
Displays version info
Dir
N/A
Displays all files and folders
In current directory
Mkdir
<directory name>
Create Directory in current
Directory
Rmdir
<directory name>
Remove directory in current
Directory
Show
<file name>
Display contents of a text file
On screen
Drive
0 or 1 or 2
0=1s t Floppy
1=2nd Floppy
2=1s t Hard Drive
3=2nd Hard Drive
If no parameters, current drive
Will be displayed
Help
N/A
Displays commands and syntax
Del
<file name>
Remove file under current directory
Rename
<file name>
Change file name of a file under
Current directory
Mem
N/A
Display Free Memory Segment
Handles
N/A
Display File Handle data
Label
N/A
Changes Current Drive Label
(NOTE: all commands are in lower case!)
The CLI also allows the user to run programs. You can type in the full
program name or omit the .com extension to run a specific program. Once the
program exits, you will be back into the CLI.
Future command line interfaces will display the operating system differently
and have different functions as well. The kernel looks for a file named cli.com upon
boot and loads that into memory, so you could write your own CLI and replace the
Aurora Prompt CLI with your own.
There are a few rules that need to be followed by the user since there are no
rule-checking procedures in this version. You cannot have two files with the same
filename. This will cause a huge problem when it comes time to access them by
reading, writing or deleting. Do not create a file with the same name as a CLI
command. The internal commands described above have precedence over the
external files and applications, so if you created your own program that plays
Blackjack and you save it as ‘handles’, you will never be able to run this application
because the internal handles command will execute before a search for an external
file is performed.
The CLI offers the execute.bat function, which is an automatic script that will
run a program before the command prompt is displayed. This is the same concept
as the MS-MS-DOS autoexec.bat file. You can create the execute.bat file by running
edit.com and typing the filename you want to run on boot followed by a carriage
return (new line). Save the file as execute.bat, press Escape to exit the operating
system and reboot. After the welcome message, the program you listed will execute
and when it finishes, the command prompt will appear. To remove this function, just
delete the execute.bat file.