1
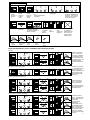
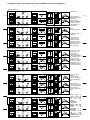
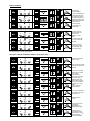
EM-VENT
CONTROL PANEL
USER MANUAL
1
Each panel has been tested. A serial number is added on the panel when the test was successful.
The presence of the serial number shows that the panel has been tested.
This manual is valid for panels with serial numbers starting from 16388. The serial number is
added on the PCB :
Version of this manual : 060601, number of pages : 10
The contents of this manual has been checked carefully. Nevertheless, we do not accept any responsibility for mistakes in this manual.
This manual is subject to changes without notice and does not claim completeness.
If you would find any contradictions in this manual, please contact your supplier.
Security
The panel should only be opened by a professional installer. There is a danger of high voltage ! The panel should not be installed in
dusty and/or humid environments and the room temperature has to be between 0°C en 30°C.
Limitations of the system
The panel and the system it is within will possibly not function due to several causes :
Smoke detectors may not function where the smoke can not reach the detector like in chimneys, in walls or in roofs. Smoke detectors
may not sense the fire on an other floor of the building. All types of detectors have their limitations. No type of smoke detector can
sense every kind of fire caused by carelessness and safety hazards such as smoking in bed, violent explosions, escaping gas, improper
storage of inflammable materials, overloaded electrical circuits, children playing with matches or arson.
The risk exists that the panel will not be correctly used due to the panic a fire in a building brings.
The panel and its accessories will not operate without any electrical power. If mains power fails, the panel will work on the batteries,
but only for a limited time.
Detectors will get less sensitive over time and should therefore be part of a maintenance program.
The panel does not provide any security against people or objects getting stuck due to the functioning of the motors. This security has
to be provided externally.
No electronic equipment can give the guarantee it will always function. It is possible that a panel which has been working correctly for
a long period can fail, even after it has just been checked, and could therefore not function in a fire.
Keeping the evacuation routes free of smoke should not only depend on this panel. Installing this panel can only be considered as a
secondary measure and it does not avoid the need of other measures like fire escape ladders outside the building, more evacuation
routes, easy access of the building for the fire brigade, fast warning of the fire brigade by means of a fire detection system. The panel
and its accessories are not a fire detection system as in EN54 and can not be used for this purpose. As described in this manual, the
panel can be coupled with a fire detection system. This system should not be used if there is a risk of loss of people or objects due to
the malfunctioning of this panel. Care has to be taken that there can not be any damage due to rain or wind due to an unwanted
opening of the vent.
This panel has to be installed following all the local standards. If the panel and its accessories are being sold in a country outside
Belgium, it is the distributors responsibility to check whether the product fulfills al the necessary requirements and gets the necessary
approvals.
Information: 01483 271371
2
General explanation about the different functions.
Call point function on the Em-Vent panel
Someone noticing a fire has to follow the instructions on the panel : “In case of fire : break cover and push „open‟ “ . The
smoke vent will be opened by means of a motor. In this way the evacuation route can be kept free of smoke.
External call point
Someone noticing a fire pushes the flexi element on the red call point that is connected to the Em-Vent panel. The EmVent panel will go into the alarm state and the smoke vent will be opened.
Automatic control with a fire detector
On the Em-Vent panel a fire detector can be connected that detects automatically a fire. The panel will go into the alarm
state and the smoke vent will be opened.
Priority control on the Em-Vent panel
It can be necessary to open a smoke vent in case of a fire to keep the evacuation routes free of smoke. Opening a
smoke vent also means that extra oxygen will be brought into the building. The fire brigade can decide if the smoke vent
has to be opened or closed. This fire brigade control must have the highest priority. This means for instance that when
the fire detector steers the smoke vent open, the fire brigade can close the smoke vent again if needed with the priority
control on the panel.
External priority control with a key switch
On the Em-Vent panel an external key switch can be connected. This external key switch can also be used as a
secondary priority control next to the priority control that is already present on the Em-Vent panel.
Ventilation control on the panel
With the buttons on the panel the smoke vent can be opened and closed for ventilation.
External call points
On the Em-Vent panel external ventilation push buttons can be connected.
Automatic wind and rain detection.
This is an addition to the use of the Em-Vent panel as a ventilation system. The smoke vent will close automatically in
case of rain detection or high wind speed.
Priorities
It is clear that the functions described above have a different degree of importance. It is clear that the ventilation control
is considered less important compared to the priority control for the fire brigade. For this reason the different functions of
the panel have been given a different priority, in descending order :
External priority control with key switch
Priority control on the panel and call point function on the panel
External call point and fire detector
Wind and rain detection
Ventilation control
For instance : The user decides to open the vent for ventilation. After a certain time there is a rain detection. This is a
higher priority and the vent will be closed again. Later on a fire is detected. A fire detector has a higher priority and the
smoke vent will be opened again. The fire brigade comes on site and decides with the priority control on the panel to
close the smoke vent to avoid entrance of oxygen. This is the highest priority, so the smoke vent will be closed again.
Even when a call point is activated, the smoke vent will remain closed, until a reset is done on the panel.
Usage of the different functions :
Ventilation control on the panel
A metal key is delivered together with the panel. Put this key as deeply as possible in the small
rectangular opening at bottom of the panel. By doing this, the plexi will be unlocked. Pull the
plexi upwards while pushing the key. As the plexi is pulled upwards, a rectangular opening in
the plexi becomes visible. Through this opening you get access to the buttons. By pushing for
1 second on the button “open”, the vent will be opened.
It is extremely important to reset the panel after usage of the buttons on the panel for
ventilation. Reason for this is that the buttons on the panel have a higher priority than the call
points and the fire detectors. By using the buttons on the panel the call points and the fire
detectors will be switched of. By pushing „reset‟ the call points and the fire detectors will be
switched on again. Because this in an important point, access to the buttons on the panel is only
possible for an authorised person, who possesses the key.
External ventilaton buttons
External ventilation buttons can be connected on the Em-Vent panel. This can be material in
the same design as switches used for lights (Ticino, Niko,…) By using external ventilation
buttons it is no longer necessary to reset the panel after usage. The ventilation buttons must
be pressed until the vent has reached the desired state (open, in the middle, …)
3
Call point function on the Em-Vent panel
The buttons of the panel are behind a plexi so they are not accessible for unauthorized users.
On four spots, where the plexi is kept in the panel, the plexi is made weaker, so it can be
broken out of the panel more easily. Someone who notices a fire, breaks the plexi, by pulling
the plexi away from the panel, and pushes the button „open‟. Working with the protecting plexi
avoids usage by unauthorised people. With the Em-Vent it is not necessary to break any
glass. There is also no key needed to operate the system, the key can not get lost, which
makes a quick intervention possible in case of a fire. When the plex is broken, it can be
replaced with a new one.
External call point
It is important that the call point is reset after an activation. This can be done with the black key that is delivered together
with the call point. Until the callpoint has been reset, the panel cannot be reset.
Automatic control with a fire detector
After a fire detection, the panel has to be reset. Different types of detectors exist. It is important to choose the correct
type of detector. This will also prevent an unwanted opening of the smoke vent due to a detector reacting too fast. Be
sure enough detectors are installed on the right spots. A coupling with a fire detection system (following EN54) is
possible.
Priority control on the Em-Vent panel
This priority control is meant for the fire brigade. When the plexi is broken, the fire brigade has access to the buttons.
No key is needed to control the panel.
External priority control with a key switch
Keep in mind that when using an external key switch the state of the panel is not visible on the key switch. The leds that
show the state are on the panel.
Buttons and led indications
led
230V
Led flashes
This state does not exist.
Led is on
Mains voltage is present.
Led is off
Mains voltage is
not present or
fuse
F1
is
defective.
Alarm
The key switch or the priority control on the panel
has been used. This led flashes to show that a
component with a higher priority has been used.
When this led flashes, the call points, the fire
detectors, ventilation push buttons, wind and rain
detector are switched of. Put the key switch back in
positon „0‟ and press reset to swich all of the
components back on.
An external call point and/or fire detector is in
alarm. Reset the call point and/or wait until all
of the smoke is out of the detector. Press reset
to leave the alarm state.
Normal
state.
There is no alarm
caused by a call
point or a fire
detector and the
priority control on
the panel has not
been used.
Fault
Zone
There is a short circuit in the cabling to the call
points and/or the detectors.
Contact your installer.
There is a short circuit in the cabling to the key
switch.
Contact your installer.
Normal state. The battery voltage is between 21
and 24,2V. If the battery charger works fine, the led
should be off within 48 hours (if the motors are not
used within this period).
There is an open circuit in the connection with
the call points and/or detectors.
Contact your installer.
There is an open circuit in the connection with
the key switch.
Contact your installer.
Fault. There is no battery connected, or the
battery is incorrectly polarized, the connection
with the battery is lost, the battery voltage is
below 21V or fuse F2 is defective.
Normal state
Fault
Prior
Batt.
Open
Close
The smoke vent opens. The led will be on after +/- The smoke vent is open. If the open and close
160 seconds.
led are on, the smoke vent is in a state between
open and closed.
The smoke vent closes. The led will be off after +/- If the open and close led are on, the smoke
210 seconds (if the smoke vent was previously vent is in a state between open and closed.
completely opened.).
If the led close is on, this will always be in
combination with the open led.
Normal state
Normal state.
The battery is
loaded
to
a
voltage
higher
than 24.2 V.
The open button
has not been
used.
The smoke vent
is closed.
4
Call point function, priority control and ventilation on the Em-Vent panel
Press „open‟.
The red led flashes to show that the smoke vent is opening.
After 160 seconds the led will be continuously on, to show that the smoke vent is open.
Press „close‟.
The red led goes off and the green led starts flashing to show that the smoke vent is closing.
After 210 seconds the led goes off to show that the smoke vent is closed.
The time during which the motor is steered to close the smoke vent is always 50 seconds longer than the time during
which the smoke vent was steered open. For instance : the dome was opened during 70 seconds, then the panel will
steer the smoke vent to close during 70+50=120 seconds, to be sure that the smoke vent is completely closed.
It is possible to press „stop‟ while the smoke vent is opening.
The button „stop‟ has 3 functions: reset, led test and stop.
Because this button also has the function led test, all leds will be on for 2 seconds when this button is pressed, to show
that all leds are still working correctly. (if there is no mains voltage, the 230V led wil not go on)
After pressing the stop button, the smoke vent will be in a state between open and closed, this is shown by the red and
the green led that will both be on at the same time.
As soon as the open or close button has been used, the red alarm led starts flashing. This means that fire detectors,
callpoints, external ventilation buttons, wind and rain detection are switched off. This is logical : when the fire brigade
has pressed the close button, a fire detector going into alarm again should not open the smoke vent again.
Switching back on the fire detectors, the ventilation buttons, the wind and rain detection is done by pressing the reset
button.
When the open or close button have been pressed for ventilation it is important to press again reset afterwards to
switch the fire detectors and call points back on.
Using the key switch
A key switch has the highest priority of the whole system. A key switch has three positions : open, close and „0‟. As
soon as the key switch is in position open or close the red alarm led starts flashing. The flashing alarm led shows that
ALL other components of the system are switched off. Even the buttons on the Em-Vent panel are switched off. First
put back the key switch in position „0‟ to be able to use the buttons on the panel.
Using the fire detectors or the external call points
As soon as a fire detector or call point goes into alarm, the red alarm led on the panel will be on. This led shows that the
ventilation buttons and the wind and rain detection is switched off. The smoke vent will be steered open automatically.
The red open led will flash when the smoke vent opens and the led will be continuously on when the smoke vent is open.
Press reset after a fire detection to switch back on the ventilation buttons and the wind and rain detection. Keep in mind
first to reset the call point. If fire detectors are present it is necessary to wait until all of the smoke is out of the detector.
Only then it is possible to reset the panel.
On the fire detectors there is a led that shows it has detected a fire. It is possible to have several fire detectors
connected to the panel. The first detector detecting will show its red led. Keep in mind that when a second detector
starts detecting, all leds of the fire detectors will go off again. The alarm led on the panel will remain on until reset.
Batt. led and 230V led
The current needed for the motors is taken out of the batteries. It is normal that when the motors start to work that the
battery voltage will drop. So it is normal that the batt. led will start flashing. After 48 hours, if the motors are not used
within this period, the batt. led should be off again, showing that the batteries are charged again.
The mains voltage has to be continiously present to charge the batteries. The Em-Vent panel switches itself off when the
battery voltage drops below 21 volts to prevent the batteries being damaged by a further discharge. It is possible that
when when there was no mains voltage present that the panel switches itself off, and this for instance during opening the
smoke vent. This means that the smoke vent also can not be closed again. The only way is to connect back the mains
voltage (green 230 V led should be on) and to wait until the batteries are charged again. As soon as the batteries are
charged again the smoke vent can be closed.
5
This page is intentionally kept blank.
6
Adding the user manual in the panel
If wished, the manual can be added in the panel. Put only the sheets with the drawings in the panel. There is a seperate
sheet for the key switch. Do not add this sheet in the panel if no key switch is present, this to avoid confusion.
Lines are printed on the left and right side of the page as a help for folding the paper.
Maintenance
It is necessary to have a maintenance done once a year by a specialist. The batteries have to be replaced every three
years. All fire detectors should be tested every year and all of them have to be replaced every 5 years. (see also local
legislation and standards).
The owner of the system has to check the correct functioning of the system on a regular basis. Every month the smoke
vent has to be opened as a test. The panel has to be mounted visibly so that malfunctions indicated by the leds can be
seen.
- The green led (230 V present) always has to be on.
- No yellow led should flash or be on.
(Exception is the batt. led that flashes when the battery is charging. When the system is not
used, the led should be off again within 48 hours. This shows that the battery charger is
working correctly.)
-
-
-
The yellow batt. led flashing does not mean that the panel is in fault. It is possible that
this led starts flashing as soon as the motor(s) start to work. This only shows that the
batteries are no longer fully loaded.
If the yellow batt. led flashes before pressing ‘open’ it is recommended to wait some time
until the batteries are more loaded. Otherwise it is possible that the panel switches itself
off while the smoke vent is not yet closed again.
If it happens often that the yellow batt. led starts flashing, especially when the system is
not daily used, it is recommended to replace the batteries.
A log book has to be made in which every problem, maintenance dates and the results of the maintenance are noted.
The owner and all parties involved have to be informed of the presence and the functioning of the system.
How to replace the plexi
The plexi is delivered with a blue protection. First remove this protection ! (The plexi has to be 100% transparent
like a window-glass, this is not the case when the protection is still present.)
Be careful not to break the plexi.
It is important that the plexi is put in the correct way in the panel. On one side of the plexi shallow lines have been
milled. The side of the plexi on which the lines have been milled has to be facing the wall (on which the panel is
mounted.
If the plexi has to be replaced, the panel has to be opened to remove the broken pieces
7
LEGEND
PRIO
ZONE
R
External
priority
control in
position
„close‟
External
priority
control in
position
„0‟
External
priority
control in
position
„open‟
Call point
Detector
Call point activated
and/or fire detector in
alarm condition
Smoke
vent
closed
Smoke
vent in the
middle
Smoke
vent
open
PRIO
ZONE
R
Led is continuously
on.
Buttons and leds on
the panel.
Smoke
vent
opens
External
ventilation
control
buttons
PRIO
ZONE
R
Press for 1 second on
the button indicated with
the arrow. The result of
this action can be seen
in the next pictures.
Led flashes
Wind and
rain
detector
There is
wind
and/or rain
detection
The function that
is crossed is
switched of due
to the use of a
function with a
higher priority
Smoke
vent
closes
USING THE KEY SWITCH (ONLY IF PRESENT ON THE INSTALLATION)
Opening
ALARM
PRIO
ZONE
R
RESET
ALARM
PRIO
ZONE
R
RESET
Vent between open and closed
ALARM
PRIO
ZONE
R
RESET
Put the key switch to
„open‟. The smoke
vent opens, indicated
by the flashing „open‟
led. A key switch has
the highest priority. All
functions that are
crossed are switched
off.
Put the key in position
„0‟. The smoke vent is
between open and
closed, indicated by the
red and green „open‟
and „close‟ leds that
are both on.
Further opening the smoke vent
ALARM
PRIO
ZONE
R
RESET
ALARM
PRIO
ZONE
R
RESET
Put the key back to
„open‟. The smoke
vent opens further
until the smoke vent is
open (indicated by the
red led that is on)
Closing the smoke vent completely
ALARM
PRIO
ZONE
R
RESET
ALARM
PRIO
ZONE
R
RESET
ALARM
PRIO
ZONE
R
RESET
Put the key back to
„close‟. The alarm led
flashes again to show
that all other
components are
switched off.
If the smoke vent is
fully closed the green
„close‟ led goes off
again. As soon as the
key switch is back in
position „0‟, all other
functions are switched
on again.
8
Call point function, priority control and ventilation on the Em-Vent panel.
Opening smoke vent
Press „open‟.
ALARM
ZONE
RESET
The smoke vent
opens and the open
led flashes.
Call point, fire
detector, ventilation
control, wind and
rain detector are
switched off.
ALARM
PRIO
ZONE
R
RESET
Stop smoke vent, while it was opening
ALARM
PRIO
R
Press
„stop/reset/ledtest‟.
RESET
All leds are on for 2
seconds.
ALARM
PRIO
ZONE
R
RESET
The smoke vent
stops and is in a
position between
open and closed,
indicated by the red
and green „open‟
and „close‟ led.
ALARM
PRIO
ZONE
R
RESET
Further opening the smoke vent
ALARM
PRIO
ZONE
R
RESET
ALARM
PRIO
ZONE
R
RESET
------ALARM
PRIO
ZONE
R
Press „open‟. The
smoke vent will
further open.
The smoke vent
opening is indicated
by the flashing red
„open‟ led. After
maximum 160 s the
smoke vent will be
completely open,
indicated by the red
„open‟ led that is on.
RESET
Closing the smoke vent
ALARM
ZONE
RESET
ALARM
PRIO
ZONE
R
RESET
ALARM
PRIO
ZONE
R
RESET
Resetting the panel
ALARM
PRIO
ZONE
R
RESET
ALARM
PRIO
ZONE
R
RESET
ALARM
PRIO
ZONE
R
RESET
Press the „close‟
button.
The smoke vent
closes, indicated by
the green flashing
led.
After max. 210
seconds, the smoke
vent is closed again
and the green
„close‟ led goes off
again.
When using the
priority control the
call points up to the
rain
and
wind
detector
are
switched off.
Important :
When using the
buttons on the
panel
as
ventilation it is
extremely
important to use
the
reset
afterwards
9 to
switch back on all
the components.
Alarm condition
ALARM
PRIO
ZONE
R
RESET
ALARM
PRIO
ZONE
R
RESET
ALARM
PRIO
ZONE
R
RESET
We start from
normal condition.
In case of fire detection
or activated call point,
the smoke vent opens
(the alarm led goes on,
ventilation buttons and
wind and rain detection
is switched off).
The smoke vent
is open after max.
160 seconds.
Resetting the panel after an alarm condition
ALARM
PRIO
ZONE
R
RESET
ALARM
PRIO
ZONE
R
RESET
ALARM
PRIO
ZONE
R
RESET
To switch back on
the ventilation and
wind and rain
detection : press
reset.
On reset all leds will
go on for 2 seconds
(led test).
The smoke vent is
open now, but can
be close again with
the „close‟ button.
Now the smoke vent can be closed again.
Using the external ventilation buttons (only if present)
ALARM
PRIO
ZONE
R
RESET
ALARM
PRIO
ZONE
R
RESET
ALARM
PRIO
ZONE
R
RESET
ALARM
PRIO
ZONE
R
RESET
ALARM
PRIO
ZONE
R
RESET
ALARM
PRIO
ZONE
R
RESET
ALARM
PRIO
ZONE
R
RESET
ALARM
PRIO
ZONE
R
RESET
ALARM
PRIO
ZONE
R
RESET
Press the ventilation
button „open‟.
The smoke vent opens
and the red „open‟ led
flashes.
As long as you keep
pressing, the smoke
vent opens.
Stop pressing.
The motor stops and
the smoke vent is
between open and
close (red and green
„open‟ and „close‟ led
are both on). Press
„open‟.
The smoke vent
opens further
until the smoke vent is
completely open (the
red led is on).
When pressing
„close‟
the smoke vent will
close again
(indicated by a
flashing green led)
Until the vent is
completely closed
again (green „close‟
led is off again). 10
tenslotte helemaal
dicht is. (groene led
is gedoofd)