1
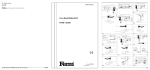
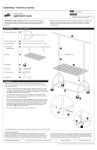
UK
Subject to change
USER’S MANUAL
Document Ref:
TW-820/18684
Copyright ©
These instructions are the sole property of Ferm-Omega Tools and may not be reproduced
Ferm Woodworking Bench
TW-820
Art.nr. 730825
Screwfix Art.nr. 18684
Ferm BV • P.O. Box 134 • 8280 AC Genemuiden • NL • www.ferm.com
0301-16
OPERATIONAL SAFETY
Concentrate
Routine and repetition can lead to mistakes. Remember
that a slight lack of concentration can result in serious
injuries in a split second
JOINTER’S BENCH
SAFETY INSTRUCTIONS
The following symbols are used in these instructions for
use:
Denotes risk of personal injury, loss of life or
damage to the tool in case of non-observance of the
instructions in this manual.
Denotes risk of electric shock.
Carefully read this manual before using the machine.
Make sure that you know how the machine functions and
how to operate it. Maintain the machine in accordance
with the instructions to make sure it functions properly.
Keep this manual and the enclosed documentation with
the machine.
Ferm products are manufactured to high quality standards they are safe and fit for purpose at time of sale, but
all tools can be dangerous if the correct precautions are
not taken.
Always follow these instructions, do not carry out the
operation until you are sure you can do so in safety.
Remember to consider the work environment for safe
operation as well as safety for tool use.
Warning! When using electric tools, basic safety
precautions should always be followed to reduce
the risk of fire, electric shock and personal injury. Read all
these instructions before attempting to operate this product.
Save these instructions for future reference.
PERSONAL SAFETY
Use Personal Protection Safety Equipment
Protect eyes with safety glasses or goggles note: the use
of safety protective eyewear without the CE mark can
lead to serious injury if the lens breaks. A suitable dust
mask should be worn if cutting, drilling or sanding is
dusty, in particular chipboard or MDF.
Approved safety footwear and headgear should worn as
appropriate, for example on building works or when
heavy weights are involved. Wear suitable gloves and
apron to protect against sparks/debris. Wear earplugs
or ear defenders.
Dress properly
Do not wear loose clothing or jewellery. It can get caught
in moving parts. Non-skid footwear is recommended
when working out doors. Wear protective hair covering
to contain long hair.
EXPLODED VIEW
Keep work area clean
Cluttered areas and benches invite injuries.
Consider the work environment
Do not expose power tools to rain or use them in damp
or wet locations. Keep work area well lit. Do not use
power tools in the presence of flammable liquids, vapours or gases.
Guard against electric shock
This unit contains dangerous voltages. Use a RCD (residual
current device) to provide protection against electrical shock.
Prevent body contact with grounded surfaces (e.g. pipes,
radiator, ranges or refrigerators).
Keep children and pets away
Do not let children or pets come into contact with the
tool, extension cable or work area.
Do not force the tool
It will work better and safer at the rate for which it was
intended.
Use the right tool
Do not force small tools or attachments to do the job of a
heavy-duty tool. Do not use tools for purposes for which
they were not intended; for example do not use a circular
saw for cutting trees or logs.
Do not abuse the cable
Never carry the tool by the cable or pull it to disconnect
it from the power socket. Keep the cable away from heat,
oil and sharp edges. Do not touch the metal plug pins
when connecting or removing the plug.
Do not over-reach
Keep a proper footing and balance at all times.
Disconnect tools from power supply
When not in use, before servicing and when changing
accessories such as blades, bits and cutters.
Always switch off and unplug the sander from the
power supply before making adjustments or changing abrasive belts.
Remove adjusting keys and wrenches
Ensure that they are removed from the tool before switching on.
Avoid unintentional starting
Do not carry plugged in tools with your finger on the
switch. Check that the switch is off before plugging in to
socket.
Stay alert
Watch what you are doing Use common sense. Do not
operate tools when tired or after taking alcohol or prescription/ non-prescription drugs.
2
Ferm
Ferm
7
Extension cables
Use only three core earthed extension cables suitable
for the power input of the tool (minimum cable size
1.5mm2). Plug into an earthed socket only.
When using a cable reel unwind it fully. Do not use long
extension cables.
Outdoors use
If the tool is suitable to be used outdoors, only use an
extension cable intended for outdoor use and marked
accordingly. Use a RCD (residual current device) to provide protection against electrical shock. Do not use in
rain or damp conditions.
Connect a dust extraction device
Whenever there are facilities for fitting a dust or fume
extraction system, make sure it is connected and used.
Use recommended accessories
The use of any other accessory or attachment other than
recommended in the instructions or catalogue may present a risk of personal injury. Use an extension cable with
a minimum conductor size of 1.5mm2.
When using a cable reel unwind it fully.
INSTALLATION
For easy assembly please follow the steps described
below. It is recommended not to fully tighten the screws.
Leave this operation to the end.
1. Fix the right leg (A) (without front holes) below
board (B) using 3 screws.
2. Fix the support (C) (groove to the inside) to the big
leg (A), using 2 long bolts per support.
3. Insert the plywood board (D) into the inner grooves
of the support.
4. Fix the left leg (A) (with front holes) below the board
(B), using 3 screws, and the support (C) using 2 long
bolts per support.
5. Fix the rails (E and G) of the drawer using 2 screws
per rail. (make sure that the wheel is on the inside and
front side).
6. Fix the drawer after the rails have been fixed.
7. Install the clamp by inserting the clamping pegs into
the holes provided. Ensure correct positioning by
pressing it against the board.
8. Complete the assembling by fully tightening all
screws.
GUARANTEE PROVISIONS
1. Ferm guarantees all material and construction
defects for a period of 36 MONTHS after purchase.
Other claims in respect of damage, of whatever
nature, direct or indirect, to persons and/or materials are excluded.
2. Always consult your Ferm dealer in the first instance.
Usually he will be able to solve the problem or repair
the defect.
3. If parts are repaired or replaced within the warranty
period, this does not extend the warranty period.
4. Fair wear and tear is not covered by this warranty.
For example motors, switches or bulbs.
5. THIS WARRANTY APLIES ONLY:
• If you can submit proof of the date of purchase, i.e. a
RECEIPT stating the date of purchase.
• If you have completed and signed the enclosed warranty card. You will find the warranty card in the back
of this manual.
• If no repairs or alterations have been made to the
machine by third parties, nor other than the original
parts have been fitted.
• If the machine was used in accordance with the
instructions.
• If we cannot plead force majeure.
6. The warranty provisions apply in combination with
our terms of delivery and sale.
7. All cost of transport of the product to be repaired are
at buyer’s expense. Badly packed articles are not
accepted.
FERM’S AFTER SALES SERVICE
Save the original packing. Should you ever have to move
the machine there is less risk of damage in the original
packing. In the case of a guarantee claim the product can
be returned best in the original packing.
ENVIRONMENTAL PROTECTION
Recycling raw materials is prefered to dumping them as
waste! To prevent the machine from being damaged
during transport its packing must be strong. Insofar as
possible the packing consists of recyclable materials such
as paper, cardboard and wood.
A set of wooden clamping pegs is also supplied to insert
into the holes in the clamp and workbench in order to
hold the different pieces to be worked on.
6
Ferm
Ferm
3
4
Ferm
Ferm
5