1
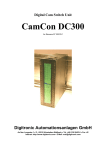
2 Basic Dialog
1
Basic Dialog
The basic dialog incorporates the ‘
‘
Framework’
’program for working with STRUC G.
The task of the basic dialog is primarily to create, select, process and document projects, master programs,
macros and function packets.
The user files and libraries, required by the STRUC editors, are saved in a data bin.
1.1
Start and End of STRUC G
STRUC G is started by a double click of the STRUC icon using the left-hand mouse key.
STRUC G
M
V4.2.3
Diagram 1/1:
STRUC Icon
After invoking STRUC, the basic dialog screen window displays the same state as it had when the previous STRUC
session was terminated: the previously processed project is in the project line, the previously processed master
program or the macro directory is in the master program line and the previously processed function packet or
macro is selected in the function packet area.
The closing of the basic dialog is started by invoking ’
FILE / Close STRUC’
.
FILE
"
Delete
Straighten up selected MP
List
"
Print to File
"
Plot
"
Extract Comment...
Replace Comment...
Exit STRUC...
Subsequently a question window is popped onto screen:
Exit STRUC
?
Do you want to exit STRUC?
Yes
Siemens AG 465 981.7101.23
SIMADYN D STRUC G User manual
No
Edition 02.96
2---3
2 Basic Dialog
If you receipt with ’
Yes’
, then the basic dialog is quitted.
If you receipt with ’
No’
, then the basic dialog is activ further on.
1.2 The Basic Dialog Screen Window
Screen Window Showing the Function Packets
2/2 indicates the basic dialog screen window that is popped onto screen, after invoking STRUC G, when a master
program is selected.
2---4
Edition 02.96
Siemens AG 465 981.7101.23
SIMADYN D STRUC G User manual
2 Basic Dialog
SIEMENS
1 23
FILE
Basic Dialog
STRUG G 4.2.3
MP
4
FP --- EDIT
MP --- EDIT
1001 0
MP --- COMP
MP
1 001 0
FP --- COMP
FP
LIBS
PN--- COMP
PROG.
P32/P16
SIMADYN D
MP
N
E
W
FP
PN
PN.BIN
AUTOCOMP
.
Projects:
create
Masterprogr.
create
pjv400
p2
handmp
mp2
O
L
D
VERSION
1)
A BC
LIBRARIES
OPTIONS
2)
p3
3)
macros
3a)
4)
files:
Processors:
D01_P1
D04_P2
D09_P3
D08_P4
erzeugen
mr
fp21
fp31
fp41
MP --- file.
spock
fp22
fp32
beam
fp23
5)
D10_P5
D15_P6
D16_P7
D20_P8
??????
Function packets:
handmp
6)
me
up
message process graph. editors 8)
g 19 message server started
1)
2)
3)
3a)
4)
5)
6)
7)
8)
-
message output Basic Dialog
7)
-
Message files--- PATH /scours04/rupprech/struc/struc/mds
Library --- PATH
/scousr04/rupprech/struc/ver/v400/
Temporary --- PATH
/scousr04/rupprech/struc/ver/v400/
Static Menu
Project Line
Master Program Line
Button for Macros
Files Line
Processor Line
Functions Packet Line
Basic Dialog and STRUC---Compiler Message Process
MP/FP---Editors Message Process
Diagram 1/2:
STRUC Basic Dialog Window --- Funktions Packet
Overview
Siemens AG 465 981.7101.23
SIMADYN D STRUC G User manual
Edition 02.96
2---5
2 Basic Dialog
SIEMENS
1 23
DATEI
Grunddialog
STRUG G 4.2.1
MP
4
FP --- EDIT
MP --- EDIT
1001 0
MP --- COMP
MP
1 001 0
FP --- COMP
FP
LIBS
PN--- COMP
PROG.
P32/P16
SIMADYN D
MP
N
E
W
FP
PN
PN.BIN
AUTOCOMP
.
Projekte:
erzeugen
Masterprogr.
erzeugen
pjv400
p2
handmp
mp2
O
L
D
1)
A BC
VERSION
BIB’
THEK
OPTIONEN
2)
p3
3)
makros
3a)
4)
Dateien:
Prozessoren:
D01_P1
D04_P2
D09_P3
D08_P4
erzeugen
mr
fp21
fp31
fp41
MP.
spock
fp22
fp32
beam
fp23
5)
D10_P5
D15_P6
D16_P7
D20_P8
??????
Funktionspakete:
handmp
6)
me
up
Meldeprozess graf. Editoren
g19
Start Meldeprozess
1)
2)
3)
3a)
4)
5)
6)
7)
8)
2---6
8)
-
Meldeausgabe Grunddialog
Meldedatei --- PFAD
Bibliotheks--- PFAD
Temporaer--- PFAD
7)
-
/scours04/rupprech/struc/struc/mds
/scousr04/rupprech/struc/ver/v400/
/scousr04/rupprech/struc/ver/v400/
Statisches Menü
Projektzeile
Masterprogrammzeile
Auswahlbutton fü r Makros
Dateienzeile
Prozessorenzeile
Funktionspaketbereich
Meldeprozeß des Grunddialogs und der STRUC---Compiler
Meldeprozeß des MP/FP---Editors
Edition 02.96
Siemens AG 465 981.7101.23
SIMADYN D STRUC G User manual
2 Basic Dialog
SIEMENS
1 23
DATEI
Grunddialog
STRUG G 4.2.1
MP
4
FP --- EDIT
MP --- EDIT
1001 0
MP --- COMP
MP
1 001 0
FP --- COMP
FP
LIBS
PN--- COMP
PROG.
P32/P16
SIMADYN D
MP
N
E
W
FP
PN
PN.BIN
AUTOCOMP
.
Projekte:
erzeugen
Masterprogr.
erzeugen
pjv400
p2
handmp
mp2
O
L
D
VERSION
1)
A BC
BIB’
THEK
OPTIONEN
2)
p3
3)
makros
3a)
4)
Dateien:
Prozessoren:
D01_P1
D04_P2
D09_P3
D08_P4
erzeugen
mr
fp21
fp31
fp41
MP.
spock
fp22
fp32
beam
fp23
5)
D10_P5
D15_P6
D16_P7
D20_P8
??????
Funktionspakete:
handmp
6)
me
up
Meldeprozess graf. Editoren
g19
Start Meldeprozess
1)
2)
3)
3a)
4)
5)
6)
7)
8)
8)
-
Meldeausgabe Grunddialog
Meldedatei --- PFAD
Bibliotheks--- PFAD
Temporaer--- PFAD
7)
-
/scours04/rupprech/struc/struc/mds
/scousr04/rupprech/struc/ver/v400/
/scousr04/rupprech/struc/ver/v400/
Statisches Menü
Projektzeile
Masterprogrammzeile
Auswahlbutton fü r Makros
Dateienzeile
Prozessorenzeile
Funktionspaketbereich
Meldeprozeß des Grunddialogs und der STRUC---Compiler
Meldeprozeß des MP/FP---Editors
Siemens AG 465 981.7101.23
SIMADYN D STRUC G User manual
Edition 02.96
2---7
2 Basic Dialog
Screen Window with Macro Overview
2/3 shows the basic dialog screen window, when the macro directory of a project is selected.
SIEMENS
1 23
FILE
Masterprogr.
create
STRUG G 4.2.3
MP
4
MP --- EDIT
Projects:
create
Basic Dialog
PN
FP --- EDIT
pjv400
p2
handmp
mp2
1001 0
FP --- COMP
FP
PN.BIN
AUTOCOMP
PROG.
O
L
D
N
E
W
VERSION
P32/P16
SIMADYN D
-
A BC
LIBRARIES
OPTIONS
2)
p3
3)
macros
3a)
4)
Dateien:
Macro --subdirectories
std
proj
5)
misc
Macros:
create
ms1
mp1
mm1
ms2
mp2
mm2
ms3
mp3
6)
ms4
ms5
message process graph. editors 8)
g19 message server started
1)
2)
3)
3a)
4)
5)
6)
7)
8)
Diagram 1/3:
2---8
-
message output Basic Dialog
7)
-
Message files--- PATH /scours04/rupprech/struc/struc/mds
Library --- PATH
/scousr04/rupprech/struc/ver/v400/
Temporary PATH
/scousr04/rupprech/struc/ver/v400/
Static Menu
Project Line
Master Program Line
Button for Macros
Files Line
Macro Sub---directory Line
Macro Area
Basic Dialog and der STRUC---Compiler Message Process
MP/FP---Editor Message Process
STRUC --- Basic Dialog ---Window --- Macro Overview
Edition 02.96
Siemens AG 465 981.7101.23
SIMADYN D STRUC G User manual
2 Basic Dialog
General Basic Dialog Operations
Each basic dialog function must be selected via the cursor.
Selecting with the cursor
Selection is implemented by placing the cursor on top of the desired function button using the mouse.
A sub-menu is popped onto screen when the left-hand mouse key is pressed and held.
The desired sub-menu function is selected with pressed and held left-hand mouse key. This function is selected
when the mouse key is released.
Remove the cursor pointer from the sub-menu and then release the mouse key if no function in the sub-menu is to
be executed.
This type of function selection is valid for all functions in the basic dialog.
Certain processing phases exist in which not all functions of a sub-menu can be executed, since they are either not
possible, not practical or not permitted. These functions are then disabled by STRUC. This is indicated to the user
by ghosting the text of this menu line on the screen.
1.3 Basic Dialog Screen Layout and File Functions
The individual sub-sections of the screen window (2/2 or 2/3) show an overview of the configuring data. The
displayed objects simultaneously represent function buttons that are layed over further sub-menus containing
the functions to process the object.
1.3.1
Project Line
All user projects are indicated here. The currently selected project is color emphasized.
All project names simultaneously represent function buttons, overlaying sub-menus which contain functions
necessary for processing the projects.
Project -- Selection
The selected project name is color emphasized and the corresponding master program is inserted into the master
program line. No master program has yet been selected and therefore the processor lines and function packet
area are empty.
projects:
create
Diagram 1/4:
pjv 400
pjv 420
Select Project
Project -- Create
A form is popped onto screen, after selecting this function, in which the name of the new project must be inserted
(2/5). The project name consists of one to six characters (lower case letters, numbers and underscores), whereby
the first character must be a letter.
Clicking the ‘
OK’button with the left-hand mouse key creates the project; the function is aborted with the ‘
Cancel’
button, i.e. no project is created.’
Siemens AG 465 981.7101.23
SIMADYN D STRUC G User manual
Edition 02.96
2---9
2 Basic Dialog
Projekte:
erzeugen
pjv 400
pjv 420
Projekt erzeugen
Projektname eingeben:
OK
Projects:
Create
Abbrechen
pjv 420
pjv 400
Create Project
Enter project name:
OK
Diagram 1/5:
1.3.2
Cancel
Sub-Menu for ‘
‘
Project Create’
’
Master Program Line
All master programs as well as the macro directory ‘
‘
Macros’
’of the selected project are displayed here. The
currently selected master program is color emphasized.
All master program names and the macro directory are simultaneously function buttons which overlay sub-menus
containing functions required for their processing.
Masterprogram -- Selection
Master prog.:
create
Diagram 1/6:
handmp
mpv400
v4_mp1
v4_mp2
v4_mp3
macros
Select Master Program
Clicking the button for the master program names with the left---hand mouse key (2/6) selects the master program.
The selected master programm is color emphasized. The processors, projected in the master program, are entered in the processor line and the function packets are entered in the function packet column of those processors,
where they are projected.
2---10
Edition 02.96
Siemens AG 465 981.7101.23
SIMADYN D STRUC G User manual
2 Basic Dialog
Masterprog.:
create
handmp
mpv400
v4_mp1
v4_mp2
v4_mp3
files:
Processors:
D01_P1
Function packets:
mr
create
spock
MP --- file:
handmp.
Diagram 1/7:
beam
me
up
Selected Master Program File
If a masterprogram is selected, then the functions for the master program compiler in the Static menu can be selected.
Siemens AG 465 981.7101.23
SIMADYN D STRUC G User manual
Edition 02.96
2---11
2 Basic Dialog
Master Program -- Create
A form is popped onto screen when this function is selected, in which the name of the new master program must
be inserted (2/8).
The syntax of the MP name is an analogous to that of the project name, i.e. one to six characters (lower case
letters, numbers and underscore), whereby the first character must be a letter.
Masterprog.:
handmp
erzeugen
mpv400
v4_mp1
v4_mp2
v4_mp3
makros
v4_mp2
v4_mp3
macros
Masterprog. erzeugen
Masterprogrammname eingeben:
OK
Master prog.:
Abbrechen
handmp
create
mpv400
v4_mp1
Create Masterprogram
Enter name of Master Program:
OK
Diagram 1/8:
Cancel
Sub-Menu for ‘
Create Master Program’
Clicking the ‘
OK’button with the left-hand mouse key creates the master program; the function is aborted with the
‘
Cancel’button, i.e. no master program is created.
First the function ’
Create Master Program’creates the master program directory and an ”empty”master program
file.
The names of the master program file and its directory are identical.
Direct MP-- Editor respectively MP-- Compiler -- Invoke
The pop---menu is popped onto screen by clicking and keeping the right hand mouse key pushed in the master
program:
Selected MP
Compile
Configuring
The MP---COMP function is invoked for the current selected master program by positioning the cursor at projecting and letting the right---hand mouse key loose.
The MP---EDIT function is invoked for the current selected master program by positioning the cursor at projecting
and letting the right---hand mouse key loose.
Macro Directory -- Select
2---12
Edition 02.96
Siemens AG 465 981.7101.23
SIMADYN D STRUC G User manual
2 Basic Dialog
Clicking the makro directory name ‘
Macros’with the left-hand mouse key selects the makro directory.
The macro directory is color emphasized. The basic dialog image changes to the makro view (2/3). The macros of
the selected projects are displayed in individual sub---directories columns.
If the macro directory is selected, then the functions for macro compiler in the Static menu can be selected.
Macro Sub-- Directory and Macro -- Select
Clicking the macro sub---menu name with the left-hand mouse key displays the currently selected macro sub---directory color emphazised (2/9).
Dateien:
Makrounter--verzeichnisse
std
proj
misc
std
proj
misc
files:
macro --subdirectories:
Diagram 1/9:
1.3.3
Select Macro Sub ---Directories
Files Line
If a master program is selected in the master program line, then the master program file as well as the processors
and function packets, configured in this master program, are displayed in the files line (2/10).
Siemens AG 465 981.7101.23
SIMADYN D STRUC G User manual
Edition 02.96
2---13
2 Basic Dialog
Dateien:
Prozessoren:
D01_P1
D04_P2
D09_P3
D08_P4
fp41
D10_P5
D15_P6
D16_P7
D20_P8
??????
Funktionspakete:
MP.
handmp
mr
fp21
fp31
spock
fp22
fp32
beam
fp23
me
up
nicht mehr benoetigte STRUC
Dateien loeschen
(*.obj,*.o, *.lst, ... )
loesche Dateien
files:
Processors:
D01_P1
D04_P2
D09_P3
D08_P4
mr
fp21
fp31
fp41
spock
fp22
fp32
beam
fp23
D10_P5
D15_P6
D16_P7
D20_P8
??????
Function packets:
MP --- file.
handmp
me
up
Diagram 1/10:
2---14
Processing Files --- Function Packets Overview
Edition 02.96
Siemens AG 465 981.7101.23
SIMADYN D STRUC G User manual
2 Basic Dialog
If the macro directory is selected in the master program line, then the macro sub-directories and the macros ,
contained in there, are displayed in the files line (2/11).
Dateien:
Makrounter--verzeichnisse
Makros:
erzeugen
std
proj
misc
ms1
mp1
mm1
ms2
mp2
mm2
ms3
mp3
ms4
ms5
files:
macro --subdirectories:
macros:
create
std
proj
misc
ms1
mp1
mm1
ms2
mp2
mm2
ms3
mp3
ms4
ms5
Diagram 1/11:
Processing Files --- Macros Overview
The names displayed in the project and master program line are path names according to the UNIX file structure.
The name of the selected master program is displayed in the basic dialog on two function buttons.
The master program name is located in the master program line (2/6) and represents the sum of all the STRUC
files assigned to a rack, whereas this name in the files line (2/7) represents only the master program file.
1.3.4
Processors Line
All processors of the selected master programs are displayed here in the function packet overview. The currently
selected processor is displayed color emphasized.
All processor names simultaneously represent function buttons, overlaying sub-menus containing the functions
required for processing the processor programs.
The macro overview displays the macro sub-directories of the selected project in the processors line. The
currently selected directory is displayed color emphasized.
Processor Program -- Select
Siemens AG 465 981.7101.23
SIMADYN D STRUC G User manual
Edition 02.96
2---15
2 Basic Dialog
Clicking the processor program name with the left---hand mouse key selects the processor program.
The selected processor program is color emphasized on screen.
Dateien:
D04_P2
D01_P1
Prozessoren:
D06_P3
D08_P4
files:
D04_P2
D01_P1
Processors:
Diagram 1/12:
D06_P3
D08_P4
Select Processor Program
Direct FP-- Editor respectively FP-- Compiler -- Invoke
The pop---menu is popped onto screen by clicking and keeping the right hand mouse key pushed in the master
program:
Selected FP
Compile
Configuring
The FP---COMP function is invoked for the currently selected function packet by positioning the cursor at projecting and letting the right---hand mouse key loose.
The FP---EDIT function is invoked for the currently selected function packet by positioning the cursor at projecting
and letting the right---hand mouse key loose.
1.3.5
Function Packet Area
All function packets of a selected master program are displayed, sorted into columns according to processors, in
the function packet overview. The selected function packet is displayed color emphasized.
All function packet names simultaneously represent function buttons, overlaying sub-menus containing the
functions required for processing the function packet.
All macros of a selected project are displayed, sorted into columns according to sub---directories, in the macro
overview. The selected macro is displayed color emphasized.
Function Packet -- Select
The selected macro is displayed color emphasized by clicking the function packet name with the left---hand
mouse key.
Function packets:
mr
create
spock
beam
me
up
Diagram 1/13:
Select Function Packet
The functions for the function packet processing can be selected in the Static menu and its sub-menus, as soon as
the function packet is selected.
2---16
Edition 02.96
Siemens AG 465 981.7101.23
SIMADYN D STRUC G User manual
2 Basic Dialog
Function Packet -- Create
After selecting this function, the user must initially specify whether the function packet is to be created for a 16 bit or
32 bit processor. A form is subsequently popped onto screen in which the function packet name of the new
function packet must be entered.
Funktionspakete:
mr
erzeugen
spock
beam
me
up
Funktionspaket erzeugen
fuer P16 Prozessor
fuer P32 Prozessor
Funktionspaketname eingeben:
OK
Function packets:
mr
create
spock
Abbrechen
beam
me
up
for P16 Processor ..
for P32 Processor ..
Create function packet
Enter name of function packet:
OK
Diagram 1/14:
Cancel
Create Function Packet
The syntax of the FP name is an analogous to that of the project name, i.e. one to six characters (lower case letters,
numbers and underscore), whereby the first character must be a letter (or a ‘
@’for special function packets).
Click on the ‘
OK’button with the left-hand mouse key to create the function packet. The ‘
Cancel’button aborts the
function, i.e. no function packet is created.
The newly created function packet is entered into the ‘
??????’column in the basic dialog, if it has not yet been
allocated to a processor program.
The allocation of the function packets to processors is implemented in the module parameter drawing of the
master program editor.
If function packets, without function packet files yet, are attached to a processor in the master program, then these
function packets are color emphasized differently on screen. Additionally they must be installed with the function
’
Create function packet’
. If you enter the name of such a function packet as a name in ’
Create function packet’
,
then its color changes and it can now be compiled.
Siemens AG 465 981.7101.23
SIMADYN D STRUC G User manual
Edition 02.96
2---17
2 Basic Dialog
Macro -- Select
The selected macro is displayed color emphasized by clicking the macro name with the left---hand mouse key.
macros:
ms1
create
ms2
ms3
Makros:
ms1
ms4
erzeugen
ms2
ms5
ms3
ms4
ms5
Diagram 1/15:
Select Macro
Macro -- Create
Selecting this function causes the form shown in 2/16 to be popped onto screen. The name of the new macro is
entered at this location. The macro sub-directory, in which the macro is to be created, must also be selected.
The syntax of the macro name is analogous to that of the project name, i.e. one to six characters (lower case
letters, numbers and underscore), whereby the first character must be a letter.
Click on the ‘
OK’button with the left-hand mouse key to create the macro. The ‘
Cancel’button aborts the function,
i.e. no macro is created.
If the basic dialog detects that a macro with the desired name already exists in one of the macro sub-directories,
then an error window is popped onto screen; a new macro is then not created.
2---18
Edition 02.96
Siemens AG 465 981.7101.23
SIMADYN D STRUC G User manual
2 Basic Dialog
Makros:
ms1
erzeugen
ms2
ms3
ms4
ms5
Makro
Makro erzeugen
Makroname
eingeben
Makrounterverzeichnis
auswaehlen
std
proj
misc
OK
macros:
ms1
create
ms2
Abbrechen
ms3
ms4
ms5
macro ...
Create macro
Enter
macro name
Select macro
subdirectory:
std
proj
misc
OK
Diagram 1/16:
Cancel
Create Sub ---menu
Siemens AG 465 981.7101.23
SIMADYN D STRUC G User manual
Edition 02.96
2---19
2 Basic Dialog
1.4 Configuring Functions in the Static Menu
The static menu differs only slightly between the function packets overview (2/2) and the macros overview (2/3).
The following text describes only the function packets overview. Deviations in the macros overview are flagged
with ‘
‘
: Macros Overview’
’
.
FILE:
Compile Basic Dialog
MP---EDIT:
Process Master Program
FP---EDIT:
Process Functions Packet
MP---COMP:
Compile Master Program
FP---COMP:
Compile Function Packet
PN---COMP:
Compile Processor Program
PROG.:
Load Program Memory Sub-Module
AUTOCOMP:
Compile Selected Master or Processor Program
VERSION:
Update User Data Version
LIBRARIES:
Select Libraries
OPTIONS:
Address Book, Disable Retro-Documentation, Save Error Image, Internal Graphics Editor
(not available in : macro overview)
(not available in : macro overview)
1.5 Configuring Data Structure
2/17 indicates the structure of the user data ‘
lnk_awd’as well as the various levels of the projects PJ, master
programs MP and function packets FP (see also chapter ‘
‘
Overview’
’of this manual).
The temporary data bin ‘
lnk_tmp’
, that holds the function packet / master program files during the editor
processing, exists in addition to the user data. The temporary data bin is allocated to the corresponding user. The
area ‘
ver’holds the libraries corresponding to a particular STRUC L version.
The processed function packet / master program files are saved from the temporary data bin ‘
lnk_tmp’to the user
data area ‘
lnk_awd’after exiting the editor.
2---20
Edition 02.96
Siemens AG 465 981.7101.23
SIMADYN D STRUC G User manual
2 Basic Dialog
Homedirectory
struc
lnk_awd
lnk_tmp
pj_1
Projektebene
pj_2
mp_1
...
makros
mp_1
mp_1.cmp
fp_1.cfp
fp_2.cfp
...
ver
...
makros
Masterprogrammebene
Funktionspaketebene
Home Directory
struc
lnk_awd
lnk_tmp
pj_1
...
macros
mp_1
mp_1.cmp
fp_1.cfp
fp_2.cfp
...
Diagram 1/17:
Project Level
pj_2
mp_1
ver
...
macros
Master Program Level
Function Packet Level
User Data Structure
Each project contains the macro directory ‘
‘
Macros’
’
, next to a series of master programs, into which the project
allocated macro files are inserted (2/18).
The macro directory contains (up to 8) macro sub-directories, into which the actual macro files are saved. Three
macro sub-directories with the names ‘
‘
std’
’
,‘
‘
proj’
’and ‘
‘
misc’
’are already created when a project is generated
(see page 3--- page 8 ). Further macro sub-directories can be created with the UNIX command mkdir. Their
names must correspond to the STRUC name convention, i.e. one to six characters (lower case letters, numbers
and underscore), whereby the first character must be a letter.
Siemens AG 465 981.7101.23
SIMADYN D STRUC G User manual
Edition 02.96
2---21
2 Basic Dialog
Makroverzeichnis eines Projektes
makros
std
proj
misc
...
ms1.cmk
ms2.cmk
ms3.umk
ms4.umk
Makrounterverzeichnisse
...
Project’
s Macro Directory
macros
std
proj
misc
...
ms1.cmk
ms2.cmk
ms3.umk
ms4.umk
Diagram 1/18:
2---22
Makroebene
Macro Sub-- Directories
...
Macro Level
Macro Directory Structure
Edition 02.96
Siemens AG 465 981.7101.23
SIMADYN D STRUC G User manual
2 Basic Dialog
Configuring Files -- P16
mpname.ump
mpname.ump
mpname.ump
mpname.cmp
MP --- EDIT
mpname.cmp
Nmpname.gpn
mpname.omp
Nmpname.mp2
MP --- COMP
mpname.nmp
fpname.ufp
fpname.ufp
fpname.cfp
fpname.ufp
FP --- COMP fpname.mfp
FP --- EDIT
Baustein--Bibliotheken
fpname.cfp
fpname.ofp
PN --- COMP Nmpname.bin
Nmpname.eln
PROG
fpname.gfp
cfpname.obj
Nmpname.mpn
fpname.ufp
fpname.ufp
fpname.cfp
Baustein--Bibliotheken
fpname.ufp
fpname.cfp
FP --- COMP fpname.mfp
FP --- EDIT
fpname.ofp
Nmpname.err
Nmpname.el1
fpname.gfp
cfpname.obj
Nmpname.el2
N=1,..,8 (Prozessornummer)
Siemens AG 465 981.7101.23
SIMADYN D STRUC G User manual
Edition 02.96
2---23
2 Basic Dialog
mpname.ump
mpname.ump
mpname.ump
mpname.cmp
MP --- EDIT
mpname.cmp
Nmpname.gpn
mpname.omp
Nmpname.mp2
MP --- COMP
mpname.nmp
fpname.ufp
fpname.ufp
fpname.cfp
fpname.cfp
fpname.ufp
FP --- COMP fpname.mfp
FP --- EDIT
Block
Libraries
fpname.ofp
PN --- COMP Nmpname.bin
Nmpname.eln
PROG
fpname.gfp
cfpname.obj
Nmpname.mpn
fpname.ufp
fpname.ufp
fpname.cfp
Block
Libraries
fpname.cfp
fpname.ufp
FP --- COMP fpname.mfp
FP --- EDIT
Nmpname.err
Nmpname.el1
fpname.gfp
fpname.ofp
cfpname.obj
Nmpname.el2
N=1,..,8 (Processor number)
Diagram 1/19:
2---24
Configuring Files --- P16
Edition 02.96
Siemens AG 465 981.7101.23
SIMADYN D STRUC G User manual
2 Basic Dialog
Configuring Files -- P32
mpname.ump
mpname.ump
mpname.cmp
MP --- EDIT
mpname.cmp
Nmpname.gpn
mpname.ump
mpname.omp
Nmpname.mp3
MP --- COMP
mpname.nmp
fpname.ufp
fpname.ufp
fpname.cfp
mkname.umk
mkname.cmk
fpname.ufp
FP --- EDIT mkname.umk
fpname.ofp
Baustein--Bibliotheken,
Makros
mkname.umk
mkname.cmk
FP --- COMP mkname.cmk
PN --- COMP
Nmpname.br3
Nmpname.eln
PROG
fpname.gfp
cfpname.o
Nmpname.mpn
fpname.ufp
fpname.ufp
fpname.cfp
fpname.cfp
fpname.ufp
FP --- EDIT mkname.umk
fpname.ofp
Baustein--Bibliotheken,
Makros
fpname.cfp
FP --- COMP mkname.cmk
fpname.gfp
cfpname.o
Nmpname.err
Nmpname.el1
Nmpname.el2
N=1,..,8 (Prozessornummer)
Siemens AG 465 981.7101.23
SIMADYN D STRUC G User manual
Edition 02.96
2---25
2 Basic Dialog
mpname.ump
mpname.ump
mpname.cmp
MP --- EDIT
mpname.cmp
Nmpname.gpn
mpname.ump
mpname.omp
Nmpname.mp3
MP --- COMP
mpname.nmp
fpname.ufp
fpname.ufp
fpname.cfp
mkname.umk
mkname.cmk
fpname.ufp
FP --- EDIT mkname.umk
fpname.cfp
FP --- COMP mkname.cmk
fpname.ofp
cfpname.o
mkname.cmk
Nmpname.mpn
fpname.ufp
fpname.ufp
mkname.umk
Nmpname.eln
PROG
fpname.gfp
Block
Libraries,
Macros
fpname.cfp
PN --- COMP
Nmpname.br3
fpname.cfp
fpname.ufp
FP --- EDIT mkname.umk
FP --- COMP mkname.cmk
fpname.gfp
fpname.ofp
Block
Libraries,
Macros
cfpname.o
Nmpname.err
Nmpname.el1
Nmpname.el2
N=1,..,8 (Processor number)
Diagram 1/20:
2---26
Configuring Files --- P32
Edition 02.96
Siemens AG 465 981.7101.23
SIMADYN D STRUC G User manual