1
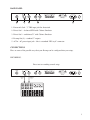
PREAMP MANUAL
OWNER’S MANUAL
DIGITAL MUSIC CORPORATION
INTRODUCTION
Congratulations on your choice of product! The three channel, all tube Voodoo Lab Guitar Preamp
was designed to be simply the most effective and organic direct recording tool available for guitar,
as well as a centerpiece to the live rig of any tone connoisseur. Careful attention was paid in the design
stage to provide tighter and more even bass response than you find in many vintage circuits, with an
emphasis on string definition and picking dynamics. Most important was capturing the elusive feel
and “vibe” of a vintage tube amp.
UNPACKING
Your Voodoo Lab Guitar Preamp box should contain the following:
1. Guitar Preamp
2. Footswitch
3. AC power cord
4. This manual
5. Warranty card
Please take a moment to fill out and mail in your warranty card. This will register your warranty,
make you eligible for technical support, and allow us to notify you with updates and new product
information. Don’t worry, we respect your privacy and never sell our mailing list.
SAFETY PRECAUTIONS
Your Preamp is a professional piece of equipment. Always use common sense and observe these
precautions:
Always make sure the unit is properly grounded.
Shut the unit off and disconnect AC power before changing fuse or tubes.
Always insure adequate air circulation around Preamp.
Always turn off the power of all related equipment before making connections.
Do not use excessive force in handling buttons, switches, or controls.
1
FRONT PANEL
POWER
VOLUME
TREBLE
MID
BASS
GAIN
VOLUME
CABINET
SIMULATOR
VOLUME
TREBLE
MID
BASS
GAIN
GAIN
INPUT
CHANNEL
SELECT
GUITAR PREAMP
1
2
3
BRIGHT
PUNCH
IN OPEN
OUT CLOSED
4
5
6
7
8
9
SHIFT
CLEAN RHYTHM
LEAD
10
11 12
13
14
15
16
17
BRIGHT
18
19
BRIGHT
20
21
22
23
1. Power switch
2. Cabinet Simulator – In/Out
3. Cabinet Simulator – 2x12 Open/4x12 Closed
4. Green Volume – volume control for Clean channel
5. Green Treble – treble EQ control for Clean channel
6. Green Mid – midrange EQ control for Clean channel
7. Punch Switch – changes EQ curve of Clean channel to accentuate the lower-mid frequencies
8. Green Bass – bass EQ control for Clean channel
9. Green Bright Switch – enhances high frequencies in the Clean channel
10. Green Gain – gain control for Clean channel
11. Channel Select – Select between Clean and Rhythm/Lead
12. Channel Select – Select Rhythm or Lead
13. Yellow Volume – volume control for Rhythm channel
14. Red Volume – volume control for Lead channel
15. Red/Yellow Treble – treble EQ control for both Rhythm and Lead channels
16. Red/Yellow Mid – midrange EQ control for both Rhythm and Lead channels
17. Shift Switch – shifts EQ curve of both Rhythm and Lead channels to accentuate the
lower-mid and lower-high frequencies
18. Red/Yellow Bass – bass EQ control for both Rhythm and Lead channels
19. Yellow Bright Switch – enhances high frequencies in the Rhythm channel
20. Yellow Gain – gain control for the Rhythm channel
21. Red Bright Switch – enhances high frequencies in the Lead channel
22. Red Gain – gain control for the Lead channel
23. Input jack – standard 1⁄4" instrument level input
2
BACK PANEL
PREAMP OUT
CAUTION
E
MADE IN U.S.A.
4
3
FUSE
SE
2
1
FUSE
FU
GUITAR PREAMP
AC IN (100W MAX)
To prevent electrical shock, do not remove cover.
No user serviceable parts inside. Refer servicing
to qualified service personnel.
FUS
DIRECT OUT
FOOTSWITCH
1 AMP
5
1. Footswitch Jack – 1⁄4" TRS input jack for footswitch
2. Direct Out 1 – balanced XLR with Cabinet Simulator
3. Direct Out 2 – unbalanced 1⁄4" with Cabinet Simulator
4. Preamp Out (2) – standard 1⁄4" outputs
5. AC In – AC power input jack – this is a standard “IEC-style” connector
CONNECTIONS
Here are some of the possible ways that your Preamp can be configured into your setup:
RECORDING:
Direct out to recording console setup
CAUTION
FUSE
FUSE
SE
Balanced
XLR
MADE IN U.S.A.
AC IN (100W MAX)
FU
GUITAR PREAMP
To prevent electrical shock, do not remove cover.
No user serviceable parts inside. Refer servicing
to qualified service personnel.
E
PREAMP OUT
FUS
DIRECT OUT
FOOTSWITCH
1 AMP
Unbalanced
1/4"
3
LIVE:
Pre-amp/power amp setup
PREAMP OUT
CAUTION
AC IN (100W MAX)
SE
MADE IN U.S.A.
FU
GUITAR PREAMP
FUSE
FUSE
To prevent electrical shock, do not remove cover.
No user serviceable parts inside. Refer servicing
to qualified service personnel.
E
DIRECT OUT
FUS
FOOTSWITCH
1 AMP
CABINET
CABINET
IN LEFT
IN RIGHT
POWER AMP
Pre-amp/power amp/effects setup
PREAMP OUT
CAUTION
4
1 AMP
CABINET
IN LEFT
IN RIGHT
EFFECTS PROCESSOR
IN LEFT
IN RIGHT
POWER AMP
SE
MADE IN U.S.A.
CABINET
FUSE
FUSE
FU
GUITAR PREAMP
AC IN (100W MAX)
To prevent electrical shock, do not remove cover.
No user serviceable parts inside. Refer servicing
to qualified service personnel.
E
DIRECT OUT
FUS
FOOTSWITCH
LIVE (continued):
Pre-amp/amplifier head setup
PREAMP OUT
CAUTION
FUSE
FUSE
E
SE
MADE IN U.S.A.
FU
GUITAR PREAMP
AC IN (100W MAX)
To prevent electrical shock, do not remove cover.
No user serviceable parts inside. Refer servicing
to qualified service personnel.
FUS
DIRECT OUT
FOOTSWITCH
1 AMP
AMPLIFIER HEAD
CABINET
SPEAKER
FX SEND
FX RETURN
Pre-amp/power amp/PA setup
CAUTION
AC IN (100W MAX)
FUSE
FUSE
SE
MADE IN U.S.A.
FU
GUITAR PREAMP
To prevent electrical shock, do not remove cover.
No user serviceable parts inside. Refer servicing
to qualified service personnel.
E
PREAMP OUT
FUS
DIRECT OUT
FOOTSWITCH
1 AMP
Balanced
XLR
PA CONSOLE
IN LEFT
POWER AMP
CABINET
5
USING THE FOOTSWITCH
Your Preamp comes equipped with a footswitch for channel selection. To use it, simply plug the 1⁄4"
jack from the captured cord into the footswitch jack on the back panel. Plugging into this jack disables the channel select switches on the front panel.
SWITCHING CHANNELS WITH A GCX AUDIO SWITCHER
You can also switch the channels of your Guitar Preamp with an external switching device like the
Digital Music GCX Guitar Audio Switcher. In order to do this you will need an insert point cable,
which goes from a stereo 1⁄4" plug on one end to two mono 1⁄4" plugs on the other. One of the mono
jacks will be ring/sleeve and the other will be tip/sleeve. You will need to have two loops open in
your GCX to switch channels.
Take the stereo end of the cable and plug it into the Footswitch jack on the back panel. Then tale the
two mono ends and plug them into the OUT/N.O. jacks of two free GCX loops like this:
CAUTION
RING/SLEEVE
FUSE
FUSE
SE
TIP/SLEEVE
MADE IN U.S.A.
AC IN (100W MAX)
FU
GUITAR PREAMP
To prevent electrical shock, do not remove cover.
No user serviceable parts inside. Refer servicing
to qualified service personnel.
E
PREAMP OUT
FUS
DIRECT OUT
FOOTSWITCH
1 AMP
GCX AUDIO SWITCHER
When Loop 3 is open and Loop 4 is closed, the Clean channel will be selected. When both loops are
closed the Rhythm channel will be selected, and when Loop 3 is closed and Loop 4 is open the
Lead channel will be selected.
6
OPERATION
Your Guitar Preamp is designed to bring the warmth of an all tube signal path to any musical situation.
Here is a brief description of the character of each channel:
CLEAN CHANNEL
The Clean channel is modeled after the legendary “black face era” American amps of the mid-60’s.
It’s airy and open sounding, with lots of spank and headroom for clean guitar sounds of many flavors
– from rhythmic funk to sparkly pop to country twang. Higher gain settings will reveal a slightly
compressed and meatier sound that will start to break up when the Gain knob is turned up all the
way. The Punch switch will add a more throaty, punchier element to your sound by accentuating the
lower-mid frequencies, while the Bright switch will bring out the highs and let you dial in as much
high-end sheen as you could ever want without thinning out your tone or sounding tinny.
RHYTHM CHANNEL
The Rhythm channel is extremely versatile! A fertile source for a wide palette of earthy, crunchy tones
that recall the “plexi era” British amps of the late 60’s, the Rhythm channel is also a great choice for
blues and country players who want a little bit of grind behind their sound. One of the most desirable
characteristics of the Rhythm channel is the way it cleans up as you back off the volume on your
guitar, yielding a rich and full tone that is subtle yet clear. Higher gain settings reveal a saturated
grind with plenty of sustain for single-note playing and solos. The Shift switch (shared with the Lead
channel) shifts the whole curve of the EQ section down, which tends to accentuate both the lower
midrange and the lower high frequencies. In addition to adding a bit of bottom end “oomph”, the
Shift switch makes the Treble control more active, and will push your signal into saturation with a
little more urgency. The Bright switch brings out the high-end frequencies, and is particularly valuable
if you are going for that scooped-mid type of tone.
LEAD CHANNEL
The Lead channel is the side of the Preamp that is the most modern and aggressive. It saturates even
at lower Gain settings, and gives you that searing, “violin-like” lead tone with long and smooth sustain
that has become the signature of many prog-rock and heavy metal guitar styles. The Lead channel is
also great for heavy riffs and rhythm parts; the tightness and definition in the low end that characterizes
the Preamp overall really comes into it’s own for heavier playing styles.
CABINET SIMULATION
Your Preamp is also equipped with our Cab Tone analog speaker emulation circuitry. The Cabinet
Simulator offers accurate and punchy emulations of either 2x12 open back or 4x12 closed back
speaker cabinets, and is the icing on the cake of the Preamp when it comes to direct recording. Your
signal goes through the Cabinet Simulator when you use either the XLR or the 1⁄4" direct outputs on
the back panel. The XLR output is balanced and should always be used for longer cable runs. The
1
⁄4" output is unbalanced and can be used any time it’s more convenient to use that style connection.
The Cabinet Simulator is also great when you are using one of the direct outs to feed the P.A. in a
live situation.
7
WARRANTY
Digital Music warrants this product against defects that are due to faulty material or workmanship
for a period of five years from the date of original retail purchase. This warranty does not include
vacuum tubes or damage to the product from accident or misuse. This warranty is given to the original purchaser only and is not assignable to any other person.
If the product should become defective within the warranty period, Digital Music will repair it or
replace it free of charge, provided it’s returned freight prepaid to Digital Music with a valid RMA
(return material authorization) number.
This warranty shall not apply to any goods that have been repaired or altered by anyone other than
the manufacturer. There are no warranties which extend beyond the terms described herein.
Should you experience any difficulty with this Digital Music product, contact us as described below.
If it’s determined that the product must be returned to the factory for repair, you will be issued an
RMA and given shipping and packaging instructions.
HOW TO REACH US
You can reach us by any of the following:
Tel:
707 545 0600
Fax:
707 545 9777
Mail:
Voodoo Lab
3165 Coffey Lane, Santa Rosa, CA 95403
Email:
[email protected]
Website: www.voodoolab.com
8