1
TABLETS
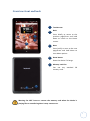
Darwin
User Manual
INDEX
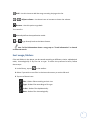
pag 1. Chapter 1. Introduction
pag. 1
Summary of features
pag. 1
Content of package
pag. 2
Overview: front and back
pag 3
Overview: side
pag 4. Chapter 2. Getting Started
pag. 4
Turning your device on and off
pag. 5
Battery
pag. 6
How to insert a MicroSD card
pag. 6
File transfer
pag 7. Chapter 3. Home Screen
pag. 7
Home Screen
pag. 8
Toolbar
pag. 8
Weather Forecast
pag. 8
Customizing Home Screen
pag. 11
Using expansion of Home Screen
pag. 12
Using the touch screen, virtual keyboard and buttons
pag 14. Chapter 4. Settings
pag 18. Chapter 5. Video Player
pag. 18
Toolbar
pag. 19
Video Menu
pag 20. Chapter 6. Photo Browser
pag. 21
Toolbar
pag. 21
Image Presentations
pag 22. Chapter 7. Music Player
pag. 22
Search for audio files
pag. 23
Playlist
pag. 25
Player Menu
pag. 26
Play music
pag. 27
Sort songs/folders
pag. 28
Equalization
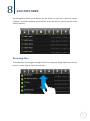
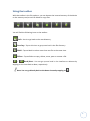
pag 29. Chapter 8. File Explorer
pag. 29
Browsing files
pag. 30
Using the toolbar
pag. 31
Managing files and folders
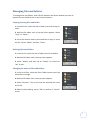
pag 33. Chapter 9. Browser
pag. 33
Using the browser
pag 34. Chapter 10. Email
pag. 34
Set up a new e-mail account
pag. 35
Managing accounts
pag 36. Chapter 11. Applications
pag. 36
Install applications
pag. 36
Uninstall applications
pag. 36
Application for reading e-books
pag 37. Appendix
pag. 37
Appendix A: Cleaning and safety
pag. 38
Appendix B: Specifications
pag. 40
Appendix C: Warranty coverage
1
INTRODUCTION
Thank you for choosing the bq Darwin. Before using the tablet, read this user guide
carefully.
Summary of features
⦁Wi-Fi connectivity: With the latest Wi-Fi technology, Darwin enables you to
connect to the Internet anywhere. Darwin automatically searches for available
networks, connects quickly and maintains the signal even if it is weak.
⦁ 8.4” touchscreen: Press or slide your finger across the screen to navigate through
the device.
⦁ G-Sensor: Automatically rotates the orientation of the screen from vertical to
horizontal when the user turns the device.
⦁ Applications: You can add more features to your bq by installing applications like
YouTube, Maps and more.
⦁ Entertainment: Your Bq Darwin plays videos, audio files and images, and can even
read e-books wherever you are.
Contents of package
Before using your bq, please check the contents of the package. If any of these items
are not in the package, consult with the distributor where you purchased the device.
Bq Darwin
Mini-USB cord
Power adaptor
Earphones
User guide
Warranty certificate
1
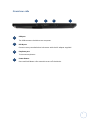
Overview: front and back
a
b
Touchscreen
Back
Press briefly to return to the
previous page/Press and hold
down to return to the Home
screen.
b
c
a
c
Next
Press briefly to turn to the next
page/Press and hold down to
view Menu options.
d
Reset button
Reset the device if it hangs.
e
Memory card slot
Can use any
memory card.
standard
SD
d
e
Warning: Do NOT insert or remove the memory card when the device is
playing files or transferring data. It may cause errors.
2
Overview: side
f
f
g
h
i
USB port
The USB connects the device to a computer.
g
DC-IN port
Connect to any standard electrical source with the AC adaptor supplied.
h
Earphone port
To connect earphones.
i
Power button
Press and hold down a few seconds to turn off the device.
3
2
GETTING STARTED
Turning your device on and off
To turn on the device, hold down the power button for a few seconds.
To turn it off, hold down the power button until a pop-up shows device options. Press
“Power off” and then “OK.”
To leave the bq on Standby, hold down the power button until a pop-up shows device
options. Press “Standby”.
Warning: The screen of the bq will go dark when the device is inactive for a
few seconds. To activate the screen, gently press the power button.
4
Battery
The device contains a rechargeable Li-ion battery. To charge the battery of your bq
Darwin, firstly connect the power cord to any standard outlet insert and the power
cord AC adaptor in the power port. The approximate time for charging the battery is 5
hours.
Note: It is advisable to completely charge the battery before using the device
for the first time.
Battery maintenance
Although the capacity of the battery will fall over time with use, its life can be
extended by following these recommendations:
⦁ Use the lithium battery frequently, at least once a week. If you do not use the
tablet PC frequently, remember to recharge the battery at least once a month.
⦁ Do not leave the battery totally uncharged for a long period of time.
⦁ Charge the battery regularly and completely.
⦁ You can use the device while the battery is being charged, but it is best NOT to
use the device while it is charging in order to extend the life of the battery.
⦁ Keep the device and battery away from sources of heat.
If the reader works only if it is connected to a power source, contact the supplier to
replace the battery.
Warning: Do not try to replace the battery on your own. Any attempt to
open the device can damage it or harm to individuals.
5
How to insert an SD card
To use an SD card, insert it in the slot of the device until it moves into place. To remove
the card from the device, press on it gently until it comes out.
File transfer
You can transfer files from your device to a computer to store images, audio files,
texts, videos, etc. on another device or vice-versa. To do this, please, follow these
steps.
1. In tablet PC go to Settings> Applications> Development and make sure that
enabled USB debugging box is enabled.
2. Connect the mini-USB cord to the device and connect the USB cord to the
computer.
3. Your device will be recognized by the computer as the removable drive “bq:” If
you have an SD card in the device, a second removable drive will appear.
3. Copy the files you wish to transfer to your device to either of these units.
5. After the files have been transferred, safely remove the USB/mini-USB cord from
the computer and the reader.
Warning: Do not disconnect the cord while the files are being copied.
Warning: It is advisable to periodically make backup copies of the content
of your device to prevent the total loss of your files in the event of
physical damage, loss or theft.
6
3
HOME SCREEN
Home Screen
Internet search
Weather forecast
world cities
Time
–
Shortcuts
E-book /Applications/Setttings.
Internet Search - This application searches the Internet quickly. Requires
Wi-Fi connection.
Time - Shows the current time.
Weather forecast – world cities - Shows the current city, the current date, the
weather and the temperature. The application requires a Wi-Fi connection.
Shortcuts - Shortcuts allow you to open an application directly just by touching the
icon.
E-book / Applications/ Settings - These icons enable reading e-books, access to
applications and settings, respectively.
7
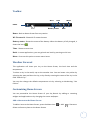
Toolbar
Wi-Fi
Time
Menu
Home
Battery status
Back
Home - Back to Home Screen from any section.
Wi-Fi network - Shows Wi-Fi network status.
Battery status - Shows the status of the battery. When the battery is fully charged, it
shows the icon
Time - Shows current time.
Back - In some applications, you can go back one level by pressing on this icon.
Menu - Press on this option to access menu items.
Weather Forecast
This application will show your city on the Home Screen, the local time and the
temperature.
To select a city in the world, tap on the weather icon. You can locate a city either by
selecting the state and then the city, or by directly entering the name of the city in the
field “Search City.”
You can also change the default temperature unit by selecting or deselecting “Use
Celsius.”
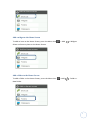
Customizing Home Screen
You can personalize the Home Screen of your bq Darwin by adding or removing
widgets and applications or by changing the screen wallpaper.
Add a shortcut to the Home Screen
To add an item to the Home Screen, press the Menu icon
Select and item to place on the Home Screen.
> Add
> Shortcuts.
8
Add to Home screen
Add a widget to the Home Screen
To add an item to the Home Screen, press the Menu icon
Select and item to place on the Home Screen.
> Add
> Widgets.
>Add
> Folders >
Add to Home screen
Add a folder to the Home Screen
To add a folder to the Home Screen, press the Menu icon
New Folder.
Add to Home screen
9
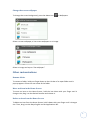
Change the screen wallpaper
To change the screen background, press the Menu icon
> Wallpapers.
Add to Home screen
Select a screen wallpaper, a live screen wallpaper or an image.
Select wallpaper from
Select an image and tap on “Set wallpaper.”
Other customizations
Rename folder
To rename a folder, hold your finger down on the title bar of an open folder until a
pop-up appears. Enter the new name of the folder.
Move and item in the Home Screen
To move an item on the Home Screen, hold the icon down with your finger until it
changes size, drag it to the desired location and release it.
Delete an item from the Home Screen
To delete an item from the Home Screen, hold it down with your finger until it changes
size. Then, drag it to the Recycling Bin on the Applications Bar.
10
Using expansion of Home Screen
To expand the Home Screen, slide your finger horizontally over the screen to the left or
the right.
The extended screen has shortcuts that will enable you to quickly activate certain
functions:
1
Connect to available Wi-Fi network
2
Update media library
3
Adjust screen brightness.
1
2
3
11
Using the touch screen, virtual keyboard and buttons
Your bq Darwin is equipped with a touchscreen. Below is a brief description of the
different areas of the touch screen and some tips on use.
Main actions
⦁ In different applications, you can go back one level by clicking on the icon "Back”
.
⦁ You can go to the home screen at any time by clicking on the Home icon
.
⦁ While playing a video or song, you can pause / resume icon down in the Pause
/Play
.
Other actions
⦁ While viewing a video or listening to music, can play in the progress bar to go
directly to a different part of the video or the song
⦁ In the various sections (files, music, videos, etc..) can move through the list of files
by dragging your finger across the screen up or down.
⦁ In the Web browser you can scroll up or down to touch the page and dragging it
up or down (Be careful not to click on a link!).
⦁ In the Web browser, tap on a link to open the page.
12
Botones
⦁ In any application can back up one level by pressing the button
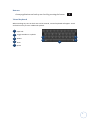
Virtual keyboard
When touching any zone in which text can be entered, a virtual keyboard will appear. Touch
and hold on a key to enter additional symbols.
1
Caps lock
2
Toggle numbers or symbols.
1
3
Delete
4
Enter
5
Space
3
2
4
5
13
4
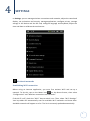
SETTINGS
In Settings, you can manage wireless connections and networks, adjust the sound and
display, set up location and security, manage applications, configure privacy, manage
storage in the device and the SD card, configure language and keybaord, adjust the
time and date or calibrate the touchscreen.
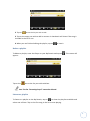
Wireless & networks
Establishing Wi-Fi connection
Before using an Internet application, you must first activate Wi-Fi and set up a
network. To do this, tap on the Menu icon
on the Home Screen, then select
“Configuration” and “Wireless connections and networks.”
If the Wi-Fi is off, check the “Wi-Fi” box to switch it on. Then, select “Wi-Fi Settings.”
Your bq tablet will automatically scan for available Wi-Fi networks and show them.
Available networks will appear on a list. The list is constantly updated automatically.
14
When Wi-Fi is on, the bq will connect automatically to the selected network if it is an
open network. If the bq finds a network that has never been set up and has a password
protection you will have to set it up.
Tap on the network to which you would like to connect, enter the required
information (password) and tap on “Connect.” Your bq will now attempt to establish a
connection with the Wi-Fi access point. If the connection is established successfully,
the message “Connected to *network name+” will appear in “Wi-Fi Settings”.
There is a maximum time for entering the password before the Wi-Fi disconnects. We
recommend checking the “Show Password” box while entering the password in order
to enter it more quickly and accurately.
Advanced connection
To manually search for Wi-Fi networks, in Wi-Fi Configuration tap on
and then tap
on “Scan.”If the Wi-Fi network to which you wish to connect does not appear on the
list, move down the screen, tap on “Add Wi-Fi Network” and enter the necessary
parameters. Then, tap on “Save.”
To access advanced network parameters ("domain regulator, “IP address,” etc.) tap on
and then on “Advanced.” The necessary information can be obtained from the the
network administrator.
Sound & Display
In this section you can configure the multimedia volume, the notification tone, the
sound selection, silent mode and SD card notifications.
Multimedia sound - Allows you to set the volume for audio and video files.
Notification tone - Establishes the default tone for notifications.
Sound selection - Controls the sound when making a screen selection.
SD card notifications - Enables sounds for SD card notifications.
Orientation - You can configure the orientation so that the screen will automatically
change when the device is turned.
Animation - Adjust the animations.
Brightness - Adjust the screen brightness.
15
Screen timeout - Adjust the amount of time before the screen goes dark
automatically.
Location & Security
This option can establish your location by means of Wi-Fi networks and configure their
passwords.
Applications
Unknown sources - Allow you to install of non-Market applications
Manage applications - Manage and remove installed applications
Running services – View and control currently running services
Development - Set options for application development.
Privacy
This function allows you to use My location for Google search results and other Google
services and do a factory reset.
Device and SD card storage
This option allows you to see the total available space in the internal memory of the
tablet PC. In addition, the Dismount SD card option will dismount the SD card before
removing it in order to avoid loss of data and the Format SD card option formats
(erases) the SD card.
Language & Keyboard
This function allows you to adjust the Local configuration, that is, select the user
language and region, set up the Android keyboard, and add or remove words from the
User dictionary.
Date & time
This option allows you to set the date and time, select the time zone and the format
for viewing the date and time.
16
Touch panel calibration
Upon entering this function, four dots will appear at the four corners of the screen.
Tap on the dots to calibrate the screen.
Update Media Library
Upon entering this function, the media library will update.
Erase activation record
Erase the activation record.
About device
It shows device status, battery use, legal information, model number, firmware
versión, kernel version and build number.
17
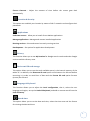
5
VIDEO PLAYER
To play a video, open the video player by tapping on the icon Video. When entering
the player, you will see a list of the videos stored on your bq. Tap on a video to watch
it. If you do not wish to watch any videos, you can return directly to the home screen
by tapping on the Home icon
.
Toolbar
While a video is playing, you can use the toolbar.
These are the icons:
/
Raise or lower the volume.
Go directly to a part of the video - You can do this with
the progress bar.
18
Set markers - This option can place a maker at the video’s current position.
When this video is played again, you can choose whether to play it from the beginning
or from the marker. To delete the marker, tap on
select the option “Delete Marker.”
to view the Menu and then
Note: Only one marker per video can be set.
Brightness - Tap on this icon to adjust screen brightness.
/
/
Next/Previous - These icons will play the next or previous video.
Pause/Play - These icons will pause the video or resume playing it.
Change screen format - Tap on this icon to change the screen format.
Stop - Tap on this icon to stop playing and return to the list of products.
Note. In video or picture mode, you can show or hide the toolbar by just
tapping anywhere on the screen.
Video menu
To access the Menu, tap on this icon
options:
in the toolbar. The Menu offers the following
Watch from the beginning - Deletes markers and plays the video from the
beginning.
Delete markers - Deletes markers in video.
Help - Offers help on use of video player.
Back - Tap on this option to exit Menu.
Warning: Some multimedia files may not play correctly if their encoding is not
supported by the device.
19
6
PHOTO BROWSER
The first window in Photo mode shows all the photos and subfolders in the internal
memory of the device or the SD card.
To see a photo, tap on a thumbnail. If a photo is in a subfolder, open the subfolder and
then tap on the thumbnail.
To return to the Home Screen, tap on
,
or
.
20
Toolbar
While observing an image, tap the screen to see the toolbar.
The toolbar can perform the following actions:
/
Zoom - Brings the image closer and moves it away, respectively. After using
zoom, you can move the image by dragging it with your finger.
Brightness - Sets the brightness of the screen.
/
Turn - Tap on this icons to turn the image 90 °.
Presentation - To start or stop a slide presentation, tap on this icon. For further
information on image presentations, see 6.2 “Image Presentations.”
/
Previous/Next - To go back to the previous image or go to the next one.
Setup - Tap on this icon to show a dropdown menu with more configurations.
Return – Press return to return to the photo browser.
Image Presentations
To start an automatic image presentation, tap
presentation at any time by again tapping on
on the toolbar. You can pause the
.
To customize the image presentation, open Setup by tapping
. In Setup, you can
define the characteristics of the presentation such as the time interval between
photos, transition effects or the display order. Select one of the following options:
"Presentation interval," "Presentation setup," "Repeat presentation" or "Random
order."
21
7
MUSIC PLAYER
To listen to music on your Bq Darwin, open the Player by tapping on the icon on the
Home Screen.
Navigate the list of folders and files with the touchscreen or with the Previous/Next
buttons. Tap on a track to play it.
To return to the Home Screen, tap
,
or
.
Search for audio files
To search for audio files in either the internal memory or in the SD card on the Bq
Darwin, enter a keyword. Follow these steps:
1. In the library, tap on
on the toolbar.
2. Select where you would like to search for the file: either the internal memory or
the SD card.
3. Tap on
and then write the keywords.
4. Tap on
to start the search.
22
Playlist
A playlist is a list of audio files the music player will play automatically and
consecutively, one after the other.
Create a playlist
To create a playlist, follow these steps:
1. In the Player, tap
2. Tap on
3. Tap
on the bottom bar. This window will appear:
(New playlist) to create a new list.
next to the list name to add songs to the list.
4. Select audio files you would like to add to the playlist. Next to the song, you will
see the checkmark “√".
5. When you are finished adding songs to your new playlist, tap
to save the list.
Edit a playlist
To edit a playlist, follow these steps:
1. In the Player, tap on
appear:
next to the bottom bar of the player. This window will
23
2. Tap on
next to the list you wish to edit.
3. Tap on the songs you wish to add or remove. A checkmark will show if the song is
included in the list or not.
4. When you are finished editing the playlist, tap on
to save it.
Delete a playlist
To delete a playlist, enter the Player on your Bq Darwin and tap on
appear:
Tap on the
. This screen will
next to the list you wish to delete.
Note: The list “Recently played” cannot be deleted.
Listen to a playlist
To listen to a playlist on the Bq Darwin, tap on
to show the playlists available and
select one of them. Tap on the first song in the list to start playing.
24
Player Menu
In the Player Menu, you will find the following icons:
The Menu can perform the following actions:
All music - Shows the list of files.
Search Internet - Searches for a song on the Internet.
Artist - Use this icon to show a list of files sorted by artist.
Album - Use this icon to show a list of files sorted by album.
Genre - Use this icon to show a list of files sorted by genre.
Playlist - Shows your playlists.
Directory - Navigates through files stored in the internal memory or the SD card.
Play - Play an audio file.
Return - Return to Home Screen.
25
Play music
To play a track, tap on the song.
Toolbar
The toolbar, which is visible while a track is playing, can perform the following
actions:
Seek - Use the progress bar to go to a particular part of
the song.
/
Play the next/previous song.
/
Pause/Play the song.
Equalizer - For further information on equalization, see section “Equalization”.
Play mode - Tap on this icon to specify the play mode of tracks.
Repeat mode - Tap on this icon to toggle the repeat mode.
26
Add - Use this icone to add the song currently playing to the list.
/
Adjust volume - Use these icons to increase or lower the volume.
Return - Use this option to go back.
You can also:
Manually define the equalization mode.
or
to go directly back to the Home Screen.
Note: To find information about a song, tap on “Track information” to launch
an Internet search.
Sort songs/folders
Files and folders in the player can be sorted according to different criteria: alphabetical
order, chronologically or by file size or type. To select the preferred criteria, follow
these steps:
1. In the library, tap on
on the toolbar.
2. Select if you wish to sort files in the internal memory or on the SD card.
3. Tap one of these icons:
Size - Orders files according to their size.
Type - Orders files according to file type.
Order - Orders files alphabetically.
Date - Orders files chronologically.
27
Equalization
To modify equalization, follow these steps:
1. While listening to music, tap on
frequency equalizer.
to access the equalizer. Your bq has a 7-
2. Select a frequency band. Then, slide your finger up or down on the band to
change the gain level for the frequency.
3. Save the configuration by tapping on
.
28
8
FILE EXPLORER
The file explorer allows you to browse the file system on your bq. To access it, tap on
“Explorer” and select whether you would like to see the files on your SD card or in the
internal memory.
Browsing files
To browse files and navigate through the file list, drag your finger upon down on the
screen. To open a file or folder, just tap on it.
29
Using the toolbar
With the toolbar in the file explorer, you can browse the internal memory of the device
or the memory card, as well as delete or copy files.
You will find the following icons on the toolbar:
Back - Use it to go back to the root directory.
Level up - Tap on this icon to go up one level in the file directory.
Multi - Tap on Multi to select more than one file at the same time.
Editor - Tap on Editor to copy, delete, move, past or rename a file.
/
Back/Next - You can go up one level in the interface or advance by
tapping on the icons Back or Next, respectively.
Note: You can go directly back to the Home Screen by tapping on
.
30
Managing files and folders
To manage files and folders, enter the file explorer and select whether you wish to
browse files on the SD card or in the internal memory.
Copying/moving files and folder
1. On the file list, select the file or folder you wish to copy or
move.
2. Hold the file down until a pop-up menu appears. Select
“Copy” or “Move.”
3. Go to the location where you would like to copy or move
the file. Tap on “Editor” and then “Paste.”
Deleting files and folders
1. In the file list, select the file or folder you wish to delete.
2. Hold the file down until a pop-up menu appears.
3. Select “Delete” and then tap on “Delete” to confirm or
“No” to exit.
Changing the name of files and folders
1. In the list of files, select the file or folder whose name you
would like to change.
2. Hold the file down until a pop-up menu appears.
3. Select “Rename.” Tap on the text box and edit the name
of the file.
4. When finished editing, tap on “OK” to confirm or “Cancel”
to exit.
31
Select several items
1. In the top toolbar, tap on “Multi”
.
2. Tap on the files or folders you wish to choose. The name of the file or folder will
turn red.
3. When finished making the selection, you can delete, copy or move the selected
files.
32
9
BROWSER
To start up the web browser, tap on the Browser icon on the Home Screen or enter
the address of the site in the Google search field.
If you are connected to a network, the browser will open and you can start browsing
the Internet directly.
Note: Not all wireless networks offer access to the Internet. Some are used
only to connect computers with no Internet connection.
Note: When Wi-Fi is enabled, your Bq Darwin will automatically connected to
configured networks when they are in range.
Using the web browser
⦁ You can move up and down by touching the page and dragging it up or down.
⦁ Just tap on a link to open it.
⦁ You can open several pages at a time. Tap on
and then tap on “New
window.” To see all windows at the same time, tap on
and “Windows.”
⦁ To go back to the previous page, tap on Back
Screen, tap on the Home icon.
. To go directly to the Home
⦁ To show items available on the menu, tap on the Menu icon.
⦁ To fill in a text field, tap the field and use the virtual keyboard to write the text.
33
10
EMAIL
To open the e-mail application, tap on the E-mail icon.
Note: Before opening this application, make sure you have an Internet
connection.
Set up a new e-mail account
When you open the application for the first time, you have to set up an e-mail account.
On subsequent occasions, the Inbox will open up directly.
To set up an e-mail account, follow these steps:
1. The device will ask you to set up an account when running the application for the
first time. Tap on “Next” to continue.
2. Enable the option “Send e-mail from this account by default” if you wish to use
this account by default to send e-mail. Then, tap on “Next” to continue.
3. Enter the information necessary to configure the POP3 or IMAP server. You can
obtain this information from your service provider, network administrator or from
the Internet.
4. Tap on “Next” to continue after you have set up the server. Your bq will check the
server configuration.
5. You will see the message "Your account is set up and, and e-mail is on its way.”
Your e-mail account has been set up correctly.
6. Enter the name to be displayed in each e-mail. Then, tap on “Done” to finish.
Note. If you have set up more than one e-mail account, the application will
open the Inbox of the account you established as the default in “Send e-mail from
this e-mail account by default.”
34
Managing accounts
Adding an account
To add an account, tap on Menu
> Accounts > Add account.
Deleting an account
To delete an account, tap on Menu
> Accounts. Hold down the account to delete
until a pop-up appears. Tap on the “Delete account” and then “OK” to confirm the
action.
Configuring accounts
To configure an account, tap on Menú
> Accounts. Hold down the account to be
configured until a pop-up appears. Tap on “Account settings.”
Information related to the account will appear. You can edit any of the settings by
tapping on them.
Checking e-mail
When the application starts up, it will open the account Inbox by default. To check
your e-mail, in the mail folder, slide your finger vertically to navigate through the email list and tap an e-mail to open it.
Hold down an e-mail to open a menu with options to “Send,” “Delete,” “Forward,”
“Reply to all,” “Reply” and “Mark as unread.”
Menu
Tap on
to show the menu.
Refresh - Update the list of e-mails.
Compose - To write an e-mail.
Accounts - Shows the list of e-mail accounts.
Account settings - Shows the settings of the active account.
35
11
APPLICATIONS
Your bq Darwin supports many third-party applications you can acquire to add more
functions to your bq. These applications are available online or directly on your device.
Install applications
To install applications, follow these steps:
1. Open the library of the application SlideMe by tapping on the SlideMe icon.
2. Search for and download SlideMe applications from the library.
3. Find the application you wish to install with the search function.
4. Tap on the installation file and follow the instructions to install the application.
Uninstall applications
To uninstall applications, follow these steps:
1. Go to Configuration > Applications > Manage applications.
2. Tap on the application you wish to uninstall.
3. Tap on uninstall to uninstall the application.
Remember:
⦁ You cannot uninstall applications installed by default in the Bq Darwin.
⦁ Some aplications developed for mobile Android may not work properly in your
tablet. For further information, please consult the software developer.
Applications for reading e-books
Bq Darwin includes three applications for reading e-books, so the device can be used as ereader. Aldiko can be used for e-books in .epub format, FBReader can be used for .epub, .fb2
and .oeb formats and EBookReader supports .epub, .pdf, .doc, .txt.
36
APPENDIX
Appendix A: Cleaning and safety
Cleaning
Before cleaning the device, shut it down and disconnect all system and power cords.
Make sure the screen is completely dry before re-connecting the cords and powering it
on.
Do not use any cleaning liquid or spray directly on the surface of the screen or the
outer shell.
⦁ Screen: Use a soft, clean, lint-free cloth to remove dust and dirt from the screen.
For fingerprints and stains, use a cloth with mild cleaning products.
⦁ Outer shell: To clean the outer shell, use soft cloth moistened with a mild
cleaning solution. Moisten the cloth with clean water, wring it out well and clean
the shell to remove any leftover cleaning agent.
Safety
To minimize the risk of electrical discharges and electrocution, follow these safety
instructions:
⦁ Never leave the outer shell open and shut down the device before cleaning it.
⦁ Do not place any object within the four edges of the screen.
⦁ Do not spill any liquids on the reader and clean it with a moist cloth. If the device gets
wet, do not switch it on or try to repair it yourself. Please call the technical service to
check the reader before turning it on again.
⦁ Use environmentally responsible products and do not handle them in extreme
environmental conditions.
⦁ Be careful with possible blows to the device, either direct or indirect, that may cause
irreparable damage to the screen and poor product performance.
⦁ Keep the reader away from dust, sand and dirt.
37
Appendix B: Specifications
Hardware
CPU
ARM 926EJ (dual-core) 600 MHz. + DSP 550 MHz
OS
Android SO 2.1
Internal
memory
8GB, extensible to 32 GB with an SD card
Memory card
SD card: 1GB, 2GB, 4GB (SDHC), 8GB (SDHC)
High sensitivity, resistive LCD screen
Screen
Size: 8.4”
800 X 600 pixels.
Connectivity
Wi-Fi
802.11 b/g
Cards
SD card slot
USB interface
USB 2.0
Features
3.5 mm earphone jack
Audio output
Internal speakers
38
Audio formats
MP3, WMA, WAV, APE, FLAC, AAC, OGG
Video formats
AVI, RM/RMVB, FLV, MKV, MOV, 3GP,MP4
Image formats
JPEG, BMP, GIF(static), PNG
Text formats
.EPUB, .FB2, .OEB
Language
Multi-language
Technical specifications
Measurements
Size: 215.8 mm (height) x 161 mm x 11 mm (thickness).
Weight: 471.4 grams
Battery
Lithium 4700 mAh battery
Battery charge
time
Approximately 5 hours
Audio playing: 9 hours
Battery
duration
Video playing: 7 hours
Web browsing: 6 hours
39
Appendix C: Warranty coverage
1. The device is covered by a 2-year warranty from the moment of delivery.
2. The warranty guarantees conformity of the product for the intended use.
3. During the warranty period, any defects in the operation of the device caused
manufacture shall be corrected either by repair or supply of a new device, provided
the option chosen is feasible and no economically disproportionate in our view. To opt
for repair, the owner must report to an authorized service center. For any other
remedy, the owner must consult the retail establishment.
Exclusions from Warranty
The technical service shall not be responsible for data or information lost on devices
set for repair and shall not be required to make any backups of said information.
Devices shall be delivered black or with the original factory content.
Technical Service
If you have a problem with your bq, or to contact us about any other matter related to
technical support, you may do so as follows:
E-mail: [email protected]
Our website: http://www.bqreaders.com/gb/technical-support.html
Telephone: +34 914 575 012
40