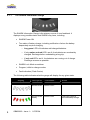
1
Hydra C650PW Folding Power Wheelchair Invacare Australia Pty Ltd ACN 074676378 1 Lenton Place (PO Box 5002) North Rocks NSW 2151 Ph: +61 2 8839 5333 Fax: +61 2 8839 5353 [email protected] August 2004 1 WARNING ! DO NOT OPERATE THIS ELECTRIC WHEELCHAIR WITHOUT FIRST READING AND UNDERSTANDING THIS MANUAL. IF YOU ARE UNABLE TO UNDERSTAND THE WARNINGS AND INSTRUCTIONS, CONTACT THE DISTRIBUTOR OR DEALER WHERE YOUR ELECTRIC WHEELCHAIR PURCHASED BEFORE ATTENPTING TO USE THIS EQUIPMENT OTHERWISE INJURY OR DAMANGE MAY RESULT. Chair User Classification Model C650PW Folding power wheel chair Max user Everyday Indoor Weight Use Use 100 KGS X X Outdoor Use X Back upholstery Armrest Controller Batteries Frame Rear wheel set Motor / gear box Legrests Casters & fork 2 SPECIFICATION No Item Specification 1 Seat Width 406 mm (16 in) / 457 mm (18 in) 2 Seat Depth 406 mm (16 in) / 457 mm(18 in) 3 Seat Height front 513 mm (20 in) / rear 490 mm (19 in) 4 Back Rest 8° bend Back height (from seat to the top of 375 mm (14.5 in) ~ 475 mm (18.5 in ) height adjustable back upholstery) 5 Rear drive Wheels Dia. 325 mm(12.5 in) pneumatic tyre 6 Front Wheels Dia. 200mm (8 in) pneumatic tyre 7 Anti-tip Wheels Dia. 40 mm (1.5 in) wheels 8 Brake & wheel locks Electro-magnetic brake, and BR-A550 alloy wheel lock 9 Manual Freewheel Yes, Easily accessible without disassembly 10 Adjustable Back Rest 8 degree bend, height adjustable 11 Adjustable Armrest Height adjustable from 213 mm (8.5 in) ~ 378 mm (15 in) 12 Battery MK-MU-1 Gel Battery 12 volt / 31 amp, 2 pcs 13 Battery Charger Off board. BAT - GC0822. 8 Amp. 14 Controller Shark Dynamic Controller 15 Drive Train 250W.Rear wheel drive with two motors, permanent magnet commutator 24V DC motors. 16 Weight Capacity 100kg (220 lbs) 17 Max Speed 6.5 km/h (4 MPH) 18 Ground clearance to Batteries 135 mm (5.3 in) 19 Ground clearance to Anti-tip 35 mm (1.4 in) Wheels 20 Turning Radius 965 mm (38 in) 21 Climbing Angle 10° 22 Range 24 km (15 miles) (Varies with passenger weight, temperature, condition of batteries, ground surface, type of charger & battery etc. ) 23 Overall Length 1150 mm (45 in) 24 Overall Width 570 mm (16 in) seat width / 620 mm (18 in) seat width 25 Overall Height Height adjustable from 911 mm (36 in) ~ 986 mm (39 in) (from underground to push handle) 26 Weight - base incl. controller, motors, legrests w/o anti-tipper, seat cushion, batteries. 27 Battery weight 28 Warranty (see details at the end of this owner’s manual) 33 kg (72.6 lbs) 11 kg (24 lb) each. 2 pcs. 5 years for main frame. 1 year for controller / gear motor / main components except exhaustive and wear and tear parts. 3 Table of Contents Forward Safety Instructions Unpacking and Assembly Special Features : Freewheel levers Armrest Backrest Seat Legrest Wheel lock Safe Driving Techniques Batteries Tyre Pressures Maintenance, Cleaning & Fault Finding Limited Warranty 4 Forward Thank you for your selection of this Invacare power wheelchair. This wheelchair is manufactured from high quality 7000 series seamless aluminium tubing. The advantage of using this high grade material is two fold, one, Invacare chairs remain well within industry standards for strength and durability and two, Invacare is able to build a high strength product at a minimum weight. Every component of a Invacare chair is produced after extensive research and evaluation to ensure durability, reliability and efficiency meet International Standards. C650PW chair’s equipment: controllers and motor/gearbox combinations are manufactured by industry leaders. Invacare Dealers throughout the nation can assist you in maintaining your wheelchair to ensure it meets your satisfaction and continues to offer you a well engineered health care product. Safety Instructions Safety is an important consideration when using a wheelchair. It is important that you read and understand all the operating and safety instructions discussed in this manual. Ensure that your power wheelchair is correctly fitted and adjusted by your selling Dealer or by your attending therapist. Be sure to engage the wheel locks before entering or leaving the chair. The wheel locks are designed to prevent movement of the chair. It is preferable to ensure that the front castors are in the forward position before transferring. With the castors in the forward position the wheel base of the chair is increased therefore offering more stability. DO NOT move forward in the seat whilst leaning forward out of the chair. If an object is to be picked up from the floor wheel or drive past it, then reverse so the front castors are in the forward position, as the chair will then have it’s greatest stability in this position. To maintain lateral stability do not reach further than the length of your arm. DO NOT lean out of the chair as this could cause instability. When transferring DO NOT stand on the foot plates. Depending on the style of foot plate either swing them away or fold them up before transferring. When approaching a ramp be sure of your own ability and your limitations in terms of strength and endurance. You and your carer should first consult a qualified specialist as to the correct techniques for ramp negotiation. 5 Before attempting a ramp the following basic safety rules should be considered: 1. 2. 3. 4. Surface of the ramp: Is it too slippery ? Degree of incline: Is it too steep to attempt alone ? Length of ramp: Is it too long for your endurance ? Obstacles: Are there any obstacles on the ramp that would necessitate an attendants assistance ? Assistance is always recommended when going up or down steep inclines. In order to prevent loss of steering control, or the possibility of tipping over backwards, an attendant is recommended when going up inclines greater than 10% (30 cm elevation on a 300 cm ramp). If it becomes necessary to stop when going up an incline, special care must be taken to avoid abrupt or sudden forward movement when you resume propelling the chair so as to avoid forces which could tip the chair backwards. Always keep the chair under control when going down a ramp or incline. Speed should be controlled at all times. When a chair is being attended by a carer and a kerb is encountered care should be taken to prevent the user being thrown forward : 1. 2. 3. 4. Go down the kerb rear wheels first, making sure that the user is square to the kerb so that the rear wheels go down together. Go up a kerb frontward with both front wheels up together. Avoid going up multiple steps. Avoid using escalators. Use the elevator. NOTE : As with all adjustable wheelchairs, operation at the extremes of adjustment may affect handling and performance. 6 Unpacking & Assembly Unpacking After removal your C650PW power chair from the carton please check that you have been supplied with the following main parts as standard specification. 1. The main frame with motors /gearboxes front castors attached 2. Foot rigging : with swing away legrests 3. Rear drive wheels :12 1/2” x 2 1/4” rear wheel with pneumatic tyres 4. Batteries boxes : two pieces, for 31 AH batteries use one box for a battery 5. Batteries : Rechargeable sealed lead-acid battery, 12V 31 AH and/or smaller. 6. Battery Tray : Steel basket 7. Battery Charger: Off board. 8. Controller : Shark Dynamic Controller 9. Motors: 24V DC permanent magnet commutator motors Assembly Please assemble the main parts mentioned as per the following procedure and check the assembly for normal operation. 1. 2. Mount the swing away legrests as shown in Fig 8. Drive wheels, motor / gearbox assemblies are pre-installed as shows in Fig 12. Fig 8 Fig 12 7 General Operation 1. 2. 3. the 4. Ensure the cushion is not on the chair. Hold the two armrests with your hands as Fig 13 shows. Extend the armrests outwards as Fig 14 shows. Push down on the seat rails to ensure the seat opens fully and locks into receivers on the wheelchair side frames as Fig 15 shows. Swing the legrests around to the front of the chair and ensure that they lock into place. Fig 13 Fig 14 Fig 15 To fold the wheelchair for storage or transportation 1. From the rear, release the battery box restraining strap. Unplug the rear battery box and remove (red plugs). Unplug the front battery box from the main controller and remove (see page 21 for more details). 2. Fold up the footplates and unlock the levers that position the legrests. Swing the footplates and legrests away. Either leave the footplates in this position or remove them completely by lifting each legrest vertically to clear the pivot bush as Fig 8 shows. 3. Take hold of the centre of the seat upholstery, one hand at the front and the other at the rear. Pull up the seat upholstery vertically as Fig 16 shows. Fig 16 8 After following all the steps in General Operation proceed with the following. 1. Insert the battery box with the external power connection towards the front of the chair. 2. There are two batteries. Attach the wiring loom to each battery making sure that the correct polarity is observed. Correct wiring is illustrated by a placard, fixed in the battery box lid. Lift each battery with the lifting harness attached into position, connect the power cables to the appropriate plugs and ensure that the power cables are clear of obstacles when replacing the battery box lid. Tighten the battery box securing strap. 3. Slide the power control module into the mounting bracket under the armrest and secure it into position. Your control module can be mounted either on the left or right hand side of the chair. Should you wish to change the mounting of the power module, your selling Dealer can assist as Fig 23 shows. 4. Ensure that all the power connections are correctly fitted. Fig 23 Foldable frame, various quick Release construction. 9 Special Features Freewheel levers For your convenience, C650PW is equipped with two freewheel levers, see Fig 18 & 19. These levers allow you to disengage the drive motors and maneuver the chair manually. WARNING! DO NOT use you C650PW while the drive motors are disengaged unless you are in the presence of an attendant! DO NOT disengage the drive motors when your C650PW on an incline. The chair could roll down on its own, causing injury ! To engage or disengage the freewheel feature: 1. Turn the freewheel levers outward to disengage the drive motors. see Fig 18. Fig 18 Driver disengaged 2. Fig 19 Drive engaged Turn the free wheel levers inward, to engage the drive motors, see Fig 19. NOTE : It is important to remember that when your C650PW is in freewheel mode, the braking system is disengaged. Armrest The height adjustable T-type armrest is provided as standard equipment on C650PW power chairs, see Fig 3. Fig 3 High adjustable armrest with controller, various adjustment function 10 Adjustment for the C650PW is facilitated by a screw as Fig 26 shows Fig 26 Arm pad adjustable by levered screw The controller unit can easily be adjusted to different position in order to meet user’s demand. To adjust, turn the screw as Fig 25 shows. . Backrest The backrest is adjustable by removing the four backrest cane securing screws and selecting the required new height. The backrest canes are predrilled as Fig 32 shows. Fig 32 WARNING! Replace worn or torn fabric immediately. Failure to do so may result in a fall and severe injury to you. 11 Seat All Invacare chairs feature seat upholstery that can be tensioned. Whilst there should be no adjustment necessary upon delivery of your new chair, over time stretch could occur. 1. To re-tension the upholstery you must firstly remove all the locating screws and washers from the chair seat rail on the side where the adjusting hook and pile is located. 2. Slide out the aluminium pinch strip and adjust the hook and pile to increase the upholstery tension. 3. Replace the pinch strip and using a punch or a similar tool, insert the tip through the pinch strip and into a centre rivnut. 4. Lever the upholstery into position and secure a locating screw. If abnormal pressure is required to align the locating screws then remove the upholstery and readjust the hook and pile. 5. Repeat this operation until all the locating screws are in position. See Fig 29. Fig 29 WARNING ! Replace worn or torn fabric immediately. Failure to do so may result in a fall and severe injury to you. 12 Legrest The C650PW standard equipment with swing-away & detachable legrest the footplate height adjustable. To adjust the height, remove the securing screws and nuts from each side and slide the extension tube and foot plate up or down to the desired height. Retighten the securing hardware as Fig 36 shows. Fig 36 Swing away and detachable legrest with extension tube OPTIONS : There is elevating legrest as an option. WARNING ! Never lift the wheelchair by the legrests. These parts are detachable and will not bear the weight of this chair. Lift this chair ONLY by non-detachable parts of the main frame. 13 Wheel Locks Wheel locks are fitted to both drive wheels. Wheel locks should be engaged whenever a transfer is made and / or when the wheelchair is stationary. 1. To apply the wheel locks pull the hand lever upward as Fig 39 shows. 2. To release the wheel locks push the hand lever downward as Fig 38 shows. Please note: When the chair’s motor gearbox is engaged the motor-gearbox will act as an electronic magnetic brake. Fig 38 To release wheel lock Fig 39 To apply wheel lock 3. DO NOT use the wheel locks to slow the wheelchair whilst descending an incline. 4. Wheel locks can be adjusted as tyre wear increases. To adjust, loosen the frame mounting clamp and slide the wheel lock upward. Retighten the clamp while wheel lock engages to correct position. Your selling dealer can assist with adjustment. 14 Safe driving techniques Driving your Chair Before transferring to your chair from either the front or the side ensure that: 1. The chair is switched off. 2. The wheel locks are engaged. 3. Swing away the armrests and legrests if appropriate. 4. The battery charger is disconnected from both the chair and the mains. After transferring make sure that you are comfortably positioned and that the legrests and armrests have been adjusted to suit your needs. The position of the joystick should be easy to reach so as to eliminate muscle fatigue during driving. TO COMMENCE : 1. Set the speed control of the chair to SLOW as described in the CONTROLLER CONTROL UNIT OWNER'S MANUAL following this manual. 2. Release the wheel locks. 3. Press the “on / off ” switch. 4. Allow two seconds to elapse before engaging the joystick. This is a safety feature to prevent sudden starts. 5. Push the joystick gently forward applying a steady even pressure. The further you push the joystick, the faster the chair will go. The chair will stop when you return the joystick to the neutral or vertical position. 6. Directional control is achieved by gently swivelling the joystick in the direction you wish to go. Pull back to reverse. 7. The controller can be programmed to give you the best feel for all driving situations and only needs a light touch to respond. In the case of an emergency, let the joystick go and the chair will come to a stop. 15 Safe Driving 1. 2. 3. 4. 5. Never drive at a speed greater than your ability to safely control your chair. Remember that wet or loose surfaces need greater care and control. Always turn the chair off when transferring or while the chair is stationary for long periods. Avoid jerky stop / start motions as this will result in excessive current draw from the batteries, increased tyre wear and the rapid wearing of the gearbox and motors. Keep your chair clean from sand and salt water. Ensure that the tyres are correctly inflated. Indoor / Outdoor Driving When driving indoors keep the level of speed to a minimum to avoid the risk of collision. For outdoor driving be wary of wet surfaces, loose sand, large kerbs and potholes. A little practice will ensure you understand the capabilities of your chair and enable you to overcome the most common obstacles en-counted when driving. If operating your chair on the roads please check with your local Police Department regarding necessary identification and safety devices such as reflectors. Chair Operation on surfaces that require Special Care When driving up or down ramps it is recommended that the user: 1. Visually checks to see if the angle of the slope is less than 15 degrees. 2. Checks to see that the ramp surface is roughened to prevent slippage. 3. Ensures that the ramp surface is correctly in line with the tyres and is wide enough to allow the tyres to pass freely along the ramp. If the ramp meets these conditions, it is recommended that the user drives the wheelchair slowly up or down the ramp, ensuring that the chair is driven in the centre of the ramp tracks. If possible, have an assistant monitor the chairs’ progress, and prevent tipping of the chair by holding the push handles at the back of the seat. If the ramp does not meet these conditions, it is recommended that alternative methods for climbing and descending be found. 16 Chair Response Should the chairs’ response not be to your satisfaction, ask your Dealer to adjust the programme to a level at which you are comfortable. This programme can be altered at anytime to either increase the response rates in line with your improved motor skills or to lower the rates to level at which you feel comfortable and in control. Kerbs For power chairs with microcellular (hard) front tyres it is recommended that before the user attempts to climb or descend a kerb that the user visually checks the height of the kerb to ensure that it does not exceed 35mm (1 1/2”) in height. If the kerb height is less than 35mm, the user should approach the kerb at right angles to the kerb line at a slow speed, climb or descend the kerb slowly so as to keep the chair under control. If climbing the kerb the user may find it easier to reverse the chair up the kerb. If the kerb height is greater than 35mm, it is not recommended that the user climb or descend the kerb. Should there be any doubt then an assistant should be called to supervise the operation. Steep Slopes When the power wheelchair is to be operated up and down steep slopes, it is recommended that the user: 1. Visually checks to see if the angle of the slope is less than 15 degrees. 2. Checks that the slope surface is roughened to prevent slippage. If the slope meets these conditions, it is recommended that the user approaches the slope at a slow speed, keeping the chair under control at all times. It may be preferable to track across the slope so as to decrease the steepness of the descent providing that the surface of the slope is wide enough and suitable to prevent slippage. If possible have an assistant monitor the chairs’ progress, and prevent tipping by holding the push handles at the back of the chair. WARNING : If the slope does not meet these conditions, it Is recommended that the user does not climb or descend the slope. 17 Batteries and Charging When your batteries are fully charged you should have sufficient power to give you all the mobility required in a day - It is important that you understand how your batteries and charger work. Battery Maintenance Batteries supplied are a Gel type battery, and require no maintenance with the exception of maintaining a full charge. Do not partly charge the battery. check the battery water level once a week and top up, if necessary, with distilled water after charging, to cover the separator plates by 6mm (1/4”), no more. If the batteries are the dry cell type there is no maintenance required. Charging the Batteries 1. 2. 3. 4. 5. 1. 2. 3. 4. Batteries should be charged every night in a well ventilated room. DO NOT place the power wheelchair near radiators or open fireplaces whilst charging. DO NOT smoke or permit naked flames in the immediate vercinity. Turn the chair controller power off before charging. It is advisable that the batteries be charged for a minimum of 10 hours per night to ensure a full return to the batteries storage capacity. The battery charger is an automatic current limiting device and will shut off when the batteries are fully charged. Charging the batteries : Position C650PW power chair next to a standard wall outlet. It is done by connecting the battery charger to the wheelchair input battery charging socket. Connecting the battery charger to a standard wall power outlet. Switching the power on. 18 1. 1. 2. During the recharge: Whilst the batteries are being recharged, a red light will appear on the battery charger, indicating that the power is connected and charging is in progress. At the end of the recharge cycle: A green light will appear on the charger. This indicates that the batteries are fully charged and ready for use. If fitted, the battery charge level indicator on the controller should also show a full charge when switched on. When do the batteries need recharging ? When the batteries fall below 80% of the maximum charge level, the “on / off” lamp on the controller will flash. This indicates that whilst you have some reserve power, the batteries should be recharged. Note: 1. Do not use batteries other than the recommended type for your chair and never use a charger other than the one supplied for the purpose. 2. If the chair is not used for a long period of time (e.g., school holidays, hospitalisation, or when vacationing) arrange to have the batteries charged for at least one day (10 hours) every month, minimum. 3. Periodically, check the battery terminals are clean and the connections are tight. Smear a thin film of petroleum jelly on the terminals to guard against corrosion. Always wash your hands after handling batteries. 19 INVACARE – Wire diagram C650PW(EA) power chair with Shark controller Date : August 20, 2004 - + Red White Cut-out switch Red Connector .Red. + + - - Cut-out switch Red White + Red Black + - Front Controller Lead .Black. Replacing the batteries CAUTION ! - if you have doubts about your ability to lift any components, it is recommended that you seek assistance so as to avoid injury. 1. Turn the power off . 2. Disconnect the battery connection plug at the front of the battery tray. 3. Release the securing belt holding the battery box. 4. Disconnect the battery connection cables located in the battery box. 5. Lift the rear battery out of the battery box by using the lifting strap. 6. Slide the front battery to the rear of the battery box and remove the battery as in step 4. 7. Undo the terminal lugs, noting the polarity of the lugs. Remove the wiring loom. 8. Repeat step 6 for the other battery. 9. Inspect the terminals on the wiring loom and the lugs on the replacement batteries to make sure they are clean. If they are not, clean with a warm solution of bicarbonate of soda (one dessert spoon) and water (approximately five litres). It is important that you wash your hands afterwards. 10. Connect the terminal lugs on the wiring loom to the new batteries, observing the polarity of the lugs as noted before. 11. Place the new batteries back into the battery box and rejoin the connectors. 12. Replace the battery box lid and secure the retaining belt. 13. Reconnect the power cable. For maximum performance it is strongly recommended that you replace both batteries at the same time. 21 Tyre and Tube You should check the pneumatic tyres air pressure at least once per week. This will prolong the life of your tyres as well as help ensure the perfect operation of your chair. If you should have a flat tyre, you should replace the tube. Replacement tyres and tubes are readily available at the dealer shop where you purchased your C650PW. Front wheels : C650PW come with 200x50mm pneumatic tyres, pressure 36 psi in each tyre as standard equipment. OPTION: 200 x 50mm airless tyres. Rear wheels : C650PW come with 12-1/2" x 2-1/4" pneumatic tyres. Pressure 40 psi or 280 KPA in each tyre is standard equipment. OPTION: 12-1/2" x 2-1/4" airless tyres. WARNING ! Make sure the tyre is completely deflated before attempting repair. Follow these easy steps for a quick and safe repair: 1. Completely deflate the tyre if pneumatic. 2. Use an ratchet and socket to remove the drive wheel screw from the centre hub of the wheel. See Fig 41. 3. Pull the wheel off of the axle. 4. Separate the tyre and tube from the rim. 5. Remove the old tube and/or tyre and replace it with a new tube and/or tyre. 6. Slide the wheel back onto the shaft. 7. Install the drive wheel nut into the centre hub and tighten. 8. Inflate the tyre pressure to maximum 36 psi for front wheel. Inflate the tyre pressure to maximum 40 psi for rear wheel. Fig 41 Rear drive wheel Screw removal Rear wheel fixing screw Must be tightened by 1000 kgf .cm torsion 22 Maintenance, Cleaning & Fault finding An electric wheelchair needs some basic attention to ensure it provides reliable service. We recommend that the user ensures that the power wheelchair is checked regularly for maintenance requirements and receives a thorough and annual maintenance check up. We recommend that the chair has at least one full service from an authorised dealer once a year. If you notice any irregular aspect of your chair phone your nearest authorised dealer for assistance. They will advise if the chair should be returned for repairs. If the chair is to be returned, they will advise on the availability of replacement units, and the required method of packing and shipping. Annual Maintenance We recommend that the chair has at least one full service per year from an Authorised Dealer. This help ensure your power chair is functioning properly and helps prevent future complications. This should include: 1. Checking the tyres and tubes. 2. Checking the batteries and terminals. 3. Checking the controller programme for the user’s needs. 4. Checking the wheelchair frame. 5. Checking the upholstery condition. Regular Maintenance and Cleaning 1. Avoid knocking or bumping the controller, especially the joystick. 2. Avoid prolonged exposure of your power chair to extreme conditions, such as heat, cold, or moisture. 3. Keep the controller clean. 4. Check all controller connectors are tight and secured properly. 5. Never hose off your power chair or place it in direct contact with water. 6. Keep the upholstery and frame clean by wiping with a soft cloth, particularly after driving through wet, sandy or muddy conditions. Do not use harsh abrasive materials when cleaning. Do not apply liquid cleaners or solvents directly to the control box, battery charger or any electrical connections. 7. Keep wheels free from lint, hair, sand and carpet fibres. 23 8. Lightly oil axle pin, wheel axles and bearings once every three months. 9. Keep rear wheel tyres at correct inflation levels to maximum 40 psi, (or 275 KPA), if use pneumatic tyre in front inflation levels to maximum 36 psi. 10. Use only recommended batteries and have batteries changed only by Qualified Dealers. 11. Charge batteries regularly. Make sure the charger lead plugs are engaged properly in the sockets. Do not disconnect by pulling the cord. 12. With the controller turned off, check the joystick. Make sure it is not bent or damaged and that it returns to centre when you release it. Check the rubber boot around the base of the joystick for damage. Visually inspect the boot. Do not handle or try to repair it. See authorized dealer if there is any problem. 13. Visually inspect the controller harnesses. Make sure that they are not frayed or cut or have any wires exposed. See authorized dealers if there is a problem with any of these harnesses. 14. Ensure that all parts of the controller system are securely fastened to your C650PW. Do not over tighten any screws. Storage Your wheelchair should be stored in a dry place free from temperature extremes. When storing, disconnect the batteries from the power chair. See "Batteries and Charging" in this manual. If you fail to store the unit under the above conditions, the frame can rust, and the electronics can be damaged. 24 FAULT FINDING CHECK LIST : Problem: The controller light flashes. Action: If the lamp flashes immediately when the power is switched on and the joystick is engaged, switch the power off, wait a few seconds, then switch on again. Wait for two seconds before engaging the joystick. Problem: The controller lamp flashes slowly while driving. Action: The slow flashing means that the battery charge level is low and should be placed on charge as soon as practicable. Problem: The controller lamp flashes continuously and the chair will not operate. Action: The continuous flashing of the lamp means there may be a major problem. Switch the power off, disengage the wheel clutches and seek assistance. Contact your Dealer and advise of the problem. Problem: The red light on the battery charger fails to illuminate when the power is connected to it. Action: Check that all the leads have been properly connected and the mains power is turned on. If this doesn’t cause the red light on the charger to illuminate, turn the mains power off, disconnect the lead from the mains to the battery charger. Contact your Dealer and advise of the problem. Problem: The chair is difficult to steer. Action: First, check the tyre pressure of all the tyres. Second, check to see if both the clutches are engaged correctly. Note : If you detect that there are problems with the motors, the battery charger, the controller or damage to the power wheelchair frame, it is recommended that you contact the nearest Authorised Service Agent or your Distributor. If you notice any other irregular aspect of your chair or if it fails to respond after making some of the above inspections, phone your nearest Authorised Service Agent or Dealer for assistance. They will advise if the power wheelchair should be returned for repairs. If the chair is to be returned, they will advise on the availability of replacement units, and the required method of packing and shipping. 25 Limited Warranty This is to certify that the Invacare C650PW power chair is guaranteed against defects in materials and workmanship and free of fault, wear and tear excluded, as follows : There will be ONE YEAR limited warranty from the date of purchase for any of below parts found, wear and tear excluded. • • • • • • • Electric motors and battery charger Micro processor controller Foot rigging Manual brakes and hardware Armrests Cross braces Backrest canes Warranty exceptions : Motor-the commentator of the motor is not warranted if the damage is caused by not replacing the motor brushes after heavy wear to the brushes. Motor brushes are wear items and are not warranted. The chair side frames are guaranteed for a period of FIVE YEARS from date of purchase. Warranty exclusions: • • • • • • Batteries Tyres and tubes Upholstery and seating Repairs and/or modifications made to any part without specific prior Written consent from Invacare Australia Pty Ltd Circumstances beyond the control of Invacare Australia Pty Ltd Labor, service calls, shipping, and other charges incurred for repair of The product unless specifically authorized by sells dealers. Damage caused by : • Battery fluid spillage or leakage • Abuse, misuse, accident, or negligence • Improper operation, maintenance, or storage • Commercial use, or use other than normal 26 This guarantee is subject to the following conditions : 1. This warranty is extended only to the original purchase/user of Invacare products. 2. The Company will not accept responsibility if the fault was caused by misuse or failure to observe the instructions in the User’s Manual. 3. If a fault develops, it is the responsibility of the owner to immediately notify the company or the Distributor from whom the chair was purchased. 4. All costs associated with the freight of the chair or any faulty components are the responsibility of the owner. 5. Labor charge incurred in the installation or repair of the above-mentioned parts plus all freight charges are not included in the warranty 6. Any parts found to be defective due to faulty workmanship and / or materials will be renewed or repaired at the Company’s discretion without charge to the owner of the chair. 7. The guarantee will be voided if any unauthorized repair service or parts alteration has been made. 8. The company will not warranty the frame or any parts damaged when the maximum weight limited of one hundred kilograms is exceeded. 27 Customer Service Support Please contact nearest Invacare distributors for any queries concerning your wheelchair and/or electric wheelchair. Before calling: Please fill in the following information. The details below will help us assist you faster and ensure we provide you with the best advice concerning your power wheelchair. Series Number .................................. Model ................................................ Date of purchase ............................... NOTICE : The information and specification of C650PW contained in this User’s Manual is subject to change without prior notice. No part of this document may be photocopied, reproduced, transmitted, transcribed, stored in a retrieval system or translated to another language or computer language, in any form or by any means, electronic, mechanical, magnetic, optical, chemical, manual or otherwise without prior written consent of Invacare Australia. All rights reserved. Invacare recommends you use Invacare accessories and parts with Invacare products. Replace any worn out parts immediately. 28 29 CONTROLLER CONTROL UNIT OWNER'S MANUAL Hydra Folding Power Wheelchair September 2004. All prices quoted are GST exempt & exclude delivery. All information, including pricing and specifications, subject to change without prior notice. Photographs are for illustration purposes only & may vary from product depiction. Invacare®, and Yes, you can., are trademarks of Invacare Corporation. © 2001 Invacare Corporation. Invacare Australia. 1 Lenton Place North Rocks NSW 2151 , Australia. Phone (02) 8839 5333. Fax (02) 8839 5353 Installation Manual SHARK DK-REMA Series of Control Units (“2 Button” Remote) by GBK80260 Issue 1, June 2004 About this Manual This manual has been designed to help you install and configure a Dynamic SHARK powerchair control system for a ‘generic’ brand powerchair. For this reason there are no guidelines for specific applications. If there is a specific requirement for your application, please contact Dynamic Controls or one of the sales and service agents, as we can assist you to configure SHARK for this application. Throughout this manual there are a few symbols that will help you quickly identify the purpose of the paragraph that follows: Notes & Precautions: Notes provide supporting information for the previous paragraph or section that should be followed in order to install, configure, and use SHARK safely and efficiently. Warnings: Warnings provide important information for the previous paragraph or section that must be followed in order to install, configure, and use SHARK safely and efficiently. Programming notes: This icon denotes the paragraph refers to the programming of SHARK. SHARK is not user serviceable. Specialized tools are necessary for the repair of any SHARK component. Do not install, maintain or operate this equipment without reading, understanding and following this manual – including the Safety and Misuse Warnings – otherwise injury or damage may result. Due to continuous product improvement Dynamic reserves the right to update this manual. This manual supersedes all previous issues, which must no longer be used. Dynamic reserves the right to change the product without notification. Any attempt to gain access to or in any way abuse the electronic components and associated assemblies that make up the powerchair system renders the manufacturer’s warranty void and the manufacturer free from liability. Dynamic and the Dynamic logo are trademarks of Dynamic Controls. All other brand and product names, fonts, and company names and logos are trademarks or registered trademarks of their respective companies. Dynamic owns and will retain all trademark rights and Dynamic or its licensors own and will retain all copyright, trade secret and other proprietary rights, in and to the documentation. All materials contained within this manual, in hard-copy or electronic format, are protected by copyright laws and other intellectual property laws. © Copyright 2004 Dynamic Controls. All rights reserved. Contents 1 Introducing SHARK ................................................1 2 Introducing the DK-REMA Control Unit ................3 2.1 2.2 2.3 2.4 2.5 2.6 3 Installation and Testing ........................................11 3.1 3.2 4 Control Unit Mounting ...................................................................... 11 3.1.1 SHARK Communications Bus ............................................ 12 Testing................................................................................................ 13 Programming SHARK...........................................15 4.1 4.2 4.3 4.4 5 The DK-REMA Control Unit...............................................................3 2.1.1 The SHARK Information Gauge............................................4 Turning SHARK On and Off ..............................................................6 Driving SHARK ....................................................................................7 Using the Horn.....................................................................................8 Locking SHARK ...................................................................................9 Charging SHARK ............................................................................. 10 Introduction........................................................................................ 15 4.1.1 Programming by Dynamic................................................... 15 4.1.2 Programming by the Powerchair Manufacturer ............... 15 4.1.3 Programming by the Dealer................................................ 16 Powerchair Manufacturer Programming in Detail ....................... 17 4.2.1 Chair Set Up .......................................................................... 18 4.2.2 Drive Program ....................................................................... 19 Chair Tamer ...................................................................................... 21 4.3.1 Stability Profiles .................................................................... 21 4.3.2 Stability Profiles 1 -4 ............................................................. 21 4.3.3 Stability Profiles 5 -8 ............................................................. 22 4.3.4 Stability Profile Parameters ................................................ 23 4.3.5 ‘Drive Program Swap' Feature ........................................... 24 Dealer Programming in Detail ........................................................ 25 Diagnostics ...........................................................27 5.1 5.2 5.3 Introduction........................................................................................ 27 Diagnostics Tools ............................................................................. 28 Flash Codes ...................................................................................... 29 6 Physical Specifications ........................................31 7 Appendices ...........................................................33 7.1 7.2 7.3 7.4 7.5 7.6 Programmable Parameters (details) ............................................. 33 Accessories + Parts List .................................................................. 36 Intended Use and Regulatory Statement ..................................... 43 Maintenance...................................................................................... 44 Warranty ............................................................................................ 45 Safety and Misuse Warnings.......................................................... 46 Table of Contents 7.7 7.8 Electromagnetic Compatibility (EMC) ........................................... 48 Contact Details ................................................................................. 49 1 Introducing SHARK SHARK heralds the dawn of new thinking in lower cost powerchair control solutions. Using a dedicated power module and control unit, SHARK has none of the compromises that go into the design of one-box controllers - this means more power, unrivalled ergonomics, greater versatility and superior usability. • Features Dynamic’s breakthrough “Chair Tamer” technology, providing unprecedented chair performance, control and safety. • A number of control units are available to meet a wide range of user needs. These range from optimally small, highly ergonomic units to units with a more traditional appearance and standard functionality. • A choice of power modules offers basic ‘drive only’ functionality up through sophisticated modules supporting multiple seat adjustments, lights, etc. • No heavy power cables running from the armrest to the motors and batteries. • No hot surfaces for the user to touch. • A longer and higher current delivery than equivalently rated integral controllers. • Superior EMC performance due to minimized power wiring. Chapter 1 : Introducing SHARK 1 THIS PAGE IS LEFT BLANK INTENTIONALLY 2 GBK80260 : Issue 1 – 1/07/2004 2 Introducing the DK-REMA Control Unit The DK-REMA is a low cost, ultra compact control unit suitable for all simple drive only applications. A number of variants are available to support different cable lengths. 2.1 • DK-REMA01 – 1.5 meter (Gunmetal Gray Case, Light Gray Accent) • DK-REMA02 – 1 meter cable (Gunmetal Gray Case, Light Gray Accent) • DK-REMA03 – 0.5 meter cable (Gunmetal Gray Case, Light Gray Accent) • DK-REMA05 – 1.5 meter cable (Black Case, Dark Gray Accent) • DK-REMA06 – 1 meter cable (Black Case, Dark Gray Accent) The DK-REMA Control Unit All user controls can be accessed from the simple, ergonomically designed panel on the SHARK Control Unit. Chapter 2 : The DK-REMA Control Unit 3 2.1.1 The SHARK Information Gauge The SHARK Information Gauge is the primary source of user feedback. It displays every possible status that SHARK may have, including; • SHARK Power ON • True state-of-battery-charge, including notification of when the battery desperately requires charging. o Any green LED’s lit indicates well-charged batteries. o If only amber and red LED’s are lit, the batteries are moderately charged. Recharge before undertaking a long trip. o If only red LED’s are lit, the batteries are running out of charge. Recharge as soon as possible. • SHARK Lock Mode countdown • Program, inhibit or charge modes • Fault indication (Flash Codes) The following table indicates what the gauge will display for any given state. Display Description This means… Notes All LED’s OFF Power is OFF All LED’s ON steady 4 GBK80260 : Issue 1 – 1/07/2004 Power is ON Less LED’s imply a reduced battery charge. Display Description This means… Notes Left RED LED Battery charge is low is flashing The batteries should be charged as soon as possible. Right to left ‘chase’ SHARK is being brought out of Lock mode To unlock SHARK, press the Horn button twice within 10 seconds. Left to right ‘chase’ alternating with steady display SHARK is in programming, inhibit and/or charging mode The steady LED’s indicate the current state of battery charge. Right GREEN LED is flashing SHARK is in SPEED LIMIT mode The current state of battery charge will be displayed at the same time. All LED’s flashing slowly SHARK has detected an Out Of Neutral At Power Up (OONAPU) condition Release the joystick back to neutral. All LED’s flashing quickly SHARK has detected a fault SHARK uses Flash Codes to indicate faults. Refer to the Diagnostics section for further information about fault diagnostics. Chapter 2 : The DK-REMA Control Unit 5 2.2 Turning SHARK On and Off Turning the Power ON Press the Power button. All indicators will light briefly. Either the current battery charge or Lock Mode will then be indicated. If SHARK is turned on while the joystick is out of neutral, an OONAPU fault will be displayed - refer to the previous table. Release the joystick back to neutral and the fault will disappear. OONAPU (Out Of Neutral At Power Up) is a feature that prevents SHARK from driving if the joystick is out of neutral when SHARK is either turned on or an inhibit condition removed. This feature prevents sudden and unexpected powerchair movements. Turning the Power OFF Press the Power button. The LED’s will turn off. Alternatively, SHARK may be placed into a Lock Mode. This may be preferable to turning the power off if leaving the powerchair at a place where unauthori zed persons may attempt to use the powerchair. The Power button can also be used to turn SHARK off in case of an emergency. 6 GBK80260 : Issue 1 – 1/07/2004 Sleep Mode Some SHARKs may be supplied factory programmed with a Sleep Feature that will automatically turn SHARK off if the joystick has not been moved within a certain period of time (programmable). After a certain amount of time with no joystick movement SHARK will automatically turn itself off. Sleep mode will not be entered while programming. When Wakeup style has been set to 'Joystick and Buttons', pressing ANY button or displacing the joystick will bring the system out of Sleep mode. When Wakeup style has been set to 'Buttons Only', pressing the On/ Off button ONLY will bring the system out of Sleep mode. The Sleep feature may be turned on or off, the method for bringing the system out of Sleep Mode can be changed, and the amount of time before Sleep mode is entered can be modified. SHARK may enter Sleep Mode while charging. This will not affect the charging of SHARK. 2.3 Driving SHARK Moving the joystick will cause the powerchair to drive in that direction. The amount of joystick movement will determine the speed that the powerchair will move in that direction. Chapter 2 : The DK-REMA Control Unit 7 For safety reasons, joystick movements are ignored when SHARK is first turned on (OONAPU). SHARK will slowly flash the Information Gauge to indicate this. Simply release the joystick back to the neutral position and the error will disappear. A user may adjust the top speed of their powerchair to suit their preference or environment by turning the speed control dial. Simply turn the dial fully clockwise to travel at top speed when the joystick is pushed fully forward. The top speed progressively reduces as the dial is turned counter-clockwise. Powerchair driving performance (speed, acceleration, etc.) can be further customized to suit the needs and preferences of each user. 2.4 Using the Horn Press the Horn button. The horn will sound for as long as the button is pressed. 8 GBK80260 : Issue 1 – 1/07/2004 2.5 Locking SHARK Some SHARKs may be supplied factory programmed with a Lock Feature that prevents unauthorized people from turning SHARK on. To LOCK SHARK While the power is ON, press and hold the Power button for 2 seconds. The display will turn off immediately. After 2 seconds all LED’s will flash briefly and the horn will sound a short beep. The powerchair will then turn off. The Lock feature may be turned on or off. To UNLOCK SHARK While SHARK is locked, press the Power button to turn SHARK on. All LED’s will flash briefly. The LED’s will then perform a slow right-to-left countdown. Press the Horn button twice before the countdown is completed (approximately 10 seconds). The current state-of-charge will then be displayed and SHARK may be operated normally. If the user does not press the Horn button twice before the countdown is complete, the Horn will sound a short beep and SHARK will turn itself off. The unlock sequence must be completed successfully before SHARK will drive again normally. Chapter 2 : The DK-REMA Control Unit 9 2.6 Charging SHARK Plug the battery charger into the charging socket located at the front of the SHARK Control Unit. If the powerchair has an On-board Battery Charger (OBC), simply plug the OBC power cable into an appropriate power outlet. The SHARK Information Gauge will indicate the system is being charged by cycling between a left-to-right ‘chase’ and displaying the current battery state-of-charge. Driving is prevented (inhibited) while the system is being charged. Once the Battery Charger displays a ‘full’ battery charge, the battery charger plug may be removed. If SHARK is turned off, or goes into sleep while charging, charging will continue. Although the SHARK Information Gauge will display an approximate battery level while charging, the Battery Charger should be used as the sole judge of charge completion. 10 GBK80260 : Issue 1 – 1/07/2004 3 Installation and Testing 3.1 Control Unit Mounting The SHARK Control Unit can be mounted on either side of the wheelchair, in an upright position using M5 screws. These should be tightened to a torque of approximately 2 Nm (18 lbf in). There are three mounting options available: plate mount and left or right tube mount. Plate Mount The SHARK Control Unit can be mounted using a flat plate, typically welded to a tubular arm. The mounting area on the Control Unit has support through the center, along with lips to support the outside of the bracket. Chapter 3 : Installation & Testing 11 Tube Mount The SHARK Control Unit can also be mounted using a tube with an outside diameter of 22mm (7/8”). The tube can be mounted in either the left or right mounting channel. For safe installation of any of the mounting options, select a screw length that protrudes between 4mm and 6mm into the case. Do not over tighten the mounting screws. These should be tightened to a torque of 2 Nm (18 lbf in). 3.1.1 SHARK Communications Bus The SHARK Power Module communicates to the Control Unit through the SHARK Communications Bus. The Bus also supplies power to the Control Unit. The connector is ‘keyed’ and can only be plugged in one way – the Control Unit symbol on top of the plug should be facing up. 12 GBK80260 : Issue 1 – 1/07/2004 3.2 Testing To ensure that the powerchair meets a minimum level of safety, the following procedure should be undertaken to ensure that the powerchair operates safely. This procedure should be carried out in a spacious environment and with due regard to any possible unexpected powerchair movement in the event of faulty installation. 1. Raise the wheels off the ground using blocks under the powerchair frame so that the wheels can turn freely. 2. Recheck all wiring, paying particular attention to polarities of batteries, motors and park brakes. 3. Make the final connection to the Battery Positive (+) terminal and close the circuit breakers. 4. Press the Power button to turn SHARK on. Ensure it turns on correctly. 5. Press the Power button again to turn SHARK off. Ensure it turns off correctly. Press the power button again to turn SHARK back on. 6. Ensure the horn is functioning correctly by pressing the Horn button. 7. Turn each drive wheel by hand to check that the park brakes are engaged. The wheels should not move. 8. Push the joystick slightly out of neutral and listen for the “click” as the park brakes disengage. 9. Move the joystick in all directions and ensure that the wheels respond smoothly and in the correct direction. 10. Release the joystick to neutral and listen for the click of the park brakes re-engaging. 11. Turn off SHARK and remove the blocks from under the powerchair. 12. Turn SHARK back on and turn the speed dial to the lowest speed setting (fully counter-clockwise). 13. Sit in the powerchair and drive in all directions slowly, checking for precise and smooth control. 14. Repeat at higher speeds. 15. Drive the wheelchair on a 1 : 6 ramp and check for normal power, smoothness and parking. Chapter 3 : Installation & Testing 13 THIS PAGE IS LEFT BLANK INTENTIONALLY 14 GBK80260 : Issue 1 – 1/07/2004 4 Programming SHARK Performance adjustments should only be made by professionals in the health care field or by persons fully conversant with the adjustment process and the operator’s capabilities. Incorrect settings or programming in an unsafe location could cause injury to the operator or bystanders, or damage to the vehicle or surrounding property. After the vehicle has been configured, check to make sure the vehicle performs to the specifications entered in the programming procedure. If the vehicle does not perform to specifications, reprogram it. Repeat this procedure until the vehicle performs to specifications. If the intended operation cannot be achieved, contact your service agent. 4.1 Introduction SHARK is fully programmable to provide superb performance for a wide variety of powerchair configurations and users. All programmed values are stored in the Power Module. In the event that the Control Unit is replaced, there is no need to reprogram SHARK. If the Power Module is replaced, SHARK can simply be reprogrammed with an identical powerchair program. SHARK can be programmed at three points: 4.1.1 Programming by Dynamic Dynamic supplies SHARK pre-configured with a ‘sensible’ generic program. Customization will be required for specific powerchair and user requirements. 4.1.2 Programming by the Powerchair Manufacturer The powerchair manufacturer ‘tunes’ the generic program to suit the characteristics of their particular powerchair. The recommended tool for this is the PC-based Shark Support Tool. The programming cable requires a special adapter to allow it to plug into SHARK. There are three categories of programmable parameters: Technical – To ensure SHARK matches the specific components of each chair, the powerchair manufacturer must configure SHARK for the technical and functional characteristics of the chair. This includes the motors, park brakes, Chapter 4 : Programming SHARK 15 Lock, DCI and Swivel functions, as well as the ability to restrict programming by the dealer. 4.1.3 Drive Programs – The powerchair manufacturer defines three Drive Programs that contain ‘typical’ sets of driving characteristics. These are intended as the starting point for further customization by the dealer and include maximum speeds, accelerations, etc. Stability Profiles – Each Drive Program contains a Stability Profile - the basis of Chair Tamer. These offer a simple and extremely effective means of solving the traditional Mid Wheel Drive (MWD) and Front Wheel Drive (RWD) stability problems without compromising on chair speed or drive performance. There are eight pre-configured Stability Profiles to select from. Programming by the Dealer The primary task of the dealer is to select the most appropriate of the three Drive Programs and tune it so that it meets the specific needs and preferences of the powerchair user. For instance, the powerchair manufacturer may provide front, mid and rear wheel Drive Programs for any single chair type. The dealer then selects the Drive Program that includes all the technical, functional and driving settings already optimized for the chair configuration (front, mid or rear) and then customizes the typical drive performance settings for each particular user. Programming is typically done using a hand held programmer, a portable programming tool suited to the quick customization of a chair. Simply plug the cable into the charging socket (via the programming adaptor – DK-ADAPT) at the front of the SHARK Control Unit. The powerchair manufacturer can limit hand held programmer access to SHARK settings using the PC-based SHARK Support Tool. 16 GBK80260 : Issue 1 – 1/07/2004 4.2 Powerchair Manufacturer Programming in Detail The powerchair program is made up of subgroups, each of which defines a separate aspect of the chair. A description of each group and parameter is provided for your reference, although some groups or parameters may not be viewable or editable at your access level. Chapter 4 : Programming SHARK 17 4.2.1 Chair Set Up This group of settings defines the mechanical and functional set up of the powerchair, including: • Setting minimum speeds and emergency deceleration rates. • Defining the extent of dealer programmability. • Select a powerchair performance profile (Drive Program). The parameter name displayed on the hand held programmer may be different to that displayed by the PC-based SHARK Support Tool. Refer to the Appendices for a full list of parameter names. Setting Description Lowest Forward Speed The maximum speed SHARK will drive with the joystick full forward, and the speed dial fully counter-clockwise. Lowest Turn Speed The maximum speed SHARK will drive with the joystick full left or right, and the speed dial fully counter-clockwise. Sleep Timer Set the amount of time (in minutes) that SHARK will turn itself off after no user input. Set to 0 to disable this feature. Wakeup Style Defines how a user can wake SHARK out of Sleep mode. Select Button or Joystick + Button. Joystick Throw Defines the amount of joystick movement required for full speed. Options are Normal (full deflection), Short or Very Short. Lock Enable Turns the Lock feature On or Off. See Section 2.5 – Locking SHARK. Field Programmability Setting this to ‘Limited’ will disable the Hand Held Programmer. Defines which of the three available Drive Programs is to be used. If set to DCI Select 1+2, the DCI Swivel function will Active Drive Program change to a Drive Program Swap mode. Activation of the DCI Swivel function will change the Active Drive Program from Drive Program 1 to 2. 18 GBK80260 : Issue 1 – 1/07/2004 4.2.2 Drive Program The Drive Program – as the name suggests – defines the driving performance of the powerchair, including: • Setting maximum forward, reverse and turn speeds • Setting forward, reverse and turn acceleration and deceleration rates • Define the chair response to joystick movements and its ability to negotiate different driving surfaces • Define the amount of ‘Traction’ (or assistance SHARK will provide) when a Stability Profile with ‘Chair Tamer’ is selected The powerchair manufacturer defines three default Drive Programs that are stored in the SHARK Power Module. The Dealer selects the most appropriate Drive Program and then customizes it for each user. Setting Description Drive Program [1-3] Name The 3 Drive Programs can be given sensible 15-character descriptive names. These will be displayed by the Hand Held Programmer. Maximum Forward Speed The maximum speed SHARK will drive with the joystick full forward and the speed pot fully clockwise. Forward Acceleration Sets how quickly SHARK will accelerate when the joystick is moved forward from neutral. Forward Deceleration Sets how quickly SHARK will decelerate when the joystick is moved toward neutral from a forward position. Maximum Reverse Speed The maximum speed SHARK will drive with the joystick full reverse and the speed pot fully clockwise. Reverse Acceleration Sets how quickly SHARK will accelerate when the joystick is moved to reverse from neutral. Reverse Decele ration Sets how quickly SHARK will decelerate when the joystick is moved toward neutral from a reverse position. Maximum Turn Speed The maximum speed SHARK will turn with the joystick full left or right and the speed pot fully clockwise. Turn Acceleration Sets how quickly SHARK will accelerate into a turn when the joystick is moved to the left or right from neutral. Chapter 4 : Programming SHARK 19 Setting Description Turn Deceleration Sets how quickly SHARK will decelerate out of a turn when the joystick is moved toward neutral from a left or right position. Tremor Damping Dampens (or softens) the introduction of acceleration / deceleration from / to a steady speed, allowing for a smoother driving experience. Particularly useful for reducing drive sensitivity to hand tremors. Stability Profile Traction The basis of ‘Chair Tamer’, select one of the eight predefined stability profiles to define the application of ‘Chair Tamer’. Defines the amount of assistance SHARK provides in controlling the chair when a Stability Profile with ‘Chair Tamer’ is selected, effectively ‘amplifying’ the effect of the Stability Profile. Set to 0% for no modification of the Stability Profile, with higher values providing increasing assistance to keep the chair stable and safe. 20 GBK80260 : Issue 1 – 1/07/2004 4.3 Chair Tamer SHARK’s ‘Chair Tamer’ is a new technology designed to provide a stable and comfortable driving experience on almost every combination of chair set up and drive configuration. Chair Tamer offers a simple and extremely effective means of solving the traditional Mid Wheel Drive (MWD) and Front Wheel Drive (FWD) issues of “spinning out” and “snaking”, without compromising chair speed or drive performance. 4.3.1 Stability Profiles The basis of Chair Tamer is the ‘Stability Profile’. A ‘Stability Profile’ is simply a set of characteristics that define if and to what extent SHARK will assist the driver to keep the chair stable. Higher levels of Chair Tamer will make SHARK work harder to keep the chair stable and safe. SHARK has eight Stability Profiles, any of which can be assigned to SHARK's three Drive Programs simply by selecting the appropriate ‘Active Stability Profile’ within each Drive Program. For example, if Drive Program 2 has been set up with ‘Active Stability Profile’ 7 selected, then the chair will behave with the speed and response characteristics defined by Drive Program 2, but overlaid with a level of Chair Tamer (or “drive assistance”) as specified by Stability Profile 7. The 8 Stability Profiles are grouped into 2 sets of four (Stability Profiles 1 -4, and Stability Profiles 5 -8). While it is possible for the powerchair manufacturer to program Stability Profiles to suit their own specific needs, every SHARK leaves Dynamic with the Stability Profiles programmed to suit generic chair types (eg, RWD, MWD, FWD, etc) as described below. 4.3.2 Stability Profiles 1-4 Stability Profiles 1 -4 are each targeted at a particular chair type. Simply select the profile that most closely reflects the chair configuration within each Drive Program. Stability Name Profile 1 No Chair Ta mer Description Best suited to… Does not apply any Chair Tamer to the chair. RWD chairs Chapter 4 : Programming SHARK 21 4.3.3 2 Lo Chair Tamer SHARK applies a small amount of Chair Tamer if it calculates joystick movements will make the chair unsafe. Small MWD chairs 3 Med Chair Tamer SHARK applies a moderate amount of Chair Tamer if it calculates joystick movements will make the chair unsafe. Large MWD chairs 4 Hi Chair Tamer SHARK applies a large amount of Chair Tamer if it calculates joystick movements will make the chair unsafe. FWD chairs Stability Profiles 5-8 Stability Profiles 5 -8 are identical to Stability Profiles 1-4, except that each Stability Profile has the Motor Polarity reversed, allowing the implementation of chairs that can be converted between Front Wheel Drive (FWD) and Rear Wheel Drive (RWD) by ‘swivelling’ the seat. This is often referred to as a ‘Swivel’ function. For best results with this style of chair, use the ‘Drive Program Swap’ feature described in the next section. Chair Tamer Profile 22 Name Description 5 No CT – Swivelled Does not apply any Chair Tamer to the chair. Motor Polarity is reversed. 6 Lo CT Swivelled SHARK applies a small amount of Chair Tamer if it calculates joystick movements will make the chair unsafe. Motor Polarity is reversed. 7 Med CT Swivelled SHARK applies a moderate amount of Chair Tamer if it calculates joystick movements will make the chair unsafe. Motor Polarity is reversed. 8 Hi CT Swivelled SHARK applies a large amount of Chair Tamer if it calculates joystick movements will make the chair unsafe. Motor Polarity is reversed. GBK80260 : Issue 1 – 1/07/2004 4.3.4 Stability Profile Parameters Setting Description Stability Profile [1-3] Name The 8 Stability Profiles can be given sensible 15-character descriptive names. These will be displayed by the Hand Held Programmer. Max Speed in Turn Sets the maximum allowable speed when turning (will slow forward movement of the chair when turning if necessary). Modifies the acceleration when coming out of a turn, depending on the speed of the turn. Faster turns will have more modification applied. Speed Acceleration Scalar Values less than 100% and acceleration out of the turn will be lessened. Values greater than 100% and acceleration out of the turn will be increased. Note that setting this programmable over 100% will make the chair more responsive, but may increase the likelihood of spinout. Modifies the acceleration when entering a turn, depending on the current forward speed. Faster speeds will have more modification applied. Turn Acceleration Scalar Values less than 100% and acceleration into the turn will be lessened. Values greater than 100% and acceleration into the turn will be increased. Note that setting this programmable over 100% will make the chair more responsive, but may increase the likelihood of spinout. Lowers the sensitivity of turning the faster the chair is being driven – reducing snaking if the chair is FWD. Turn at Max Speed Will also reduce the ability to turn quickly at high speeds, reducing the chances of the chair rolling. Turn Acceleration at Max Speed Increases the turn acceleration as the maximum speed increases. This will not make the chair more stable, but will make it more responsive to turns. A value of 100% will have no effect. Traction at Max Speedpot Defines the amount of Traction that will be applied proportional to the position of the speed control dial. As chairs are most unstable at high speeds, there is little need to compromise the responsiveness of the chair at low speed control dial settings. By setting ‘Traction’ to a low value and ‘Traction at Max Speedpot’ to a higher value, more Traction (or ‘drive assistance’) will be provided the higher the speed control dial setting. Note: If ‘Traction at Max Speedpot’ is set lower than ‘Traction’, ‘Traction’ will always be used. Chapter 4 : Programming SHARK 23 4.3.5 Setting Description FWD/RWD Swivel Sets if the motor polarities are to be reversed in this Stability Profile. ‘Drive Program Swap' Feature Ideally, when a chair fitted with a Seat Swivel function has the seat reversed, the following actions will occur. 1. The motor polarity is automatically reversed so that joystick movements cause the chair to move in the correct direction no matter which direction the seat is facing. 2. The Stability Profile will automatically change to the one most appropriate for the new chair configuration. For example, when in RWD no Chair Tamer is applied, while in FWD Medium Chair Tamer is applied, so that the chair remains stable and safe no matter which direction the seat is facing. If the ‘Active Drive Program’ parameter is set to any of "Drive Program 1", "Drive Program 2" or "Drive Program 3", applying the ‘Swivel’ function on the Drive Control Input (DCI) will achieve item 1 only. If the ‘Active Drive Program’ parameter is set to "DCI Select 1+2", applying the ‘Swivel’ function on the DCI will achieve both items 1 and 2. 1. When the DCI is "Normal" – the active Drive Program is Drive Program 1. 2. When the DCI is "Swivel" – the active Drive Program is Drive Program 2. By setting Drive Program 2 to use a Stability Profile that has ‘FWD/RWD Swivel’ set to Yes, a change in Chair Tamer settings and motor reversal will both happen automatically, whenever the DCI “Swivel” is active. When ‘Active Drive Program’ is set to ‘DCI Select 1+2’, the Drive Control Input “Swivel” function will change to a “Drive Program Swap” feature. Making ‘Swivel’ active on the Drive Control Input will not swap the polarity of the motors. 24 GBK80260 : Issue 1 – 1/07/2004 4.4 Dealer Programming in Detail The primary task of the Dealer is to select an appropriate Drive Program and customize this for a user. Below is a flowchart of how to use a hand he ld programmer to select and modify parameters. Refer to previous sections and the Appendices for a description of each parameter. START MAIN No faults TECH Fault(s) present ** TECHNICIAN** DYNAMIC SHARK V1.0 ** DIAGNOSTICS ** WWWWWWWWWWW System Fault 0801 Shark PM fault LANG PROG DIAG Cycle language TECH EXIT Passnumber correct Enter passnumber xyz MAIN OK D1 D2 D3 NEXT Fault(s) present TECH Passnumber incorrect ** TECHNICIAN ** Passnumber incorrect MENU ** TECHNICIAN ** ** DIAGNOSTICS ** Active program is: Fault log - page 1 PPPPPPPPPP EXIT EXIT RETRY 0702/1000/0802/0600 NEXT SWAP EXIT NEXT MORE MAIN Cycle through fault log ** PROGRAM ** View/edit ** DIAGNOSTICS ** PPPPPPPPPP EXIT Usage statistics NEXT YES Hours on = xxxx EXIT NEXT MORE EDIT Cycle through use counters ** PROGRAM ** Field Programmability is "Limited" Joystick Throw JJJJJJJJJJJ EXIT NEXT DYNAMIC SHARK V1.0 SWAP This unit is not Swaps Normal/ Short/Very Short Programmable. ** PROGRAM ** Sleep Timer SS Minutes EXIT NEXT UP DOWN General: Shaded screens are only accessed once technician mode is entered; otherwise they are skipped. Technician mode is exited whenever the programmer is unplugged or power is cycled. ** PROGRAM ** Veer Correction VVVVVVV EXIT NEXT LEFT RIGHT T ** TECHNICIAN ** Calibrate joystick? EXIT NEXT Key: WWWWWW: PPPPPPPP: JJJJJJJJJJJ: VVVVVVV: SS: "System OK" or "System Fault(s)" Current drive program (text as set in Wizard) Joystick throw (Normal, Short, Very Short) Veer correction (left or right, and %) Minutes before sleep, or OFF YES Chapter 4 : Programming SHARK 25 EDIT PPPPPPPPPP Load compensation PPPPPPPPPPP Xx mOhms Reverse Deceleration EXIT NEXT UP DOWN xx% EXIT NEXT UP DOWN PPPPPPPPPP Stability profile PPPPPPPPPPP TTTTTTTTTT Max Turn Speed EXIT NEXT SWAP xx% EXIT NEXT UP DOWN PPPPPPPPPPP Max Forward Speed PPPPPPPPPPP xx% Turn Acceleration EXIT NEXT UP DOWN xx% EXIT NEXT UP DOWN PPPPPPPPPPP Forward Acceleration PPPPPPPPPPP xx% Turn Decleration EXIT NEXT UP DOWN xx% EXIT NEXT UP DOWN PPPPPPPPPPP Forward Deceleration PPPPPPPPPPP xx% Tremor Damping EXIT NEXT UP DOWN xx% EXIT NEXT UP DOWN PPPPPPPPPPP Max Reverse Speed PPPPPPPPPPP xx% Traction EXIT NEXT UP DOWN xx% MENU PPPPPPPPPPP Reverse Acceleration xx% MENU 26 EXIT NEXT UP GBK80260 : Issue 1 – 1/07/2004 DOWN EXIT NEXT UP DOWN 5 Diagnostics SHARK is not user serviceable. Specialized tools are necessary for the repair of any SHARK component. 5.1 Introduction A flashing SHARK Information Gauge indicates there is an abnormal condition somewhere on the powerchair. The components that SHARK provides fault information for include, the motors, the park brakes, the batteries, the cabling and the SHARK modules themselves. Note that joystick OONAPU (Out Of Neutral At Power Up) is not a fault. Simply by removing your hand from the joystick and allowing it to return to the neutral position, the fault will immediately clear. If the condition persists after removing your hand, the joystick may be damaged. Consult a service agent. The nature of the abnormal condition is indicated by a flash code. This is a sequence of flashes, separated by a pause, followed by a repetition of the sequence. The number of flashes relates to the condition. For instance, four flashes of the SHARK Information Gauge, a pause, followed by four flashes, etc. indicates a right motor fault. Five flashes would indicate a left park brake fault. Depending on the severity of the condition, the powerchair may or may not allow driving. In some cases the chair may be allowed to drive but in a reduced speed (‘limp’) mode. Chapter 5 : Diagnostics 27 5.2 Diagnostics Tools While SHARK indicates the abnormal condition, a hand held programmer or the PC-based SHARK Support Tool will provide more detailed information on the fault. Hand Held Programmer Plugging a hand held programmer into the SHARK Control Unit when an abnormal condition exists will cause the fault to be displayed. A 4-digit code will be displayed which indicates the condition. The first two digits provide the flash code number. The second two digits provide more specific diagnostics information that is suitable for repair technicians. In some cases, viewing a history of any abnormal conditions that occurred previously on the system may be useful in diagnosing the current condition. This can be done by entering the Fault Log from the Diagnostics menu. Usage statistics are also available from this menu. DYNAMIC Wizard Wizard is the preferred diagnostics tool in the workshop environment, providing a full fault history and verbal descriptions of each flash and associated servicing code. If after analyzing the data, the condition cannot be diagnosed, it is possible to print or save a Status Report for further analysis or distribution to a service center. 28 GBK80260 : Issue 1 – 1/07/2004 5.3 Flash Codes Flash codes indicate the nature of an abnormal condition directly from the SHARK Information Gauge. Without the use of any servicing tools, the condition can be simply diagnosed. Flash Code Description Possible stall timeout or user error. 1 User Fault Release the joystick to neutral and try again. Check the batteries and cabling. 2 Battery Fault Try charging the batteries. Batteries may require replacing. 3 Left Motor Fault Check the left motor, connections and cabling. 4 Right Motor Fault Check the right motor, connections and cabling. 5 Left Park Brake Fault Check the left park brake, connections and cabling. 6 Right Park Brake Fault Check the right park brake, connections and cabling. 7 SHARK Control Unit Fault Check the SHARK Communications Bus connections and wiring. Replace the Control Unit. 8 9 SHARK Power Module Fault SHARK Communications Fault Check SHARK connections and wiring. Replace the Power Module. Check SHARK connections and wiring. Replace the SHARK Control Unit. Check all connections and wiring. 10 Unknown Fault Consult a service agent. Wrong type of Control Unit connected. 11 Incompatible Control Unit Ensure the branding of the Power Module matches that of the Control Unit. Chapter 5 : Diagnostics 29 THIS PAGE IS LEFT BLANK INTENTIONALLY 30 GBK80260 : Issue 1 – 1/07/2004 6 Physical Specifications Parameter SHARK Control Unit Material Plastic Finish Protection Rating IPx4 Shipping Weight 460g Force required to operate joystick 800 grams Min Nominal Operating Temperature Range Operating Temperature Range – SHARK Programming Adapter Storage Temperature Range Operating Humidity Range Max Units -25 50 °C 0 50 °C -40 0 65 90 °C %RH Chapter 6 : Specifications 31 THIS PAGE IS LEFT BLANK INTENTIONALLY 32 GBK80260 : Issue 1 – 1/07/2004 Programmable Parameters (details) Units Lowest Forward Speed 5 → 100 % ü ü ü Lowest Turn Speed 5 → 100 % ü ü ü Sleep Timer Off → 30 Min ü ü ü Wakeup Style Button → Joystick or Button - Joystick Throw Normal → Short → Very Short - No → Yes - Field Programmability Limited → Full - Active Drive Program 1 → 3 → DCI Select 1+2 ( * If set to DCI Select 1+2, it can not be edited with the HHP) - 50 → 100 % Parameter Hand Held Programmer Values SHARK Support Tool – OEM 7.1 SHARK Support Tool – Enh. Dealer Appendices SHARK Support Tool – Dealer 7 Chair Set Up Lock Enable Emergency Deceleration ü ü ü ü ü ü ü ü ü ü T* ü ü ü ü Chapter 7 : Appendices 33 SHARK Support Tool – Dealer SHARK Support Tool – Enh. Dealer SHARK Support Tool – OEM Hand Held Programmer Parameter O O ü Values Units Single → Dual - Software Current Limit 10 → 60 Amps ü Stall Timeout 0 → 60 Sec ü -10 → 10 % 15-character description - Maximum Forward Speed 30 → 100 % Forward Acceleration 20 → 90 Forward Deceleration Parkbrake Type ü ü ü O O ü ü ü ü ü % ü ü ü ü 30 → 100 % ü ü ü ü Maximum Reverse Speed 30 → 100 % ü ü ü ü Reverse Acceleration 20 → 90 % ü ü ü ü Reverse Deceleration 30 → 100 % ü ü ü ü Maximum Turn Speed 10 → 90 % ü ü ü ü Turn Acceleration 10 → 90 % ü ü ü ü Turn Deceleration 20 → 100 % ü ü ü ü Tremor Damping 10 → 100 % ü ü ü ü Veer Compensation ü Drive Programs Drive Program Name 34 GBK80260 : Issue 1 – 1/07/2004 SHARK Support Tool – OEM SHARK Support Tool – Enh. Dealer Units Hand Held Programmer SHARK Support Tool – Dealer Values Stability Profile 1→8 - T Traction 0 → 50 % ü 15-character description - ü Max Speed in Turn 5 → 100 % ü Speed Acceleration Scalar 0 → 200 % ü Turn Acceleration Scalar 0 → 200 % ü Turn at Max Speed 5 → 100 % ü Turn Acceleration at Max Speed 100 → 300 % ü Traction at Max Speedpot 0 → 50 % ü No → Yes - ü Parameter ü ü ü ü Stability Profiles Stability Profile Name FWD/RWD Swivel ü Editable at this level O Viewable at this level T Editable by HHP in Technician Mode only Chapter 7 : Appendices 35 7.2 Accessories + Parts List Dynamic SHARK Installation Manuals Part Description DCL Part # Qty/Unit Dynamic SHARK DK-PMA Installation Manual GBK80262 1 Dynamic SHARK DK-PMB Installation Manual GBK80537 1 Dynamic SHARK DK-REMA (2 Button Remote) Installation Manual (This Manual) GBK80260 1 Dynamic SHARK DK-REMB (3 Button Remote) Installation Manual GBK80261 1 Dynamic SHARK Programming Accessories Part Description DCL Part # Qty/Unit Dynamic SHARK Programming Adapter DK-ADAPT 1 Wizard 5 Kit – Programming Kit Contains software, cables and adapter (no dongle) DWIZ5-KIT 1 Wizard 5 – Software Only (CD) DWIZ5-SW 1 Wizard Dongle – OEM or Dealer version (Parallel Port) DWD-OEM or DWD-DLR 1 Wizard Dongle – OEM or Dealer version (USB) DWD-OEM-U or DWD-DLR-U 1 DX Hand Held Programmer DX-HHP 1 36 GBK80260 : Issue 1 – 1/07/2004 Dynamic SHARK Looms – For DK-REMA & DK-PMA Power Module Chapter 7 : Appendices 37 Ê Motor Loom (700mm) Part Description DCL Part # Qty/Unit Preferred Option Motor Loom – Left Keyed (700mm) GSM61191P 1 Motor Loom – Right Keyed (700mm) GSM61192P 1 Motor Loom – Left Unkeyed (700mm) GSM61191 1 Motor Loom – Right Unkeyed (700mm) GSM61192 1 Part Description DCL Part # Qty/Unit Battery Loom (500mm) GSM80204 1 or Ë Battery Loom (500mm) 38 GBK80260 : Issue 1 – 1/07/2004 Ì Battery Extension Loom (300mm) Part Description DCL Part # Qty/Unit Battery Extension Loom (300mm) GSM80200 1 Í DCI Loom (300mm) – For DK-PMA Power Module Part Description DCL Part # Qty/Unit DCI Loom (300mm) GSM80205 1 Î SHARK Control Unit Extension Cable Part Description DCL Part # Qty/Unit SHARK Control Unit Extension Cable (1200mm) GSM80232 1 SHARK Control Unit Extension Cable (900mm) GSM80231 1 SHARK Control Unit Extension Cable (640mm) GSM80211 1 SHARK Control Unit Extension Cable (300mm) GSM80203 1 Chapter 7 : Appendices 39 Dynamic SHARK Connector Kits and Adapters – DK-PMA Power Module Shown 40 GBK80260 : Issue 1 – 1/07/2004 Ï Motor & Battery Connector Kit Item A B C D E Fa Fb Fc Part Description DCL Part # Qty/Unit Battery Connector Housing Battery Spade Receptacle Innergy Contact - Female Positronic Contact – Female Connector Boot (not shown) Either Motor Connector Housing – Unkeyed GME80016 GCN8002 GCN0781 GCN0794 GCN0787 1 2 4 4 3 GCN0790 2 GCN60146 1 GCN60147 1 Or Left Motor Connector Housing – Keyed Right Motor Connector Housing – Keyed (pictured) Ð Single Motor Connector Kit Item A B C Da – Unkeyed (GSM80210) or – Keyed (GSM80209) – Unkeyed (GSM60182) or – Keyed Left (GSM60182PL) or – Keyed Right (GSM60182PR) Part Description DCL Part # Qty/Unit Innergy Contact – Female Positronic Contact – Female Connector Boot (not shown) Either Motor Connector Housing – Unkeyed GCN0781 GCN0794 GCN0787 2 2 1 GCN0790 1 Db Or Left Motor Connector Housing – Keyed GCN60146 1 Dc Or Right Motor Connector Housing GCN60147 – Keyed 1 Chapter 7 : Appendices 41 Ñ Battery Connector Kit – GSM80208 Item Part Description A B C Battery Connector Housing Battery Spade Receptacle Connector Boot (not shown) DCL Part # Qty/Unit GME80016 GCN8002 GCN0787 1 2 1 Ò Drive Control Input (DCI) Connector Kit for DK-PMA Power Module– GSM80206 Item Part Description A DCI Connector Housing DCL Part # Qty/Unit GCN8001 1 GCN0687 4 (AMP MateNlok Mini 4w Hse #172167-1) B DCI Pins 26-22 AWG Ó Beau Chair to SHARK Controller Adapter (300mm) Part Description DCL Part # Beau Chair to SHARK Controller Adapter Loom (300mm) GSM80202 Qty/Unit 1 DX Batteries to SHARK Controller Adapter Loom (175mm) Part Description DCL Part # Qty/Unit DX Batteries to SHARK Controller Adapter Loom (175mm) GSM80201 1 42 GBK80260 : Issue 1 – 1/07/2004 7.3 Intended Use and Regulatory Statement Intended Use The Shark Control Unit and Power Module are intended to provide speed and direction control for small or medium sized power wheelchair systems utilizing dual DC motors and integrated park-brakes. The intended power source is a 24V battery. The SHARK controller will respond to user input demand via the joystick input, in terms of speed and direction. The wheelchair manufacturers are provided with all the integration, set-up, operating environment, test and maintenance information needed in order to ensure reliable and safe use of the controller. Device Classification Europe The SHARK Controller is a component of a Class I medical device as detailed in the Council Directive 93/42/EEC concerning Medical Devices. USA The SHARK Controller is a component of a Class II medical device (Powered Wheelchair) as detailed in 21 CFR § 890.3860. Compliance and Conformance with Standards In accordance with the device classification, the SHARK wheelchair controller is designed to comply with the requirements of the European Medical Device Directive 93/42/EEC and 21 CFR § 820.30. The SHARK Controller has been designed such that the combination of the wheelchair and the SHARK Controller, along with accessories as applicable, complies with the requirements of the MDD Harmonized standards EN12184 and EN12182 and the FDA Consensus standard ISO 7176 for performance. However, final compliance of the complete wheelchair system with international and national standards is the responsibility of the wheelchair manufacturer or installer. SHARK Programming Adapter The Shark programming adapter is intended to allow the Shark Controller series of power wheelchair controllers to communicate with the DX Hand Held Programmer and the SHARK Support Tool. The adapter is not intended to alter the controller in any way, but simply passes information to and from the controller. The information passed may alter the controller performance. The intended power source is a 24V battery supply from the Shark controller. The intended environment is indoors, or outdoors in dry conditions. Chapter 7 : Appendices 43 7.4 Maintenance 1. All vehicle components should be regularly checked for loose, damaged or corroded connectors, terminals, or cabling. All cables should be restrained to protect them from damage. Damaged components should be replaced. 2. All switchable functions on the Dynamic electronics system should be regularly tested to ensure they function correctly. 3. All Dynamic electronic components should be kept free of dust, dirt and liquids. If necessary, wipe with a cloth dampened with warm water. Do not use solvents or abrasive cleaners. 4. There are no user-serviceable parts in any Dynamic electronic component. Do not attempt to open any case, or undertake any repairs, or warranty claims will be affected. 5. Where any doubt exists, consult your nearest service center or agent. Warning: If any component is damaged in any way, or if internal damage may have occurred (for example by being dropped), have it checked by qualified personnel before operating. 44 GBK80260 : Issue 1 – 1/07/2004 7.5 Warranty All equipment supplied by Dynamic Controls is warranted by the company to be free from faulty materials or workmanship. If any defect is found within the warranty period, the company will repair the equipment, or at its discretion, replace the equipment without charge for materials and labor. This Warranty is subject to the provisions that the equipment: • has been thoroughly checked upon completion of installation, and all programmable options correctly adjusted for safe operation prior to use. • has been correctly installed. • has been used solely in accordance with this manual. • has been properly connected to a suitable power supply in accordance with this manual. • has not been subjected to misuse or accident, or been modified or repaired by any person other than someone authorized by Dynamic Controls. • has been used solely for the driving of electrically powered wheelchairs in accordance with the wheelchair manufacturer's recommendations. Chapter 7 : Appendices 45 7.6 Safety and Misuse Warnings Warnings to be included in the User Manual The following warnings are applicable to the installer and must be passed on to the end-user before use of the product. • Do not install, maintain or operate this equipment without reading, understanding and following the proper instructions and manuals, otherwise injury or damage can result. • No user-serviceable parts inside. • A warning must be conveyed to the operator that he or she has the responsibility to ensure that the vehicle is kept in a good safe operating condition, and to ensure that components, such as cables, are protected from damage by securing them in optimum positions. • A warning must be conveyed to the operator that the controller could cause the vehicle to come to a sudden stop. In situations where this might affect the safety of the operator, the fitting and wearing of a seat belt is required. • Performance adjustments should only be made by professionals in the health care field or by persons fully conversant with the adjustment process and the operator’s capabilities. Incorrect settings, or programming in an unsafe location, could cause injury to the operator or bystanders, or damage to the vehicle or surrounding property. • Performance adjustments should only be made indoors, or outdoors in dry conditions. • The user should turn the system off before getting in and out of the vehicle. • Do not operate the vehicle if it behaves erratically, or shows abnormal response, heating, smoke or arcing. Turn the system off at once and consult your service agent. • If the vehicle drives without demand, press the Power button. • Ensure that the battery charger used with SHARK is pin-compatible for drive inhibit. Consult your dealer or vehicle manufacturer. • If the vehicle speed surges when going down hill, the common reason is the operation of an over-voltage protective device. When running down hill, the braking energy from the motor is sent to the battery, which charges it. However, if the battery is fully charged, it cannot accept the generated energy without dramatically increasing its voltage. If this over-voltage condition were allowed to continue, there would be a risk of damage to the battery or an explosion. To prevent these risks, the controller forces the vehicle to slow down until the battery voltage drops to a safe level, after which it allows the vehicle to speed up again. To prevent speed surging with charged batteries, we advise operators to descend hills slowly. • No connector pins should be touched, because contamination or damage due to electrostatic discharge might result. • The controller should not be stored or operated outside of the minimum or maximum temperature ranges specified in this manual. 46 GBK80260 : Issue 1 – 1/07/2004 • Most electronic equipment is influenced by radio frequency interference (RFI). Caution should be exercised with regard to the use of portable communications equipment in the area around such equipment. While Dynamic Controls has made every effort to ensure that RFI does not cause problems, very strong signals could still cause a problem. It is the responsibility of the vehicle manufacturer to ensure that the vehicle is tested in accordance with local EMC regulations. • If RFI causes erratic behavior, turn the vehicle off immediately. Turn the vehicle off before using cell phones or portable communications devices. • In the event of the fault indicator flashing while driving, the operator must ensure that the system is behaving normally. If not, the system must be turned off and a service agent contacted. • Report any malfunctions immediately to your service agent. Service and Configuration Warnings The following warnings are applicable to the installation technician only. • After the vehicle has been configured, check to make sure the vehicle performs to the specifications entered in the programming procedure. If the vehicle does not perform to specifications, reprogram it. Repeat this procedure until the vehicle performs to specifications. If the intended operation cannot be achieved, contact your service agent. • The completed installation must be thoroughly checked, and all programmable options correctly adjusted, for safe operation prior to use. Chapter 7 : Appendices 47 7.7 Electromagnetic Compatibility (EMC) Dynamic Electronic Controllers have been tested on typical vehicles to confirm compliance with the following appropriate EMC standards: USA: ANSI/RESNA WC/Vol:2 - 1998 Sec 21 Europe: EN12184:1999 Sec 9.8.1-3 National and international directives require confirmation of compliance on particular vehicles. Since EMC is dependant on a particular installation, each variation must be tested. The guidelines in this section are written to assist with meeting EMC requirements. Minimizing Emissions Motors: Motor brushes generate electromagnetic emissions. It may be necessary to fit capacitors between the brush holders and motor case. Ensure the leads are kept as short as possible. A suitable capacitor is 4n7, 250V Polypropylene. Wiring: Keep wire lengths as short as practical for a tidy layout. Minimize any wire loops, particularly loops of single wires as opposed to wire pairs. Endeavor to run wires in pairs or bunches. Where practical, tie cables to wheelchair frame. Immunity to Radiated Fields Follow the wiring recommendations for minimizing emissions. Immunity to ESD Follow the wiring recommendations for minimizing emissions. Ensure all vehicle sub-frames are electrically connected. Do not leave connections unnecessarily exposed. 48 GBK80260 : Issue 1 – 1/07/2004 CONTROLLER POWER MODULE OWNER'S MANUAL Hydra Folding Power Wheelchair September 2004. All prices quoted are GST exempt & exclude delivery. All information, including pricing and specifications, subject to change without prior notice. Photographs are for illustration purposes only & may vary from product depiction. Invacare®, and Yes, you can., are trademarks of Invacare Corporation. © 2001 Invacare Corporation. Invacare Australia. 1 Lenton Place North Rocks NSW 2151 , Australia. Phone (02) 8839 5333. Fax (02) 8839 5353 Installation Manual DK-PMA SHARK Power Module by GBK80262 Issue 1, June 2004 About this Manual This manual has been designed to help you install and configure a Dynamic SHARK powerchair control system for a ‘generic’ brand powerchair. For this reason there are no guidelines for specific applications. If there is a specific requirement for your application, please contact Dynamic Controls or one of the sales and service agents, as we can assist you to configure SHARK for this application. Throughout this manual there are a few symbols that will help you quickly identify the purpose of the paragraph that follows: Notes & Precautions: Notes provide supporting information for the previous paragraph or section that should be followed in order to install, configure, and use SHARK safely and efficiently. Warnings: Warnings provide important information for the previous paragraph or section that must be followed in order to install, configure, and use SHARK safely and efficiently. Programming notes: This icon denotes the paragraph refers to the programming of SHARK. SHARK is not user serviceable. Specialized tools are necessary for the repair of any SHARK component. Do not install, maintain or operate this equipment without reading, understanding and following this manual – including the Safety and Misuse Warnings – otherwise injury or damage may result. Due to continuous product improvement Dynamic reserves the right to update this manual. This manual supersedes all previous issues, which must no longer be used. Dynamic reserves the right to change the product without notification. Any attempt to gain access to or in any way abuse the electronic components and associated assemblies that make up the powerchair system renders the manufacturer’s warranty void and the manufacturer free from liability. Dynamic and the Dynamic logo are trademarks of Dynamic Controls. All other brand and product names, fonts, and company names and logos are trademarks or registered trademarks of their respective companies. Dynamic owns and will retain all trademark rights and Dynamic or its licensors own and will retain all copyright, trade secret and other proprietary rights, in and to the documentation. All materials contained within this manual, in hard-copy or electronic format, are protected by copyright laws and other intellectual property laws. © Copyright 2004 Dynamic Controls. All rights reserved. Contents 1 Introducing SHARK................................................. 1 2 Introducing SHARK Power Modules ..................... 3 3 Installation and Testing .......................................... 5 3.1 3.2 3.3 4 Programming the DK-PMA ................................... 17 4.1 4.2 5 Introduction............................................................................... 19 Diagnostics Tools ..................................................................... 20 Specifications........................................................ 21 6.1 6.2 7 Introduction............................................................................... 17 DK-PMA Programmable Parameter Descriptions..................... 17 Diagnostics............................................................ 19 5.1 5.2 6 Mounting..................................................................................... 5 Connections and Wiring ............................................................. 6 3.2.1 General Wiring Notes and Recommendations................. 6 3.2.2 Typical Cabling Installation .............................................. 7 3.2.3 Battery Connections ........................................................ 8 3.2.4 Motor and Park Brake Connections ............................... 10 3.2.5 SHARK Communications Bus ....................................... 12 3.2.6 Drive Control Input (DCI) Connections .......................... 13 Testing...................................................................................... 15 Electrical Specifications............................................................ 21 Physical Specifications ............................................................. 22 Appendices............................................................ 23 7.1 7.2 7.3 7.4 7.5 7.6 7.7 7.8 7.9 Programmable Parameters (details)......................................... 23 Accessories + Parts List ........................................................... 25 Intended Use and Regulatory Statement.................................. 32 Maintenance............................................................................. 34 Warranty................................................................................... 35 Safety and Misuse Warnings.................................................... 36 Service and Configuration Warnings ........................................ 37 Electromagnetic Compatibility (EMC) ....................................... 38 Contact Details ......................................................................... 39 Table of Contents 1 Introducing SHARK SHARK heralds the dawn of new thinking in lower cost powerchair control solutions. Using a dedicated power module and control unit, SHARK has none of the compromises that go into the design of one-box controllers - this means more power, unrivalled ergonomics, greater versatility and superior usability. • Featuring Dynamic’s breakthrough “Chair Tamer” technology, meaning unprecedented chair performance, control and safety. • A number of control units are available to meet a wide range of user needs. These range from optimally small, highly ergonomic units to units with a more traditional appearance and standard functionality. • A choice of power modules is also available offering basic ‘drive only’ functionality up through sophisticated modules supporting multiple seat adjustments, lights, etc. • No heavy power cables running from the armrest to the motors and batteries. • No hot surfaces for the user to touch. • A longer and higher current delivery than equivalently rated integral controllers. • Superior EMC performance due to minimized power wiring. Chapter 1 : Introducing SHARK 1 THIS PAGE IS LEFT BLANK INTENTIONALLY 2 GBK80262 : Issue 1 – 1/07/2004 2 Introducing SHARK Power Modules The “DK-PMA” is a 60 Amp Shark Power Module suitable for most drive only applications. • 60 Amps of power for optimal chair driving performance. • “Chair Tamer” technology optimizes Mid and Front Wheel Drive chair performance. • “DCI” connector that enables Shark to control seat swivel, stop and slow down features. • Direct On-Board Battery Charger connection. The physical differences between the SHARK Family Power Modules are described below. A 4 Pin DCI connector is featured on: DK-PMA 60 Amp Drive Only Power Module DK-PMB-01 60 Amp Drive Only + 15 Amp Boost A 12 Pin SHARK Port is featured on: DK-PMB-11 60 Amp Power Module + 15 Amp Boost + 1 Seat Function DK-PMB-21 60 Amp Power Module + 15 Amp Boost + 2 Seat Functions + Lights Chapter 2 : Introducing the Shark Power Modules 3 THIS PAGE IS LEFT BLANK INTENTIONALLY 4 GBK80262 : Issue 1 – 1/07/2004 3 Installation and Testing 3.1 Mounting • The position and orientation should give maximum mechanical protection to the SHARK Power Module. • Mount out of the path of water splashes from wheels or cowling. • Protect the front (connector panel) from direct splashing. • Failure to adhere to the mounting orientations specified might lead to water ingress, which could result in system malfunctions and long-term damage to the unit. • For peak performance, locate SHARK so that air can flow over and around the case. • A position close to the batteries and motor is recommended to reduce the length of high-current wires. • Use both screw positions to attach the SHARK Power Module. M4 (11/64”) x 30mm socket cap screws are recommended. Select a screw length that protrudes between 4mm and 6mm into the case. Do not over tighten the mounting screws. These should be tightened to a torque of 2 Nm (2.7 lb-ft). Regardless of mounting orientation, protect powerchair wiring and connectors from the risk of damage, water splashes and/or water ingress, and route the cabling so that water will not run down into the connector system. The use of cable boots is highly recommended. Do not mount the SHARK Power Module in a position where the user can come into contact with the unit. The case temperature can exceed 41°C. Chapter 5 : Diagnostics 5 3.2 Connections and Wiring SHARK Power Module connections are located along the front panel of the case. 3.2.1 General Wiring Notes and Recommendations. The following notes apply to all wiring on the powerchair. Notes specific to particular component wiring can be found under each component’s designated sub-section (i.e. battery connections). It is the installer’s responsibility to ensure the finished wiring package is safe and fit for purpose. 1. Before making any connections to the controller, disable the powerchair by one of the following means to prevent accidental movement. • Place the battery charger circuit breaker in the open position. • Disconnect the motor or batteries and/or elevate the drive wheels. 2. All wiring should be as short as possible to prevent voltage loss at high current. 3. The type of cable used must be appropriate for the mechanical and environmental abuse it is likely to encounter. 4. Heavy gauge wire is mandatory for high current connections (batteries and motors). For lower current wiring a gauge heavier than required to meet the current carrying requirements is recommended for mechanical robustness. Generally speaking wire gauges smaller than 0.5 mm2 are not recommended because they are not sufficiently robust for this application. Further details can be found in the sections detailing component specific wiring requirements. 5. Wiring should be suitably restrained to prevent snagging and securely fastened to the powerchair frame to ensure there is no strain on the connectors. 6. Take particular care of the routing and securing of wiring on chairs with moving or movable structures, such as seat raise, tilt, recline etc. Such moving structures have the potential to crush and shear wiring, causing potential safety issues. 6 GBK80262 : Issue 1 – 1/07/2004 7. To minimise EMC issues: 3.2.2 • Wiring should be kept as short as possible. • To minimise EMC generating “loops”, pairs of wires should be run together where possible (e.g. run Motor Positive and Motor Negative leads together). • Avoid running wires in close proximity to the motors. Typical Cabling Installation Chapter 5 : Diagnostics 7 Battery Connector Pinout Pin Function 1 2 Battery Positive Battery Negative Motor Connector Pinout Pin Function 1 2 3 4 Motor Positive Motor Negative Park Brake Negative Park Brake Positive SHARK Bus Connector Pinout Pin Function 1 2 3 4 Battery Positive SHARK Communications BUS High SHARK Communications BUS Low Battery Negative Drive Control Input (DCI) Connector Pinout Pin Function 1 2 3 4 3.2.3 Battery Positive DCI Input - - no connection - Battery Negative Battery Connections The Battery connector has two terminals - Battery Positive (+) and Battery Negative ( - ). For a 60 Amp controller, the recommended MINIMUM battery wire size is 6 mm2 for runs of up to 800 mm, increasing by 1.0 mm2 for each additional 400 mm run length. The heavier the wire, the better chair performance will be. The final connection to the Battery Positive (+) terminal should not be made until the wheelchair is completely wired and ready for testing as described in the Testing section. SHARK has been designed to perform optimally with either Lead-Acid or Gel Cell 24 V deep cycle batteries, rated between 20 - 120 Amp hours. 8 GBK80262 : Issue 1 – 1/07/2004 A thermal circuit breaker must be installed between the batteries and the Power Module - as close as possible to the batteries - to protect both the batteries and the system wiring. If the two batteries are permanently wired together (single battery box), the best position for the circuit breaker is between the two batteries. If the batteries are separated (individual battery boxes), each battery requires a circuit breaker. A 30-40 Amp slow-acting, thermal type circuit breaker is suggested. The thermal circuit breaker should have a trip rating no higher than the current limit of the Power Module. Check thoroughly to ensure that it provides the necessary degree of motor protection. Chapter 5 : Diagnostics 9 3.2.4 Motor and Park Brake Connections The SHARK Power Module has two motor connectors – M1 and M2. These are typically Right and Left motor, respectively (see note 4 below). Each motor connector has two motor pins (Positive and Negative), as well as two Park Brake pins (Positive and Negative). The motor connectors are ‘keyed’ so that they cannot be swapped or inserted incorrectly. These notes are in addition to the “General Wiring Notes and Recommendations” described in Section 3.2.1. 1. It is preferred that the left and right motor harnesses – M1 and M2 are of equal length (but also see note 4). 2. For a 60 Amp controller the recommended MINIMUM motor wire size is 3 mm2 for runs of up to 400 mm, increasing by 0.5 mm2 for each additional 200 mm run length. The heavier the wire, the better chair performance will be. 3. The length and gauge of wire effects the wire resistance and hence the optimum Load Compensation setting. Ensure the “Load Compensation” parameter is tuned to match the chair wiring. 4. Left and right motors must not be physically interchangeable. The preferred method to ensure this is to use the polarised motor connectors (Left Motor Connector Housing = GSM61191P, Right Motor Connector Housing = GSM61192P). However, an alternative method to guarantee non-transposable motor wiring can be achieved by providing the exact wire lengths (non equal) required for the left and right motors. If necessary, the motor connections can be swapped when programming SHARK. For this reason, the connectors are not labeled Left and Right, but M1 and M2, as shown. 10 GBK80262 : Issue 1 – 1/07/2004 SHARK supports both 24V and 12V park brake wiring. 24-Volt Park Brake Wiring - Dual If the wheelchair has two 24V Park Brakes (or ‘Dual’), the park brakes are wired as below. For this configuration, the Park Brake setting must be set to ‘DUAL’. 24-Volt Park Brake Wiring - Single Alternatively, two 24V park brakes can be wired in parallel from the M2 connector as below. For this purpose the M2 connector must be used. If the Park Brakes are connected to the M1 connector instead of M2, a Left Park Brake fault (Flash Code 5) will occur. For this configuration, the Park Brake setting must be set to ‘Single’. If set to ‘DUAL’ a Right Park Brake fault (Flash Code 6) will occur. Chapter 5 : Diagnostics 11 12-Volt Park Brake Wiring - Single If the wheelchair has two 12V Park Brakes, the wiring may be driven from just one Park Brake output. If this is the case, the M2 connector must be used. For this configuration, the Park Brake setting must be set to ‘Single’. If set to ‘DUAL’ a Right Park Brake fault (Flash Code 6) will occur. 3.2.5 SHARK Communications Bus The SHARK Power Module communicates to the Control Unit through the SHARK Communications Bus. The Bus also supplies power to the Control Unit. The connector is ‘keyed’ and can only be plugged in one way – the Control Unit symbol on top of the plug should be facing up. 12 GBK80262 : Issue 1 – 1/07/2004 3.2.6 Drive Control Input (DCI) Connections SHARK provides support for an On-board Battery Charger (OBC), an ‘inhibit’, a ‘speed limit’ and a ‘swivel’ function through the Drive Control Input (DCI) socket as shown below. It is recommended that the largest gauge wire supported by the Shark contacts (16 AWG/1.3 mm2) be used. Drive Control Input (DCI) The DCI allows the powerchair speed and configuration to be adjusted depending on the resistance of the DCI “Loop”. The loop can be set to be ‘Off’, ‘Normally Open’ or Normally Closed’. • Inhibit - Prevents the powerchair from driving, typically when the chair is being charged, or when a seat is raised or tilted. • Speed Limit - Automatically limits the drive speed to a preprogrammed value, typically when a seat is raised or tilted and driving too fast may be dangerous. The value to which it slows down is programmable. • Swivel – Automatically swaps the drive motor polarities when the powerchair swaps (or swivels) between front and rear wheel drive. When the ‘Active Drive Program’ is set to ‘DCI Input 1+2’, Swivel will change into a ‘Drive Program Swap’ mode and will automatically swap from Drive Program 1 to Drive Program 2 whenever the DCI “Swivel” is active. In this case, the motor polarities will not reverse, unless specified within the set up of the Drive Program. To determine the function, an appropriate resistance must be placed across the DCI Input pin ( I ) and the DCI ground ( - ) pin. Depending on the resistance value, SHARK will inhibit, limit or swivel driving. Normal Speed Limit Swivel Swivel + Speed Limit Inhibit Nominal DCI Loop Resistance ( ± 5% ) Resistance (Ω) SHARK Information Gauge 0 (>560)* 120 330 120 + 330 (450 nominal) >560 ( 0 )* - Right GREEN indicator will flash - Right GREEN indicator will flash Right to left chase followed by steady display Chapter 5 : Diagnostics 13 * When DCI Operation is set to Normally Open, Normal and Inhibit functions will be swapped. DCI examples: A powerchair has a seat raise function. A powerchair has a swivel function. SHARK will automatically limit speed to 60% when the seat is raised (S1), and inhibit drive (S2) when the seat is raised above a certain height. SHARK will automatically reconfigure itself for FWD when the seat is swiveled (S1) and limit speed to 80%. When the seat is swiveled: 1. SHARK will automatically change to Drive Program 2, which contains drive settings and a Stability Profile optimized for FWD. 2. SHARK will limit speed to 80%. When the OBC is plugged into a power socket, an inhibit switch internal to the OBC will close (0 resistance), inhibiting drive. DCI Operation Normally Closed DCI Operation Normally Open DCI Speed Limit 60% DCI Speed Limit 80% Active Drive Program Drive Program 1 Active Drive Program DCI Input 1+2 The switch configuration must ensure that driving is inhibited when the chair is being charged, or when the chair/seat is in an undefined position (i.e. partially swiveled). 14 GBK80262 : Issue 1 – 1/07/2004 The DCI function can be enabled and disabled. Additionally, the speed to which the chair reduces while in Speed Limit can also be set. OBCs have either normally closed or normally open Inhibit outputs. By setting the DCI Operation parameter to Normally Open, SHARK will swap the Normal and Inhibit values in the above table. An open circuit (>560 ohms) will allow normal drive, while a circuit resistance of 0 will prevent driving. All other values stay the same. Check the documentation that came with your OBC for product specifications. For instance, an OBC that has an open Inhibit contact when the charger is not plugged in should be set to Normally Open. 3.3 Testing To ensure that the powerchair meets a minimum level of safety, the following procedure should be. This procedure should be carried out in a spacious environment and with due regard to any possible unexpected powerchair movement in the event of faulty installation. 1. Raise the wheels off the ground using blocks under the powerchair frame so that the wheels can turn freely. 2. Recheck all wiring, paying particular attention to polarities of batteries, motors and park brakes. 3. Make the final connection to the Battery Positive (+) terminal and close the circuit breakers. 4. Press the Power button to turn SHARK on. Ensure it turns on correctly. 5. Press the Power button again to turn SHARK off. Ensure it turns off correctly. Press the power button again to turn SHARK back on. 6. Ensure the horn is functioning correctly by pressing the Horn button. 7. Turn each drive wheel by hand to check that the park brakes are engaged. The wheels should not move. 8. Push the joystick slightly out of neutral and listen for the “click” as the park brakes disengage. Chapter 5 : Diagnostics 15 16 9. Move the joystick in all directions and ensure that the wheels respond smoothly and in the correct direction. 10. Release the joystick to neutral and listen for the click of the park brakes re-engaging. 11. Turn off SHARK and remove the blocks from under the powerchair. 12. Turn SHARK back on and turn the speed dial to the lowest speed setting (fully counter-clockwise). 13. Sit in the powerchair and drive in all directions slowly, checking for precise and smooth control. 14. Repeat at higher speeds. 15. Drive the wheelchair on a 1 : 6 ramp and check for normal power, smoothness and parking. GBK80262 : Issue 1 – 1/07/2004 4 Programming the DK-PMA Performance adjustments should only be made by professionals in the health care field or by persons fully conversant with the adjustment process and the operator’s capabilities. Incorrect settings or programming in an unsafe location could cause injury to the operator or bystanders, or damage to the vehicle or surrounding property. After the vehicle has been configured, check to make sure the vehicle performs to the specifications entered in the programming procedure. If the vehicle does not perform to specifications, reprogram it. Repeat this procedure until the vehicle performs to specifications. If the intended operation cannot be achieved, contact your service agent. 4.1 Introduction SHARK is fully programmable to provide superb performance for a wide variety of powerchair configurations and users. All programmed values are stored in the Power Module. In the event that the Control Unit is replaced, there is no need to reprogram SHARK. If the Power Module is replaced, SHARK can simply be reprogrammed with an identical powerchair program. 4.2 DK-PMA Programmable Parameter Descriptions Setting Description Defines which of the three available Drive Programs is to be used. If set to DCI Select 1+2, the DCI Swivel function will Active Drive Program change to a Drive Program Swap mode. Activation of the DCI Swivel function will change the Active Drive Program from Drive Program 1 to 2. DCI Operation Defines if the DCI is Off, Normally Open or Normally Closed. See Section 3.2.6 – Drive Control Input (DCI) Connections. DCI Speed Limit Sets the maximum speed that SHARK will drive at when the DCI Speed Limit function is active. Emergency Deceleration Defines the deceleration rate that SHARK will use when a fault is detected. Chapter 5 : Diagnostics 17 Setting Description Park Brake Type Defines whether Single or Dual park brakes are used. See Section 3.2.4 – Motor and Park Brake Connections. Software Current Limit Sets the peak current that SHARK will provide to each motor. Stall Timeout If the Current Limit is exceeded for this amount of time, driving will be disabled and a Flash Code 1 displayed on the SHARK Information Gauge. Release the joystick back to neutral and try again. Use this feature to protect the motors from undue stress. Veer Compensation Compensates for mismatched motors so that moving the joystick directly forward will drive in a straight line. Motor Swap When set to ‘Yes’, the motors (M1 and M2) will be swapped. Left Motor Invert Reverses the polarity of the left motor (M1). For example, a forward command will cause the motor to turn in the reverse direction. Right Motor Invert Reverse the polarity of the right motor (M2). For example, a forward command will cause the motor to turn in the reverse direction. Load Compensation This matches SHARK to the motors. It indicates to SHARK the resistance of the motors so that it can compensate appropriately for adverse driving conditions, for example when going over curbs and ramps. SHARK will not control the chair correctly unless this is set correctly. Max Load Compensation 18 This sets the maximum Load Compensation value that can be selected by the HHP. GBK80262 : Issue 1 – 1/07/2004 5 Diagnostics SHARK is not user serviceable. Specialized tools are necessary for the repair of any SHARK component. 5.1 Introduction An abnormal condition is indicated by a flash code on the Shark Control Unit’s “Information Gauge” (generally the same as the battery gauge). A Flash Code is a sequence of flashes, separated by a pause, followed by a repetition of the sequence. Depending on the severity of the condition, the powerchair may or may not allow driving. In some cases the chair may be allowed to drive but in a reduced speed (‘limp’) mode. Note that joystick OONAPU (Out Of Neutral At Power Up) is not a fault. Simply by removing your hand from the joystick and allowing it to return to the neutral position, the fault will immediately clear. If the condition persists after removing your hand, the joystick may be damaged. Consult a service agent. Flash Description 1 User Fault Possible stall timeout or user error 2 Battery Fault Check the batteries & cabling 3 Left Motor Fault Check the left motor connections & cabling 4 Right Motor Fault Check the right motor connections & cabling 5 Left Park Brake Fault Check the left park brake connections & cabling 6 Right Park Brake Fault Check the right park brake connections & cabling 7 SHARK Control Unit Fault Check the SHARK Communications Bus 8 SHARK Power Module Fault Check the SHARK connections & wiring 9 SHARK Communications Fault Check the SHARK connections & wiring 10 Unknown Fault Check all connections & wiring 11 Incompatible Control Unit Wrong type of Control Unit Connected Chapter 5 : Diagnostics 19 5.2 Diagnostics Tools While SHARK indicates the abnormal condition, a hand held programmer or the PC-based SHARK Support Tool will provide more detailed information on the fault. Hand Held Programmer Plugging a hand held programmer into the SHARK Control Unit when an abnormal condition exists will cause the fault to be displayed. A 4-digit code will be displayed which indicates the condition. The first two digits provide the flash code number. The second two digits provide more specific diagnostics information that is suitable for repair technicians. DYNAMIC Wizard Wizard is the preferred diagnostics tool in the workshop environment, providing a full fault history and verbal descriptions of each flash and associated servicing code. If after analyzing the data, the condition cannot be diagnosed, it is possible to print or save a Status Report for further analysis or distribution to a service center. 20 GBK80262 : Issue 1 – 1/07/2004 6 Specifications 6.1 Electrical Specifications Parameter Description Compatible Battery Supply 24V supply, 2 x 12V in series, circuit breaker protected, gel cell type of recommended minimum capacity 20 Amp hours. Compatible Motor 24V DC permanent magnet type, typically rated 100-200 watts. Compatible Park Brake Either 2 x 12V connected in series, or 2 x 24V connected in parallel SHARK Programming Adapter For use only with SHARK, DX-HHP and SHARK Support Tool. Min Nominal Max Units SHARK Operating Voltage ( Vbatt ) 18 24 32 Volts Reverse Supply Voltage -32 Volts Current Rating • Peak (<60 secs @ 20°C initial) 55 60 • Continuous (@ 20°C ambient) 13 15 63 Amps Amps SHARK Park Brake Output • Voltage Vbatt – 1.2 • Current 0.6 Quiescent Current (idle) Vbatt 0.7 120 Volts Amps 150 mAmps Drive Control Input • Output Current 8 15 mAmps • Working Input Resistance 0 ∞ Ohms • Maximum Input Voltage Range 0 50 Volts 0 38 Volts 8 12 (RMS) Amps 8 12 (RMS) Amps 5 Amps SHARK Communications Bus • SBHi, SBLo Voltage Range • Max Output Current (SBB+) Controller Battery Charger Max Current Power Module OBC Max Current Chapter 6 : Specifications 21 6.2 Physical Specifications Parameter SHARK Power Module Material Die cast Aluminum Finish Powder coated “Rolling Thunder” (Charcoal/Silver) Protection Rating IPx4 Shipping Weight 960g Min Operating Temperature Range Operating Temperature Range – SHARK Programming Adapter Storage Temperature Range Operating Humidity Range 22 GBK80262 : Issue 1 – 1/07/2004 Nominal Max Units -25 50 °C 0 50 °C -40 65 °C 0 90 %RH Parameter Values Units Field Programmability Limited → Full - Active Drive Program 1 → 3 → DCI Select 1+2 ( * If set to DCI Select 1+2, it can not be edited with the HHP) - Off → Normally Open → Normally Closed - DCI Speed Limit 0 → 100 % Emergency Deceleration 50 → 100 % Single → Dual - Software Current Limit 10 → 60 Amps Stall Timeout 0 → 60 Sec SHARK Support Tool – OEM Programmable Parameters (details) SHARK Support Tool – Enh. Dealer 7.1 SHARK Support Tool – Dealer Appendices Hand Held Programmer 7 Chair Set Up DCI Operation Parkbrake Type T* O O Chapter 7 : Appendices 23 Parameter Values Units Hand Held Programmer SHARK Support Tool – Dealer SHARK Support Tool – Enh. Dealer SHARK Support Tool – OEM Veer Compensation -10 → 10 % Motor Swap No → Yes - Left Motor Invert No → Yes - Right Motor Invert No → Yes - 0 → 1000 (limited to Maximum Load Compensation) mΩ T 0 → 1000 mΩ Drive Programs Load Compensation Maximum Load Compensation 24 Editable at this level O Viewable at this level T Editable by HHP in Technician Mode only GBK80262 : Issue 1 – 1/07/2004 7.2 Accessories + Parts List Dynamic SHARK Installation Manuals Part Description DCL Part # Qty/Unit Dynamic SHARK DK-PMA Installation Manual (This Manual) GBK80262 1 Dynamic SHARK DK-PMB Installation Manual GBK80537 1 Dynamic SHARK DK-REMA (2 Button Remote) Installation Manual GBK80260 1 Dynamic SHARK DK-REMB (3 Button Remote) Installation Manual GBK80261 1 Dynamic SHARK Programming Accessories Part Description DCL Part # Qty/Unit Dynamic SHARK Programming Adapter DK-ADAPT 1 Wizard 5 Kit – Programming Kit Contains software, cables and adapter (no dongle) DWIZ5-KIT 1 Wizard 5 – Software Only (CD) DWIZ5-SW 1 Wizard Dongle – OEM or Dealer version (Parallel Port) DWD-OEM or DWD-DLR 1 Wizard Dongle – OEM or Dealer version (USB) DWD-OEM-U or DWD-DLR-U 1 DX Hand Held Programmer DX-HHP 1 Chapter 7 : Appendices 25 Dynamic SHARK DK-PMA Looms 26 GBK80262 : Issue 1 – 1/07/2004 Motor Loom (700mm) Part Description DCL Part # Qty/Unit Preferred Option Motor Loom – Left Keyed (700mm) GSM61191P 1 Motor Loom – Right Keyed (700mm) GSM61192P 1 Motor Loom – Left Unkeyed (700mm) GSM61191 1 Motor Loom – Right Unkeyed (700mm) GSM61192 1 Part Description DCL Part # Qty/Unit Battery Loom (500mm) GSM80204 1 or Battery Loom (500mm) Chapter 7 : Appendices 27 Battery Extension Loom (300mm) Part Description DCL Part # Qty/Unit Battery Extension Loom (300mm) GSM80200 1 Part Description DCL Part # Qty/Unit DCI Loom (300mm) GSM80205 1 DCI Loom (300mm) SHARK Control Unit Extension Cable 28 Part Description DCL Part # Qty/Unit SHARK Control Unit Extension Cable (1200mm) GSM80232 1 SHARK Control Unit Extension Cable (900mm) GSM80231 1 SHARK Control Unit Extension Cable (640mm) GSM80211 1 SHARK Control Unit Extension Cable (300mm) GSM80203 1 GBK80262 : Issue 1 – 1/07/2004 Dynamic SHARK Connector Kits and Adapters Chapter 7 : Appendices 29 Motor & Battery Connector Kit Item A B C D E Fa Fb Fc Part Description DCL Part # Qty/Unit Battery Connector Housing Battery Spade Receptacle Innergy Contact - Female Positronic Contact – Female Connector Boot (not shown) Either Motor Connector Housing – Unkeyed GME80016 GCN8002 GCN0781 GCN0794 GCN0787 1 2 4 4 3 GCN0790 2 GCN60146 1 GCN60147 1 Or Left Motor Connector Housing – Keyed Right Motor Connector Housing – Keyed (pictured) Single Motor Connector Kit Item – Unkeyed (GSM60182) or – Keyed Left (GSM60182PL) or – Keyed Right (GSM60182PR) Part Description DCL Part # Innergy Contact – Female Positronic Contact – Female Connector Boot (not shown) Either Motor Connector Housing – Unkeyed GCN0781 GCN0794 GCN0787 2 2 1 GCN0790 1 Db Or Left Motor Connector Housing – Keyed GCN60146 1 Dc Or Right Motor Connector Housing – Keyed GCN60147 1 A B C Da 30 – Unkeyed (GSM80210) or – Keyed (GSM80209) GBK80262 : Issue 1 – 1/07/2004 Qty/Unit Battery Connector Kit – GSM80208 Item A B C Part Description DCL Part # Qty/Unit Battery Connector Housing Battery Spade Receptacle Connector Boot (not shown) GME80016 GCN8002 GCN0787 1 2 1 Drive Control Input (DCI) Connector Kit – GSM80206 Item Part Description A DCI Connector Housing DCL Part # Qty/Unit GCN8001 1 GCN0687 4 (AMP MateNlok Mini 4w Hse #172167-1) B DCI Pins 26-22 AWG ➓ Beau Chair to SHARK Controller Adapter (300mm) Part Description DCL Part # Qty/Unit Beau Chair to SHARK Controller Adapter Loom (300mm) GSM80202 1 DX Batteries to SHARK Controller Adapter Loom (175mm) Part Description DCL Part # Qty/Unit Chapter 7 : Appendices 31 DX Batteries to SHARK Controller Adapter Loom (175mm) 7.3 GSM80201 1 Intended Use and Regulatory Statement Intended Use The Shark Control Unit and Power Module are intended to provide speed and direction control for small or medium sized power wheelchair systems utilizing dual DC motors and integrated park-brakes. The intended power source is a 24V battery. The SHARK controller will respond to user input demand via the joystick input, in terms of speed and direction. The wheelchair manufacturers are provided with all the integration, set-up, operating environment, test and maintenance information needed in order to ensure reliable and safe use of the controller. Device Classification Europe The SHARK Controller is a component of a Class I medical device as detailed in the Council Directive 93/42/EEC concerning Medical Devices. USA The SHARK Controller is a component of a Class II medical device (Powered Wheelchair) as detailed in 21 CFR § 890.3860. Compliance and Conformance with Standards In accordance with the device classification, the SHARK wheelchair controller is designed to comply with the requirements of the European Medical Device Directive 93/42/EEC and 21 CFR § 820.30. The SHARK Controller has been designed such that the combination of the wheelchair and the SHARK Controller, along with accessories as applicable, complies with the requirements of the MDD Harmonized standards EN12184 and EN12182 and the FDA Consensus standard ISO 7176 for performance. However, final compliance of the complete wheelchair system with international and national standards is the responsibility of the wheelchair manufacturer or installer. SHARK Programming Adapter 32 GBK80262 : Issue 1 – 1/07/2004 The Shark programming adapter is intended to allow the Shark Controller series of power wheelchair controllers to communicate with the DX Hand Held Programmer and the SHARK Support Tool. The adapter is not intended to alter the controller in any way, but simply passes information to and from the controller. The information passed may alter the controller performance. The intended power source is a 24V battery supply from the Shark controller. The intended environment is indoors, or outdoors in dry conditions. Chapter 7 : Appendices 33 7.4 Maintenance 1. All vehicle components should be regularly checked for loose, damaged or corroded connectors, terminals, or cabling. All cables should be restrained to protect them from damage. Damaged components should be replaced. 2. All switchable functions on the Dynamic electronics system should be regularly tested to ensure they function correctly. 3. All Dynamic electronic components should be kept free of dust, dirt and liquids. If necessary, wipe with a cloth dampened with warm water. Do not use solvents or abrasive cleaners. 4. There are no user-serviceable parts in any Dynamic electronic component. Do not attempt to open any case, or undertake any repairs, or warranty claims will be affected. 5. Where any doubt exists, consult your nearest service center or agent. Warning: If any component is damaged in any way, or if internal damage may have occurred (for example by being dropped), have it checked by qualified personnel before operating. 34 GBK80262 : Issue 1 – 1/07/2004 7.5 Warranty All equipment supplied by Dynamic Controls is warranted by the company to be free from faulty materials or workmanship. If any defect is found within the warranty period, the company will repair the equipment, or at its discretion, replace the equipment without charge for materials and labor. This Warranty is subject to the provisions that the equipment: • has been thoroughly checked upon completion of installation, and all programmable options correctly adjusted for safe operation prior to use. • has been correctly installed. • has been used solely in accordance with this manual. • has been properly connected to a suitable power supply in accordance with this manual. • has not been subjected to misuse or accident, or been modified or repaired by any person other than someone authorized by Dynamic Controls. • has been used solely for the driving of electrically powered wheelchairs in accordance with the wheelchair manufacturer's recommendations. Chapter 7 : Appendices 35 7.6 Safety and Misuse Warnings Warnings to be included in the User Manual The following warnings are applicable to the installer and must be passed on to the end-user before use of the product. • Do not install, maintain or operate this equipment without reading, understanding and following the proper instructions and manuals, otherwise injury or damage can result. • No user-serviceable parts inside. • A warning must be conveyed to the operator that he or she has the responsibility to ensure that the vehicle is kept in a good safe operating condition, and to ensure that components, such as cables, are protected from damage by securing them in optimum positions. • A warning must be conveyed to the operator that the controller could cause the vehicle to come to a sudden stop. In situations where this might affect the safety of the operator, the fitting and wearing of a seat belt is required. • Performance adjustments should only be made by professionals in the health care field or by persons fully conversant with the adjustment process and the operator’s capabilities. Incorrect settings, or programming in an unsafe location, could cause injury to the operator or bystanders, or damage to the vehicle or surrounding property. • Performance adjustments should only be made indoors, or outdoors in dry conditions. • The user should turn the system off before getting in and out of the vehicle. • Do not operate the vehicle if it behaves erratically, or shows abnormal response, heating, smoke or arcing. Turn the system off at once and consult your service agent. • If the vehicle drives without demand, press the Power button. • Ensure that the battery charger used with SHARK is pin-compatible for drive inhibit. Consult your dealer or vehicle manufacturer. • If the vehicle speed surges when going down hill, the common reason is the operation of an over-voltage protective device. When running down hill, the braking energy from the motor is sent to the battery, which charges it. However, if the battery is fully charged, it cannot accept the generated energy without dramatically increasing its voltage. If this over-voltage condition were allowed to continue, there would be a risk of damage to the battery or an explosion. To prevent these risks, the controller forces the vehicle to slow down until the battery voltage drops to a safe level, after which it allows the vehicle to speed up again. To prevent speed surging with charged batteries, we advise operators to descend hills slowly. • No connector pins should be touched, because contamination or damage due to electrostatic discharge might result. • The controller should not be stored or operated outside of the minimum or maximum temperature ranges specified in this manual. 36 GBK80262 : Issue 1 – 1/07/2004 • Most electronic equipment is influenced by radio frequency interference (RFI). Caution should be exercised with regard to the use of portable communications equipment in the area around such equipment. While Dynamic Controls has made every effort to ensure that RFI does not cause problems, very strong signals could still cause a problem. It is the responsibility of the vehicle manufacturer to ensure that the vehicle is tested in accordance with local EMC regulations. • If RFI causes erratic behavior, turn the vehicle off immediately. Turn the vehicle off before using cell phones or portable communications devices. • In the event of the fault indicator flashing while driving, the operator must ensure that the system is behaving normally. If not, the system must be turned off and a service agent contacted. • Report any malfunctions immediately to your service agent. 7.7 Service and Configuration Warnings The following warnings are applicable to the installation technician only. • After the vehicle has been configured, check to make sure the vehicle performs to the specifications entered in the programming procedure. If the vehicle does not perform to specifications, reprogram it. Repeat this procedure until the vehicle performs to specifications. If the intended operation cannot be achieved, contact your service agent. • The completed installation must be thoroughly checked, and all programmable options correctly adjusted, for safe operation prior to use. Chapter 7 : Appendices 37 7.8 Electromagnetic Compatibility (EMC) Dynamic Electronic Controllers have been tested on typical vehicles to confirm compliance with the following appropriate EMC standards: USA: ANSI/RESNA WC/Vol:2 - 1998 Sec 21 Europe: EN12184:1999 Sec 9.8.1-3 National and international directives require confirmation of compliance on particular vehicles. Since EMC is dependant on a particular installation, each variation must be tested. The guidelines in this section are written to assist with meeting EMC requirements. Minimizing Emissions Motors: Motor brushes generate electromagnetic emissions. It may be necessary to fit capacitors between the brush holders and motor case. Ensure the leads are kept as short as possible. A suitable capacitor is 4n7, 250V Polypropylene. Wiring: Keep wire lengths as short as practical for a tidy layout. Minimize any wire loops, particularly loops of single wires as opposed to wire pairs. Endeavor to run wires in pairs or bunches. Where practical, tie cables to wheelchair frame. Immunity to Radiated Fields Follow the wiring recommendations for minimizing emissions. Immunity to ESD Follow the wiring recommendations for minimizing emissions. Ensure all vehicle sub-frames are electrically connected. Do not leave connections unnecessarily exposed. 38 GBK80262 : Issue 1 – 1/07/2004 ® Invacare Australia 1 Lenton Place North Rocks NSW 2151 Australia For your local Invacare Distributor Phone: (02) 8839 5333 Fax: 02 8839 5353 www.invacare.com.au email: [email protected] All information, including pricing and specifications, subject to change without prior notice. Photographs are for illustration purposes only & may vary from product depiction. Invacare®, and Yes, you can., are trademarks of Invacare Corporation. © 2001 Invacare Corporation.