1
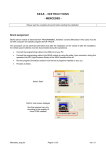
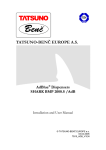
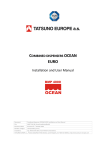
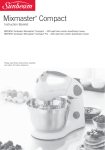
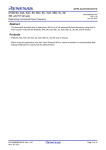
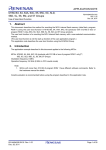
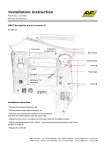
SEAS - INSTRUCTIONS - DAF Please read the complete document before starting the installation Brand assignment SEAS add-on module is delivered NOT PROGRAMMED, therefore a brand (DAF in this case) must be set with computer and specific program SETUP TRUCK This procedure can be achieved both before and after the installation on the vehicle (if after the installation, the vehicle power batteries must be disconnected during the operations). • Connect the programming cable to the USB port of your PC • Connect the programming cable to the SEAS module by using the white 4 pins connector; during this operation the LED (Light Emission Diode) of the SEAS module will be off. • Run the program SimulaCan (select it from the list of programs installed on your pc). • Proceed as follow: m o c . 2 d b o u . w w w Select “Start” Wait for next screen displayed (the time required can vary according to the quantity of virtual COM installed) DAF_eng.doc Pagina 1 di 5 Ver. 0.1 If the connection is successfully achieved (serial communication recognized and accepted) the program will display this page: you can now select DAF brand Select “Send PROG” When the programming operation is completed, the yellow LED on your SEAS module will turn on. • m o c . 2 d b o u . w w w Select “Quit” to close the program SimulaCan Disconnect the programming cable of your SEAS module and place the specific cover on top of the white 4 pins connector. IMPORTANT: the following instructions indicate how to connect and install your SEAS module on the original AdBlue system of the truck. The number displayed and the colour of the conductors of the AdBlue system are referred to DAF 85-410 year 2009, these details may vary according to different production lots or vehicle equipment. Please refer to the schemes/layouts supplied with the DAF technical manual to identify the CANBus line of the AdBlue system, its protection fuse and the power feeding. The main working procedure of SEAS modules does not vary. DAF_eng.doc Pagina 2 di 5 Ver. 0.1 Installation on the vehicle: Before proceeding, please make sure that the following conditions are respected: • NO faulty codes memorized in the original ECU. • AdBlue liquid higher than the reserve level • Vehicle batteries disconnected from the electrical circuit The SEAS module is supplied with 5 conductors: • • Power feeding / activation: RED (+15): BLACK (earth): GREY (+30): to be connected to a 24 Volt source “under key” (24 Volt enabled when the engine key is in ON position); preferably to the same source that enables the AdBlue system working. This connection will supply power to the SEAS module when the engine key is in ON position (dashboard ON). to be connected to an earth available, preferably the same as AdBlue. to be connected to a 24 Volt source always available of AdBlue system, necessarily BETWEEN the E357 protection fuse and the AdBlue system. m o c . 2 d b o u . w w CAN-Bus line connection: The two conductors plaited together must be connected to the CAN-Bus line of the AdBlue system. w WHITE (CAN H): to be connected to CAN H of the system that must be simulated. BROWN (CAN L): to be connected to CAN L of the system that must be simulated. The connections must be made under the box of the connectors locate under the protection cover of radiator (passenger side).The SEAS module can be fixed in a support external, because is completely waterproof; or in the fuse box that communicate on the passenger side. The two wirings of the CAN of the truck coming from the connector 56D; the supply in the connector 9A. The conductor of the ground of AdBlue have the number 9136, but is possible use another ground conductor can be find with a multimeter. The 5 conductors of SEAS module must be soldered to the 5 conductors of the AdBlue system. SEAS Module DAF AdBlue system Notes Colour Notes Connector / PIN Colour / number CAN L BROWN CAN L 56D - 13 Yellow / 3780-C CAN H WHITE CAN H 56D – 14 Red / 3781-C Activation (+30) GREY 24 Volt always available (+30) between E357 and AdBlue 9A - 6 - / 1640 24V under key (+15) RED 24V UNDER KEY (+15) 9A - 5 - / 1380 Earth Black Earth - to identification - / 9136 DAF_eng.doc Pagina 3 di 5 Ver. 0.1 2 24V UNDER KEY D 4 3 +15 1380 56D:14 CAN L BROWN CAN H WHITE 1640 PIN to connect the original AdBlue ECU 9136 4 AdBlue 3 B 2 1640 1 L 3780-C 7 9 1380 ww H 3781-C RED BLACK B C GREY +30 +15 F 9A:6 8 SEAS D Fuse (E357) da 20 Amp m o c . 2 d b o u . w C 24V ALWAYSAV. (TO BATTERY) 56D:13 RED 9A:5 1000:5 +30 YELLOW 1 A A EARTH EARTH 1 DAF_eng.doc 2 3 Pagina 4 di 5 4 Ver. 0.1 Notes on the “Activation” signal: The SEAS module and the original AdBlue system cannot be both activated at the same time, the grey Activation wire (+30) is utilized to enable automatically the SEAS module working. For this reason, it is extremely important to connect this wire to a 24 Volt source always available (battery); moreover, the soldering operation must be done between the 20 Amp. (E357) fuse and the AdBlue module. Consequently, if you want to stop and exclude the original AdBlue system working, it is enough to remove the E357 fuse before starting the engine. The SEAS module will automatically be activated. To reset the original AdBlue system working, it is enough to re-install the E357 fuse before starting the engine. The SEAS module will be de-activated. IMPORTANT: the E357 fuse is located into the fuse & relay box, under the dashboard, passenger side. It might be identified with a written SCR. • There might be other fuses with the same written SCR, but characterized by a lower value of Ampere; these fuses do NOT have to be considered. Self-learning CAN-Bus line: m o c . 2 d Once the SEAS module is fully connected to the electrical circuit of AdBlue system, and after the identification of the E357 fuse controlling the power feeding of the AdBlue system, the vehicle power batteries can be reconnected. b o u . w w The SEAS module acquires inputs from the CAN-Bus line the first time the dashboard is turned on (key ON but engine still OFF). w Please make sure that E357 fuse is correctly inserted and placed, then follow the procedure: • • • Turn on the dashboard (key ON) and verify that the YELLOW LED is turned on, too. After approx. 1 minute, the YELLOW LED. switches off and a GREEN LED will turn on. Switch off the dashboard (key OFF). After this procedure, the SEAS module will be activated whenever the dashboard will be turned on (key ON). The result will be: • If the E357 fuse is installed, the original AdBlue system will be working and the two LED will always be on. • If the E357 fuse is not installed, the original AdBlue system will not be working and the SEAS module will be activated; the two LED will be flashing. All the operations on the E357 fuse have to be performed ONLY with the dashboard switched off (key OFF). SEAS module - diagnostic table of LED (Light Emission Diode) DASHBOARD KEY OFF KEY ON DAF_eng.doc YELLOW LED GREEN LED OFF OFF OFF OFF ON OFF ON OFF ON ON Flashing working (intermittent) Pagina 5 di 5 State of the SEAS module No power feeding Not programmed Programmed, waiting for self-learning Auto-acquiring operations completed Data saved: module not activated Data saved: module ACTIVATED Ver. 0.1