1
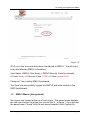
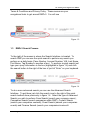
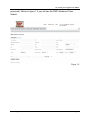
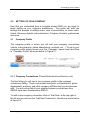
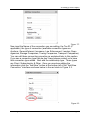
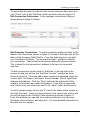
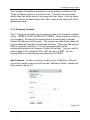
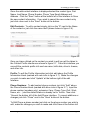
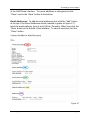
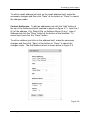
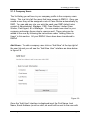
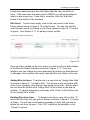
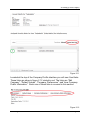
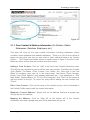
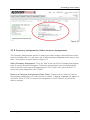
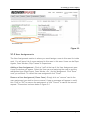
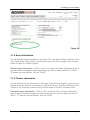
RMP-v3 Migration from RMP-v2 Recovery Manager Pro, LLC. 1.0 Starting Your Migration to RMPv3 1.0 Starting Your Migration to RMPv3 Recovery Manager Pro v3 Release Announcement Version: 3.0.1 Target Release Date: 13th December 2010 Migration Start Time: 11th December 2010 12:00 AM EST Migration End Time ( Estimated): 13th December 2010 12:00 AM EST Migration will take place on the 11 th and 12th of December and may take up to 24 hours to complete. Any data input into RMPv2 after the conversion start time noted above MAY NOT be transferred during the migration to RMPv3. This means if you status a job after the migration has started you may need to status that job in v3 as well. Description: RMPv3 is our newest internet based Recovery Managem ent Software. Not only have we kept the features and functionality that you had in RMPv2 but we have added much more. Highlights: Full Integration with MVTRAC LPR system. VIN to License Plate mapping (additional cost involved) Faster Page/View Loads Faster Searching Enhanced Case Detail ( Account Info) page to display all case aspects to include mapping Contact (Debtor) addresses, updates, etc Seamless connections to Recovery Agencies, Clients and other company connections. (Allows you to assign accounts to other recovery agencies within the RMPv3 network - Company Connection must be established ). Multi Lingual (available soon) Enhanced Contact Management System RMPv3 Migration Guide Page 2-1 1.0 Starting Your Migration to RMPv3 Enhanced Invoicing & Expense Modules Easier Navigation Enhanced Event Tracker ( extensive logging so managers have transparency into all work being performed ) Crisper, Cleaner Interfaces (Faster Performance ) Customizable Color Schemes using CSS 1024 bit data encryption for all sensitive information and communications Enhanced Security ( Fine-grained role-based access control allows users to control every aspect of the application, configuring the roles and permissions in a way that fits each company's unique organizational structure) Migration Impact on Users: During the migration window mentioned above RMPv2 may be intermittent at times during the first 12 -14 hours of the migration. If you experience problems during that time please be patient. We will do everything we can to minimize this issue during migration. If you have any problems please address them to [email protected]. RMPv3 Migration Guide Page 2-2 1.0 Starting Your Migration to RMPv3 1.1 RMPv3 Login Process You must be at a computer with an internet connection to use RMP. Open your preferred web browser and navigate to https://www.recoverymanagerpro.com. Once you are viewing the page click on “Login” located at the top right of the page (as shown in Figure1.1). Figure 1.1 You will be forwarded to our Login interface. Input your User Name and Password provided to you by RMP and click the “Log On” button (as shown in Figure 1.2. RMPv3 Migration Guide Page 2-3 1.0 Starting Your Migration to RMPv3 Figure 1.2 All of your User Accounts have been transferred to RMPv3. You will log in using the following RMPv2 information. User Name: RMPv2.User Name + RMPv2.Security Code for example v2 User: pwren v2 Security Code: 1234 = v3 User: pwren1234) Password: Your existing RMPv2 password. You have now successfully logged into RMPv3 and have landed on the RMP Switchboard. 1.2 RMPv3 Menus (Navigational) Our menus are located at the top of each page. The parent menu displays the sub menu below it anytime you mouse over it. In figure 1.3 you will see the parent menu “Home” with the sub menu beneath it with Contact Us, RMPv3 Migration Guide Page 2-4 1.0 Starting Your Migration to RMPv3 Terms & Conditions and Privacy Policy. These menus are your navigational tools to get around RMPv3. You will see Figure 1.3 1.3 RMPv3 Search Process To the right of the menus is where the Search Interface is located. To search RMP you can use the quick search to perform any search you perform on a daily basis (Case Number, Account Number, VIN, Last Name, First Name, Tag Number to mention a few). To perform a quick search just type your query information in the box (highlighted in figure 1.4) and click the search button to the right of the box of just hit “Enter” on your keyboard. Figure 1.4 To do a more advanced search you can use the Advanced Search Interface. To get there just click the search icon to the right of the quick search textbox show previously in figure 1.4. Select the type of Advanced Search you wish to perform Case Search (search your company cases) , Companies Search (search companies within RMP), Contact Search (search your companies contacts), Event Search (search your companies events) and Finance Search (search your companies invoices & RMPv3 Migration Guide Page 2-5 1.0 Starting Your Migration to RMPv3 payments). Below in figure 1.5 you will see the RMP Advanced Case Search. Figure 1.5 RMPv3 Migration Guide Page 2-6 2.0 Setting Up Your Company 2.0 SETTING UP YOUR COMPANY Now that you understand how to navigate around RMP you are ready to begin setting up your company preferences. This guide will walk you through the process of adding users, roles & permissions to those users, clients, Recovery Agents (subcontractors), Company Contacts, preferences and more. 2.1 Company Profile The company profile is where you will add your company connections (clients, subcontractors, police departments, auctions, etc…).To get to your company profile simply mouse over the “Company” parent menu and then to “Company Profile” as shown below in Figure 2.1. Figure 2.1 2.1.1 Company Connections (Clients/Subcontractors/Auctions, etc) The first listing you will see in your company profile is the company connections listing. These connections are clients, subcontractors, police departments, auctions, and other company affiliates that you do business with. You will notice that all your existing company connections from RMPv2 have been transferred to RMPv3. To add a new company connection click on “Add New” at the top right of the list and you will see the “Add New Connection” interface as show below in figure 2.2. RMPv3 Migration Guide Page 2-1 2.0 Setting Up Your Company Figure 2.2 Now input the Name of the connection you are adding, the Tax ID (if applicable), the type of connection (available connection types are Auctions, General/Internet, Insurance, Law Enforcement, Lenders, Repo Agencies, Storage Companies, Towing Companies, Transport Companies). You can edit these connection properties as explained later in this section. If you see a connection type that we don’t have please contact us to have that connection type added. Next add the relationship type. Those types are Client, Subcontractor & Other. Once you are done adding the information click the “Add New” button at the bottom left of the “Add New Connection” interface as shown below in the red circle in Figure 2.3. Figure 2.3 RMPv3 Migration Guide Page 2-2 2.0 Setting Up Your Company To cancel this process if you do not wish to save what you have input just click “Close” next to the “Add New” button as shown above in figure 2.3. Edit Connection Preferences: In the company connections listing as shown below in figure 2.4 below. Figure 2.4 Edit Company Connections - To edit a connection profile just click on the Name of the connection (shown in figure 2.4 circled in Red) and you will be taken to the Company Detail Profile. From this detail page you can add your Connection Contacts. You must add at least 1 primary contact for your connection. That contact must have an address & phone numbers. This is import for this connection’s address to be input on forms and invoices. To add a connection contact click on “Add New” at the top right of the contact list and you will see the “Add New Contact” interface as show below in figure 2.5. Once the add contact interface is displayed select the contact type, First Name, Last Name, Phone Num ber, Phone Type Email Address and Address. Click the “Save” button at the bottom left of the interface to Save the new contact information. If you wish to cancel the new contact entry just click close next to the “Save” button at the bottom . To edit a contact simply click on the “E” next to the Name of the contact or just click the name. Once you have clicked on the contact you wish to edit you will be taken to the Contact Profile interface as shown in figure 2.7. From this interface you can edit the contacts profile info such as name, birth date, driver’s license, and other info. For more detailed information on this refer the next section. RMPv3 Migration Guide Page 2-3 2.0 Setting Up Your Company The Company Connections preferences can be edited by clicking on the “Prefs” as shown in figure 2.4 circled in blue. These are the connection default fees that will be used for invoicing and other forms. Once you have input the values for these simply click “Save” down at the bottom left of the preferences page. 2.1.2 Company Contacts The 2nd listing you will see in your company profile is the company contacts listing. THESE CONTACTS ARE NOT USERS!! These are just contact for your company, all users of the system have a corresponding Company Contact file that goes with the user. The contacts you add in this listing will only be added as company contacts and not users. When you add users to RMP (as covered in section 2.1.4 of this pamphlet) they will be automatically added as a Company Contact at that time. You only need to add contacts to this listing that WILL NOT be users of RMP. All your existing RMPv2 contacts have been transferred to RMPv3 Add Contacts: To add a company contact click on “Add New” at the top right of the contact list and you will see the “Add New Contact” interface as show below in figure 2.5 Figure 2.5 RMPv3 Migration Guide Page 2-4 2.0 Setting Up Your Company Once the add contact interface is displayed select the contact type, First Name, Last Name, Phone Number, Phone Type Email Address and Address. Click the “Save” button at the bottom left of the interface to Save the new contact information. If you wish to cancel the new contact entry just click close next to the “Save” button at the bottom. Edit Contacts: To edit a contact simply click on the “E” next to the Name of the contact or just click the name itself (shown below in figu re 2.6). Figure 2.6 Once you have clicked on the contact you wish to edit you will be taken to the Contact Profile interface as shown in figure 2.7. From this interface you can edit the contacts profile info such as name, birth date, driver ’s license, and other info. Profile: To edit the Profile Information just click edit above the Profile Information block (marked with red circle in figure 2.7). Make the changes you wish to make and click “Update” at the bottom right of the edit interface. Phone Numbers: To add contact phone numbers just click “Add” above the Phone Number block (marked with blue circle in figure 2.7). Input the phone number (numbers only), extension if any, Phone Type (Cell, Work, Home, etc…) and the default status is already set to “Active. Now click “Save at the bottom left of the Add Phone interface. To cancel additions or changes just click “Close” next to the “Save” button at the bottom. To Edit Phone a phone number just click on the phone number you wish to edit, make the changes you wish to make and click Save at the bottom left RMPv3 Migration Guide Page 2-5 2.0 Setting Up Your Company of the Add Phone interface. To cancel additions or changes just click “Close” next to the “Save” button at the bottom. Email Addresses: To add an email addresses just click the “Add” button at the top of the Email Addresses block (marked in green on figure 2. 7). Input the email address, type of email (Work, Personal, Other) and click the “Save” button at the bottom of the interface. To cancel input just click the “Close” button. Figure 2.7 RMPv3 Migration Guide Page 2-6 2.0 Setting Up Your Company To edit an email address just click on the email address itself, make the necessary changes and then click “Save” at the bottom or “Close” to cancel the changes made. Contact Addresses: To add an addresses just click the “Add” button at the top of the Addresses block (marked in purple on figure 2.7). Input line 1 & 2 of the address, City, State & Zip, an Address Name (if any), type of Address and click the “Save” button at the bottom of the interface. To cancel input, just click the “Close” button. To edit an address just click on the address itself, make the necessary changes and then click “Save” at the bottom or “Close” to cancel the changes made. The Add Address block is shown below in figure 2.8. Figure 2.8 RMPv3 Migration Guide Page 2-7 2.0 Setting Up Your Company 2.1.3 Company Users The 3rd listing you will see in your company profile is the company users listing. This is a list of all the users that have access to RMPv3. Once you create a user they will be assigned a role of Case Worker automatically by RMP. You can add any role you wish the each user RMP default roles consist of Administrator, Manager, CSR, Case Worker, Limited Case Worker, Field Agent, & Lot Manager. You can create new roles for your company and assign those roles to users as well. These roles can be added to the user by following the instructions under “Adding Roles to Users” in this section. All your RMPv2 Users have been transferred to RMPv3 Add Users: To add a company user click on “Add New” at the top right of the user list and you will see the “Add New User” interface as show below in figure 2.9. Figure 2.9 Once the “Add User” interface is displayed input the First Name, Last Name, Email Address (must be valid, an email will be sent to the user with RMPv3 Migration Guide Page 2-8 2.0 Setting Up Your Company a temporary password) and the User Name that the user would like to have. If the user name has been used in RMPv3 you will be prompted to select a new unique one. Once this is complete, click the “Add User” button at the bottom of the interface. Edit Users: To edit a user simply click on the user name in the Users Listing (shown below in figure 2.10 circled in red). You can also edit the users contact record by clicking on the Name (shown in figure 2. 10 circled in green). See Section 2.1.1 for editing contact profiles. Figure 2.10 Once you have clicked on the user name you wish to edit you will be taken to the Account Details interface as shown in figure 2.11. From this interface you can change the users password (must have an Administrator or Manager role to perform this action) and add Security Roles to the user. Adding Role to Users: To add a role to a user click on “Assign New Role” as shown in figure 2.11 circled in Red. You will see a pop up window with a list of your company roles that you can assign to the user. Simply select the role from the list and click “Assign Role” at the bottom of the pop up window. To cancel assigning a role simply click “Close” at the bottom next to the “Assign Role” button. Deleting Role from User: : To delete a role from a user click on the “X” just to the left of the role you wish to delete, as shown in figure 2.1 1 circled in Green. You will see a confirmation message to verify that you wish to delete the role from the user. Click “OK” to perform the deletion or click “Cancel” to cancel. RMPv3 Migration Guide Page 2-9 2.0 Setting Up Your Company Figure 2.11 Located at the top of the Company Profile interface you will see 4 text links. These links are show in figure 2.12 circled in red. The links are “Edit Company”, “Default Values”, “Company Preferences”, and View Company Public Information”. Each one of these links is covered in this section. Figure 2.12 RMPv3 Migration Guide Page 2-10 2.0 Setting Up Your Company 2.1.4 Edit Company The first link (as shown above in figure2.12) is “Edit Company”. Click on this to edit your basic company information such as Company Name, Tax ID, Type of Company and any notes. The “Edit Company” interface is shown below in figure 2.13. Once you have made the changes you wish click “Save” at the bottom of the interface as shown below circled in red. Once you are done with your changes click the “Back” button at the top left of the page as shown circled in green below. Figure 2.13 2.1.5 Default Values The default values section is where you input your default fees and values for your company. These types of fees and values are Areas of Operation, Custom Fees, Job Classifications, and Job Update Templates. This page comes with a standard set of fees that you will need to update. These fees are used in RMP to automatically set new client fees to these values. You have the ability to change the client fees at any time this is just to save you time in your setup. RMPv3 Migration Guide Page 2-11 2.0 Setting Up Your Company Edit Existing Default Values: In the Default Values Listing as shown below in figure 2.14 simply click on the value you wish to change. Figure 2.14 Once you have clicked on the fee/value to change a pop up window will appear to “Edit” the default value selected. You can change the display name and the value. Click “Save” at the bottom of the pop up to save your changes. Adding New Default Value: To add a new default value just click on the “Add New” as shown above in figure 2.14 circled in red. The “Add Default Value” pop up window will appear as shown in figure 2.15. RMPv3 Migration Guide Page 2-12 2.0 Setting Up Your Company Figure 2.15 Select the Type of Value you wish to save (Areas of Operation, Custom Fees, Job Classifications, and Job Update Templates), the Status will be defaulted to “Active”, input the Display Name and then the value. Once completed, click “Save” as shown in figure 2.15 circled in Red. You can add as many defaults as you wish. 2.1.6 Company Preferences The Company Preferences interface is for your company level preferences such as Time Zone your company is located, your company default emails for RMPv3 generated emails. Once the Company Preferences interface is displayed make the changes you wish and click the “Save” button at the bottom left of the page. 2.1.7 View Company Public Information This simply displays what others will see if they look your company up via the RMP Advanced Search. Below in figure 2.16 is a Company Public Profile page. RMPv3 Migration Guide Page 2-13 2.0 Setting Up Your Company Figure 2.16 You have now successfully set up your RMPv3 company. You can now begin to add cases to the system and process those cases. Should you have any questions or comments please send them to [email protected]. Please be sure to reference the “Help” section as shown below in Figure 2.17, circled in blue, to display help documentation on any interface you happen to be viewing. Figure 2.17 RMPv3 Migration Guide Page 2-14 2.0 Setting Up Your Company 3.0 CASE DETAIL (ACCOUNT INFO) INTERFACE This page has been improved extensively. We have made it easier to navigate to forms, documents, invoicing & updates. We have also broken this interface up into section to make it easier to work with. Below you will find the information about those sections and how to interact with them. At the top right of this interface are your links to Case Documents which will have all the saved forms & CR’s from t he case, Case History, Case Timeline and Case Forms (Adjuster Run Sheet, Release Forms, etc..). 3.1 General Information Section This is the basic job information. Click on "edit" at the top of the General Information area to edit this data. The General Info section is shown below in figure 3.1 circled in blue. Case Status - The status of the job itself (Active, Hold, Pending, etc..) Case Number - This is your internal job number. You can assign this number yourself or let RMP do it for you. Date Assigned – The date this case was assigned to you. Last Change – The date of the last change on the case you are viewing Days Open – The number of days the case has been open with your company. Job Type - The type of job (Involuntary, Voluntary, Field Hit, etc... Company Name - Your company name. Client - The client that assigned you to the job. Area Of Operation - This is a generalized area for you to gather open hot list and map an area of accounts to run. Case Classification – You can assign each case a classification and set up those classes for billing. (See more in the help file for “Default Value” in the company section of the help files.) RMPv3 Migration Guide Page 3-15 2.0 Setting Up Your Company Figure 3.1 3.1.1 Case Contact & Address Information (Co-Debtors, Debtor References, Relatives, Employers, etc.) This area will store all the case contact information including addresses, phone numbers, email addresses and website addresses. There is no limit to the number of these sub items that you save to each case or each individual listed in the Contact Section. The Contact Information section is shown below in figure 3.2 circled in red. Below are some actions that can be taken from this section Adding a Case Contact - Click on "add" at the top of the Contact Information area. This will pop up a window for you to add the new case contact. First select the Contact Type (Debtor, Co-Debtor, Client Contact, Lien Holder, etc). Now type in the First Name (if company name type all in last name area), Last Name, Phone Number, Phone Type, Email address, and address (addresses are 1 line addresses ie. 1234 Main Street, Daytona Beach, FL 32114). Once complete, click "Save" at the bottom to add the contact to the job. To cancel the entry without adding the new contact click "Close". Edit a Case Contact - Click on the name of the contact and you will be forwarded to the Contact Profile page to edit the contact information. Mapping a Contact Address - Simply click on the address itself and a google map will pop up with the address. Mapping All Address - Click on "Map All" at the bottom left of the Contact Information area and a google map with all the addresses will pop up. RMPv3 Migration Guide Page 3-16 2.0 Setting Up Your Company Figure 3.2 3.1.2 Company Assignments/Subcontractor Assignments The Company Assignments section is where you would assign a subcont ractor to this case for outside work. You will see a list of subcontractors assigned to this case in this area. This section is shown below in figure 3.3 Add a Company Assignment - Click on "add" at the top of the Company Assignment area. A pop up window will appear. Select the subcontractor you are assigning the case to and the case type for this assignment. Click "Save" once you are done. To cancel the case assignment click "Close". Remove a Company Assignment (Close Case) - Simply click on "remove" next to the company assignment you wish to close or cancel. A pop up message will appear to verify this. Click on "OK" to remove the assignment or click "Cancel" to ca ncel the remove request. RMPv3 Migration Guide Page 3-17 2.0 Setting Up Your Company Figure 3.3 3.1.3 User Assignments The User Assignments section is where you would assign a user to this case for inside work. You will see a list of users assigned to this case in this area. Users can be Repo Agents, Case Workers, Skip Tracers or Supervisors. Adding a User Assignment - Click on "add" at the top of the User Assignment area. A pop up window will appear. Select the User you are assigning the case to and the assignment type (Repo Agent, Case Worker, etc..) for this assignment. Click "Save" once you are done. To cancel the case assignment click "Close". Remove a User Assignment (Close Case) - Simply click on "remove" next to the user assignment you wish to close or cancel. A pop up message will appear to verify this. Click on "OK" to remove the assignment or click "Cancel" to cancel the remove request. This section is shown below in figure 3.4 RMPv3 Migration Guide Page 3-18 2.0 Setting Up Your Company Figure 3.4 3.1.4 Asset Information You will see the asset information in this area, VIN, Year, Make, Mode, Tag Info , Drive Train, Body Style, Engine Type, Transmission Type, and Trim package if any. Shown below in Figure 3.5 circled in green. Edit the Asset Information - Click on "edit" at the top of the Asset Information area. A pop up window will appear, make the changes you wish to make and click on "Save". To cancel your edit request, click on "Close". 3.1.5 Finance Information You will see the finance information in this area, Case Account Number, Loan Amount, Monthly Payment amount, Loan Balance, Past Due Amount, Past Due Date and Case Payout (if you must pay to recover unit). Shown below in Figure 3.5 circled in blue. Edit the Finance Information - Click on "edit" at the top of the Finance Information area. A pop up window will appear, make the changes you wish to make and click on "Save". To cancel your edit request, click on "Close". RMPv3 Migration Guide Page 3-19 2.0 Setting Up Your Company Figure 3.5 3.1.6 Case Updates Located at the bottom of the Case Details interface, all the case updates will be in this listing. You can add/edit updates, refresh the listing or filter the listing. Refresh Listing - Click on "Refresh" at the top right of the list next to "Functions". Add New Update - Click on "Add New" at the top right of the list next to "Functions". Filter Listing - Just type in the criteria you wish to filter by next to "Filter" at the top left. Edit Update - Click on any part of the update in the listing to load the Edit Update area under the listing. Make the changes you wish to make and click on "Save" under the text area. To cancel the changes click on "Close". RMPv3 Migration Guide Page 3-20