1
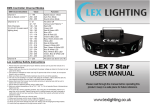
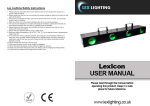
Lex Lighting Safety Instructions
1. Please keep this User Manual for future reference and be sure to pass this manual on to
anyone using the fixture.
2. Always make sure that you are connecting to the proper voltage as stated on the decal or rear panel of the fixture.
3. This product is intended for indoor use only! To prevent risk of fire or shock, do not expose fixture to rain or moisture.
4. Make sure there are no flammable materials close to the unit while operating.
5. The unit must be installed in a location with adequate ventilation, atleast 20inches (50 cm) from adjacent surfaces. Be sure that no ventilation slots are blocked.
6. Always disconnect from power source before servicing or replacing fuse and be sure to replace with same fuse rating.
7. Secure fixture to fastening device using a safety chain.
8. Maximum ambient temperature (Ta) is 104° F (40° C). Do not operate fixture at temperatures higher than this.
9. In the event of a serious operating problem, stop using the unit immediately. Never try to repair the unit by yourself. Repairs carried out by unskilled people can lead to damage or malfunction and will void your warranty. Please contact the nearest authorized technical
assistance center.
10. Never connect the device to a dimmer pack.
11. Make sure the power cord is never crimped or damaged.
12. Never disconnect the power cord by pulling or tugging on the cord.
13. Never carry the fixture directly from the cord. Always use the hanging/mounting bracket.
14. Avoid direct eye exposure to the light source while it is on.
Congratulations on purchasing your new lighting effect
from Lexlighting. Reading through this manual will ensure
trouble free and long life operation of the unit.
Sound to Light (Music Trigger Mode)
To put your fixture in sound-to-light mode:
G-1-
Features:
- 96 High Brightness LED’s (Red, Green & Blue)
- Sound To Light (Inbuilt Microphone)
- Full DMX
- Master/Slave Mode (up to 4 slaves)
- Digital Settings Display
- Package Spec: D400cm W310cm H230cm
- Package Weight: 3kg Approx
UP
DOWN
Press the MODE button until the first letter in the display shows “G”.
Then using the UP and DOWN buttons, select “G-1-” and press
the ENTER button. Your light is now in sound to light and will run
through Programmed chases (patterns) one by one, activated by
sound using the built in Microphone.
Auto Mode
Contents:
MODE ENTER
Auto mode will run through the programmed chases (patterns) one
by one regardless of any sound input. As above, simply Press the
MODE button until “G” is displayed. Using the UP and DOWN buttons select “G-2-” and press the ENTER button. Your light is now
in AUTO Mode. Selecting “G-3-” will stop the Auto Chase Mode.
- Light Unit Dualex II
- IEC Mains Cable UK Plug
- Hanging Bracket
- User Manual
Master/Slave Mode
Your Dualex allows you to connect it to other Dualex units (max 4
slaves) to create a stunning in-sync light show. This is achieved by
linking XLR cables(sold seperatley) from each fixture using the DMX
IN and DMX OUT ports. Please observe the diagram below.
DMX IN
DMX OUT
IEC Power
Input
Fuse
MASTER
Digital Display
Dualex’s
Mode Button
Enter Button
Down Button
Up Button
Display Settings
SLAVE 1
SLAVE 2
SLAVE 3
SLAVE 4
IN
IN
IN
IN
IN
OUT
OUT
OUT
OUT
OUT
G-1s-1s-2s-3s-4The above example shows the master units mode set on Sound Active. The 4 slaves will now also be sound active and be in-sync with
the master.
DMX Mode
DMX (Digital Multiplex) is a universal protocol used as a form of
communication between intelligent fixtures and controllers. A DMX
controller sends DMX data instructions from the controller to the
fixture. DMX data is sent as serial data that travels from fixture to
fixture via the DATA “IN” and DATA “OUT” XLR terminals located on
all DMX fixtures.
The Dualex II is a DMX enabled fixture and the DMX mode and
DMX address settings are controlled via the Digital control panel. It
also carries the standard 3-pin XLR connections for DMX use.
To set your fixture for use with a universal DMX controller:
Press the MODE Button and use the UP and DOWN buttons until
you see ‘A001’ on the screen, press ENTER. Your fixture is now
set in the DMX mode on channel 1 of the DMX universe and is
awaiting input from your DMX controller. Based on a DMX controller
having 16 channels per fixture:
Light 1 in the DMX universe
Display A001
Light 2 in the DMX universe
Light 3 in the DMX universe
Display A017
Display A034
Please consult the manual of your DMX controller for more information on addressing fixtures.
Mounting Your Fixture
Your light is designed to be hung from either a Ceiling, DJ Truss
or T-Bar Stand. The bracket comes supplied with a hole to allow
mounting of the fixture.
Always ensure the fixture is tightly fitted to whatever it is your mounting it too. The Bracket thumb wheels can be adjusted and tightned
to place your fixture at a desired position.
Also a safety hook is mounted on the unit. Please be sure to connect a safety chain or safety cable to the hook.
Care and Maintenance
Cleaning your fixture will keep it looking great for many years and
also ensure its long life and trouble free operation. Clean your fixture
with a slightly damp, lint-free cloth. Never use chemicals to clean the
fixture as this could impair its finish. Always make sure the fixture is
powered off before cleaning.
If you need to replace the fuse, always make sure you replace with
the same fuse specification. NEVER attempt to wrap foil around the
fuse.