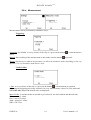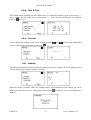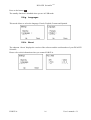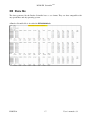
1
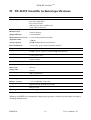
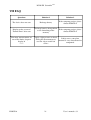
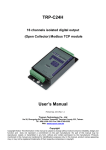
F luorescence and
Optoelectronics
R esearch for the
Communication between
E cophysiology
and
A griculture
DUALEX Scientific TM
USER’S MANUAL
DUALEX Scientific TM
FORCE-A
User’s manual v.3.1
DUALEX Scientific TM
Table of content
I
DUALEX SCIENTIFIC OPTICAL LEAF-CLIP ..............................................................................................1
I.1.
I.2.
II
DESCRIPTION ..................................................................................................................................................1
DUALEX SCIENTIFIC TRANSPORT CASE............................................................................................................2
GETTING STARTED ...........................................................................................................................................3
II.1.
CHARGING THE DUALEX SCIENTIFIC...............................................................................................................3
II.2.
SWITCHING ON THE DUALEX SCIENTIFIC .....................................................................................................3
II.3.
MAIN MENU ....................................................................................................................................................3
II.4.
SUB MENU ‘MEASUREMENT’ ...........................................................................................................................4
II.4.a. Calibration ................................................................................................................................................4
II.4.b. Measurement .............................................................................................................................................4
II.4.c. How to delete a measurement ....................................................................................................................6
II.4.d. Power alarm ..............................................................................................................................................7
II.4.e. Management of the memory ......................................................................................................................7
II.5.
SUBMENU ‘USB’ ............................................................................................................................................8
II.5.a. Connection ................................................................................................................................................8
II.5.b. DUALEX® Scientific update .....................................................................................................................9
II.6.
SUBMENU ‘SETTINGS’ ................................................................................................................................... 12
II.6.a. GPS ......................................................................................................................................................... 12
II.6.b. Format ..................................................................................................................................................... 13
II.6.c. Measurement ........................................................................................................................................... 14
II.6.d. Date & Time ............................................................................................................................................ 15
II.6.e. Contrast ................................................................................................................................................... 15
II.6.f. Standby .................................................................................................................................................... 15
II.6.g. Languages ............................................................................................................................................... 16
II.6.h. About ....................................................................................................................................................... 16
III
DATA FILE .......................................................................................................................................................... 17
IV
DUALEX SCIENTIFIC TECHNICAL SPECIFICATIONS ........................................................................... 18
V
PRECAUTIONS OF USES. ................................................................................................................................ 19
V.1.
V.2.
V.3.
V.4.
V.5.
VI
VII
ENVIRONMENT OF USE .................................................................................................................................. 19
SHOCKS AND VIBRATIONS ............................................................................................................................. 19
STORAGE ...................................................................................................................................................... 19
CLEANING ..................................................................................................................................................... 19
EXCHANGE OF BATTERIES ............................................................................................................................. 19
CONDITIONS OF GUARANTEE ..................................................................................................................... 20
FAQ .................................................................................................................................................................. 21
FORCE-A
User’s manual v.3.1
DUALEX Scientific TM
I Dualex Scientific optical leaf-clip
I.1.
Description
2) Light source
3) Light detector
1) Opening handle
5) LCD screen
4) Keyboard
7) Attach wrist-strap
6) USB interface
1) Handle to open the clip: when pressing on this handle, the clip opens and the leaf can be
introduced between the 2 heads. When released, the heads hold the leaf allowing the measurement
to be done. The testing position of the Dualex is with the clip closed.
2) The head that contains 5 different LEDs: 1 UV-A emitting LED, 2 visible-emitting LEDs and
two NIR-emitting LEDs.
3) The head that contains the optical detector: a filtered PIN photodiode.
4) Keyboard.
5) LCD Screen.
6) USB Interface that allows to download data, to upgrade the software and to charge the Dualex
Scientific unit.
7) The wrist-strap must be tied to the Dualex Scientific unit in order to avoid the fall of the device.
FORCE-A
1
User’s manual v.3.1
DUALEX Scientific TM
The 5 buttons on the keyboard are used to navigate through the software. The buttons are
multitask, and every action depends on the state of the tool.
•The button
is used to switch on the Dualex Scientific with a long press. This button is also
used to switch off the Dualex Scientific: one press in the main menu, or a long press at any time.
•The button
measurement.
is used to enter a selection in a sub-menu, to validate a selection or to make a
•The button
is used to cancel an action or a selection, and allow the suppression of the last
measurement; in this case the software will come back to the previous state. A long press turns
back to the main menu.
• Buttons
and
change the side tag.
I.2.
are used to navigate in the menus, to increase the group rank and to
Dualex Scientific transport case
The Dualex Scientific is delivered in a shock resistant case. It contains the Dualex Scientific leafclip, a USB cable with a USB wall plug adapter and this user’s manual.
The Dualex Scientific is powered by an internal rechargeable Li-Po battery. The battery can be
charged using the USB cable directly from the computer, or using the wall plug adapter (110220/50-60Hz).
FORCE-A
2
User’s manual v.3.1
DUALEX Scientific TM
II Getting Started
Unpack the Dualex Scientific and check that there is no evident damage.
The Dualex Scientific is charged before delivery, however depending on storage time, the battery
can be discharged.
II.1.
Charging the Dualex Scientific
To charge the Dualex Scientific, connect the USB cable to either:
-
the wall plug adapter cable and plug it in a regular power supply (check that voltage (110220V) and frequency (50-60 Hz) are compatible)
-
a USB port on a computer.
While connected, a charge indicator will appear on the screen:
The Dualex Scientific unit can be operated when the battery is under charge.
The full charge of the battery will be completed after 4 hours.
With a full charge, operating time is nearly 7 hours in continuous use.
II.2.
Switching on the Dualex Scientific
To switch on the Dualex Scientific, press a ‘long push’
A screen with FORCE-A image will quickly appear.
Then the main menu will be displayed.
II.3.
on the keyboard.
Main menu
The main menu includes 3 sub-menus:
1. Measurement: allows measurements.
2. USB: allows to download the recorded data and to update the device software from a
computer.
FORCE-A
3
User’s manual v.3.1
DUALEX Scientific TM
3. Settings: give access to the different menu configurations like the GPS, Format, Measure,
Date & hours, Contrast, Stand-by mode, Language and About.
The navigation among the menus is made by using buttons up
keyboard.
The selected sub-menu is marked by (> <). Use the button
II.4.
and
down
on
the
to select the sub-menu.
Sub menu ‘measurement’
To initialize a measurement sequence, select the sub-menu ‘Measurement’ and press
button.
II.4.a. Calibration
When the measurement sub-menu is selected and before any measurement, the Dualex Scientific
unit will ask for a short self-calibration. The following screen will appear:
Be careful during calibration process that there is nothing between the optical heads and that the
clip is well closed.
To start self-calibration, press on the button
.
Warning: You can face three potential problems during the calibration:
- The clip is opened: close it and press on the button
.
- There is a leaf between both heads: remove it and press on the button
- Heads are dirty, clean them and press on the button
.
.
II.4.b. Measurement
Once calibration succeeded, the DUALEX® Scientific unit is ready to measure and displays the
following screen:
FORCE-A
4
User’s manual v.3.1
DUALEX Scientific TM
(Depending on the version of your Dualex Scientific, Anth index is calculated or not)
To make a measurement, open the clip by pressing the handle and place a leaf between the optical
heads.
Release the handle, the measurement is automatically made. When a measure is taken, two types of
beep can ring:
- A long beep which means that the measurement is well done and recorded.
- Three short beeps which mean that the measurement is wrong and not recorded.
If the reading succeeds, the indices values appear on the screen:
► NBI: or Nitrogen Balance Index. This index is the ratio between Chl and Flav.
The range of this index is 0 - 999. If the measured value is outside these limits, the value displayed
on the screen is ***. This state is recorded in the memory of the device under the tag “NaN”. If the
measurement is inconsistent, the displayed tag is: ___
► Chl: chlorophyll content.
The range of this index is 0-150. If the measured value is outside these limits, the displayed value
on the screen is: ***. This state is recorded in the memory of the device under the tag “NaN”. If
the measurement is inconsistent, the displayed tag is: ___
► Flv: index of phenolics, mostly flavonols, content.
The range of this index is 0-3. If the measured value is outside these limits, the displayed value on
the screen is: ***. This state is recorded in the memory of the device under the tag “NaN”. If the
measurement is inconsistent, the displayed tag is: ___
FORCE-A
5
User’s manual v.3.1
DUALEX Scientific TM
► Anth: index of phenolics, anthocyanins content.
The range of this index is 0-3. If the measured value is outside these limits, the displayed value on
the screen is: ***. This state is recorded in the memory of the device under the tag “NaN”. If the
measurement is inconsistent, the displayed tag is: ___
► grp: indicates the group rank. The measurements can be grouped into a set of measurements
statistically connected. Press on
(group+) to increment the number of group. The statistical
results of the latest group are then displayed.
If the data are not valid, the statistical results appear under the tag ***. To return to the measure
menu, press on
.
► mes: corresponds to the rank number of the measurement performed in the group. This value
increases automatically with every measurement.
► sup / inf: the side of the leaf, adaxial or abaxial, and its associated epidermis – that is
positioned against the light source head (upper head) – will be measured. To measure the opposite
side of the leaf, you may flip over the leaf or invert the position of the Dualex heads.
You can add the leaf side tag which will be associated to the next measurement: adaxial (sup) or
abaxial (inf). To change this tag, just press on
. This information is stored with the
measurement.
Warning: there is no limitation to the measurements rank in a group. The capacity of the internal
flash memory (1.8Mo) allows more than 10 000 measurements. Nevertheless, it’s recommended to
transfer the data by the command >USB< onto a computer after every campaign of measurements.
After the transfer of the data file, you can erase it from the flash memory using your computer.
II.4.c. How to delete a measurement
The last made measurement can be deleted by pressing the button
for confirmation. Press on the button
(No) or
(Yes):
A long press on the button
FORCE-A
(short press), the screen asks
leads to the main menu and saves the measurement.
6
User’s manual v.3.1
DUALEX Scientific TM
II.4.d. Power alarm
In order to avoid a loss of data, a double alarm informs you about the level of the battery.
The first alarm informs you that there is only 20% of the battery power left « Low battery ». You
can continue your measurements for some time (approximately 1 hour).
The second alarm informs that there is only 10% of the battery power left « Empty battery ». To
avoid a loss of data, the device automatically shuts down. Measurements are not possible any
more.
II.4.e. Memory management
The DUALEX Scientific manages the capacity of the memory and displays two safety messages to
ask to empty the memory card:
- « memory almost full » between 200 kB and 2 kB free memory left
- « Memory full » with less than 2 kB free memory left (less than 15 measurements).
► If you switch on the Dualex Scientific, when only between 200 kB and 2 kB free memory is
available, the following message is displayed:
Press on the button
. Download the memory content to a computer. If you go to the submenu
‘measurement’, the message will be displayed a second time.
► When DualexScientific is switched on, if less than 2 kB of free memory remains, the following
message is displayed:
FORCE-A
7
User’s manual v.3.1
DUALEX Scientific TM
Press the button
. You cannot go up to the submenu ‘Measurement’. It is necessary to empty the
memory of the Dualex Scientific.
► During the measurements, if the free memory decreases below 200 kB, the message «memory
almost full» appears. Press the button
. You can continue the measurements but please empty
the memory as soon as possible.
► During the measurements, if the memory decreases below 2 kB the message «memory full »
appears. Press the button
. The last measurement is saved and the DUALEX Scientific returns
to the main menu. You cannot reach anymore the submenu ‘measurement’. It is necessary to empty
the memory.
II.5.
Submenu ‘USB’
The submenu USB allows transferring the measured data to a computer and also it allows to
update DUALEX® Scientific from a computer.
II.5.a. Connection
Connect the cable USB to the mini connector USB:
The mini connector USB to be plugged into the
DUALEX’s connector located at the bottom of
the device.
The connector USB to be plugged into the USB
port of the computer.
In the main menu, select the sub-menu ‘USB’ with the buttons
press the button
:
(top) and
(bottom), and
The Dualex Scientific behaves then as an USB device.
Use the command interface of your operating system to transfer the file containing the
measurements. In Dualex, one file is created per calendar day of measurement: all the
measurements of the day are stored in this file, named « DX yyyymmdd.csv », where « yyyy »
represents the year, “mm” the month and « dd » the day. Once the file on your computer, it can be
FORCE-A
8
User’s manual v.3.1
DUALEX Scientific TM
analysed using any spreadsheet software.
Note: When the Dualex Scientific is used in USB mode, no measurement can be realized. To go
out of the USB mode, press on
. The software returns then to the main menu.
II.5.b. Dualex Scientific update
WARNING:
In order to avoid a loss of data, please copy the files from the memory before proceeding
to an update. The DUALEX Scientific will erase the memory at the end of the process.
The USB has to remain connected throughout the update. If the device is disconnected, the
following message will be displayed:
Switch on the DUALEX® with the button
.
Connect the cable USB to the mini connector USB. In the main menu of DUALEX®, select the
sub-menu >USB< with the botton
and
. Press the button
. The DUALEX® Scientific
behaves then as an USB device.
Transfer of the software: Copy the files boot.dx4 and flavxxx (xxx correspond to the number of the
update: it is an applicative software) in the memory of your DUALEX® Scientific.
WARNING: Do not do anything during the files transfer.
Software set up:
-
Leave the USB mode once the 2 files are transferred, by pressing on the button
-
Re-start the device by pressing on the button
The following screens appear:
-
FORCE-A
Press the button
.
. The updating of the software begins.
to select « start »:
9
User’s manual v.3.1
DUALEX Scientific TM
FORCE-A
10
User’s manual v.3.1
DUALEX Scientific TM
Note: if your update requires a license, press the button
Select the sub-menu >license< and press the button
to select « Menu ».
.
The license allows to change the rights (addition or deletion of application).
This screen allows entering the licence key. To change the number, press on the button “+” and to
change the digit, press on the button “_>”.
Once the number is entered, press on
. Press twice the button
Press the button
(launching) to start the updating program.
to return at the update menu.
Note: The cancellation is possible at anytime without saving, by pressing on the button
.
WARNING: If the 5 figures are not correct, the following screen appears:
The licence keys are unique: they are specific to the device.
FORCE-A
11
User’s manual v.3.1
DUALEX Scientific TM
II.6.
Submenu ‘settings’
The submenu ‘settings’ gives an access to adjustable parameters:
1. GPS: toggles GPS in mode Off, Light or Full.
2. Format: formates the flash memory.
3. Measurement: allows selecting the acquisition mode for measurements.
4. Date & Time: updates date and time.
5. Contrast: allows variation of screen contrast.
6. Standby: adjusts the time before standby mode.
7.Language: allows to change the language of the Dualex Scientific.
8. About: displays the version of the software and the Dualex Scientific serial number.
These parameters are validated by using the button
software returns then to the main menu.
.Or left as previously by pressing on
, the
II.6.a. GPS
There are three ways to use the GPS:
- GPS Off (by default): no GPS data saved.
- GPS ponctual: GPS data are saved by pressing a few seconds on the button
the measurement.
during
- GPS systematic: the GPS is active all the time, it saves GPS datas for every measurement.
We can adjust the time zone in > Time zone <:
When the GPS is active in mode ponctual or systematic, the device begins looking for the GPS
with the aim to update the time and the date.
FORCE-A
12
User’s manual v.3.1
DUALEX Scientific TM
II.6.b. Format
The setting ‘format’ deletes all datas from the memory of the Dualex Scientific.
WARNING: in order to avoid a loss of data, please copy the files from the memory before
proceeding to an update. The Dualex Scientific will erase the memory at the end of the process.
To format the memory, press on
, the screen asks for a confirmation before formatting the
memory. Press on the button
(No) or
(yes):
If the buttons
main menu.
If the button
(No) or
are selected, the datas are left intact and the software returns to the
(Yes) is pressed, all the datas are erased from the memory:
But if an error occurs during the formatting, the screen displays « Error format ». If this error
appears, please switch off the device and load the battery. If the problem persists, please contact
FORCE-A.
Press on the button
, the DUALEX returns then to the sub menu ‘settings’.
WARNING: The DUALEX uses the format FAT 12. Do not try to format your DUALEX’
memory by using the formatting functions offered by your operating system; it could block the
memory.
FORCE-A
13
User’s manual v.3.1
DUALEX Scientific TM
II.6.c. Measurement
Measurements can be performed by alternative ways:
- Triggering:
Automatic (by default): at every closure of the clip or a press on the button
saved.
Manual: the recording of the measurement is only made once the button
, a measurement is
is pressed.
Tuning: this function re-adjusts the parameters to allow the automatic mode, depending on the clip
aperture. Use it if automatic mode doesn’t work.
- 1 Side/2 Sides:
1 Side: at every closure of the clip or a press on the button
, a measurement is recorded
(following the triggering previously selected). At every measurement, values Chl, Flav, Anth and
NBI of the side (adaxial or abaxial side) are displayed.
Mean 2 Sides: 2 measurements are needed to get values for one leaf (adaxial and abaxial side).
Chl = mean of 2 values
Flav = sum of 2 values
Anth = mean of 2 values
NBI = Chl / Flav.
FORCE-A
14
User’s manual v.3.1
DUALEX Scientific TM
II.6.d. Date & Time
This setting allows adjusting the date and the time. To change the number, press on the button “+”
and to change the next field, press on the button “_>”, once the date and the time are adjusted,
press on
to save it.
II.6.e. Contrast
You can adjust the contrast of the screen with the buttons
contrast, return to the main menu by pressing
.
and
. After having adjusted the
II.6.f. Standby
The time before Dualex Scientific enters the standby mode can be chosen. It can be adjust between
1 and 10 minutes; the default setting is 5 minutes.
When the Dualex Scientific enters the standby mode, all measurements and settings are saved.
When you restart the device by a long press on the button
, to measure, a new self-calibration is
needed.:
FORCE-A
15
User’s manual v.3.1
DUALEX Scientific TM
Press on the button
.
The standby function is disabled when you are in USB mode.
II.6.g. Languages
This mode allows to select the language: French, English, German and Spanish.
II.6.h. About
The submenu ‘About’ displays the version of the software and the serial number of your DUALEX
Scientific.
Please refer to this information when you contact FORCE A.
FORCE-A
16
User’s manual v.3.1
DUALEX Scientific TM
III Data file
The datas generated by the Dualex Scientific have a .csv format. They are thus compatible with
any spreadsheet and any operating system.
A Dualex Scientific file is described in DX20130102.xls:
FORCE-A
17
User’s manual v.3.1
DUALEX Scientific TM
IV DUALEX Scientific technical specifications
Measured material
Measurement process
Leaf
4 measured indices:
Chl: chlorophyll index
Flav: flavonol index
NBI: nitrogen status, Chl/Flav ratio
Anth: anthocyanin index
Automatic or manual
Measured area
5 mm in diameter
Sample thickness
1 mm maximum
Measurement area access
8.5 cm maximum (half-leaf width)
Acquisition time
< 500 ms
Storage capacity
10,000 multiparametric measurements
Data classification
3 levels (file, group, and measurement numbers)
Temperature range
From 5 to 45°C
Measured parameters
Light sources
5 LED 1 UV-A, 1 green, 1 red and 2 NIR (near-infrared)
Detectors
1 silicon photodiode
User interface
LCD screen
Sound warning
Data downloading
USB connection for data transfer
Battery
Li-ion rechargeable battery
Battery life
10 hours
Charge time
4 hours
Total weight
220 g (with battery)
Size
205 mm x 65 mm x 55 mm
Positioning
Internal GPS
Relative accuracy
< 2.5 m (CEP, 50%, 24 h static)
Languages
English, French, Spanish and German
Safety
Ring for leash
Updating
Remote program updating
Warning: as FORCE-A is continuously improving its products, technical specifications are subject
to change without notice.
FORCE-A
18
User’s manual v.3.1
DUALEX Scientific TM
V Precautions of uses.
V.1.
Environment of use
The Dualex Scientific is adapted to be used in various environmental conditions. The device is
resistant to natural humidity of the plant material. In the range of 5°C to 40°C, the temperature is
permanently measured.
V.2.
Shocks and vibrations
During the use, it is important to avoid shocks as well as intense vibrations.
V.3.
Storage
When you finished the measurements, please mind to switch off the device.
Keep the Dualex Scientific in a dry (0 - 40°C non condensing), clean and dust free environment.
V.4.
Cleaning
During every return in the laboratory, the Dualex Scientific should be cleaned by using a tissue
slightly moistened with a mixture of water and alcohol.
The optical parts of the device must be carefully cleaned by blowing clean and dry air, and then
with a cotton stalk slightly moistened with ethanol.
V.5.
Exchange of batteries
If the batteries of the Dualex Scientific need replacement, please contact FORCE-A. The batteries
are especially designed for this device. The replacement of batteries by an unsuitable model can
seriously damage the unit.
FORCE-A
19
User’s manual v.3.1
DUALEX Scientific TM
VI Conditions of guarantee
In the case of a normal use, the Dualex Scientific leaf-clip is guaranteed for 1 year (after delivery)
against any defect or manufacturing defect.
Any attempt of modification or repair by a non authorized person ends this guarantee.
The Dualex Scientific leaf-clip is a data acquisition instrument. FORCE-A company is not
responsible of any interpretations which could result from measurements realized by the Dualex
Scientific.
In case of dysfunction, please contact FORCE-A company for the return. The material must be
then sent back to the following address:
FORCE-A
Centre Universitaire Paris-Sud - Bât. 503
91893 Orsay Cedex
France
Tel: +33 1 69 35 88 39
Fax: +33 1 69 35 88 97
e-mail: [email protected]
Complaints:
To benefit from the guarantee, please get in touch with the company FORCE-A and enclose to the
package a description of the problem and the clearing of the transport costs for return.
FORCE-A will repair or will exchange at its expenses the defective product. However if FORCE-A
estimates that the problem is due to a misuse, a modification of the product, an accident or any use
not in compliance with the recommendations, FORCE-A reserves the right to charge the repairs,
the necessary spare parts as well as the transport costs for return.
FORCE-A
20
User’s manual v.3.1
DUALEX Scientific TM
VII FAQ
Questions
Solution 1
Solution 2
The device does not start
Recharge battery
If the symptom persists, please
contact FORCE-A
Display on the screen of
"Format Error" after start
Recharge battery, then perform
a new formatting of the
memory
If the symptom persists, please
contact FORCE-A
Too many measurements are
out of the limits, frequent
display of
“ *** “
FORCE-A
Apply a light pressure to heads
Likely cause: your plant
during the measurement, or
material is very concentrated in
over the clip to avoid leaf
compounds
veins.t
21
User’s manual v.3.1
Contact:
Secretariat
Force A, Université Paris Sud 11 – Bâtiment 503
91893 Orsay Cedex, France
Tel: + 33 1 69 35 88 62 - Fax: + 33 1 69 35 88 97
Email: [email protected]
Web site: www.force-a.eu