1
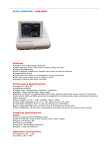
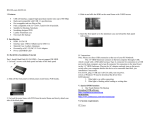
1. Getting Started
Kit Contents
● 2.5" Enclosure
● USB Y Cable
● eSATA cable
● iSATA to eSATA bracket cable
● Installation CD
● Screw Pack
● Carry Bag
● QIG
Product Overview
1. OTB Button
2. USB2.0 Port
3. eSATA Port
4. DC Jack
Minimum System Requirements
● Available OHCI-compliant USB port
● Windows 98SE/ME/2000/XP/VISTA/7
● MAC OS 9.x and 10.x or higher
Note : eSATA mode isn’t complaint with Windows 98SE/ ME
2. Assembling the 2.5" SATA HDD
Step 1 : Open the enclosure, and take out the PCB
Step 2 : Insert SATA HDD into the SATA connector of PCB
Step 3 : Put in the screws and tighten SATA HDD.
Step 4 : Position the PCB and HDD set carefully into the aluminium casing, put the screws in and tighten them.
3. Connecting the Drive
Note : If using Windows 98SE , you must install the device driver on your system before connecting the drive.
USB Connection
1. Connect one end (USB A Type) of the USB Y Cable to your computer.
2. Connect the other end (USB mini 5) of the USB Y Cable to the USB port on the back of the drive.
3. The power indication LED (on the front panel) will illuminate and the presence of an external drive will be visible on your PC monitor or laptop.
eSATA Connection
Note: If using PC without eSATA interface , please install the iSATA to eSATA bracket cable in your PC (please make sure your PC or motherboard supports
iSATA before installation.) If using a laptop, please make sure there is a built-in eSATA or eSATA interface on your laptop.
1. Connect the USB Y Cable between your PC and the enclosure; this is to give power to the drive. Read/Write HDD through USB connection will be
disabled while the eSATA cable is connected.
2. Connect one end of the eSATA cable to your PC or Laptop
3. Connect the other end of the eSATA cable to your external enclosure.
4. Installing OTB Software
Note: Please select proper OTB .exe version for your computer before installation , OTB supports Windows System only but doesn’t support eSATA Mode.
1. Put Installation CD-ROM into the Optical Drive on your computer or laptop.
2. Select the correct OTB software version and then follow the installation procedures.
3. Once OTB is successfully installed on the computer or laptop, an OTB icon will appear on the system tray of your computer.
Page 1
5. Disconnecting the Drive
Caution: To prevent data loss always be sure to close all active applications before shutting down the drive.
Windows
1.
2.
3.
Double-click the Safely Remove Hardware icon in your system tray (typically located on the bottom right corner of your desktop).
Select the appropriate device from the list and click "Stop". Click "OK" to confirm your selection of the drive to be disconnected.
Click "Close" and ensure that the drive is powered off already.
MAC
1.
2.
Find the Removable Disk icon associated with the drive that you want to disconnect and drag it to the Trash icon on your desktop.
After the disk icon disappears from the desktop and the drive is powered off, you may safely disconnect the USB cable from your computer.
6. Remarks
1. The detailed installation manual can be found in the "User Manual" of the CD.
2. The product is compliant with CE/FCC/UL/RoHS/WEEE.
Page 2