1
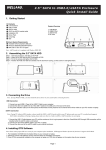
1. Getting Started
Kit Contents
● 3.5" TURBO LEOPARD Enclosure
● USB3.0 Cable
● eSATA Cable (ME-752SE only)
● Power Adapter
● Enclosure Stand
● QIG (Quick Install Guide)
Minimum System Requirements
● Available USB3.0 Host port
● USB3.0-equipped Windows XP / VISTA / 7
● USB3.0-equipped Mac OS X 10.5 or above
Product Overview
(case outlook on right side)
● Power / Access : real-time LED indicator
● OPEN : the switch to open the case
● ME-752S : offers USB3.0 output
● ME-752SE : offers USB3.0 and eSATA output
● Copy : for one touch backup function
2. Assembling the 3.5" SATA HDD
Insert the hard drive :
Step 1. Pull down the “OPEN” switch, and open the front panel.
Step 2. Insert the SATA HDD with correct position. (connector to connector)
Step 3. Close the front panel will push the drive into the enclosure. If you can’t close the panel, check if you position the drive correctly.
Eject the hard drive :
Step 1. Open the enclosure by pulling down the “OPEN” switch
Step 2. Push out the hard drive by using the ejection stick.
Step 3. Take out the hard drive. (Please be careful when removing the disk, the drive may be too HOT to handle)
Step 4. Close the front panel.
3. Connecting the Drive
1. Connect one end of USB3.0 or eSATA (ME-752SE) cable to your computer.
2. Connect the other end of USB3.0 or eSATA (ME-752SE) cable to the USB3.0 or eSATA port on the rear of the enclosure.
3. Turn on the power switch, the power indication LED will blink and the presence of an external drive will be visible on your system tray.
4. Formatting Hard Drive
In order to use a hard drive, or a portion of a hard drive, in Windows you need to first partition it and then format it. This process will then assign
a drive letter to the partition allowing you to access it in order to use it to store and retrieve data. All hard disk management is done in the Disk
Management Administrative Tool. Follow these steps to open this tool:
1. Click on the Start button and select the Control Panel option.
Page 1
2. If in Classic control panel mode, double-click on the Administrative Tools icon and then double-click on Computer Management icon. If
your control panel is in the Category view, click on Performance and Maintenance, then click on Administrative Tools, and finally
double-click on the Computer Management icon.
3. When the Computer Management screen opens, click on the Disk Management option under the Storage category. This will present you with
a screen called The Disk Management Screen.
To make a partition from the unused space you would do the following.
1. Right click on the space listed as unallocated.
2. At the menu that comes up, click on the New Partition option.
3. You will now be presented with a wizard as to how you would like the partition to be created. At the first screen press Next.
4. At the following screen, determine if you need a primary or extended partition. Most people will be fine selecting Primary Partition. Select
Primary Partition and press Next.
5. At the next screen you will be prompted to type in how much of the unallocated space you would like used for the new partition. Regardless,
of what you decide, you need to enter a size in the Partition size in MB: field, or stick with the default size, and press the Next button.
6. At the next screen select the drive letter you would like assigned to it, or use the default one given. When done, press the Next button. The
drive letter that you assign here will be how you access the partition later.
7. In this step you will determine how you would like the new partition to be formatted. For the most part you are advised to use the NTFS.
8. Type a name in the Volume Label field that will be associated with this partition or leave it blank.
9. Finally press the Next button and you will come to a summary screen. Review how the partition will be created, and if you are satisfied, press
the Finish button to complete the creation and formatting of your new hard disk partition.
When the computer finishes creating and formatting the new partition you will be presented with the Disk Management screen again and will
see that you have a new partition and drive letter on your computer. Now you can use that drive to start storing your data.
5. Download and Install OTB Software
Note : OTB supports Windows System and USB mode only. ME-752SE doesn’t support OTB via eSATA connection.
Note : The hardware copy doesn’t function with GPT partition (GUID Partition Table), only MBR partition (Master Boot Record) is supported.
Please follow below steps for downloading and installing OTB :
1. Download free OTB software on line at http://www.welland.com.tw/html/support.html#otb
2. As below screenshot, select the proper OTB software version and download it to your computer.
3. Unzip and execute the .exe file and then follow the installation procedures.
4. Once OTB is successfully installed in the computer or laptop, an OTB icon will appear on the system tray of your computer.
5. The user manual of OTB is included within the .rar file.
6. Disconnecting the Drive
Caution: To prevent data loss always be sure to close all active applications before shutting down the drive.
Windows
1.
Double-click the Safely Remove Hardware icon in your system tray (typically located on the bottom right corner of your desktop).
2.
Select the appropriate device from the list and click "Stop". Click "OK" to confirm your selection of the drive to be disconnected.
3.
Click "Close" and ensure that the drive is powered off already.
MAC
1.
Find the Removable Disk icon associated with the drive that you want to disconnect and drag it to the Trash icon on your desktop.
2.
After the disk icon disappears from the desktop and the drive is powered off, you may safely disconnect the USB cable from your computer.
Page 2


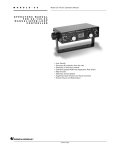
![OPTICAL DISTRIBUTION FRAME [Wall Mount Type]](http://vs1.manualzilla.com/store/data/005974674_1-8c415a2e9ec23148facf1df43798f7a3-150x150.png)