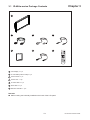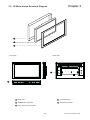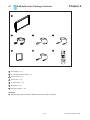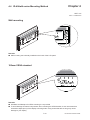
1
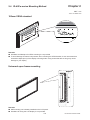
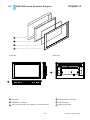
Toll Free: 1-888-865-6888
Tel: 510-226-8368 Fax: 510-226-8968
Email: [email protected]
User Manual
ID-40Pw
Open frame LCD panel
ID-40Aw
Front aluminum LCD panel
ID-40AwN
Options :
40" wide LCD
- TV tuner
- Quad Display
Front NEMA4 / IP 65 LCD panel
Contents
Chapter 1
Getting Started
1.1
1.2
1.3
1.4
Chapter 2
Unpacking........................................................................2
Optional Accessories........................................................2
Package Contents.............................................................3
Structure Diagram.........................................................................4
Dimension Diagram......................................................................5
Mounting Method..........................................................................6
ID-40Aw
3.1
3.2
3.3
3.4
Chapter 4
Before Installation.............................................................2
ID-40Pw Open frame LCD panel
2.1
2.2
2.3
2.4
Chapter 3
Important Safeguards.......................................................1
Front aluminum LCD panel
Package Contents............................................................7
Structure Diagram........................................................................8
Dimension Diagram.....................................................................9
Mounting Method.......................................................................10
ID-40AwN Front NEMA4 / IP 65 LCD panel
4.1
4.2
4.3
4.4
Package Contents...........................................................11
Structure Diagram.......................................................................12
Dimension Diagram....................................................................13
Mounting Method........................................................................14
Contents
Chapter 5
Connection...................................................................15
Chapter 6
Operation
6.1
6.2
On-screen Display Operation........................................16
On-screen Menu............................................................17
Chapter 7
LCD Specifications.................................................18
Chapter 8
TV Tuner Options
8.1
8.2
Chapter 9
TV Tuner options...........................................................19
How to Use Remote Controller.................................20-21
Quad Display Options ...................................... 22
Chapter 10 Troubleshooting.......................................................23
Chapter 11 Dimensions..................................................................24
Chapter 12 Cleaning
12.1 Cleaning the LCD display...............................................25
12.2 Cleaning the Remote Controller.....................................25
Chapter 1
1.1 Important Safeguards
Please read all of these instructions carefully before you use the device. Save this manual for future
reference.
What the warranty does not cover
■
■
Any product, on which the serial number has been defaced, modified or removed.
Damage, deterioration or malfunction resulting from:
□
□
□
□
□
□
□
□
■
Accident, misuse, neglect, fire, water, lightning, or other acts of nature, unauthorized product modification, or failure to follow instructions supplied with the product.
Repair or attempted repair by anyone not authorized by us.
Any damage of the product due to shipment.
Removal or installation of the product.
Causes external to the product, such as electric power fluctuation or failure.
Use of supplies or parts not meeting our specifications.
Normal wear and tear.
Any other causes which does not relate to a product defect.
Removal, installation, and set-up service charges.
P.1
ID-40Pw/ID-40Aw/ID-40AwN
Chapter 1
1.2 Before Installation
■
It is very important to locate the LCD Display in a suitable environment.
■
The surface for placing and fixing the LCD Display should be stable.
■
■
Make sure the place has good ventilation, is out of direct sunlight, away from sources of excessive dust, dirt, heat,
water, moisture and vibration.
Convenience for connecting the LCD Display to the related facilities should be well considers too.
1.3 Unpacking
The LCD Display comes with the standard parts shown on the package contents. Check and make sure they are included and in good condition. If anything is missing, or damage, contact the supplier immediately.
1.4 Optional Accessories
1. Power Cord
1.1 IEC power cord
1.2 NEMA 5-15 power cord (US)
1.3 BS 1363 power cord (UK)
1.4 CEE 7/4 power cord (German)
1.5 AS 3112 power cord (Australia)
P.2
ID-40Pw/ID-40Aw/ID-40AwN
Chapter 2
2.1 ID-40Pw series Package Contents
1
2
3
4
6
5
7
POWER
MUTE
INPUT
1
2
3
4
5
7
8
6
9
0
DISPLAY
CLEAR
SELECT
BACK
MENU
EXIT
al
User Manu
ENTER
+
+
CH
VOL
-
AUDIO
-
FREEZE
+ ZOOM -
ASPECT
ADJUST
+
-
PIP
SOURCE
SWAP
POSITION
PIP
AUDIO
PIP
ASPECT
SLEEP
PIP
1 LCD display x 1 pc
2 6' VGA cable (male to male) x 1 pc
3 User manual x 1 pc
4 Power cord x 1 pc
5 S-Video cable x 1 pc
6 RCA cable x 1 pc
7 Remote controller x 1 pc
Remarks
Universal open frame mounting set is already installed on the LCD panel
■
P.3
ID-40Pw/ID-40Aw/ID-40AwN
Chapter 2
2.2 ID-40Pw series Structure Diagram
1
2
Front View
Rear View
3
4
1
Rear case
3
Universal open frame mounting
2
SAMSUNG LCD panel
4
LCD membrane
P.4
ID-40Pw/ID-40Aw/ID-40AwN
2.3 ID-40Pw series Dimension Diagram
Chapter 2
UNIT : mm
1mm = 0.03937 inch
Front View
Rear View
P.5
ID-40Pw/ID-40Aw/ID-40AwN
2.4 ID-40Pw series Mounting Method
Chapter 2
UNIT : mm
1mm = 0.03937 inch
100mm VESA standard
Remarks
Hardware and M6*8pcs for VESA mounting is not provided
To avoid damage of internal components, when mounting the VESA bracket, do not use screws that
exceed the depth (6mm) of the display mounting holes. Using screws that are too long may cause
damage to your display
■
■
Universal open frame mounting
Remarks
■ Wall mounting set is already installed on the LCD panel.
■ Hardware for fixing the LCD display is not provided.
P.6
ID-40Pw/ID-40Aw/ID-40AwN
Chapter 3
3.1 ID-40Aw series Package Contents
1
2
4
6
3
5
7
al
User Manu
POWER
MUTE
1
2
4
5
7
8
9
DISPLAY
0
CLEAR
INPUT
3
6
SELECT
BACK
MENU
EXIT
ENTER
+
+
CH
VOL
-
AUDIO
-
FREEZE
+ ZOOM -
ASPECT
ADJUST
+
-
PIP
SOURCE
SWAP
POSITION
PIP
AUDIO
PIP
ASPECT
SLEEP
PIP
1 LCD display x 1 pc
2 6' VGA cable (male to male) x 1 pc
3 User manual x 1 pc
4 Power cord x 1 pc
5 S-Video cable x 1 pc
6 RCA cable x 1 pc
7 Remote controller x 1 pc
Remarks
Wall mounting set is already installed on the back of the LCD panel
■
P.7
ID-40Pw/ID-40Aw/ID-40AwN
Chapter 3
3.2 ID-40Aw series Structure Diagram
1
2
3
Front View
Rear View
5
4
1
Rear case
4
LCD membrane
2
SAMSUNG LCD panel
5
Wall-mount bracket
3
6mm aluminum front bezel
P.8
ID-40Pw/ID-40Aw/ID-40AwN
3.3 ID-40Aw series Dimension Diagram
Chapter 3
UNIT : mm
1mm = 0.03937 inch
Front View
Rear View
P.9
ID-40Pw/ID-40Aw/ID-40AwN
3.4 ID-40Aw series Mounting Method
Chapter 3
UNIT : mm
1mm = 0.03937 inch
Wall mounting
Remarks
Wall mounting set is already installed on the back of the LCD panel.
■
100mm VESA standard
Remarks
■ Hardware and M6*8pcs for VESA mounting is not provided
■ To avoid damage of internal components, when mounting the VESA bracket, do not use screws that
exceed the depth (6mm) of the display mounting holes. Using screws that are too long may cause
damage to your display
P.10
ID-40Pw/ID-40Aw/ID-40AwN
4.1
Chapter 4
ID-40AwN series Package Contents
1
2
4
6
3
5
7
al
User Manu
POWER
MUTE
1
2
4
5
7
8
9
DISPLAY
0
CLEAR
INPUT
3
6
SELECT
BACK
MENU
EXIT
ENTER
+
+
CH
VOL
-
AUDIO
-
FREEZE
+ ZOOM -
ASPECT
ADJUST
+
-
PIP
SOURCE
SWAP
POSITION
PIP
AUDIO
PIP
ASPECT
SLEEP
PIP
1 LCD display x 1 pc
2 6' VGA cable (male to male) x 1 pc
3 User manual x 1 pc
4 Power cord x 1 pc
5 S-Video cable x 1 pc
6 RCA cable x 1 pc
7 Remote controller x 1 pc
Remarks
■ Wall mounting set is already installed on the back of the LCD panel.
P.11
ID-40Pw/ID-40Aw/ID-40AwN
4.2
Chapter 4
NAP-40W series Structure Diagram
1
2
3
4
Front View
Rear View
5
4
1
Rear case
4
6mm aluminum front bezel
2
SAMSUNG LCD panel
5
LCD membrane
3
4mm protective glass (Front Nema 4 / IP 65 protection)
6
Wall-mount bracket
P.12
ID-40Pw/ID-40Aw/ID-40AwN
4.3
ID-40AwN series Dimension Diagram
Chapter 4
UNIT : mm
1mm = 0.03937 inch
Front View
Rear View
P.13
ID-40Pw/ID-40Aw/ID-40AwN
4.4 ID-40AwN series Mounting Method
Chapter 4
UNIT : mm
1mm = 0.03937 inch
Wall mounting
Remarks
Wall mounting set is already installed on the back of the LCD panel.
■
100mm VESA standard
Remarks
■ Hardware and M6*8pcs for VESA mounting is not provided
■ To avoid damage of internal components, when mounting the VESA bracket, do not use screws that
exceed the depth (6mm) of the display mounting holes. Using screws that are too long may cause
damage to your display
P.14
ID-40Pw/ID-40Aw/ID-40AwN
Chapter 5
5.1 Connection
Component Video Connector
Power
Input Device
HDMI VGA
S-Video
AUDIO
IN OUT
1
3
4
5
6
2
1
Video out
4
Pb
2
Video 1
5
Pr
3
Y
6
Video 2
Caution : The LCD Display are hot-pluggable, but components of connected devices may
not be hot-pluggable. Plugging and unplugging cables while connected devices are powered on may cause irreversible damage of the devices and LCD Display. Before attempting
to connect anything to the LCD Display, we suggest that turn off power to all devices before
connecting them. Apply power to connected devices again only after the LCD Display receiving power.The company is not responsible for damage caused in this way.
P.15
ID-40Pw/ID-40Aw/ID-40AwN
Chapter 6
6.1 On-screen Display Operation
LCD membrane
Membrane Switch
Function
Power light
Green = On
Orange = Power saving
Power on / off LCD
Display the OSD menu
Scrolls through menu options and adjusts the displayed control
(To auto adjustment by pressing the button
for 5 seconds)
Exit the OSD screen
Toggle analog, digital & video connection (DVI-D and video options only)
P.16
ID-40Pw/ID-40Aw/ID-40AwN
Chapter 6
6.2 On-screen Menu
1.
2.
3.
4.
5.
Picture
Picture Mode:
Normal / Soft / Vivid / User mode to choose
Brightness:
Adjust background black level of the screen image
Contrast:
Adjust the difference between the image background
(black level) and the foreground (white level)
Saturation:
Adjust the saturation of the image color
Sharpness:
Adjust the image from weak to sharp
Hue:
Adjust the screen hue value
Sound
Sound Mode:
Movie / User / Normal / News mode to choose
Volume:
Adjust the volume of sound
Bass:
To set the value of bass sound
Treble:
To set the value of treble sound
Balance:
To set the balance value of treble and bass sound
Surround:
Turn on or Turn off the surround sound
Function
Language:
Select the language in which the OSD menu is
displayed - English
Timer:
To set the current time / off time & on time
TTX Language:
RUSSIAN, ARABIC, FARSI, WEST, EAST can be
choose
Hotel Lock:
Default password : 0000;
To enter into the Hotel Mode, Volume Control, Tuner
Control, Max Volume, Change Password, Source Lock,
Child Lock, Prog. Set & Prog. Num Submenu
Reset:
Recall returns the adjustments back to factory settings.
PC
H. Position:
Align the screen image left or right
V. Position:
Align the screen image up or down
Clock :
Adjust the clock value
Phase:
Adjust the phase value
Auto Sync:
Adjust automatically sizes, centers, and fine tunes the
video signal to eliminate waviness and distortion.
Advance
Scale:
Select the scale - 16:9 or 4:3
3D NR:
Low / Mid / High / Off mode to choose
Color Temp.:
Normal / Cool / Warm / User to choose
OSD Transparence: Set the value of ODS Transparence
OSD Duration:
To set the time that menu will be display
PIP / POP:
To adjust picture in picture & picture on picture setting,
to enter into thescale, Sub Source, PIP Size, PIP
Position, Sound Source & Swap
P.17
ID-40Pw/ID-40Aw/ID-40AwN
Chapter 7
7.1 LCD Specifications
Item
Description
LCD Manufacturer
Diagonal Size
40" TFT
Max. Resolution
1366 x 768
Brightness (cd/m²)
500
Color Support
16.7 M
Contrast Ratio (typ.)
2000:1
Viewing Angle (H/V)
178˚ x 178˚
Display Area (mm)
885 x 498
Tr Response Time (ms)
10
LCD Panel MTBF (hrs)
50,000
Display Input Signal
Analog RGB
Connection
DB-15 connector
Power Input
Auto-sensing 100 to 240VAC, 50 / 60Hz
Power Consumption
Compatibility
Max. 200 Watt, Standby 20 Watt
Multi-platform - Mix PCs, SUNs, IBMs, HPs & DELLs.
Options
TV
Environmental
Operation
0˚ to 50˚C Degree
Storage
-5˚ to 60˚C Degree
Relative Humidity
Shock
Vibration
5~90%, non-condensing
10G acceleration (11ms duration)
5~500Hz 1G RMS random vibration
P.18
ID-40Pw/ID-40Aw/ID-40AwN
Chapter 8
8.1 TV Tuner Options
Component Video Connector
Power
Input Device
TV HDMI VGA
S-Video
AUDIO
IN OUT
1
3
4
5
6
2
1
Video out
4
Pb
2
Video 1
5
Pr
3
Y
6
Video 2
Remarks
■ Package includes a remote controller
P.19
ID-40Pw/ID-40Aw/ID-40AwN
8.2 How to Use Remote Controller
Chapter 8
19
1
20
2
21
2
3
22
2
4
5
23
24
6
25
7
26
8
9
10
27
28
11
29
12
30
13
31
32
14
15
33
34
16
17
18
35
36
P.20
ID-40Pw/ID-40Aw/ID-40AwN
Chapter 8
8.2 How to Use Remote Controller
POWER
Switches on or off the TV
2
SMODE
News, Movie, User & Normal mode can be choose
3
PMODE
Soft, Vivid, User & Normal mode can be choose
4
1-9
Only use in TV mode. Select channels. For channel numbers 10 and
above, enter the second digit within two seconds.
5
EXIT
Exit the menu or cancel
6
MENU
Display the menu on the screen or go to the previous menu
7
OK / ENTER
Enter to the select item settings or excude the setting
8
▲/▼/◄/►
Go to the upper menu or select the previous value /
Go to the next menu or select the next value /
Decrease the setting value /
Increase the setting value or enter to the select item setting
9
V-
Decrease the speaker volume
10
V+
Increase the speaker volume
11
DVD SETUP
Reserve for OEM model
12
A-B
Reserve for OEM model
13
SUBTITLE
Reserve for OEM model
14
HOLD / ►II
Reserve for OEM model
15
MIX
Reserve for OEM model
16
INDEX
Reserve for OEM model
17
TV / RADIO / ■
Reserve for OEM model
18
◄◄
Reserve for OEM model
19
MUTE
Turn on or off the speaker
20
SOURCE
Selects desired input mode
21
AUDIO / I / II
Select sound effect: NORMAL, POPULARITY, ROCK, JAZZ, CLASSICALLY, USER
22
SLEEP
Select the sleeping time
23
PROGRAM /
Play the cycle of the previous channel watched
24
+10 / LIST
For channel numbers more than 10
25
DISPLAY / INFO
Press this button will show the current input source
26
TEXT / GOTO
Input the Main Channel input source
27
P+
For TV model only, increase the channel number
28
P-
For TV model only, decrease the channel number
29
REPEAT
Reserve for OEM model
30
ANGLE
Reserve for OEM model
31
REVEAL / D.DIS
Reserve for OEM model
32
SIZE
Reserve for OEM model
33
SUBPAGE / ►►I
Reserve for OEM model
34
FAV / I ◄ ◄
Reserve for OEM model
35
EPG /
36
►►
I►
1
Reserve for OEM model
Reserve for OEM model
P.21
ID-40Pw/ID-40Aw/ID-40AwN
Chapter 9
9.1 Quad Display Option
Specifications
RS-232
Alarm I/O
VCR in
VCR out
Video IN
1~4
Video Loop
1~4
AV BNC
Item
Model Number
VGA
Power
Description
QD (NTSC)
QD (PAL)
Number of Color
16.7 M
16.7 M
Imaging System
NTSC
PAL
1024 x 525
1024 x 625
60
50
Resolution
Refresh Rate
Video Input
Video Output
Camera Input
1.0 Vpp, 75 Ohm x 4
VCR Input
1.0 Vpp, 75 Ohm x 1
Live Monitor
1.0 Vpp, 75 Ohm x 1
Loop Through Out
1.0 Vpp, 75 Ohm x 4
VCR Output
1.0 Vpp, 75 Ohm x 1
Auto Gain Control
Yes
Time / Date
Yes
On Screen Display
Yes
Camera Title
Display Format
8 Character Title
2 x Zoom On
Playback
Yes
QUAD
Yes
FULL
Yes
SEQUENCY
Yes
Dwell Time
0 to 99 Sec Adjustable
Built-in Buzzer
Yes
Key Lock
Yes
Remarks
For more details, please refer to Quad Display User Manual.
■
P.22
ID-40Pw/ID-40Aw/ID-40AwN
Chapter 10
10.1 Troubleshooting
1. The membrane power light is not ON
■
■
Press the power On / Off on LCD membrane to check if the monitor is in the ON mode.
Check the power cord is properly connected to the LCD display and power outlet.
2. Power does not turn ON
■
Check whether the power plug is securely inserted into the receptable.
3. No picture are displayed
■
■
■
Check cables for disconnection.
Check whether the power for all inout equipment is ON.
Check for connection to wrong terminals or for wrong input mode.
4. Remote controller does not function properly
■
■
■
■
Check for incorrect battery orientation.
Check for dead batteries.
Check whether you are pointing the remote control transmitter properly at the display’s receiver.
Check for any obstacle between the remote and the display.
5. There are spots on the screen
■
Check whether your AV equipment is affected by interference from automobiles, trains, high-voltage transmission
lines, neon signs or other potential sources of interference.
6. Degraded colors/tints
■
Check whether all picture adjustments have been properly made.
7. Improper screen position/size
■
Check whether screen position and size have been properly adjusted.
P.23
ID-40Pw/ID-40Aw/ID-40AwN
Chapter 11
11.1 Dimensions
Product Dimension
(W x D x H)
Net Weight
ID-40Pw series
1028 x 119 x 611 mm
40.5 x 4.7 x 24.1"
45 kg
99 lb
ID-40Aw series
1022 x 136.6 x 605 mm
40.2 x 5.4 x 23.8"
45 kg
99 lb
ID-40AwN series
1022 x 136.6 x 605 mm
40.2 x 5.4 x 23.8”
45 kg
99 lb
Model
P.24
ID-40Pw/ID-40Aw/ID-40AwN
Chapter 12
12.1 Cleaning the LCD display
You may need the following precautions before you begin to clean the LCD display, please read and understand the
details below fully.
1. Make sure the monitor is turned off
2. Never spray or pour any liquid onto the screen directly
3. To remove dust and other particles, wipe the screen with a clean, soft, lint-free cloth.
4. Be cautions of all kinds of cleaning solvents or chemicals, some individuals may be harmful to the LCD display.
5. If the LCD display is still not clean enough, apply a small amount of non-ammonia, non-alcohol based glass
cleaner onto a clean, soft, lint-free cloth, and wipe the screen.
6. Don’t use water or oil on the monitor directly.
12.2 Cleaning the Remote Controller
1. Use a soft cloth for cleaning
2. If it is heavilystained, soak a soft cloth in a mixture of water and detergent and squeeze it dry before wiping off the
stains.
3. Use a soft, dry cloth for final cleaning.
The company reserves the right to modify product specifications without prior notice and assumes no responsibility for any error which
may appear in this publication.
All brand names, logo and registered trademarks are properties of their respective owners.
Copyright 2008 Synergy Global Technology Inc.All rights reserved.
P.25
ID-40Pw/ID-40Aw/ID-40AwN